How to Set Up PayPal in Acumatica
Send PayPal invoices, track payment status, and reconcile — all from inside Acumatica. Generated in NotebookLM from the product PDF.
Managing payments shouldn’t feel like you’re playing a game of tag between two different systems. For many businesses, the gap between their cloud Enterprise Resource Planning software, or ERP, and their payment processor is a source of constant manual data entry and human error. You end up jumping back and forth between Acumatica and the PayPal portal just to see whether a customer has paid.
At Biz-Tech Services, we designed the PayPal Integration to bridge that gap. It lets you send PayPal payment invoices directly from Acumatica, monitor payment status in real time, and update your records automatically when money is received. Let’s walk through how to set it up.
Preparing your tools
Before we dive into the software, your business needs a few things ready. First, you must have a PayPal Business account, because personal accounts don’t support the Application Programming Interface, or API, that invoicing requires. You’ll also need your PayPal API application credentials, specifically your Client ID and your Client Secret.
To find these, log in to the PayPal developer website and create a new application under My Apps and Credentials. That’s where you copy your ID and Secret, for either a testing environment, known as a Sandbox account, or your live production account. Inside Acumatica, make sure the Accounts Receivable, or AR, and Sales Orders modules are active, since those are the primary areas where the integrator lives.
Connecting the payment method
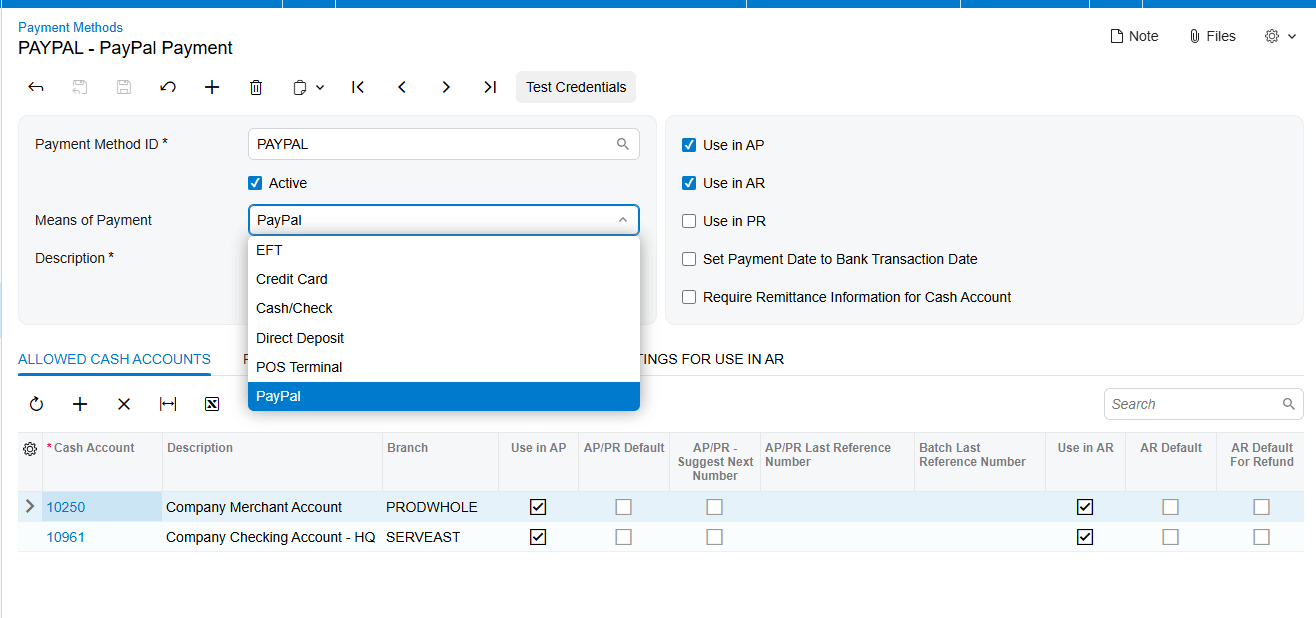
The first major step is telling Acumatica how to talk to PayPal, and we do that by creating a dedicated payment method. On the Payment Methods screen, you create a new record and give it a clear description, like PayPal. The most important part of this step is selecting PayPal in the Means of Payment field.
Once you do that, a new PayPal Settings tab appears. This is where you paste the Client ID and Client Secret you gathered earlier. You also enter the base web address for the PayPal API, which is the Sandbox address if you’re still testing, or the production address for live business transactions.
We recommend using the Test Connection button right away, to verify your credentials are accepted. Finally, add the specific cash or bank account where these PayPal payments should be posted, on the Allowed Cash Accounts tab.
Linking your customers
Now that the bridge is built, you tell the system which customers will use it. Each customer who plans to pay by PayPal needs a customer payment method configured.
When you open a customer record and go to their payment methods, you add the PayPal method you just created. The critical piece here is the PayPal customer email address. That’s the exact address where PayPal delivers the digital invoice. The system pre-fills this email on new payments for that customer, and you can override it for a one-off if you need to.

Sending your first payment request
With the setup complete, you can start sending payment requests. We’ve built three ways to do this, depending on your workflow.
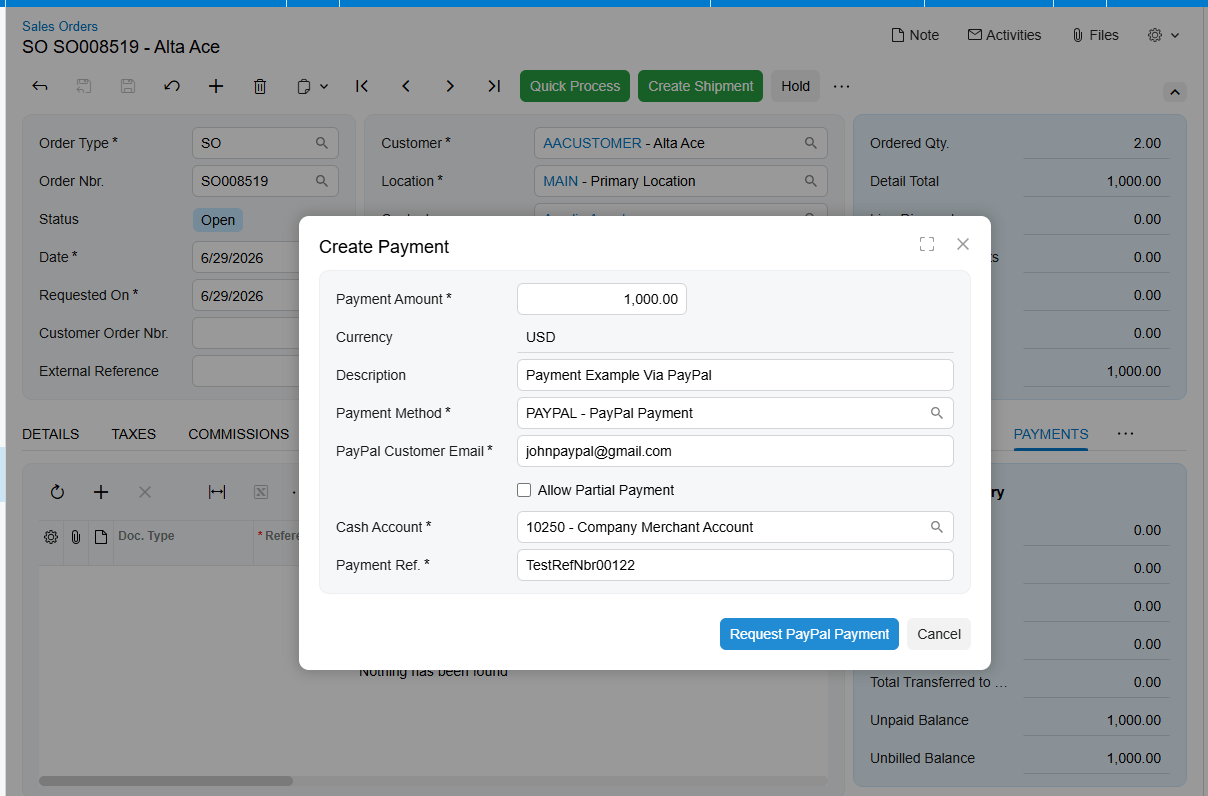
The most common way is from a sales order. If your business collects payment before shipping, you open the order and use the Create Payment button. Once you add the cash account and a payment reference, a Request PayPal Payment button appears. When you select it, the system automatically creates an Accounts Receivable payment record, sends the invoice to the customer, and puts the payment on hold with a status of Sent.
You can also send requests directly from an invoice, if you’ve already billed the customer after a shipment, or from the Payments and Applications screen, for standalone deposits that aren’t tied to a specific document. In every case, the customer receives a PayPal email with a link to pay, and they can even use guest checkout if they don’t have a PayPal account themselves.
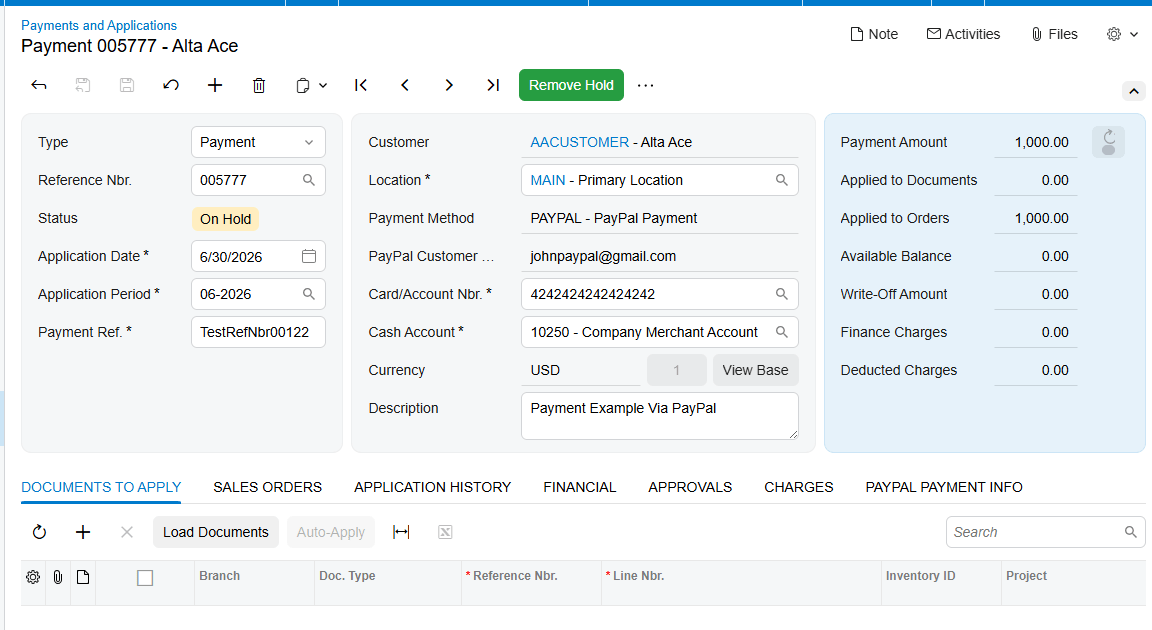
Managing the payment lifecycle
Acumatica doesn’t just send the link; it mirrors the state of each invoice from PayPal. It’s worth remembering that Acumatica checks PayPal on demand, rather than constantly in the background. When you want to check the status of a payment, you select the Remove Hold button on that payment record. The system then calls the PayPal API and updates the status. If the customer has paid in full, the status moves to Paid, and the payment is released in Acumatica automatically.
Partial payments, cancellations, and refunds
The integration handles the what-ifs too. If a customer makes a partial payment, PayPal connector notifies the system of the amount received. Acumatica stores that partial amount and keeps the payment on hold, letting the customer use the same link to pay the remaining balance later, and the payment is released in full only once the whole balance is collected.
If you need to cancel an invoice before it’s paid, there’s a Cancel PayPal Invoice button that alerts the customer and removes the record in Acumatica, to keep your books clean. By removing the unpaid Payment, the integrator updates the Payment Status in PayPal as well.
For refunds, you use the standard Void Check or Refund actions in Acumatica. We recommend handling all refunds this way, because the integration automatically tells PayPal to return the money to the customer, while at the same time voiding the payment in your Accounts Receivable records.
Streamlining your reconciliation
To stay on top of everything, we’ve included a Check PayPal Payment Status processing screen. This is your central hub for daily reconciliation. Instead of checking payments one by one, you can see every outstanding PayPal-linked payment in a single grid. You can filter by status, like Partially Paid, and process them all at once to synchronize your records with the latest data from PayPal.
The bottom line
The clear takeaway is that by connecting your payment processor directly to your ERP, you create a single source of truth for your finances, and you cut out the guesswork and manual entry that slow you down.
If you’re ready to see how this integration can transform your billing process, visit biz-techservices.com today to request a full demo.