Magento Acumatica Connector Configuration Checklist
Magento Acumatica Connector Configuration Checklist
Launching a Biz-Tech Services Inc Magento Acumatica integration between your online storefront and your Enterprise Resource Planning system, or ERP, is a transformative step for your business operations. At Biz-Tech Services, we know the difference between a stressful go-live and a seamless transition lies in the preparation. A thorough pre-launch checklist makes sure every automated workflow is rooted in accurate data and secure connections. By walking through these requirements now, you eliminate technical friction, so the moment you flip the switch, your orders, inventory, and customer data flow exactly as intended.
Establishing required configuration
The first phase is establishing the technical foundation inside Acumatica. Before you can sync any data, confirm that your Acumatica system is running one of the approved licenses, such as PCSR, PERP, or SAAS. Once your licensing is verified, install the Biz-Tech Magento integrator customization package. On the Customization Projects form, you upload the deployment package, validate the project to catch any environment conflicts, and publish it to your tenant.
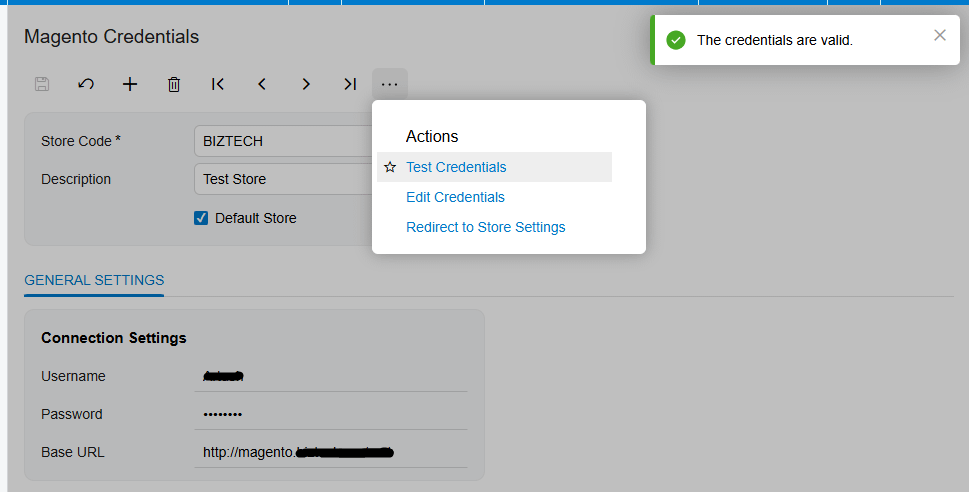
With the package published, your next priority is establishing the API connection. On the Magento Credentials screen, you enter your Magento system credentials, which include your username, your password, and the base web address for your store. The most critical step here is the Test Credentials action; a successful confirmation is your green light that the two systems are officially speaking to each other.
Data preparation and strategic mapping
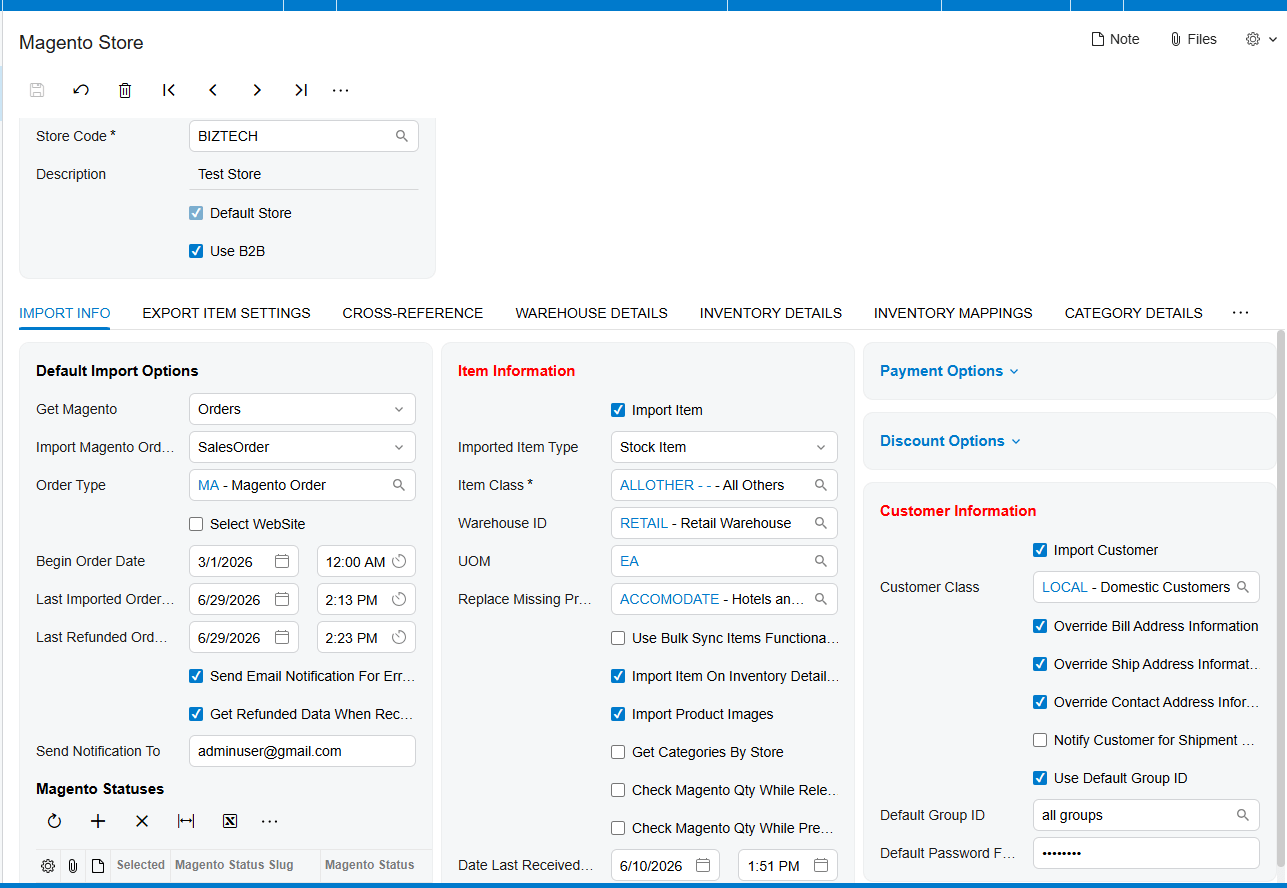
After the API connection is established in Biz-Tech Services Inc Magento Acumatica integrator, you move into the Magento Store screen to define your high-level operating rules. Your first task is to set a begin order date, which tells the system exactly when to start looking for Magento orders and prevents accidentally importing old historical data.
Next, prepare your default settings for both customers and items. If you choose to import customers as new records, define a default customer class, and decide whether the system should override the billing and shipping address information from the web store. For your inventory, confirm your default item class, the primary warehouse for fulfillment, and the default unit of measure, or UOM. And a key part of data preparation is making sure your Stock Keeping Unit values, or SKUs, in Magento match your inventory IDs in Acumatica. If the Import Item setting is turned off, the system relies entirely on that SKU match to find the right product, and if a match isn't found, the order import will fail.
Validation points and cross-referencing
Validation is the process of making sure specific values in Magento have a designated home in Acumatica. In the Cross-Reference tab, you match your Magento shipping methods to your Acumatica ship-via codes. You do the same for financial data, mapping your Magento payment methods to the corresponding payment types and cash accounts in your ERP.
You also validate how the systems handle inventory levels and attributes. In the Warehouse Details tab, you select which physical warehouses contribute to the total quantity synced back to Magento.

If you use complex product details, the Inventory Mappings tab is where you make sure your Acumatica attributes, like color or size, are correctly linked to their Magento properties. And in the Category Details tab, you retrieve your Magento product categories, so you can keep your storefront organized directly from your ERP.

User access and security
Security and user access are vital for a good customer experience. For your internal team, make sure they're set up to receive email notifications for any failed order imports, so troubleshooting can happen immediately. And when it comes to your customers, the Biz-Tech Services Inc Magento Acumatica connector needs specific data for a successful sync. Every customer contact must have a first name, a last name, and an email address. And to allow a secure customer login, you establish a default Magento customer password within Acumatica, made up of a mix of letters, numbers, and special characters.
Testing the workflow
Before going live, walk through a complete testing cycle. Start with the Get Orders process on the Import Magento Orders screen to retrieve recent web transactions, and verify they appear with the correct statuses, like Pending or Processing.
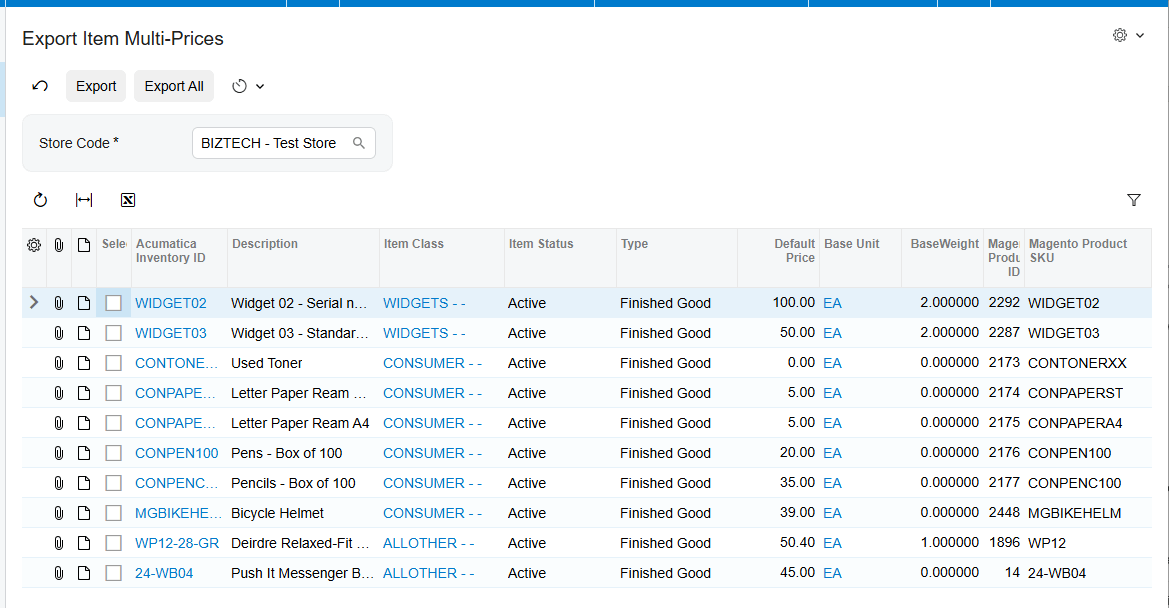
Next, test your item and price synchronization. Use the Export Item Multi-Prices screen to sync a test price and verify it updates correctly on your storefront. Finally, it's essential to test your refund workflows. The Biz-Tech Services Inc Magento Acumatica connector manages five different refund cases, ranging from simple sales order cancellations to reversing invoices that have already been released. Verify that the system creates the right customer refund payment types or credit memos, based on the current state of the order.
Go-live readiness and automation
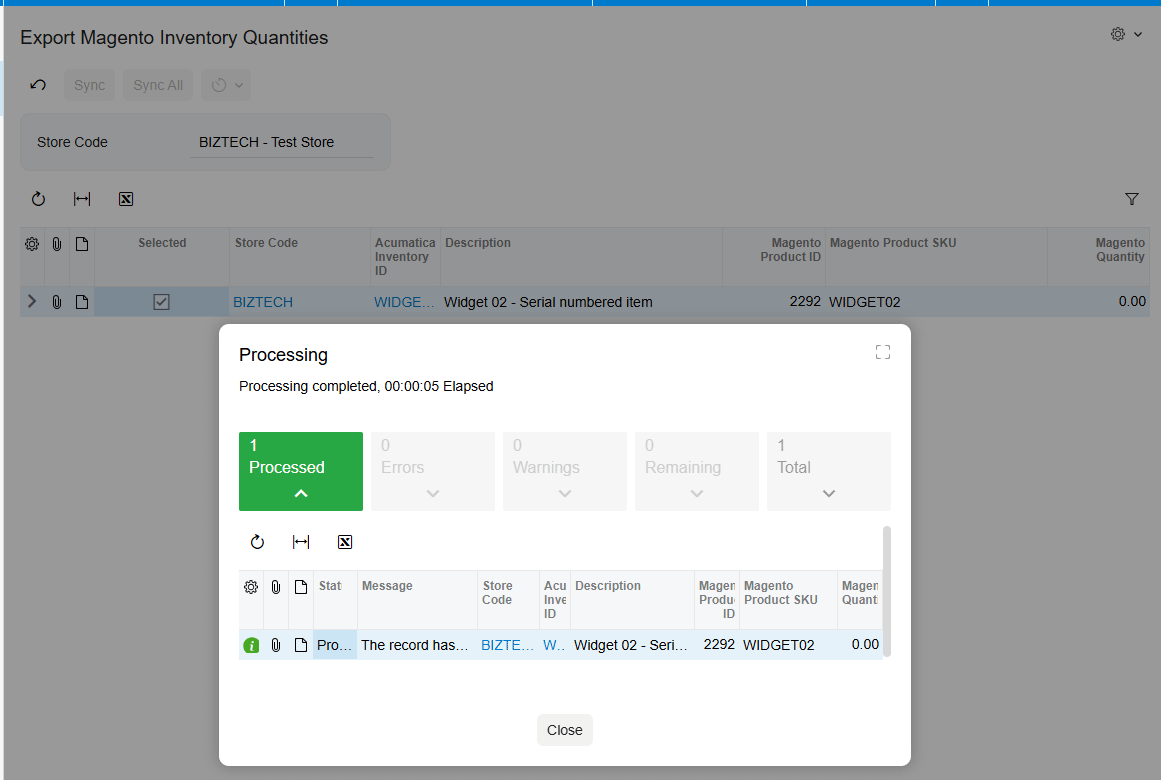
The final stage is preparing for automated efficiency in Biz-Tech Services Inc Magento Acumatica integration. Before you begin full automation, do one last check of your inventory quantities using the Export Magento Inventory Quantities screen, to make sure your available or on-hand stock levels are perfectly aligned.
The single most important takeaway for go-live readiness is to verify your last imported order date and confirm that your Get Orders timer is working correctly to handle the expected volume of your business. When those steps are complete, your Biz-Tech Services Inc Magento Acumatica integration is ready to provide a seamless, real-time connection between your ERP and your e-commerce platform.
If you're ready to see the Biz-Tech Services Magento Acumatica Connector in action, and want to learn how it can streamline your specific workflows, visit biz-techservices.com to schedule a personalized demo today.
Amazon Acumatica Connector Configuration Checklist for FBA and FBM
Amazon Acumatica Connector Configuration Checklist for FBA and FBM
Selling on Amazon presents a unique set of challenges, especially when you're balancing two fulfillment models: Fulfillment by Merchant, or FBM, where you handle the shipping, and Fulfillment by Amazon, or FBA, where Amazon takes the lead. At Biz-Tech Services, we've found the move to an integrated Enterprise Resource Planning system, or ERP, works best when you have a clear roadmap. This pre-launch checklist makes sure your Acumatica environment is perfectly synchronized with Amazon before you process your first live order, so you avoid data discrepancies and give your customers the seamless experience they expect.
Establishing required configuration
The journey begins with a solid technical foundation. First, confirm that your Acumatica system is running one of the required licenses, such as PCSR, PERP, or SAAS. Once your licensing is in place, install the Biz-Tech Amazon Connector customization package. On the Customization Projects form, you upload the deployment package, validate it to catch any environment conflicts, and publish it to your tenant.
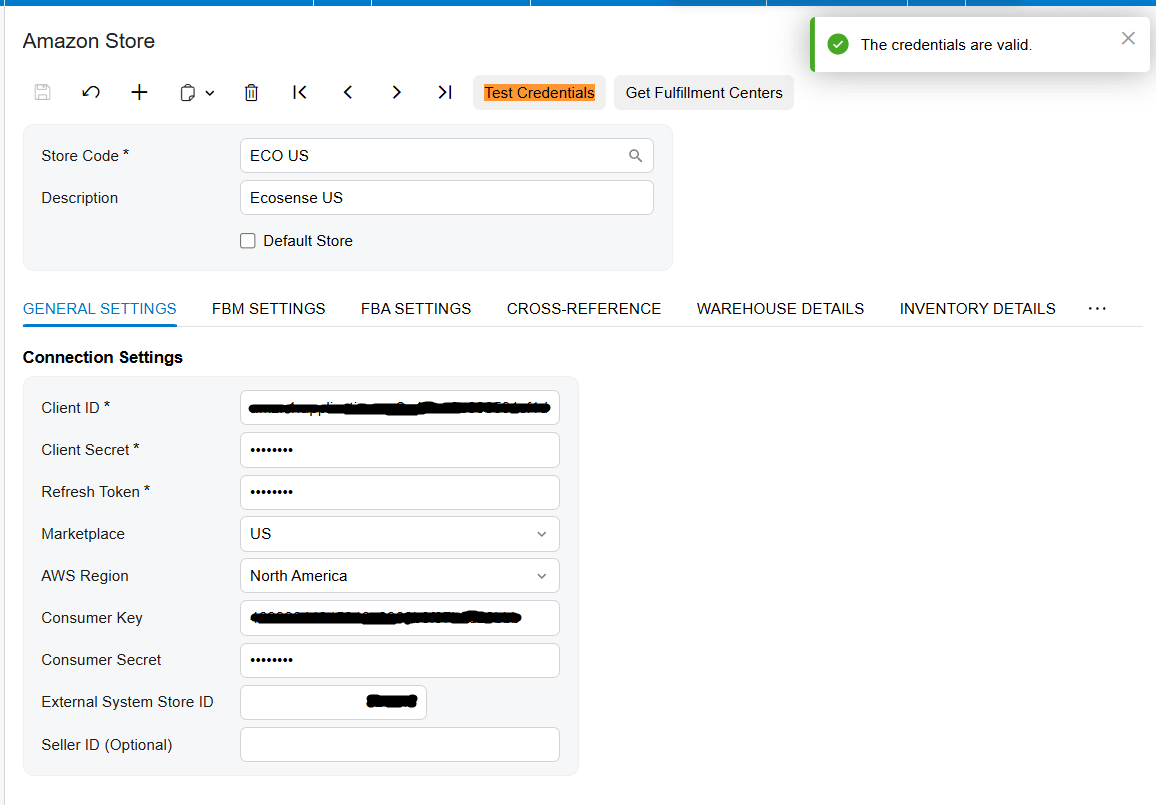
With the package published, your focus shifts to the Amazon Stores screen. This Biz-Tech Services Inc. Amazon Acumatica integration relies on an intermediate server that we manage at Biz-Tech Services to bridge Acumatica and Amazon. To establish that bridge, you enter your connection settings, including your Client ID, your Client Secret, and your Refresh Token, and you specify your marketplace and your AWS region so the system looks at the correct data center. The most critical step here is the Test Credentials action; once you see a success message, you know the API connection is secure and ready.
Data preparation and strategic mapping
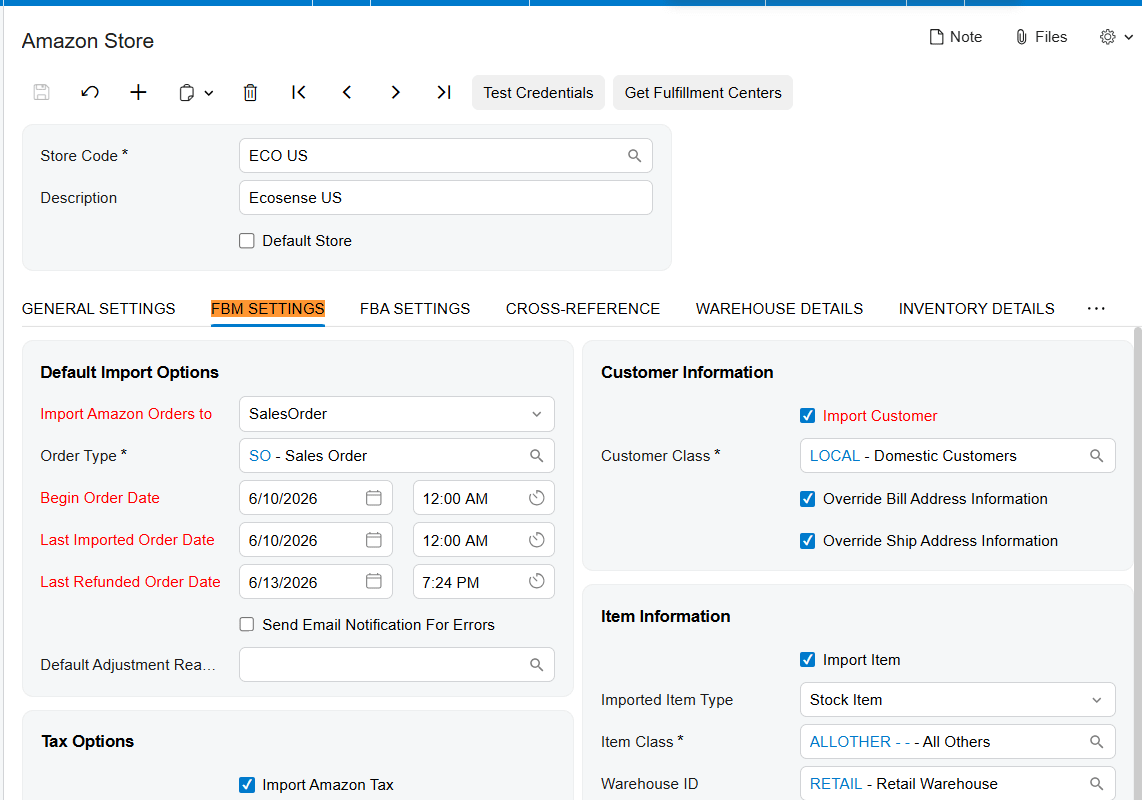
Now that the connection is active at Biz-Tech Services Inc. Amazon Acumatica integration, data preparation varies by fulfillment model. For your FBM operations, define your high-level rules in the FBM Settings tab. Confirm the default order type, typically a Sales Order or an Invoice, and set a Begin Order Date to specify when the integration should start retrieving data. The field gets its initial default value when a new Store Code is created. You can edit the value and after Get Orders process, the Last Imported Order Date field’value would be updated, like Last efunded Order Date. You also decide whether the system should automatically create a new Customer record when one doesn't exist, or use a default customer for all Amazon transactions. For this, use configure the Import Customer.
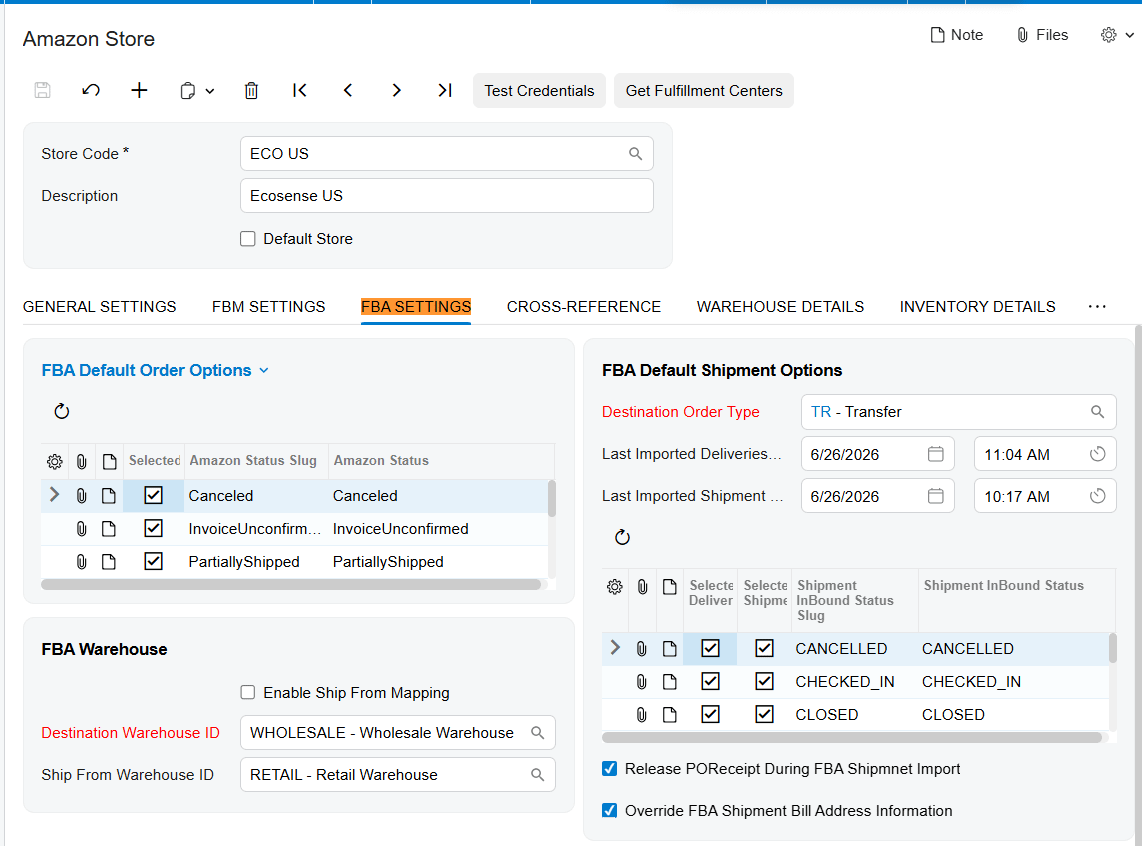
For your FBA operations, data preparation means setting up a Destination Warehouse ID in Acumatica to represent Amazon's fulfillment centers. Then establish your Destination Order Type, usually a transfer order, since FBA shipments are treated as internal inventory moves until the final sale. A key part of FBA readiness is mapping the Amazon fulfillment centers to your local ship-from warehouse IDs, so when you send stock to Amazon, the system knows exactly which of your warehouses is providing the inventory.
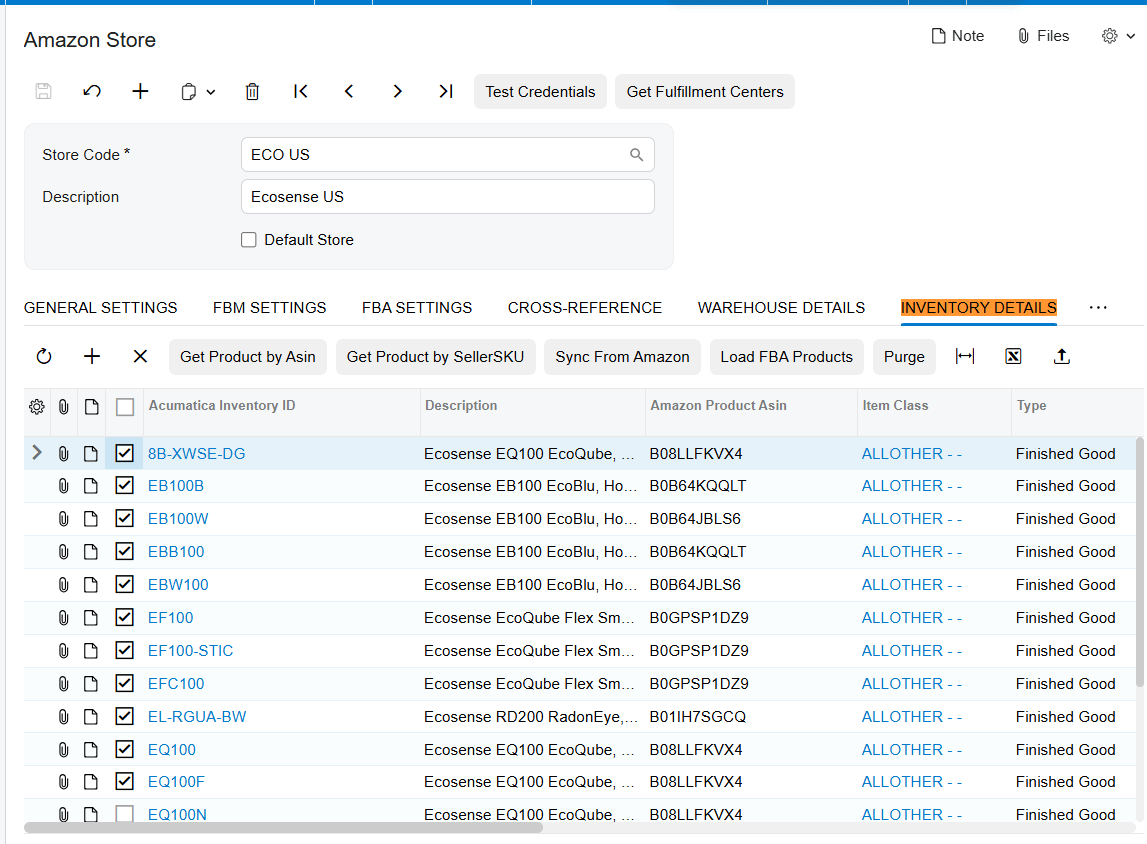
Finally, for both models, prepare your product catalog. In Biz-Tech Services Inc. Amazon Acumatica integrator the Inventory Details tab is available for you to map your Stock Keeping Unit values, or SKUs, from Amazon to your internal inventory IDs. You can even use actions like Get Product by ASIN to pull existing Amazon item details straight into your ERP.
Validation points and cross-referencing
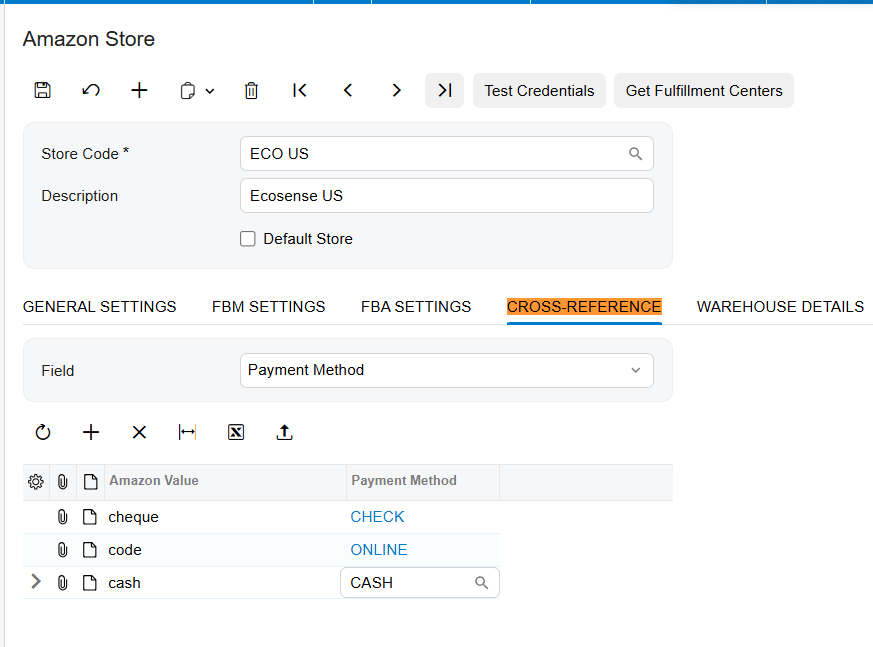
Validation is the process of translating Amazon's data into terms Acumatica understands. In the Cross-Reference tab of Biz-Tech Services Inc. Amazon Acumatica Connector, your first priority is mapping ship-via codes, so when a customer selects a shipping method on Amazon, it translates to the correct carrier and service in your warehouse. Next, validate your financial mappings by connecting Amazon's payment methods to your internal payment types.
You also validate how the system handles exceptions. Pre-define a list of cancel reasons and adjustment reasons in their tabs; these are required whenever you cancel or refund an order, to keep your records accurate. And for FBA users, validate your status mapping, which aligns Acumatica's internal order statuses with Amazon's specific statuses, like Pending or Shipped.
User access and security
Before moving to testing, make sure your user access is properly configured. The connection requires a Seller ID and an MWS authorization token, generated through the developer authorization process. It's also worth noting that the intermediate server acts as the primary controller for fulfillment events, so your internal users should be trained to monitor the Error Messages field of Order, to catch any issues during the automated sync.
Testing the workflow
Testing is the most vital part of the checklist, and for Biz-Tech Services Inc. Amazon Acumatica connector, we recommend starting with the Get Orders process. Retrieve your recent FBM and FBA orders and review them in the grid to confirm that buyer names, tax amounts, and line items appear correctly.
Next, walk through a full fulfillment cycle for an FBM order. That involves sending a purchase order acknowledgement to Amazon, creating the shipment in Acumatica, and confirming it with a valid tracking number. At biz-Tech Services Amazon Acumatica Integrator, the test is a little different for FBA: retrieve FBA shipments and confirm they correctly create transfer orders that update your warehouse quantities. Finally, test the refund process, whether you're reversing an invoice manually or using the Import Amazon Refunded Orders screen, and verify that the system creates the right credit memo and moves the order status to Closed.
Go-live readiness and automation
The final step is preparing for automated, hands-off operation. Before going live, use the Export Amazon Inventory Quantities screen for a final sync, so the quantity available for sale on Amazon matches your actual stock in Acumatica. For FBA, we suggest enabling the setting to release the purchase-order receipt during FBA shipment import, to further automate receiving.
The single most important takeaway for go-live readiness is to verify your Begin Order Date and Last Imported Order Date one final time, to prevent redundant API calls and costs. Once those dates are confirmed and your test fulfillments succeed, your system is ready for the volume of the Amazon marketplace.
If you'd like to see how this checklist applies to your specific business needs, visit biz-techservices.com to schedule a personalized demo today.
Shopify Acumatica Connector Configuration Checklis
Shopify Acumatica Connector Configuration Checklist
Launching a new integration between your Shopify storefront and your Enterprise Resource Planning system, or ERP, is an exciting step toward total business automation. At Biz-Tech Services, we've seen that the most successful go-live events are the result of meticulous preparation. Before you turn on the automated sync, it's essential to follow a structured pre-launch checklist. This makes sure your data is mapped correctly, your settings align with your business rules, and your team is ready to handle the flow of information. By verifying these steps now, you prevent common integration hurdles and ensure a seamless experience for your customers from day one.
Establishing required configuration
Your first step begins with the technical foundation inside Acumatica. Before any data can move, confirm that your Acumatica system is running one of the approved licenses for the connector, specifically the PCSR, PERP, or SAAS license types. Once the license is confirmed, you move to installation. On the Customization Projects form, you upload the Biz-Tech Shopify Connector deployment package. It's vital to validate the project first, to catch any environment conflicts, before you publish the customization to your tenant.
With the package published, a Shopify workspace appears in your menu, and your next priority is establishing the secure bridge between the two platforms. On the Shopify Credentials screen, you input your Application Programming Interface, or API, details. That includes your API key, your API password, your access token, and your store's base web address. We highly recommend using the Test Credentials action right after entering this data. A successful test confirms that Acumatica can communicate with the Shopify API, which is your green light to begin the detailed configuration.
Data preparation and strategic mapping
Once the connection is live, you define how the two systems will share information. Start on the Shopify Stores screen by setting your store code and description. If your business operates in a business-to-business, or B2B, environment, make sure to select the Use B2B option. This is critical, because it enables Shopify Plus features like company profiles, multiple contacts per company, and custom price lists. Whit this option enabled, the Biz-Tech Services Shopify Integrator maps the Acumatica Customers to Shopify Companies and Acumatica Contacts to Shopify Customers. Without the B2B checkbox, Acumatica Customer and Shopify Customer are mapped.
Next, prepare your order and item rules. First, confirm your begin order date. That date tells the connector exactly when to start looking for Shopify orders, and prevents accidentally importing old historical data.
For your inventory, decide whether the system should automatically create new records in your ERP when they don't already exist. If you enable the Import Item setting, you also define the default item class, the unit of measure, or UOM, and the default warehouse. And to keep your catalog organized, consider setting up a numbering sequence for automatic Stock Keeping Unit, or SKU, generation during import.
Validation and cross-referencing
Validation is the process of making sure that specific values in Shopify have a matching home in Acumatica. In the Cross-Reference tab, your first task is to map your Shopify shipping methods to your Acumatica ship-via codes. That way, when a customer selects a shipping service on your site, it appears correctly on the sales order for your warehouse team.
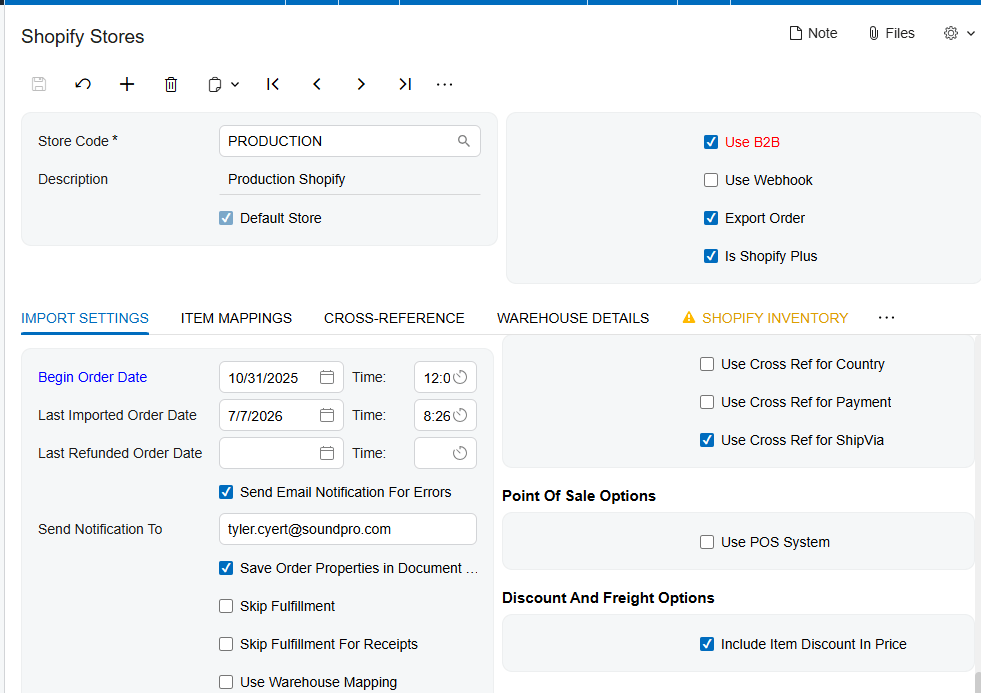
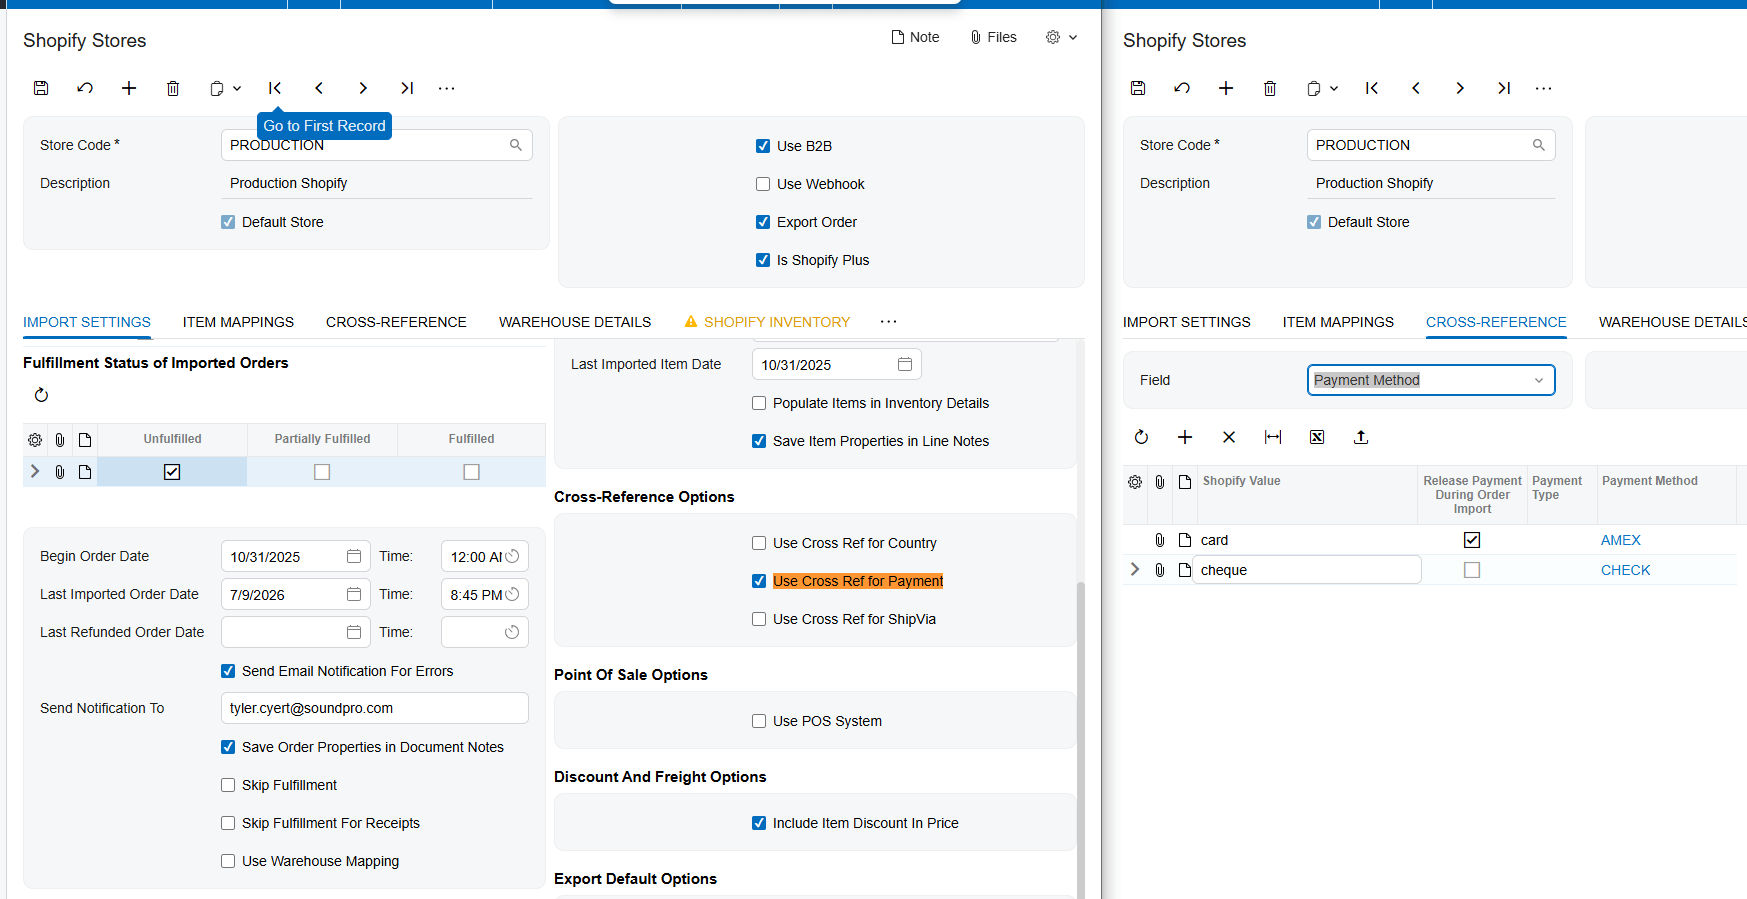
You also validate your financial workflows. Make sure you've matched your Shopify payment methods to the corresponding payment types in Acumatica, like credit cards or electronic transfers, and if you want to automate the accounting side, you can choose to release payments automatically during order import. Don't forget to validate your tax settings by mapping customer tax zones and tax IDs. Finally, in the Warehouse Details tab, use Load Shopify Locations to map your physical Acumatica warehouses to your Shopify locations, so the inventory quantities synced to your storefront reflect the true stock available for sale across your selected sites.
User access and B2B security
For businesses using the B2B functionality, managing user access is a key part of your readiness. Because Acumatica acts as the source of truth for customer details for Biz-Tech Services Shopify Inegrator, you need to make sure your company profiles and contacts are synchronized. When you sync a contact, the connector lets you manage the Shopify account password directly within that contact record in Acumatica. This two-way synchronization makes sure your B2B customers, their locations, and their contacts always have the correct permissions and information when they log in to your store.
Testing the workflow
Before you flip the switch on your live environment, walk through the get-and-process cycle. Start by testing the order import. Use the Get Orders action on the Import Shopify Orders screen of Biz-Tech Services Shopify Integrator to retrieve recent web transactions, and verify that the order statuses, customer details, and line items appear exactly as they do in Shopify. Then import the records as sales orders or invoices accourding to store configuration.
Next, test your inventory and product sync. Sync a test item and its images to Shopify to confirm that descriptions and pricing flow correctly. And if your business handles returns, it's essential to test the Import Shopify Refunded Orders process. That lets you see how the system handles different scenarios, like creating credit memos or processing customer refunds, based on whether a shipment was already confirmed in the ERP.
Go-live readiness and automation
The final stage of your checklist is moving from manual testing to full automation. To keep your data in sync without manual clicks, configure your webhook settings. By enabling webhooks for orders, fulfillments, and refunds, you let Shopify notify Acumatica the moment a change happens. Finally, set up your automation schedules for background tasks like syncing inventory quantities or sales prices.
The most important takeaway for go-live readiness is that a successful Biz-Tech Services Shopify integration isn't just about moving data; it's about moving the right data at the right time. When your credentials are tested, your cross-references are mapped, and your webhooks are active, you're ready to launch.
If you'd like to see these steps in action, or want a guided tour of how the Shopify Integration with Acumatica can streamline your business, visit biz-techservices.com to schedule a demo today.
WooCommerce Acumatica Connector Configuration Checklist
WooCommerce Acumatica Connector Configuration Checklist
Launching a new integration between your e-commerce storefront and your Enterprise Resource Planning system, or ERP, is a significant milestone for any growing business. At Biz-Tech Services, we know the secret to a smooth go-live isn't just the software itself, but the preparation that happens before the first order ever flows through. A thorough pre-launch checklist makes sure your data is clean, your connection is secure, and your team is ready for the automated workflows. Follow it, and you'll move from a manual process to a fully synchronized environment with confidence.
Establishing your required configuration
The first phase begins with the technical foundation inside Acumatica. Before you can sync any data, make sure your system is properly licensed, running one of the approved licenses, such as PCSR, PERP, or SAAS. Once that's verified, install the Biz-Tech Services, Inc. WooCommerce Connector customization package. On the Customization Projects form, you upload the deployment package, validate the project to catch any conflicts, and publish it to your tenant.
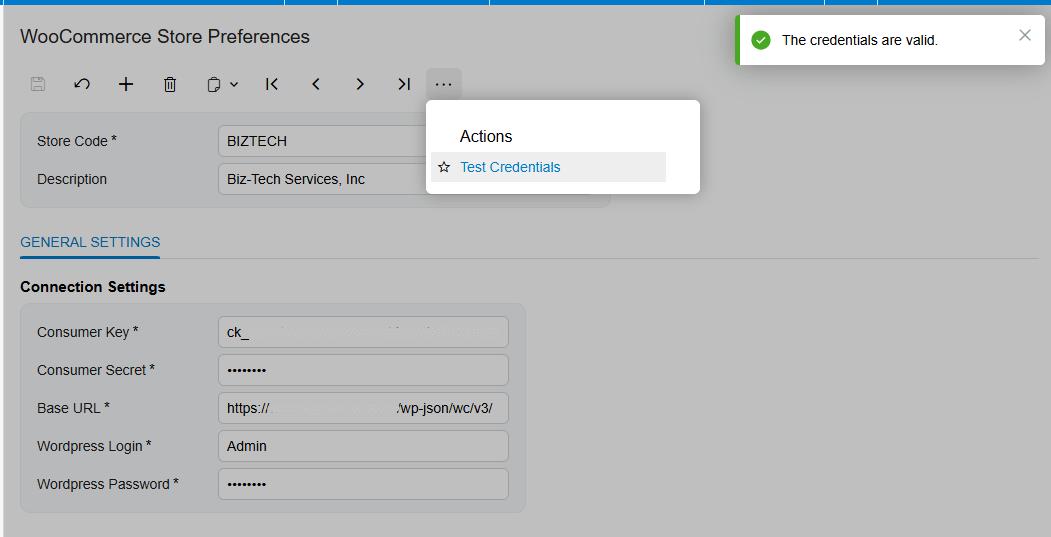
With the package published, a WooCommerce workspace appears in your Acumatica menu, and now you establish the API connection. WooCommerce Integrator works on REST API. In your WordPress site, under the WooCommerce settings, you generate a consumer key and a consumer secret with read and write permissions. Then, on the WooCommerce Store Preferences screen in Acumatica, you enter your base web address, your WordPress login, and your password. The final step here is the Test Credentials action; a message that your credentials are valid is your green light to move on.
Data preparation and strategic mapping
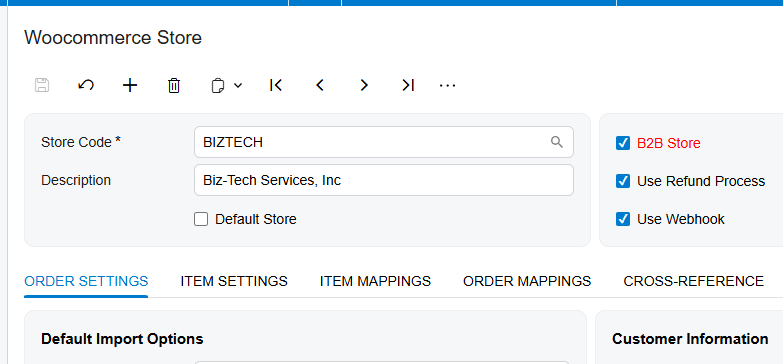
After the connection is established, you move into the WooCommerce Store screen, which acts as the brain of the integration. Your first task is to define your high-level operating rules. Decide whether you're running a business-to-business operation by selecting the B2B Store option, which changes how customers and contacts are synchronized. With this option enabled, the Acumatica Contacts are exported to WooCommerce as Users. Withouth the option, the Acumatica Customer with its main Contact is exported to WooCommerce.
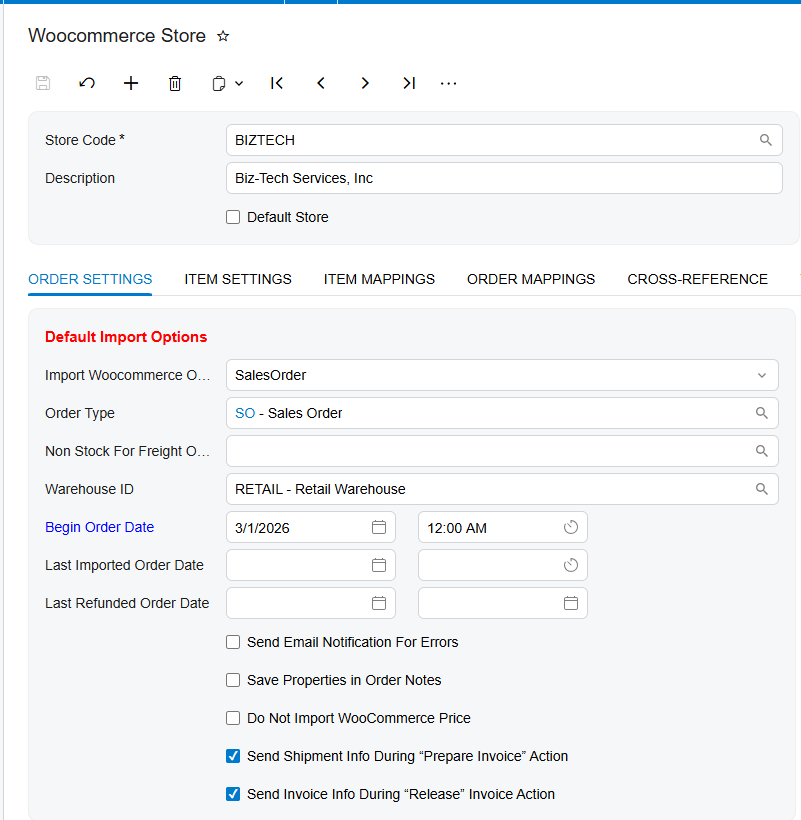
Next, prepare your order settings. Confirm the Acumatica order type and the default warehouse that will be assigned to every incoming WooCommerce order. You also set a Begin Order Date, which tells the system exactly when to start looking for orders and prevents accidentally importing years of historical data. This needs to be configured once, as after the firt Get Orders request. When a new Store code is configured, the WooCommerce Integrator automatically adds value to this field. The Last Imported Order Date is updated to provide data for next get request.

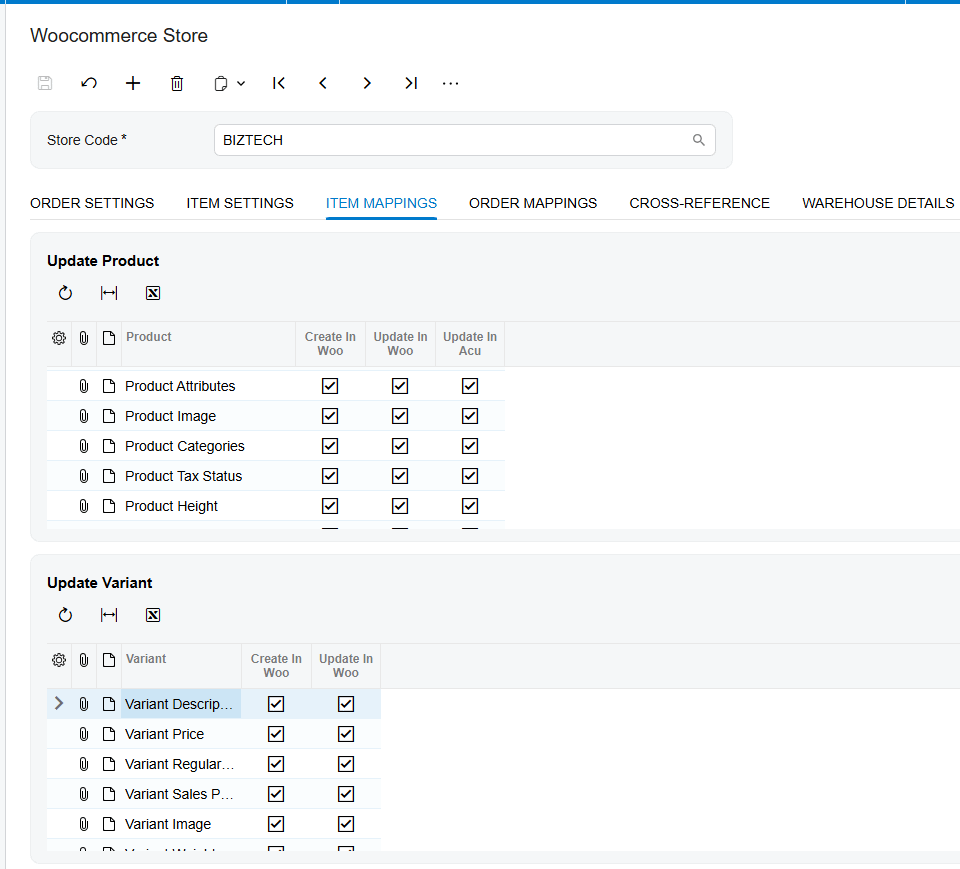
Data preparation extends to your inventory. In the Item Settings tab, define the default item class and the unit of measure, or UOM, for new items. If your business relies on specific identifiers, you can enable a numbering sequence for Stock Keeping Unit, or SKU, generation. And in the Warehouse Details tab, select the specific warehouses that contribute to the total quantity synced back to your web store, so your customers always see accurate stock levels.
Validation and cross-referencing
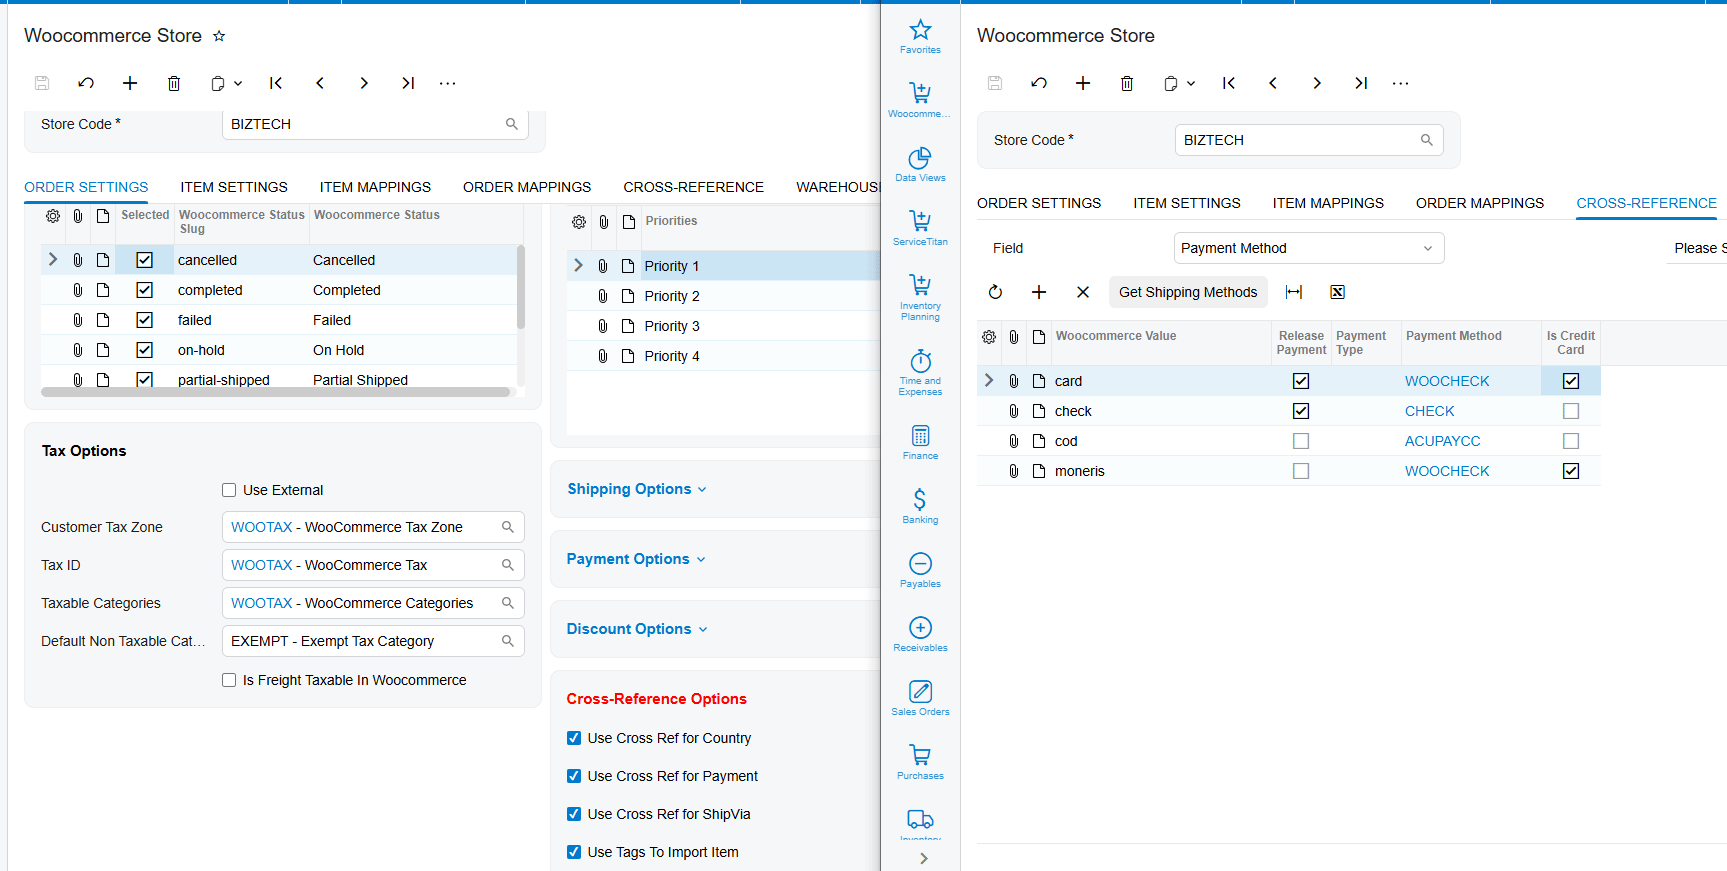
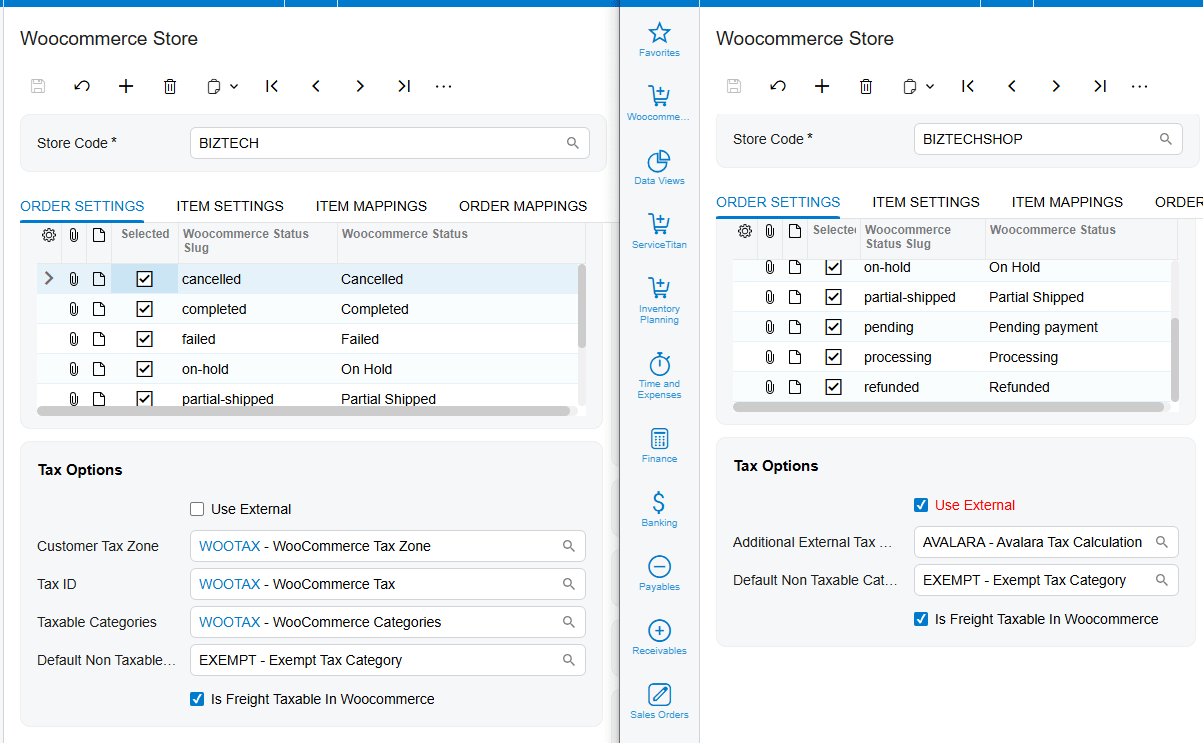
Validation is about making sure the language WooCommerce speaks matches the language of your ERP, and that's handled mostly through the Cross-Reference tab. To have option avalable here, the checkboxes are required. You map your WooCommerce shipping methods to your Acumatica ship-via codes, so shipping services are identified correctly on every sales order. You do the same for payments, matching your web payment gateways, like credit cards or PayPal, to the right payment methods and types in your accounts receivable.
You also validate how taxes are handled. In the tax options, you decide whether to use an External Tax service like Avalara or to map specific customer tax zones and tax IDs directly.
And to finalize everything, use the Load WooCommerce Fields action in the Order Mappings tab, so every piece of data, from the order date to a customer note, has a designated home in Acumatica.
User access and security
Security matters when you connect two systems. For your internal team, make sure the WordPress user tied to the API keys has the right permissions to allow the data flow. And on the Acumatica side, if you run a B2B store, remember that any contact you want to export as a web user must have a password set on their contact record.
Also, if you're moving from an older version of the WooCommerce Connector or an existing store, use the Update Synchronized Customers action. That transfers your existing customer information into the integration tabs, so your current client base is recognized by the new system without creating duplicate records.
Testing the workflow
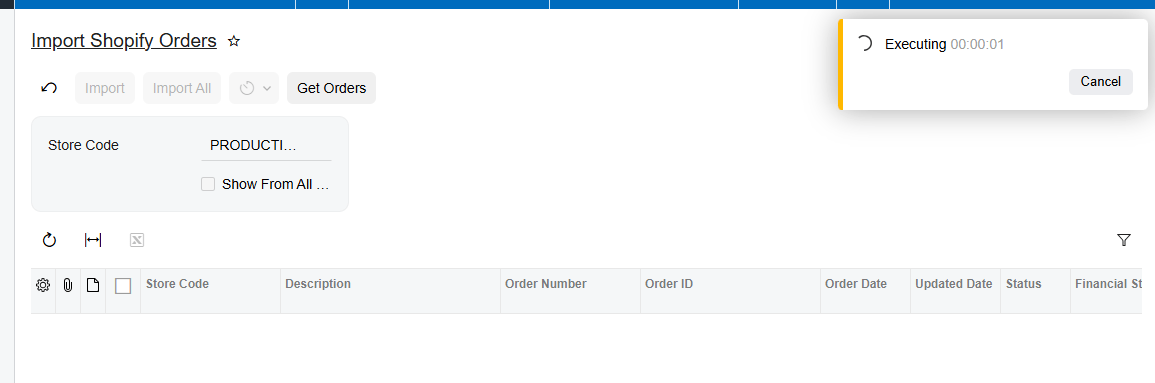
Never go live without a full test. Your first test should be the Get Orders process. On the Import WooCommerce Orders screen, retrieve your recent web orders and confirm they appear with the correct statuses, like Processing or On Hold. Besides Import WooCommerce Order screen, Biz-Tech Services, Inc. WooCommerce Integrator provides ability to retrieve an individual order via its WooCommerce ID on WooCommerce Orders screen.
Next, test item synchronization. Use the export item process to sync a test item, and verify that the price, description, and images appear correctly on your website. Finally, walk through a complete fulfillment cycle: import a test order, create a shipment, confirm it, and prepare the invoice. Verify that the tracking number writes back to WooCommerce and that the web order status updates to Completed. If anything goes wrong, the Get Order Process Error Messages screen helps you identify and resolve the issue.
Go-live readiness and automation
The final step is moving from manual clicks to automated efficiency. You configure your automation schedules to decide how often the system runs Get Orders and Import All, and we recommend setting those to intervals that match your business volume.
The single most important takeaway for go-live readiness is to verify your last imported order date and your warehouse quantities one last time before you enable the schedules. When those are confirmed, your integration is ready to give your customers a seamless experience and your team an efficient workflow.
If you're ready to see how this WooCommerce connector can transform your operations, visit biz-techservices.com to schedule a personalized demo today.
WooCommerce Acumatica Connector Configuration Checklist
Launching a new integration between your e-commerce storefront and your Enterprise Resource Planning system, or ERP, is a significant milestone for any growing business. At Biz-Tech Services, we know the secret to a smooth go-live isn't just the software itself, but the preparation that happens before the first order ever flows through. A thorough pre-launch checklist makes sure your data is clean, your connection is secure, and your team is ready for the automated workflows. Follow it, and you'll move from a manual process to a fully synchronized environment with confidence.
Establishing your required configuration
The first phase begins with the technical foundation inside Acumatica. Before you can sync any data, make sure your system is properly licensed, running one of the approved licenses, such as PCSR, PERP, or SAAS. Once that's verified, install the Biz-Tech Services, Inc. WooCommerce Connector customization package. On the Customization Projects form, you upload the deployment package, validate the project to catch any conflicts, and publish it to your tenant.
With the package published, a WooCommerce workspace appears in your Acumatica menu, and now you establish the API connection. WooCommerce Integrator works on REST API. In your WordPress site, under the WooCommerce settings, you generate a consumer key and a consumer secret with read and write permissions. Then, on the WooCommerce Store Preferences screen in Acumatica, you enter your base web address, your WordPress login, and your password. The final step here is the Test Credentials action; a message that your credentials are valid is your green light to move on.

Data preparation and strategic mapping
After the connection is established, you move into the WooCommerce Store screen, which acts as the brain of the integration. Your first task is to define your high-level operating rules. Decide whether you're running a business-to-business operation by selecting the B2B Store option, which changes how customers and contacts are synchronized. With this option enabled, the Acumatica Contacts are exported to WooCommerce as Users. Withouth the option, the Acumatica Customer with its main Contact is exported to WooCommerce.

Next, prepare your order settings. Confirm the Acumatica order type and the default warehouse that will be assigned to every incoming WooCommerce order. You also set a Begin Order Date, which tells the system exactly when to start looking for orders and prevents accidentally importing years of historical data. This needs to be configured once, as after the firt Get Orders request. When a new Store code is configured, the WooCommerce Integrator automatically adds value to this field. The Last Imported Order Date is updated to provide data for next get request.
Data preparation extends to your inventory. In the Item Settings tab, define the default item class and the unit of measure, or UOM, for new items. If your business relies on specific identifiers, you can enable a numbering sequence for Stock Keeping Unit, or SKU, generation. And in the Warehouse Details tab, select the specific warehouses that contribute to the total quantity synced back to your web store, so your customers always see accurate stock levels.
Validation and cross-referencing
Validation is about making sure the language WooCommerce speaks matches the language of your ERP, and that's handled mostly through the Cross-Reference tab. To have option avalable here, the checkboxes are required. You map your WooCommerce shipping methods to your Acumatica ship-via codes, so shipping services are identified correctly on every sales order. You do the same for payments, matching your web payment gateways, like credit cards or PayPal, to the right payment methods and types in your accounts receivable.
You also validate how taxes are handled. In the tax options, you decide whether to use an External Tax service like Avalara or to map specific customer tax zones and tax IDs directly.
And to finalize everything, use the Load WooCommerce Fields action in the Order Mappings tab, so every piece of data, from the order date to a customer note, has a designated home in Acumatica.
User access and security
Security matters when you connect two systems. For your internal team, make sure the WordPress user tied to the API keys has the right permissions to allow the data flow. And on the Acumatica side, if you run a B2B store, remember that any contact you want to export as a web user must have a password set on their contact record.
Also, if you're moving from an older version of the WooCommerce Connector or an existing store, use the Update Synchronized Customers action. That transfers your existing customer information into the integration tabs, so your current client base is recognized by the new system without creating duplicate records.
Testing the workflow
Never go live without a full test. Your first test should be the Get Orders process. On the Import WooCommerce Orders screen, retrieve your recent web orders and confirm they appear with the correct statuses, like Processing or On Hold. Besides Import WooCommerce Order screen, Biz-Tech Services, Inc. WooCommerce Integrator provides ability to retrieve an individual order via its WooCommerce ID on WooCommerce Orders screen.
Next, test item synchronization. Use the export item process to sync a test item, and verify that the price, description, and images appear correctly on your website. Finally, walk through a complete fulfillment cycle: import a test order, create a shipment, confirm it, and prepare the invoice. Verify that the tracking number writes back to WooCommerce and that the web order status updates to Completed. If anything goes wrong, the Get Order Process Error Messages screen helps you identify and resolve the issue.
Go-live readiness and automation
The final step is moving from manual clicks to automated efficiency. You configure your automation schedules to decide how often the system runs Get Orders and Import All, and we recommend setting those to intervals that match your business volume.
The single most important takeaway for go-live readiness is to verify your last imported order date and your warehouse quantities one last time before you enable the schedules. When those are confirmed, your integration is ready to give your customers a seamless experience and your team an efficient workflow.
If you're ready to see how this WooCommerce connector can transform your operations, visit biz-techservices.com to schedule a personalized demo today.
DocVision PDF Automation Configuration Checklist for Acumatica
DocVision PDF Automation Configuration Checklist for Acumatica
When you're ready to transform your sales operations by automating document entry, having a clear roadmap is the difference between a bumpy start and a seamless transition. At Biz-Tech Services, we know the key to success with DocVision PDF Automation, our solution for Portable Document Format, or PDF, scan and import, is preparation. This pre-launch checklist walks your business through the essential steps to make sure your Enterprise Resource Planning system, or ERP, is fully ready to turn incoming customer documents into accurate orders instantly. Follow it, and you'll maximize efficiency, reduce data-entry mistakes, and get your team ready for go-live.
Establishing your foundational configuration
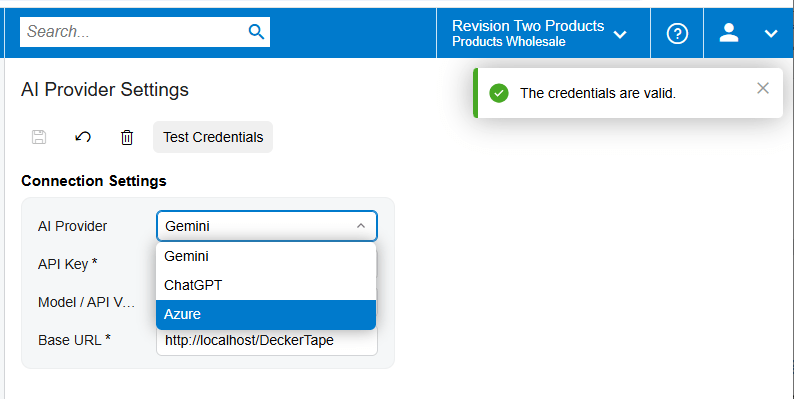
Your journey begins with the core connection between Acumatica and the cloud infrastructure it relies on. First, confirm that your Azure setup is complete, so your ERP can use cloud services like storage and virtual machines to process incoming files. Within the connection settings, verify that your Application Programming Interface key, or API key, along with the API version and the base web address, are all entered correctly.
We always recommend using the Test Credentials feature before you move forward. Running that test confirms the system can communicate with the cloud platform, which is the essential backbone for importing your customer Purchase Order files, or POs, and converting them into sales orders.
Preparing your customer and inventory data
Once the connection is established, your next priority is data preparation. DocVision uses a per-customer PDF mapping approach, which means you can adapt to the unique document structure of every client you serve. For each unique format you receive, you create a template ID.
A critical part of this stage is setting up your customer cross-references. Make sure the system can accurately identify the customer values and locations on the PDF and map them to the matching records in Acumatica. That way, when a document arrives, the system knows exactly which customer account to credit and where the goods should ship.
After the customer setup, prepare your item data through the inventory cross-reference system. You can manually map individual PDF line items to your Acumatica inventory IDs, or, if you have a high volume of items, import those mappings in bulk from an Excel file. This step is vital, because it bridges the gap between how your customers describe a product and how it's stored in your database.
Mapping and validation points
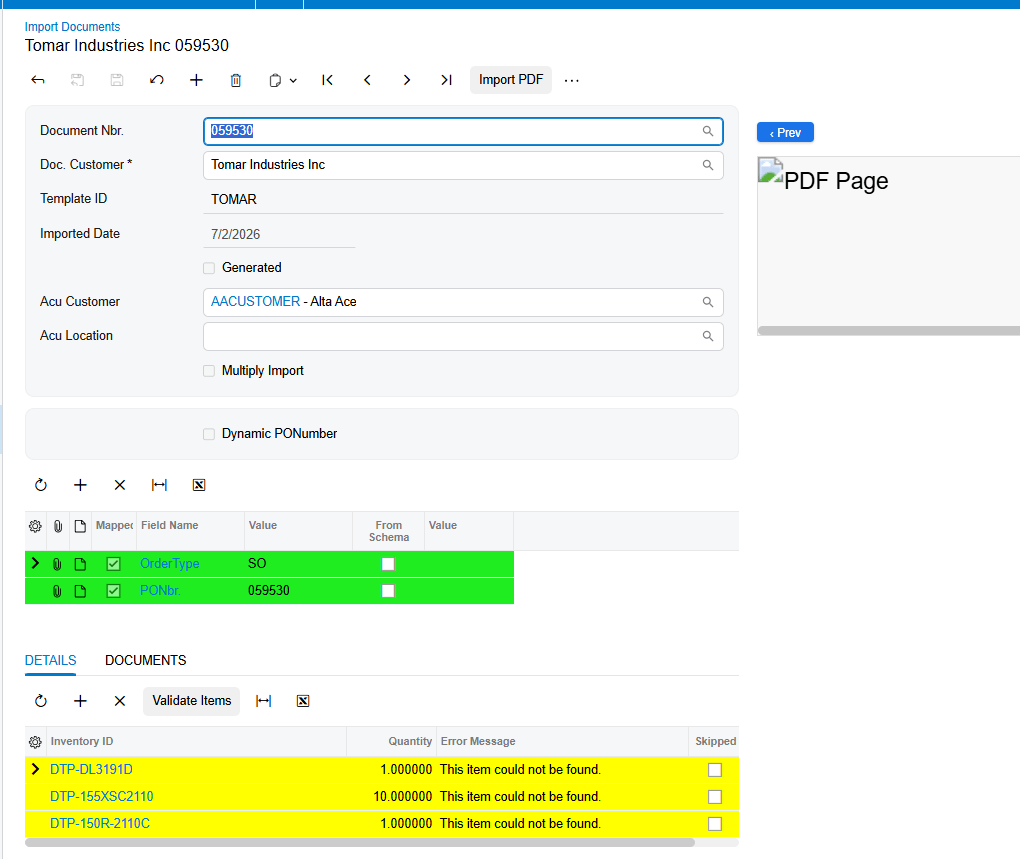
With your data prepared, you move into fine-tuning your document mappings, where you define exactly which pieces of information from the PDF are extracted and where they land in your system. First, confirm the mapping of your header fields, like the date or customer name, using the Sales Order Advanced target. Next, make sure you've mapped the transaction details using the Sales Order Details Advanced target.
During this, pay close attention to the Dynamic PO Number setting. If a customer document happens to be missing a purchase order number, the system can flag it and issue a warning, letting you choose an alternative number so the process keeps moving.
And before you consider a template ready for production, learn the validation signals in the interface. When you review an imported document, watch the color indicators. Green means everything is mapped correctly and you're ready to generate an order. Yellow means some items aren't linked yet, and you should use the Validate Items button to resolve them. Red signals a specific error that needs your attention before the order can proceed.
User access and security
Because DocVision is built natively for Acumatica, it's designed to work inside your existing secure environment. Before going live, verify that your user permissions are configured correctly. The system respects your established audit trails and security protocols, so only authorized team members can generate or modify orders. And because it's a native integration, you don't have to worry about external dependencies compromising your data security or your system's performance.
Final testing and go-live readiness
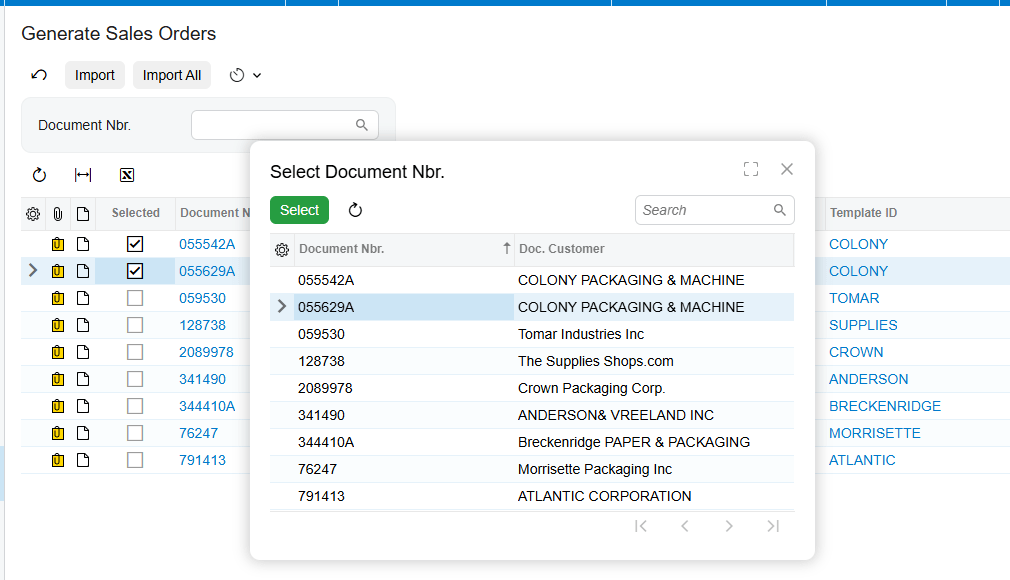
The final step is a full test of the end-to-end workflow. Practice importing a document, then use the three-dots menu to select Generate Sales Order. Confirm that the system successfully creates the order and that the Generated checkbox is automatically selected on the document record.
For high-volume operations, we suggest testing the batch-processing capabilities. On the Generate Sales Orders screen of DocVision Integration, you can filter by document number and process many orders at once, which is a big part of the time savings your business is after. It is available on Import Documents screen as well to create individual Sales Orders. Finally, get your team familiar with the generic inquiry built specifically for DocVision. It acts as your central command center, where you can track all your document numbers, template IDs, and generation dates in one place.
The single most important takeaway for go-live readiness is that validation is the key to automation. When your cross-references are accurate and your templates validate with a green status, you can trust the system to handle the heavy lifting of data entry. If you're ready to see how these configurations work in the real world, visit biz-techservices.com to schedule a demo and start your journey toward a more efficient, automated future.
CRV Configuration Checklist for Acumatica Beverage Distributors
CRV Configuration Checklist for Acumatica Beverage Distributors
Managing a beverage distribution business in California brings unique regulatory requirements, especially when it comes to the California Redemption Value, or CRV. When you run on an Enterprise Resource Planning system, or ERP, like Acumatica, accuracy isn't just a goal, it's a requirement for compliance and financial integrity. At Biz-Tech Services, we know the move to automated environmental-fee tracking can feel complex, which is exactly why a thorough pre-launch checklist matters. This checklist makes sure your system is configured correctly, your data is prepared, and your team is ready for a smooth go-live.
Required configuration: defining the foundation
The first step toward automated compliance is setting up the CRV items themselves. In Acumatica, these are Non-Stock Items, designed to be added automatically to sales transactions whenever you sell beverages that fall under the state's recycling program. Here, ECOFEE is the non-stock item. So first, confirm that your CRV non-stock items are created and correctly categorized, and that they're available in both the inventory and the sales modules.
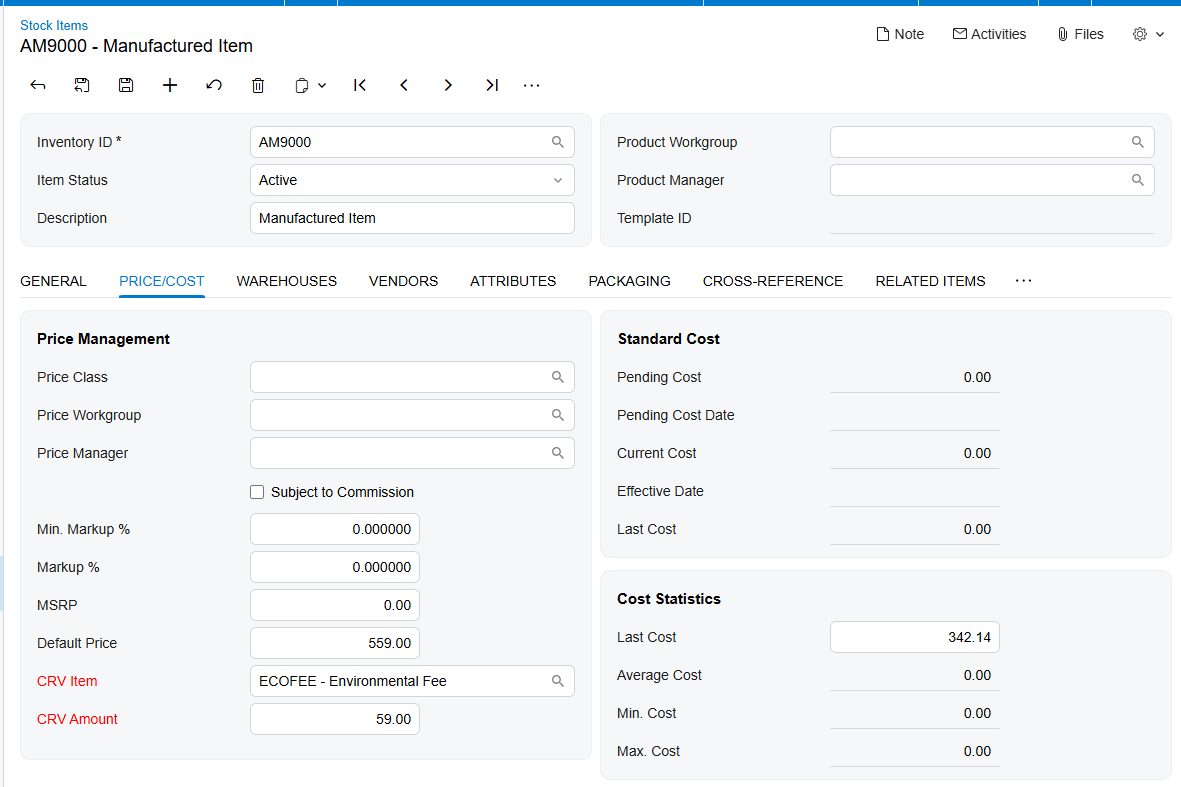
Once those items exist, your next task is to bridge the gap between your beverage products and these fees. On the Stock Item screen for each beverage, go to the Price and Cost tab and select the matching non-stock CRV item in the designated field. That link is what tells the system exactly which fee to apply when a specific beverage is sold.
Data preparation: pricing and units of measure
Next, make sure your pricing and unit data are carefully prepared. It's not enough to link a beverage to a CRV fee; you also have to define the fee's specific value. On the Stock Item screen, focus on two areas. First, verify the CRV amount field on the Price and Cost tab, which lets you define a separate price for the fee item.
For many distributors, though, the fee isn't one-size-fits-all; it often depends on the container size or volume. To handle that, confirm the setup on the General tab of the Stock Item screen, where another CRV amount field sets the fee based on the selected Unit of Measure, or UOM. With that in place, whether you're selling a single bottle or a full case, the system calculates the redemption value precisely.
Customer validation: controlling the automation
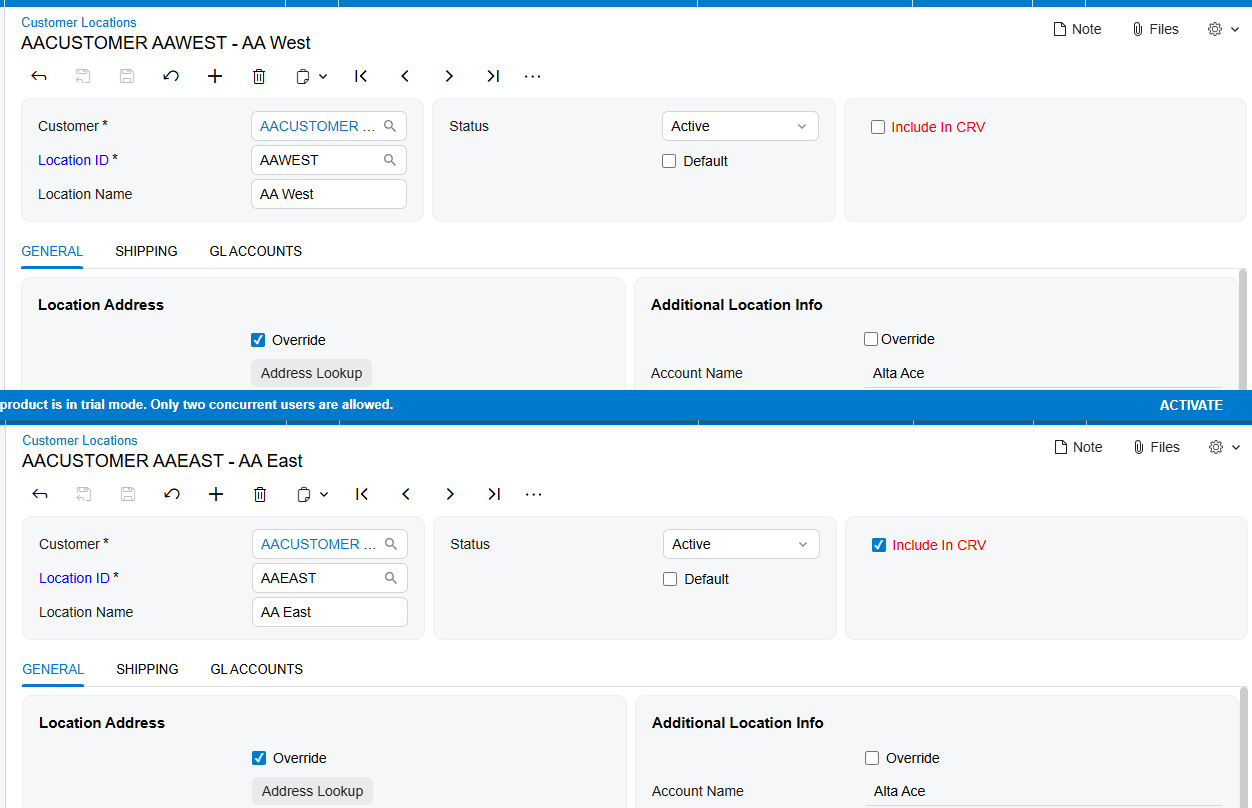
Once your items are configured, validate your customer records, because not every customer or transaction requires CRV tracking, and the system lets you toggle the automation at the source. Confirm that the Include in CRV checkbox is set correctly on the customer's default location on Customer Locations screen. This is a critical validation point, since that checkbox decides whether the fee item automatically appears on a sales order based on the location of the Customer.
As you prepare for launch, we suggest auditing your customer list to make sure this flag is active for all of your relevant California-based accounts. That way the automation runs only when it should, which prevents unnecessary manual corrections during a busy sales cycle.
User access and tracking points
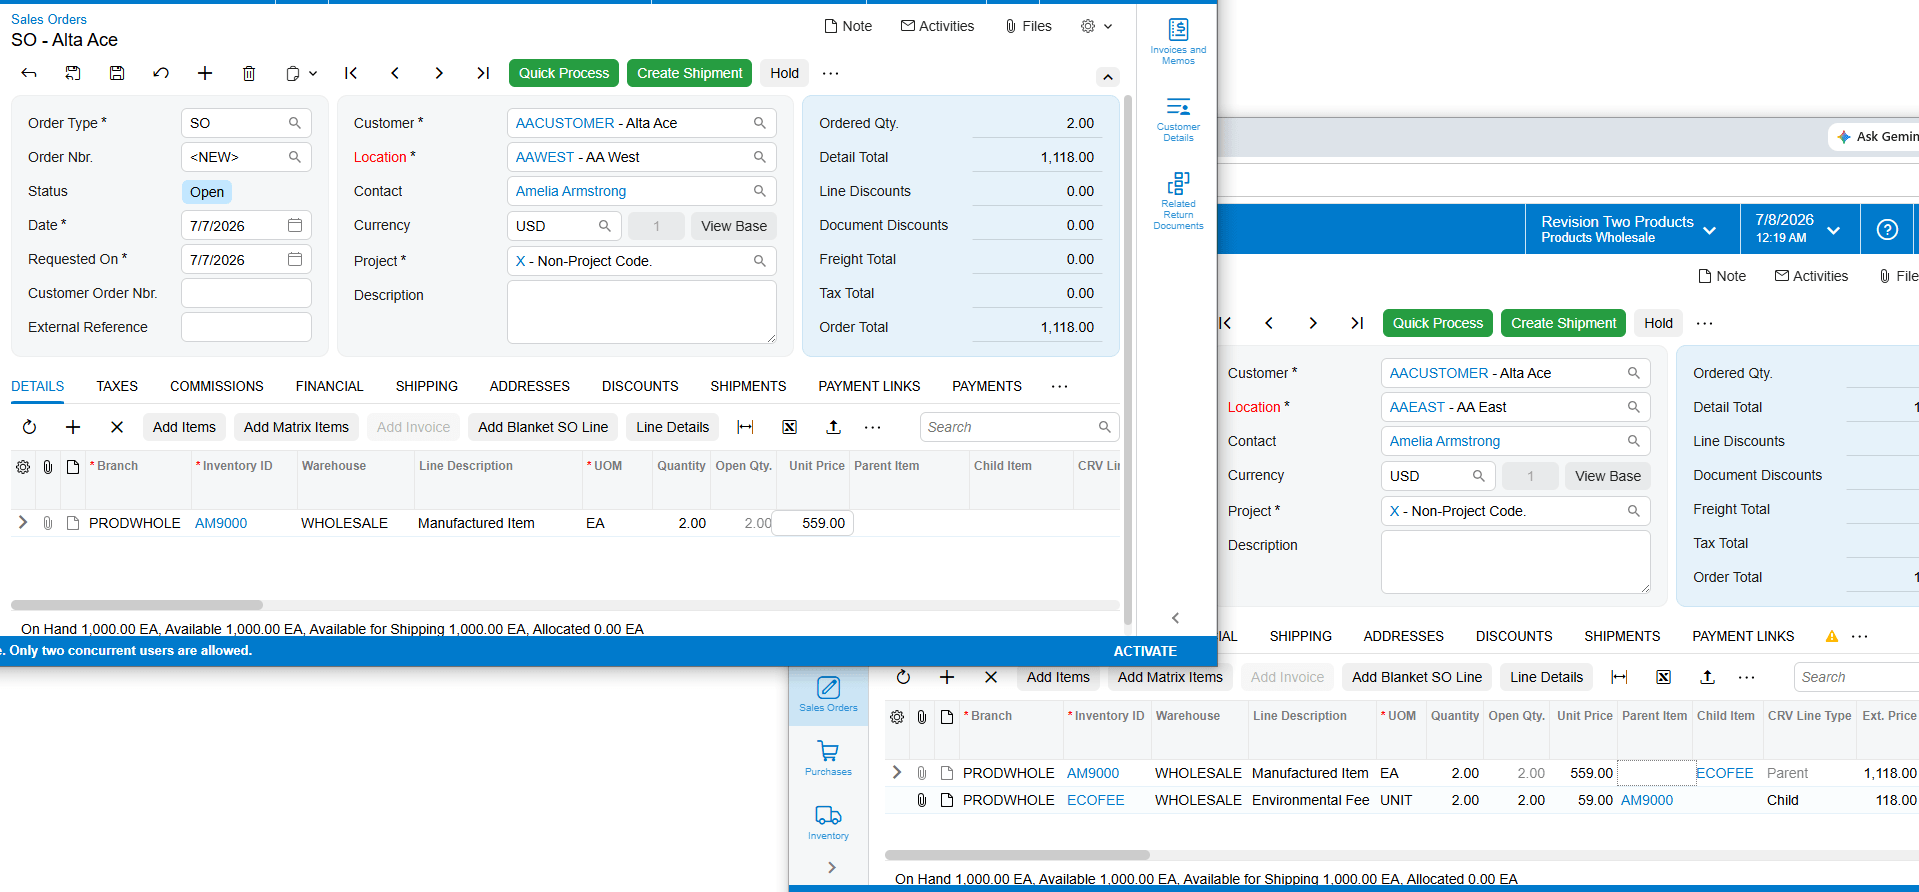
As you move closer to go-live, make sure your team knows how to verify the automation is working. We've enhanced the standard Acumatica screens to give clear visibility into these fees. In particular, make sure your sales and warehouse teams are familiar with the new Parent Item and Child Item fields, which we've added to the Sales Orders, Shipments, and Invoices screens. They make it easy to identify the main beverage product, the parent, and its associated environmental fee, the child, which matters a lot in a high-speed distribution environment.
Testing: the sales order workflow
Before you officially flip the switch, a rigorous testing phase is essential, and we recommend a series of end-to-end tests in a sandbox environment. First, confirm the automation by going to the Sales Orders screen and choosing a customer whose location is flagged to include these fees. When you add a parent beverage item to the order, watch for the system to automatically add the matching CRV item as a new line.
During that test, pay close attention to the details. The system should give the child item the same quantity and the same warehouse as the parent. If the fee line appears instantly, with matching quantity and warehouse, you know your configuration is sound.
Go-live readiness and final validation
The final stage is confirming readiness across the whole document lifecycle, because compliance doesn't stop at the sales order; it has to flow through to the final invoice. So verify that the parent-and-child relationship is visible not just on the sales order, but also on the shipment and the invoice. That end-to-end visibility keeps both your financial reporting and your customer's billing accurate and transparent.
The real takeaway for go-live readiness is this: consistency between your Stock Item settings and your customer location flags is what drives a successful, automated environmental-fee program. When those elements line up, the system removes the burden of manual entry and reduces the risk of regulatory errors.
If you're ready to see how these automated workflows can transform your beverage distribution business, we'd love to help. Visit biz-techservices.com today to schedule a demo and see the Acumatica CRV configuration in action.
Consignment Processing Configuration Checklist for Acumatica
Consignment Processing Configuration Checklist for Acumatica
Launching a new module inside your Enterprise Resource Planning system, or ERP, is a significant milestone for any growing business. At Biz-Tech Services, we know the key to a successful go-live isn't just the software itself; it's the preparation you put in before the first order is ever entered. And when you're managing inventory held at your customers' locations, visibility and accuracy are everything. So we've put together this pre-launch checklist to make sure your Acumatica environment is fully ready for Consignment Processing.
Phase one: required system configuration
Your first step is the technical foundation. You need to make sure the Consignment Processing customization project is correctly installed in your Acumatica environment. On the Customization Projects form, we recommend you first validate the project to catch any conflicts with your existing setup, and then publish it for your tenant. That uploads the package to your database and compiles the files that switch on the consignment features.
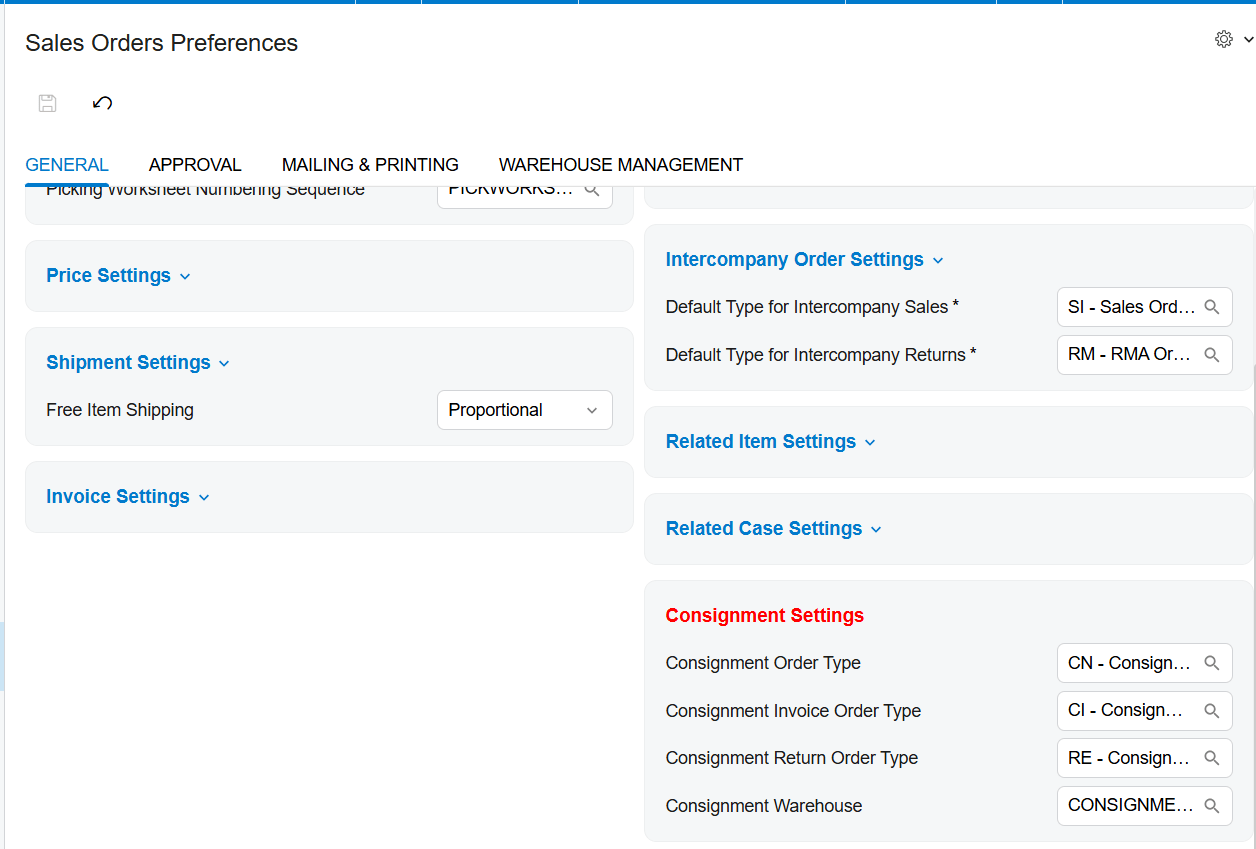
After the installation is verified, move to the Sales Order Preferences form. This is where you define the DNA of your consignment transactions, and you need to confirm that three specific order types are established. First, verify a consignment order type, typically labeled CN, created from the Transfer Order template. Next, make sure a consignment invoice order type, or IN, is set up from the Invoice Order template. And finally, confirm a consignment return order type, or CR, also built on the Transfer Order template. Within these same preferences, designate a default consignment warehouse to streamline your data entry later on.
Phase two: warehouse and customer data preparation
With the core preferences set, your next focus is your warehouse structure. Go to the Warehouses form to identify the locations that will hold consigned stock. For every warehouse you use for this purpose, make sure the Use for Consignment checkbox is selected. This is a critical validation point, because only warehouses with that setting can be chosen as destination warehouses on your consignment orders. Remember, in this workflow your standard warehouses serve as the source of the items, while the consignment warehouse acts as the destination.
Once your warehouses are ready, prepare your customer records. On the Customers screen, go to each client taking part in your consignment program. You can associate a specific consignment warehouse directly with a customer, and this step is vital for accuracy. A warehouse set at the customer level overrides the general default from Sales Order Preferences, so items are always tracked to the right location for that specific partner.

Phase three: process validation and user access
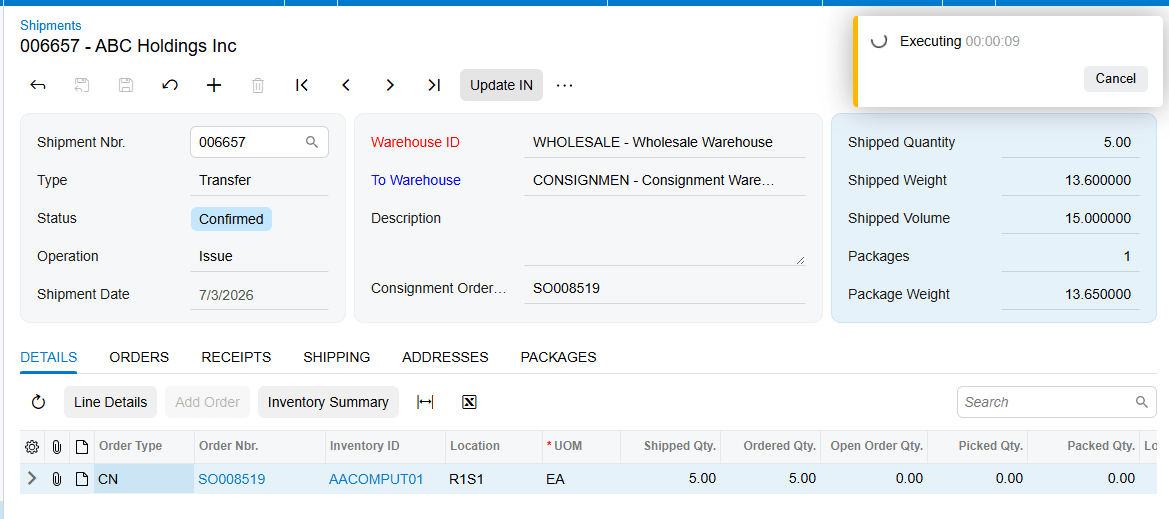
Before you let your team process live transactions, you need to validate the workflow and make sure everyone understands the specific triggers the system requires. A key training point for your staff is the shipment confirmation process. Unlike a standard sale, a consignment shipment needs a second action to move the inventory. Confirm that users know how to find and use the Update Inventory button, under the Actions menu, once a shipment is confirmed.
You should also validate that the system is automating the background tasks correctly. When that Update Inventory action runs, verify that Acumatica automatically generates and releases a transfer-type purchase receipt. That's the mechanism that issues items out of your main warehouse and receives them into the consignment warehouse. If this step is missed, your inventory valuation and quantities won't reflect the stock actually sitting at the customer's site.
Phase four: testing and go-live readiness
The final stage is end-to-end testing of the two most common post-shipment scenarios: selling and returning. First, create a test consignment order and move it to a Consignment, or Partial Consignment, status. At that point, verify that the Consignment Sell Items and Consignment Return Items buttons are properly enabled in the Actions menu.
Perform a test sell to make sure the item selection window correctly shows the available open quantities, and confirm that selecting an item and adding it generates a consignment invoice order. For returns, follow the same steps to make sure a consignment return order is created, and that the Update Inventory action on that return correctly updates your balances.
As a final readiness check, we recommend configuring your physical inventory types for consignment stock. On the Physical Inventory Types form, confirm you have a type created with the Consignment Inventory Count checkbox enabled, so you can count stock held at customer locations. And verify that the system calculates the book quantity by summing the open quantities from your active consignment orders, so when you reconcile, you're billing the customer accurately for any variances found during the count.
The bottom line
The single most important takeaway for go-live readiness is that consignment success depends on the smooth transition of statuses, from open, to consignment, and eventually to closed once every item is either sold or returned. If your configuration and data preparation follow this checklist, you'll have the visibility you need to manage your distributed inventory with confidence.
For more on optimizing your Acumatica experience, or to see a live walkthrough of these steps, visit biz-techservices.com for a demo.
How to Set Up ServiceTitan in Acumatica
How to Set Up ServiceTitan in Acumatica
Managing a field service business is a constant balancing act. You have your team out in the field using ServiceTitan to deliver great customer service, and your back-office team working in your Enterprise Resource Planning system, or ERP, which is Acumatica. The real-world problem many businesses face is the data gap between these two worlds. When your systems don't talk to each other, you're stuck with manual data entry, missed invoices, and inventory numbers that never quite match up.
At Biz-Tech Services, we know your time is better spent growing your business than double-checking spreadsheets. That's why we built a seamless integration. In this guide, we'll walk you through the initial setup and connection, to get your ServiceTitan data flowing into Acumatica correctly.
The foundation: the ServiceTitan Store
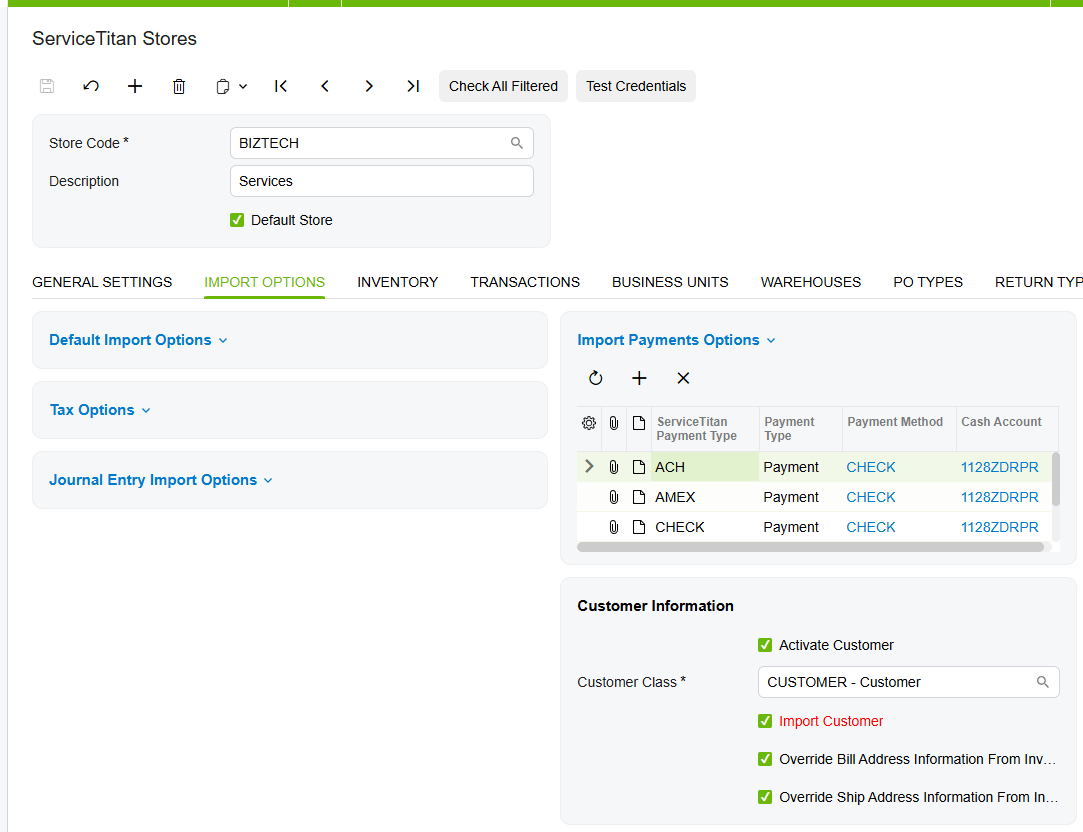
The most important thing to understand is that the entire integrator rests on one foundation: the ServiceTitan Store setup. Before you can import a single invoice or sync a vendor, you have to configure the Store in Acumatica. If this isn't set up correctly, the system simply can't work.
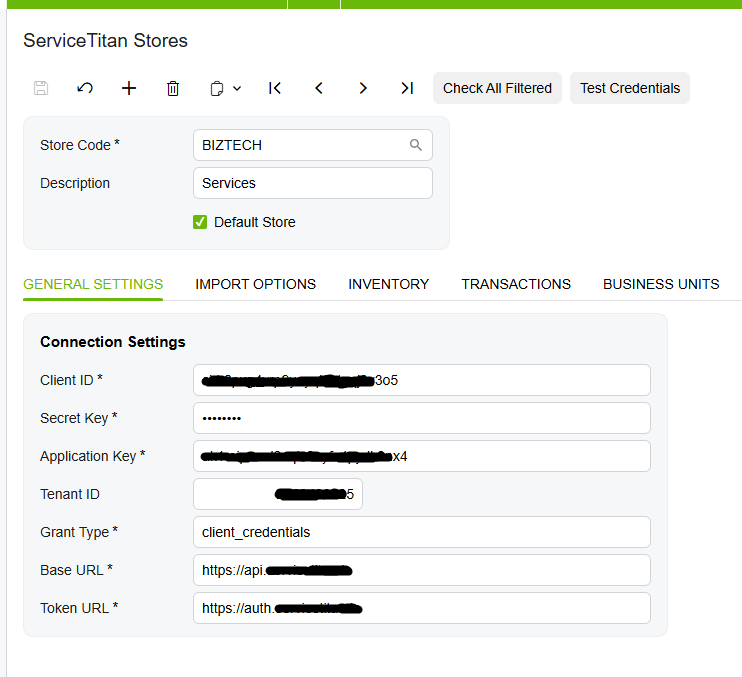
The Store setup is the brain of the integration. It controls everything, from how customers are created to how your warehouses and branches are mapped. To get started, you use the Connection Settings tab to enter your API credentials, and then the Test Credentials feature to confirm Acumatica is successfully talking to ServiceTitan. Once the connection is live, you assign a store code and a description so you can easily identify it.
Mapping your financials and business units
Once the connection is established, you make sure the money lands in the right place. That starts with mapping your General Ledger accounts, often shortened to GL. You tell the system exactly which GL accounts in Acumatica should correspond to your activities in ServiceTitan.
Next comes your organizational structure. Your business likely uses different business units in ServiceTitan to track different types of work, and you map those business unit IDs directly to your Acumatica branches. This makes sure every transaction is attributed to the correct part of your company. You also map your terms, which tells Acumatica how to handle payment timing and due dates based on your ServiceTitan settings.
Managing customers and vendors
A big benefit of this integration is that you don't have to create the same customer twice. In the Store settings, you turn on the Import Customer option, and the system automatically creates a new customer in Acumatica if one doesn't already exist. You can even set it to override the billing and shipping addresses, so the most current information from the ServiceTitan invoice is what stays in your ERP.
The same logic applies to the people you buy from. By turning on the Import Vendor option, the system can generate your ServiceTitan vendors inside Acumatica. You can let it create them automatically, or manually map your existing ServiceTitan vendors to your current Acumatica vendor list.
Inventory, warehouses, and trucks
For field service companies, inventory is often the hardest thing to track, and the integrator simplifies it by mapping your pricebook items. When you turn on the Import Item option, the system can generate stock and non-stock items in Acumatica automatically. As a rule, your materials and equipment from ServiceTitan become stock items, while your services are created as non-stock items.
But where is that inventory located? You handle that through warehouse mapping. You take your ServiceTitan warehouse and truck IDs and map them to specific Acumatica warehouses. That way, when a technician pulls a part off a truck, the integrator knows exactly which warehouse inventory to adjust in your financial records.

The workflow: invoices, payments, and purchase orders
With the foundation built, you can look at the actual flow of work. When you turn on the invoice and payment options, you gain a lot of control. You can import invoices with specific statuses, or filter them by date. And if you activate payment, the system imports the payment information along with the invoice. In many cases, when an invoice and its payment are both ready in ServiceTitan, they come in together, and the payment is automatically applied to the right invoice in Acumatica.
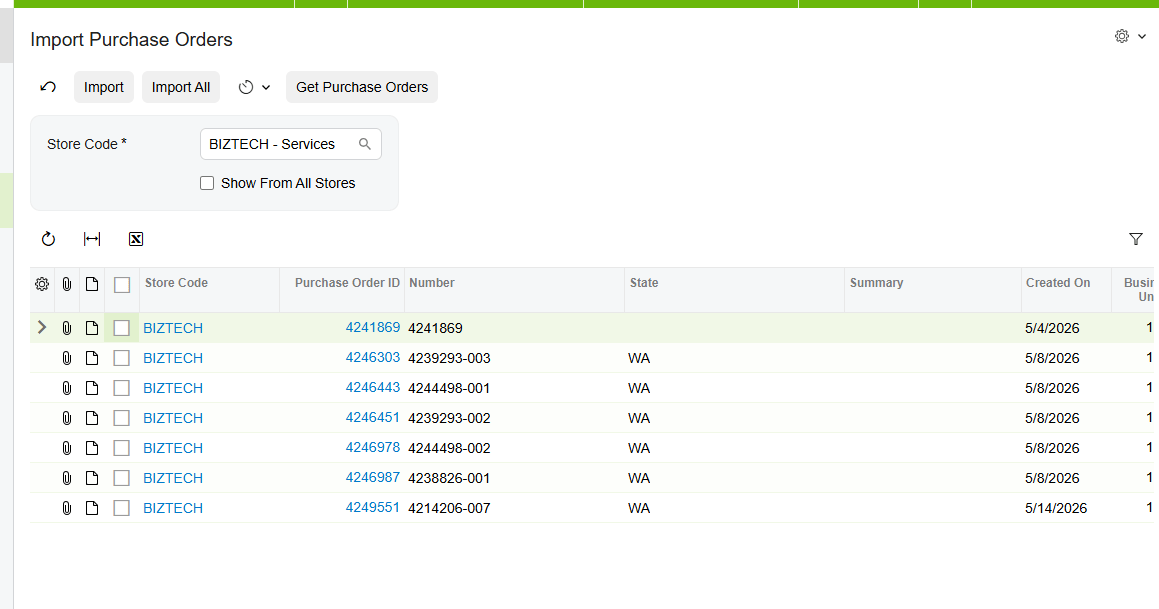
There's one important rule to remember about purchase orders, or POs. In this ServiceTitan connector, you can't import a receipt or a bill unless the related purchase order has already been imported into Acumatica. The system is built to keep a clean paper trail. When you import the PO first, it can then attach any later receipts or bills to that specific order, so your PO history is always accurate.
Finally, for businesses that prefer a different accounting method, there's a journal entry option. If you choose not to activate the full invoice import, you can instead bring your ServiceTitan data in as journal entries, posted directly into the General Ledger.
The bottom line
The most important thing to remember is that the ServiceTitan Store setup is the foundation of the entire ServiceTitan integrator. Get the mapping right here, and your data flows seamlessly from the field into your books.
Setting this up correctly the first time saves hundreds of hours of manual correction later. If you're ready to stop chasing data and start growing your business, we're here to help. Visit biz-techservices.com to schedule a demo and see this ServiceTitan connector in action.
How to Set Up Salesforce in Acumatica
How to Set Up Salesforce in Acumatica
Every day, your business relies on two powerhouses: Salesforce for your Customer Relationship Management, or CRM, and Acumatica for your Enterprise Resource Planning, or ERP. But when these two systems aren't talking to each other, your team is stuck manually moving data between sales, finance, and inventory. That gap leads to slow order processing, outdated customer information, and missed opportunities. At Biz-Tech Services, we designed our integration to bridge that gap, giving you real-time synchronization so everyone in your organization makes decisions from the same up-to-date information.
Let's walk through how to set up this connection step by step, so you can start seeing a unified view of your business.
Connecting the systems
The heart of the integration is a screen we call the Salesforce Store. Think of it as your central hub, where you define exactly how data flows between the two platforms.
Your first step is to establish the secure connection in the General Info tab. Here, you enter your Salesforce instance address and your API credentials, including your username, password, client ID, and client secret. Once those are in, there's a Test Credentials button that gives you immediate feedback on whether the connection is valid.

Configuring your order flow
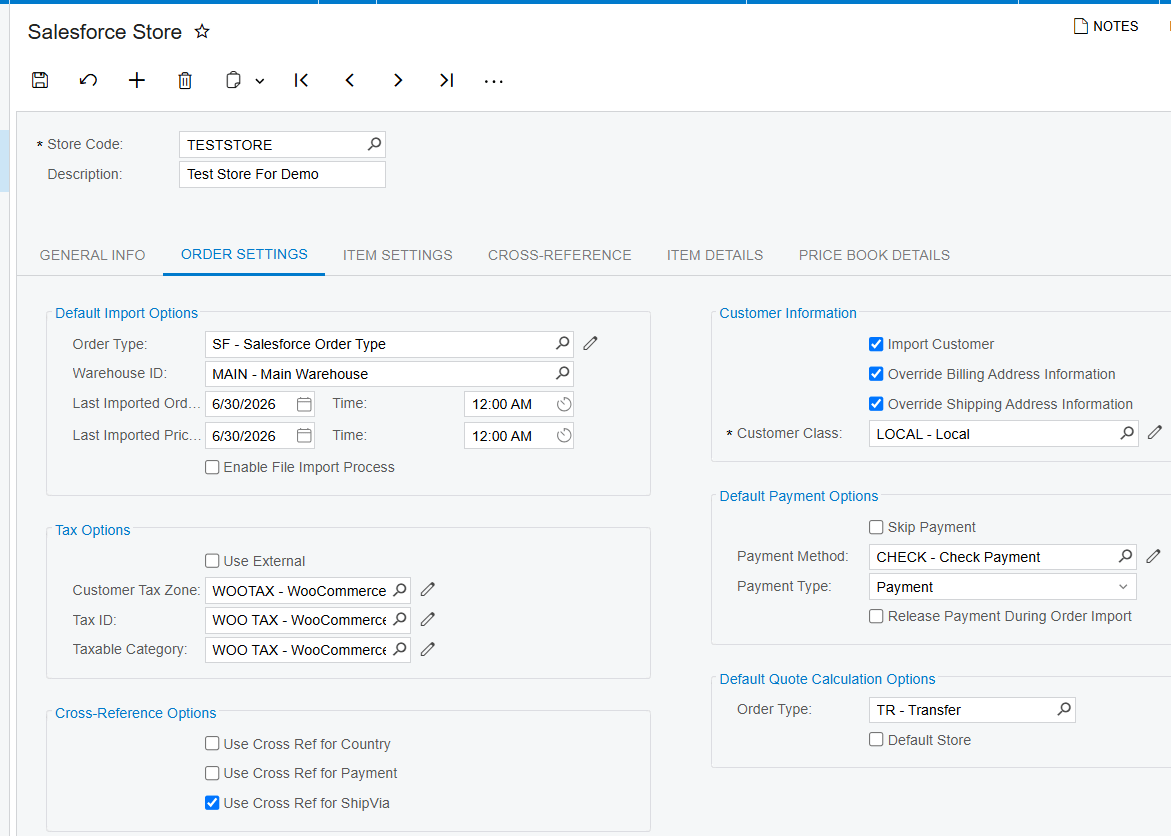
Once the connection is live, you tell Acumatica how to handle incoming sales for SalesForce Integrator. In the Order Settings tab, you define the default order type and the warehouse for every order that comes in from Salesforce.
One of the most important parts of this setup is how you handle taxes. You can use an external tax calculation service, like Avalara, or you can map the system to import taxes exactly as they were calculated in Salesforce.
To keep your shipping and payment data clean, you use cross-reference options. These let you link specific values from Salesforce, like a FedEx Ground shipping method, to the matching ship-via code in Acumatica. That way, when an order arrives, Acumatica knows exactly how to process it without manual intervention.
Managing customers and products
A successful SalesForce integration means your customer data is always in sync. In the customer information section, you decide whether the system should automatically create a new customer record in Acumatica whenever a new order is imported. If you enable that, it pulls in the email, contact info, and customer class automatically.
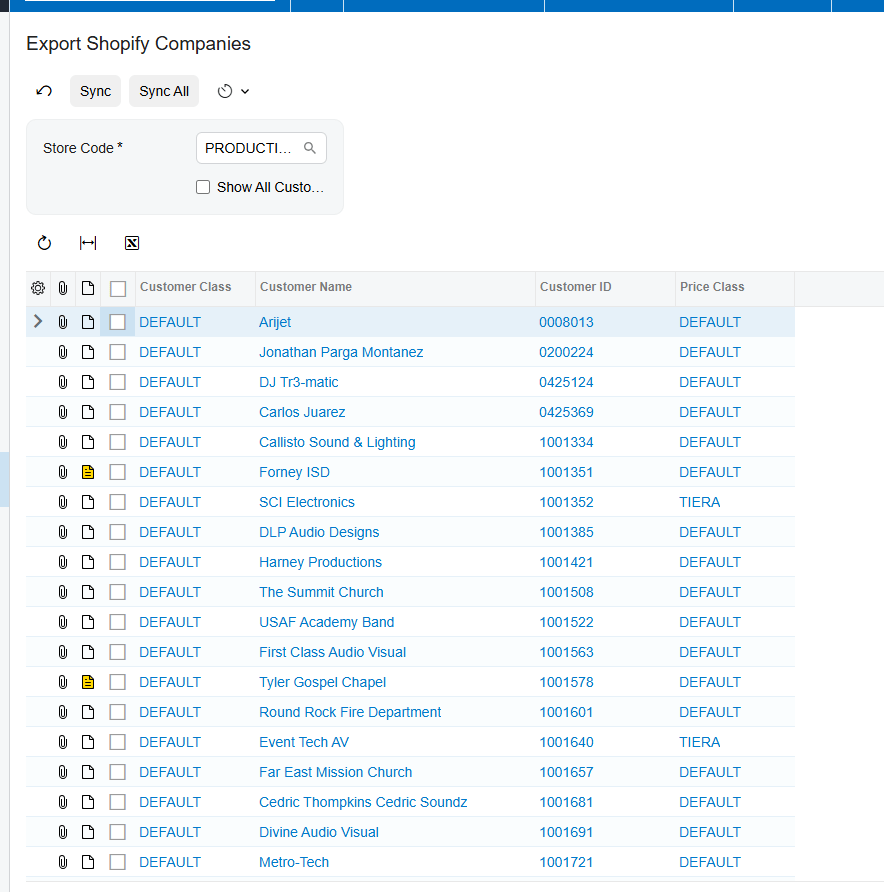
If you already have a large database in Acumatica, you can use the Export Salesforce Customers screen to push those records into Salesforce as accounts. If a customer has a primary contact, that person is created as a contact in Salesforce at the same time. And you can always confirm a record is linked by looking for the Salesforce Account ID right on the customer screen in Acumatica.
Next, your inventory. Under item settings, you can have the system create new items in Acumatica based on your Salesforce products. It uses the Salesforce product SKU to find a matching inventory ID in Acumatica, and you can even automate unique product IDs with a predefined numbering sequence.
Setting prices and discounts
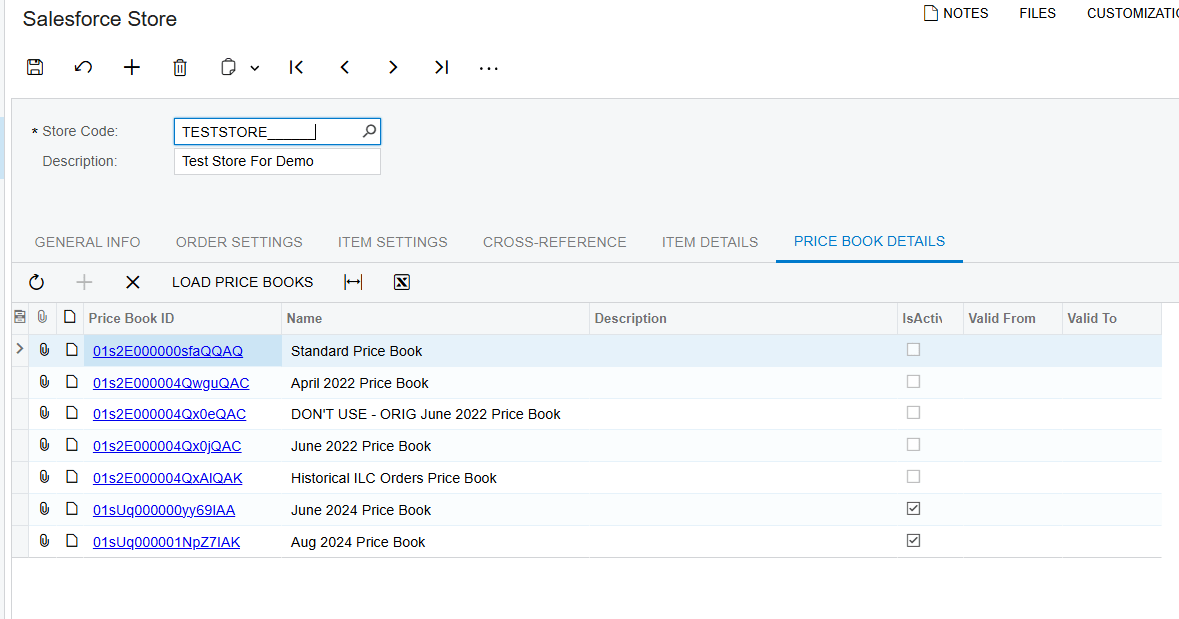
To keep your sales team accurate, you need consistent pricing. The Price Book Details tab lets you load your Salesforce price books directly into Acumatica. From there, you use the Export Salesforce Price Books screen to add products to a price book or update list prices. Just remember that items must be in your standard price book before they can be added to any custom one.
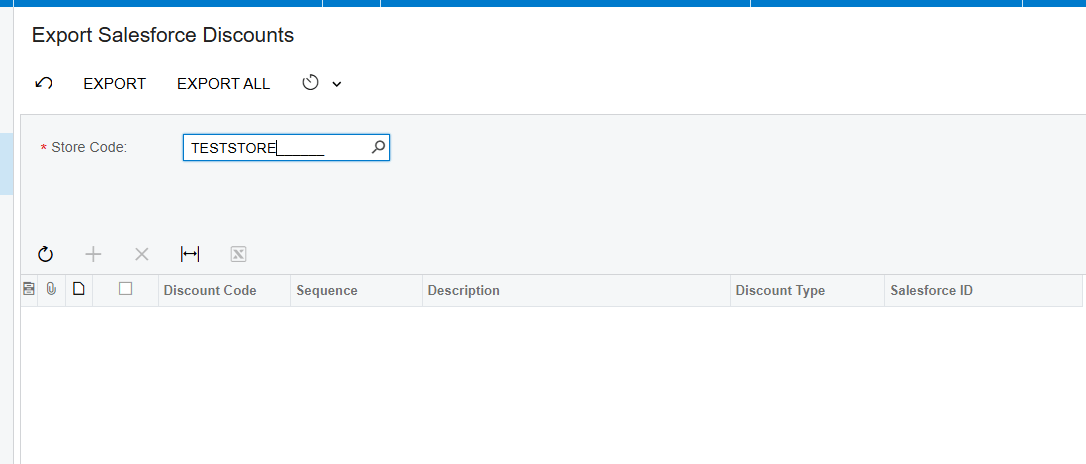
Promotions are handled through the Export Salesforce Discounts screen. You can create or update discount codes in Acumatica and sync them to Salesforce as either line-level or document-level discounts. That makes sure the price the customer sees in the CRM matches the final invoice in the ERP.
The daily workflow: import and two-way sync
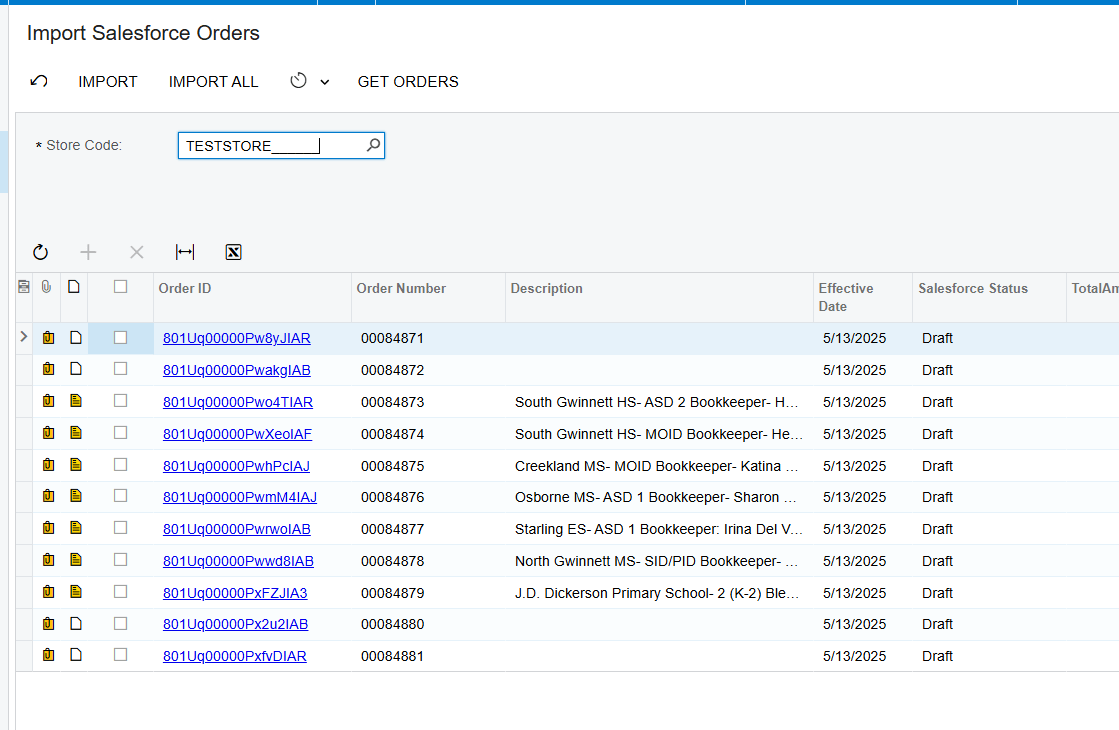
With everything configured in SalesForce Connector, your team uses the Import Salesforce Orders screen. You select a date range, hit Get Orders, and you see all the pending sales. You import them one by one or all at once, turning those Salesforce opportunities into Acumatica sales orders instantly.
The real beauty of this integration is that it's bidirectional. If you need to update a shipping address, add a new line item, or change a discount code in Acumatica, you use the Sync Orders to Salesforce screen to push those changes back to the CRM. That keeps your sales reps informed about the status and final details of every deal.
Visibility across the business
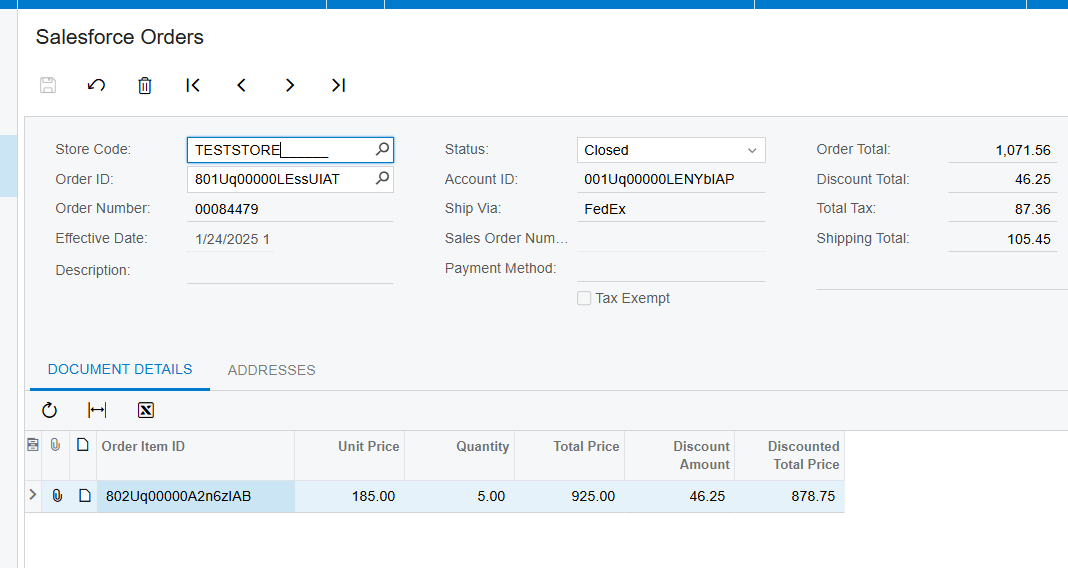
The ultimate goal of this setup is total visibility. Through the Salesforce Orders inquiry screen, your finance team can see the original Salesforce order details, while your sales team can see the resulting Acumatica sales order number and status, without leaving their preferred environment. We even sync internal notes from Salesforce into the Acumatica sales order, so no piece of communication is lost through SalesForce Connector.
The bottom line
The one clear takeaway is that automation eliminates the manual gaps that slow your business down. By following these setup steps, you make sure your sales and finance teams are always working in perfect harmony.
If you're ready to see how this integrator can transform your workflows, visit biz-techservices.com to schedule a live demo. We look forward to helping you connect your business for growth.
How to Set Up PayPal in Acumatica
How to Set Up PayPal in Acumatica
Send PayPal invoices, track payment status, and reconcile — all from inside Acumatica. Generated in NotebookLM from the product PDF.
Managing payments shouldn't feel like you're playing a game of tag between two different systems. For many businesses, the gap between their cloud Enterprise Resource Planning software, or ERP, and their payment processor is a source of constant manual data entry and human error. You end up jumping back and forth between Acumatica and the PayPal portal just to see whether a customer has paid.
At Biz-Tech Services, we designed the PayPal Integration to bridge that gap. It lets you send PayPal payment invoices directly from Acumatica, monitor payment status in real time, and update your records automatically when money is received. Let's walk through how to set it up.
Preparing your tools
Before we dive into the software, your business needs a few things ready. First, you must have a PayPal Business account, because personal accounts don't support the Application Programming Interface, or API, that invoicing requires. You'll also need your PayPal API application credentials, specifically your Client ID and your Client Secret.
To find these, log in to the PayPal developer website and create a new application under My Apps and Credentials. That's where you copy your ID and Secret, for either a testing environment, known as a Sandbox account, or your live production account. Inside Acumatica, make sure the Accounts Receivable, or AR, and Sales Orders modules are active, since those are the primary areas where the integrator lives.
Connecting the payment method
The first major step is telling Acumatica how to talk to PayPal, and we do that by creating a dedicated payment method. On the Payment Methods screen, you create a new record and give it a clear description, like PayPal. The most important part of this step is selecting PayPal in the Means of Payment field.
Once you do that, a new PayPal Settings tab appears. This is where you paste the Client ID and Client Secret you gathered earlier. You also enter the base web address for the PayPal API, which is the Sandbox address if you're still testing, or the production address for live business transactions.
We recommend using the Test Connection button right away, to verify your credentials are accepted. Finally, add the specific cash or bank account where these PayPal payments should be posted, on the Allowed Cash Accounts tab.

Linking your customers
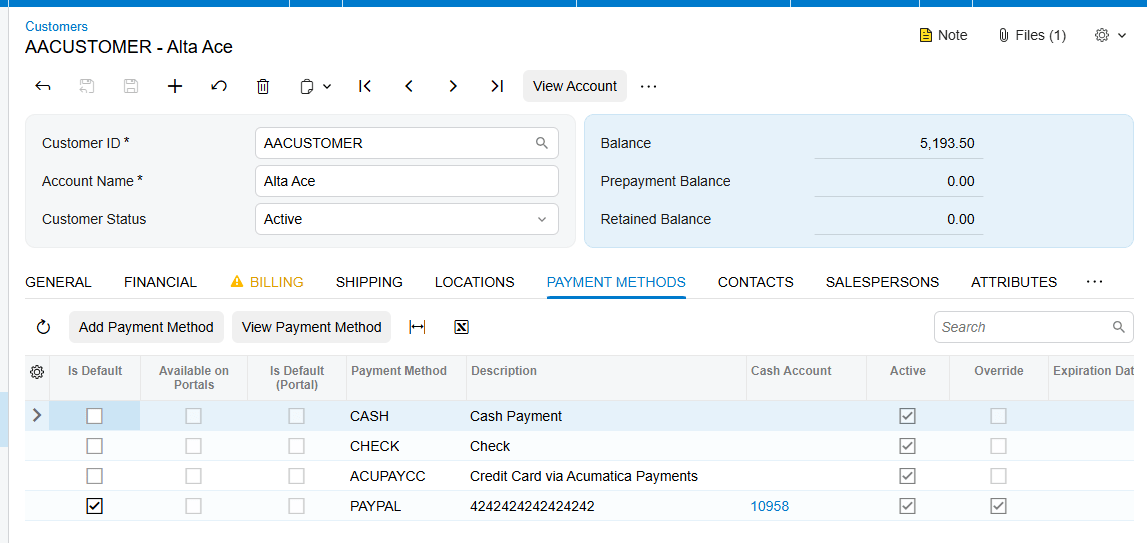
Now that the bridge is built, you tell the system which customers will use it. Each customer who plans to pay by PayPal needs a customer payment method configured.
When you open a customer record and go to their payment methods, you add the PayPal method you just created. The critical piece here is the PayPal customer email address. That's the exact address where PayPal delivers the digital invoice. The system pre-fills this email on new payments for that customer, and you can override it for a one-off if you need to.
Sending your first payment request
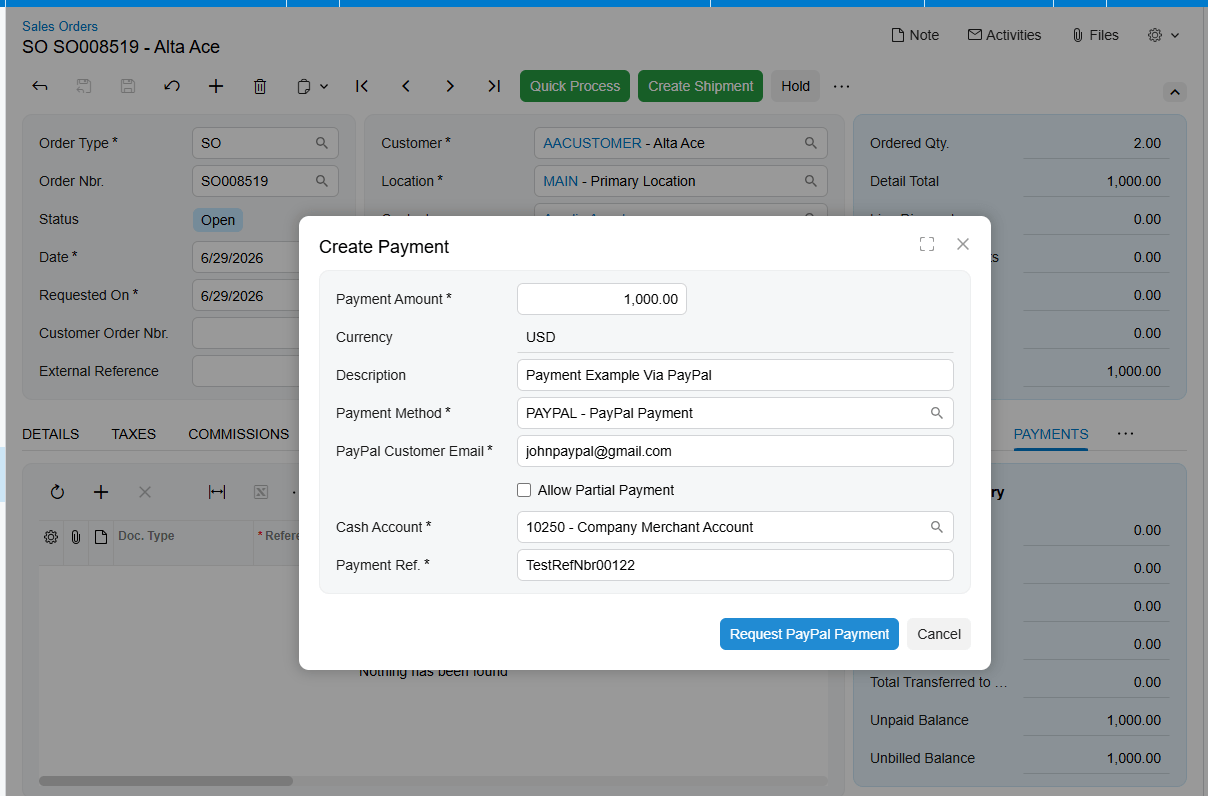
With the setup complete, you can start sending payment requests. We've built three ways to do this, depending on your workflow.
The most common way is from a sales order. If your business collects payment before shipping, you open the order and use the Create Payment button. Once you add the cash account and a payment reference, a Request PayPal Payment button appears. When you select it, the system automatically creates an Accounts Receivable payment record, sends the invoice to the customer, and puts the payment on hold with a status of Sent.
You can also send requests directly from an invoice, if you've already billed the customer after a shipment, or from the Payments and Applications screen, for standalone deposits that aren't tied to a specific document. In every case, the customer receives a PayPal email with a link to pay, and they can even use guest checkout if they don't have a PayPal account themselves.
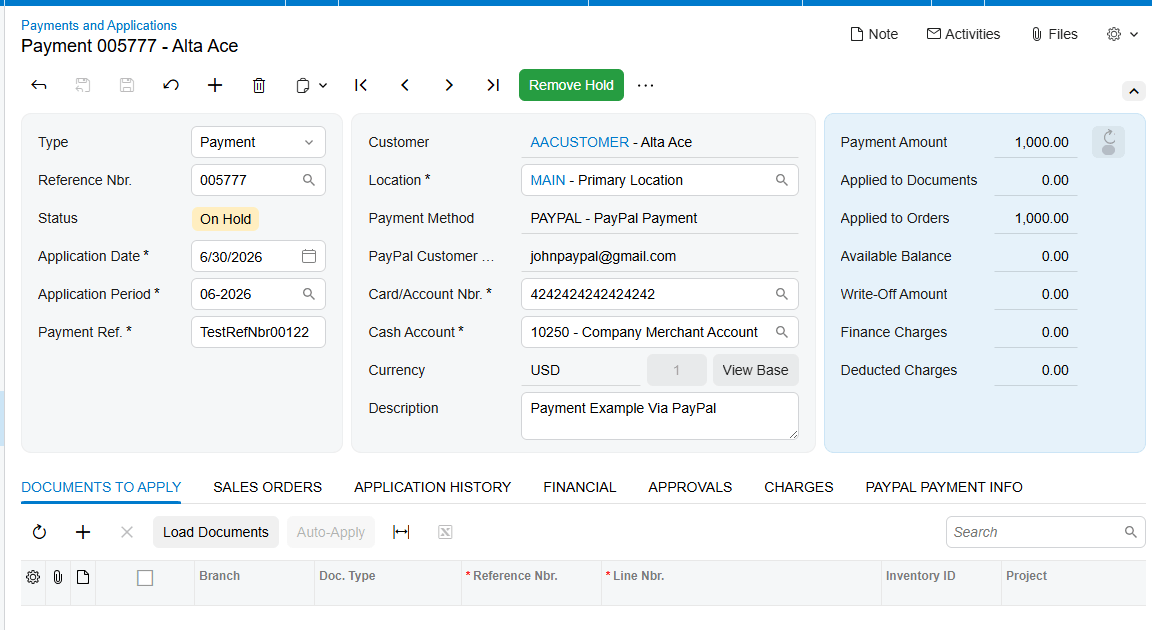
Managing the payment lifecycle
Acumatica doesn't just send the link; it mirrors the state of each invoice from PayPal. It's worth remembering that Acumatica checks PayPal on demand, rather than constantly in the background. When you want to check the status of a payment, you select the Remove Hold button on that payment record. The system then calls the PayPal API and updates the status. If the customer has paid in full, the status moves to Paid, and the payment is released in Acumatica automatically.
Partial payments, cancellations, and refunds
The integration handles the what-ifs too. If a customer makes a partial payment, PayPal connector notifies the system of the amount received. Acumatica stores that partial amount and keeps the payment on hold, letting the customer use the same link to pay the remaining balance later, and the payment is released in full only once the whole balance is collected.
If you need to cancel an invoice before it's paid, there's a Cancel PayPal Invoice button that alerts the customer and removes the record in Acumatica, to keep your books clean. By removing the unpaid Payment, the integrator updates the Payment Status in PayPal as well.
For refunds, you use the standard Void Check or Refund actions in Acumatica. We recommend handling all refunds this way, because the integration automatically tells PayPal to return the money to the customer, while at the same time voiding the payment in your Accounts Receivable records.
Streamlining your reconciliation
To stay on top of everything, we've included a Check PayPal Payment Status processing screen. This is your central hub for daily reconciliation. Instead of checking payments one by one, you can see every outstanding PayPal-linked payment in a single grid. You can filter by status, like Partially Paid, and process them all at once to synchronize your records with the latest data from PayPal.
The bottom line
The clear takeaway is that by connecting your payment processor directly to your ERP, you create a single source of truth for your finances, and you cut out the guesswork and manual entry that slow you down.
If you're ready to see how this integration can transform your billing process, visit biz-techservices.com today to request a full demo.