
ServiceTitan Acumatica Integration Configuration Checklist
A successful ServiceTitan Acumatica integration is decided long before the first invoice ever crosses between the two systems. It is decided during configuration. Field service companies live in two platforms at once: dispatchers, technicians, and sales staff work inside ServiceTitan every hour of the day capturing jobs, invoices, purchase orders, and payments in the field, while the controller and accounting team depend on Acumatica to manage inventory, branches, vendors, and the general ledger. When those two systems are not connected, the result is predictable. The same invoice gets keyed twice, purchase receipts pile up waiting to be reconciled, and nobody can say with confidence what a job actually cost.
The Biz-Tech Services ServiceTitan Connector closes that gap so the work recorded in the field lands in your Enterprise Resource Planning, or ERP, system exactly once and exactly right. A connector, however, is only as reliable as the configuration behind it, and the most common cause of a rough go-live is not the software but a mapping that was never completed or a date filter that was never set. This ServiceTitan Acumatica integrator configuration checklist walks through every required setting, the data you need to prepare in advance, the points where you should stop and validate, the user access to confirm, and the tests to run before you switch on automatic synchronization.
Step One: Configure the ServiceTitan Store in Acumatica
Every ServiceTitan Acumatica integration begins with the ServiceTitan Store. This is the single most important step in the entire setup process and it belongs on the first line of your checklist. The Store is the foundation on which every other setting depends, because it controls your invoice import rules, your customer creation rules, your inventory and item handling, your warehouse and branch mapping, your vendor and business unit mapping, your transaction processing logic, and the way purchase orders, receipts, and bills flow into Acumatica. If the ServiceTitan Store is not configured correctly, the system will not work and no data can be imported at all.
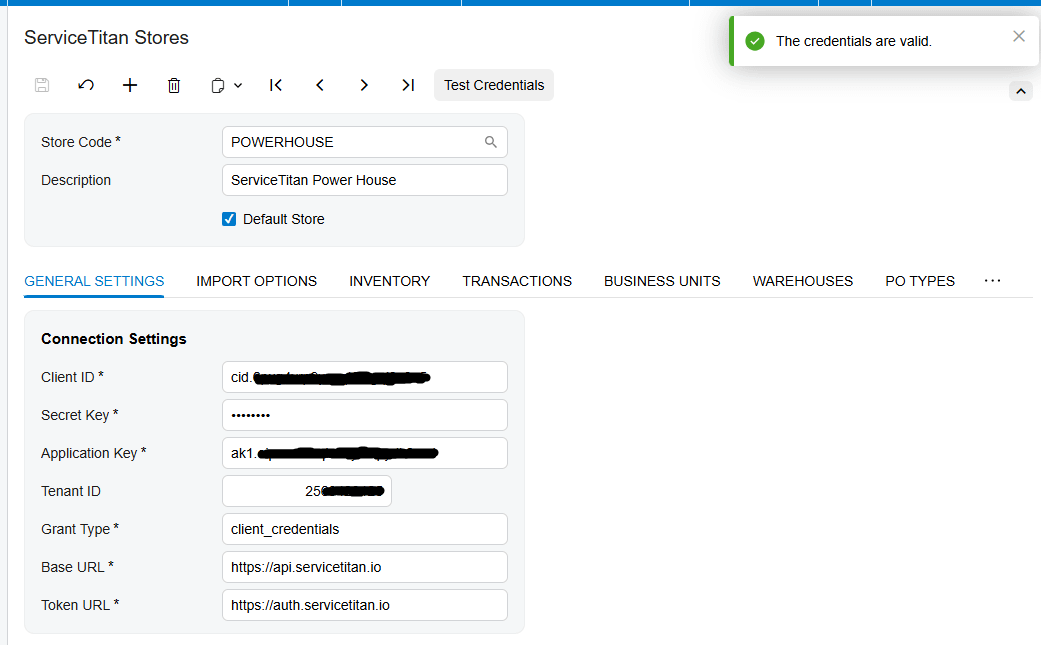
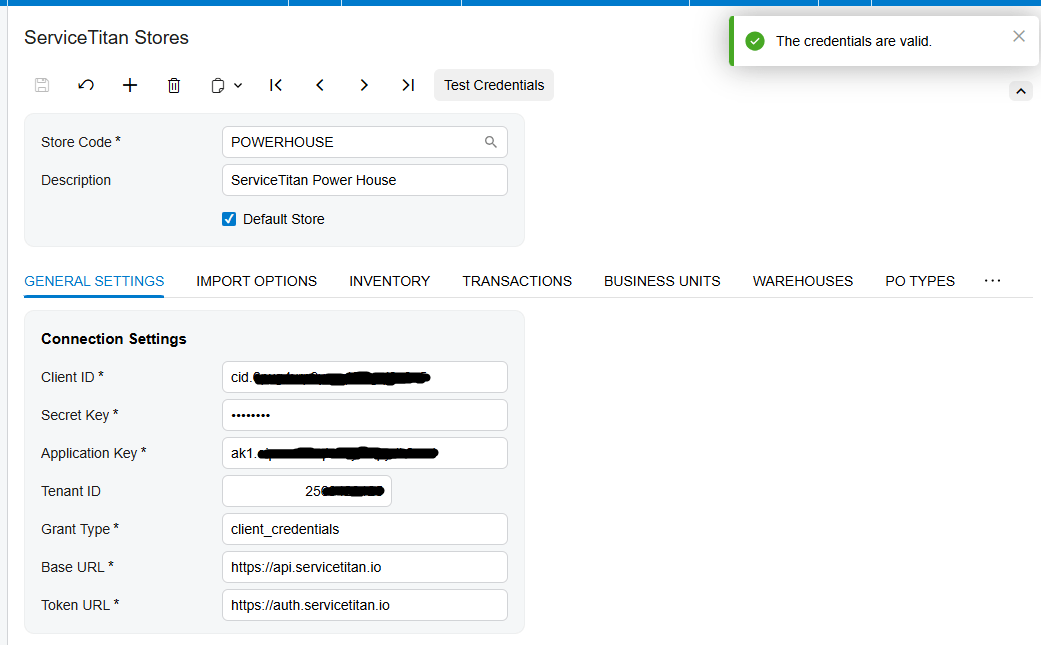
Start by assigning a Store Code, the lookup value that identifies the corresponding ServiceTitan store, and give it a clear Description so your team can recognize it later. If you select the Default Store checkbox, will tell the system to set and display that store code automatically on every processing screen, removing a small but repetitive step from your users’ daily routine. Companies operating several stores should decide up front which one carries the default flag.
With the Store record in place, move to the General Settings tab and enter the credentials generated on the ServiceTitan side to authorize the connection. Once those values are saved, use the Test Credentials action before going any further. This validation step confirms that Acumatica can reach your ServiceTitan store through the Application Programming Interface, or API, and it is the earliest safe point to catch a mistyped key or an authorization that was never granted. Do not begin any mapping work until this test succeeds.
Step Two: Set Invoice, Tax, and Payment Import Options
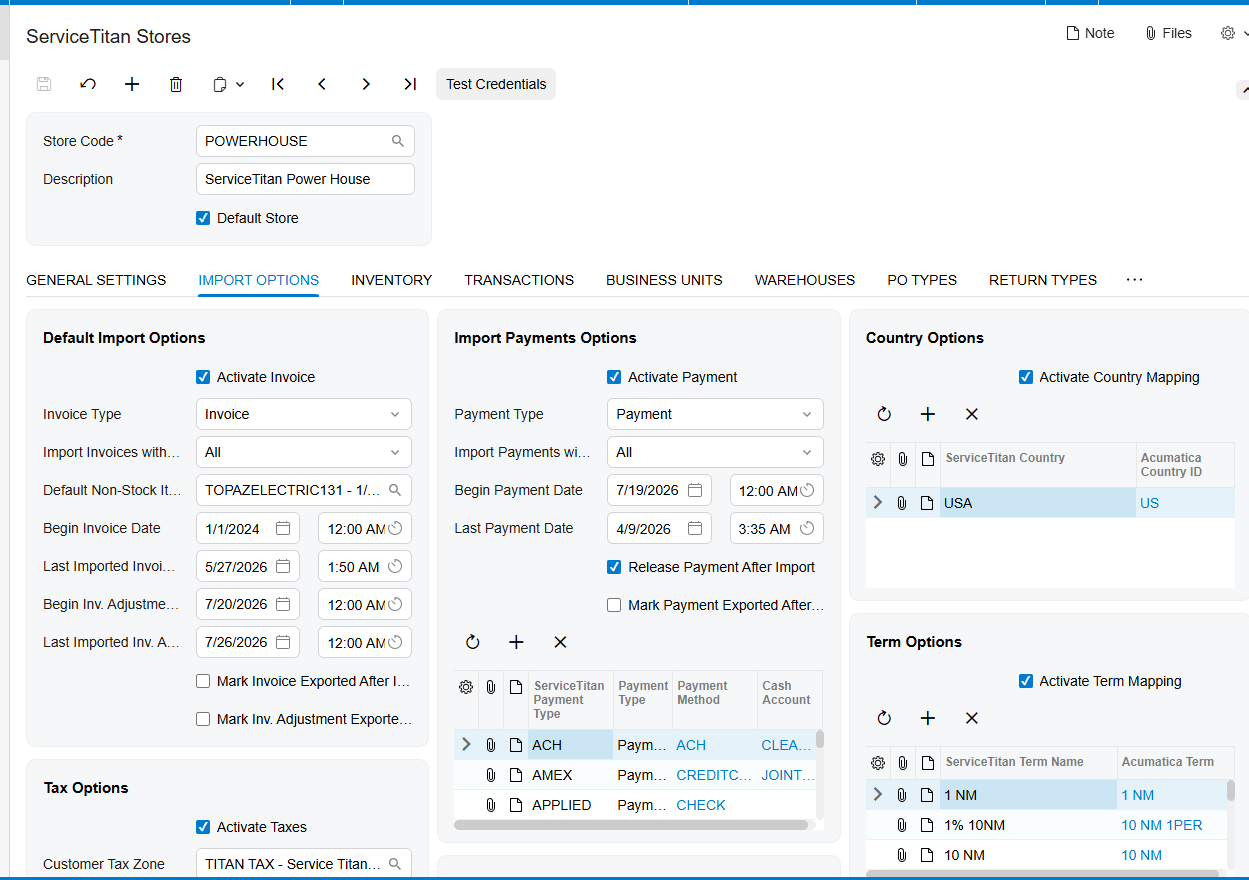
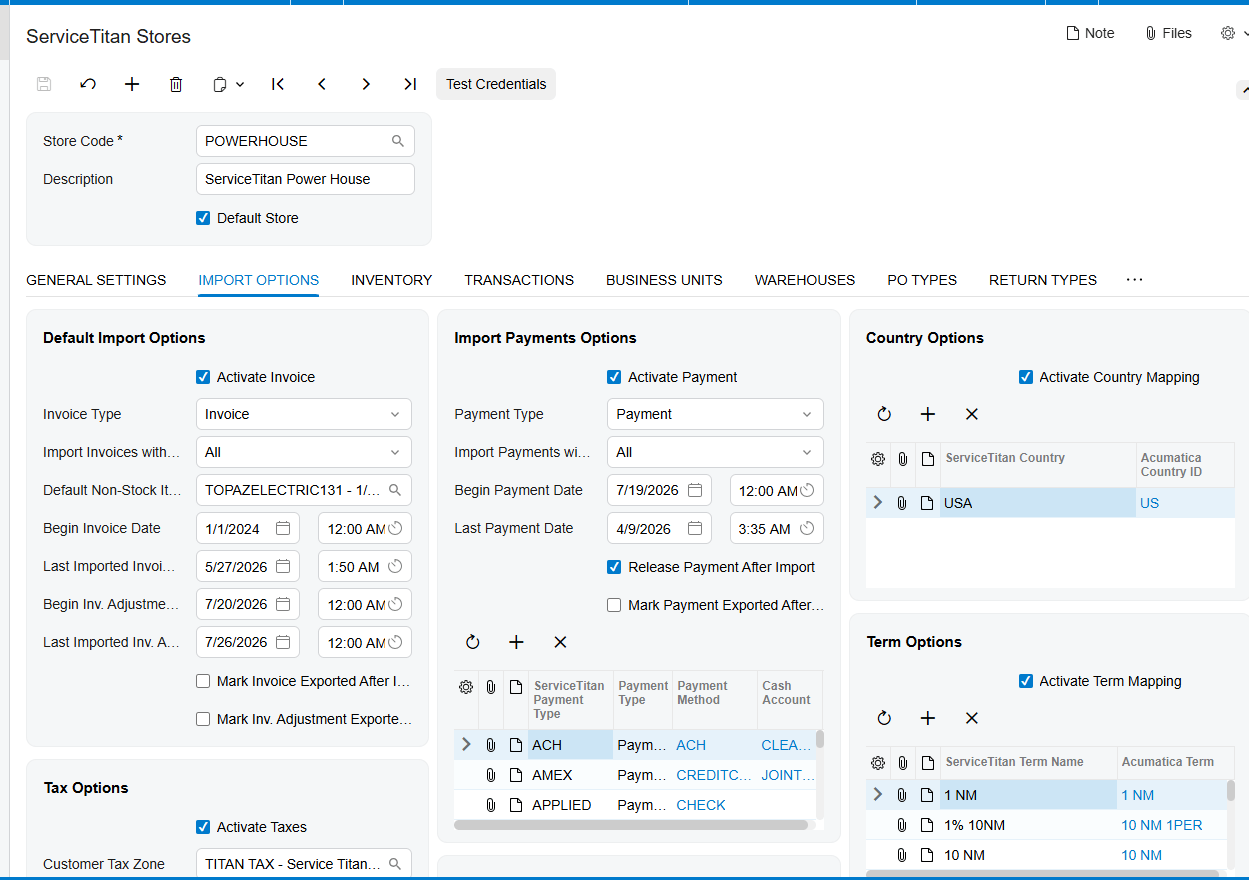
The next item on the ServiceTitan integration checklist is the Import Options tab, where your business decides what actually comes across. Selecting the Activate Invoice checkbox opens the invoice section and lets you import invoices along with their taxes, payment methods, customer data, and general ledger accounts. You will need to specify the Invoice Type, which determines what kind of document ServiceTitan invoices become in Acumatica, and choose whether to import invoices with one preferred status or with all statuses at once.
Date filtering deserves particular attention during preparation, because it governs how much history you pull in on day one. The Begin Invoice Date defines the point from which the first import should reach back, and the Last Invoice Date records when the most recent import ran, which subsequent import processes then use as their starting point. Choose your beginning date deliberately. Setting it too far back can pull years of closed transactions into a fresh system, while setting it too late can leave open invoices stranded in ServiceTitan.
Tax handling is a simple checkbox that enables importing invoices with their taxes included, but confirm with your accounting team that the resulting tax treatment matches how they expect revenue to post. For payments, selecting the Activate Payment checkbox allows invoices to arrive with their payment information attached. Two decisions follow. First, the Payment Type determines whether payments imported from ServiceTitan are created in Acumatica as payments or as prepayments. Second, Release Payment After Import controls whether those payments are released automatically or left for your team to review. Many businesses leave automatic release turned off during the first few weeks and enable it once they trust the results.
Step Three: Prepare Customer, Country, Term, and GL Account Data
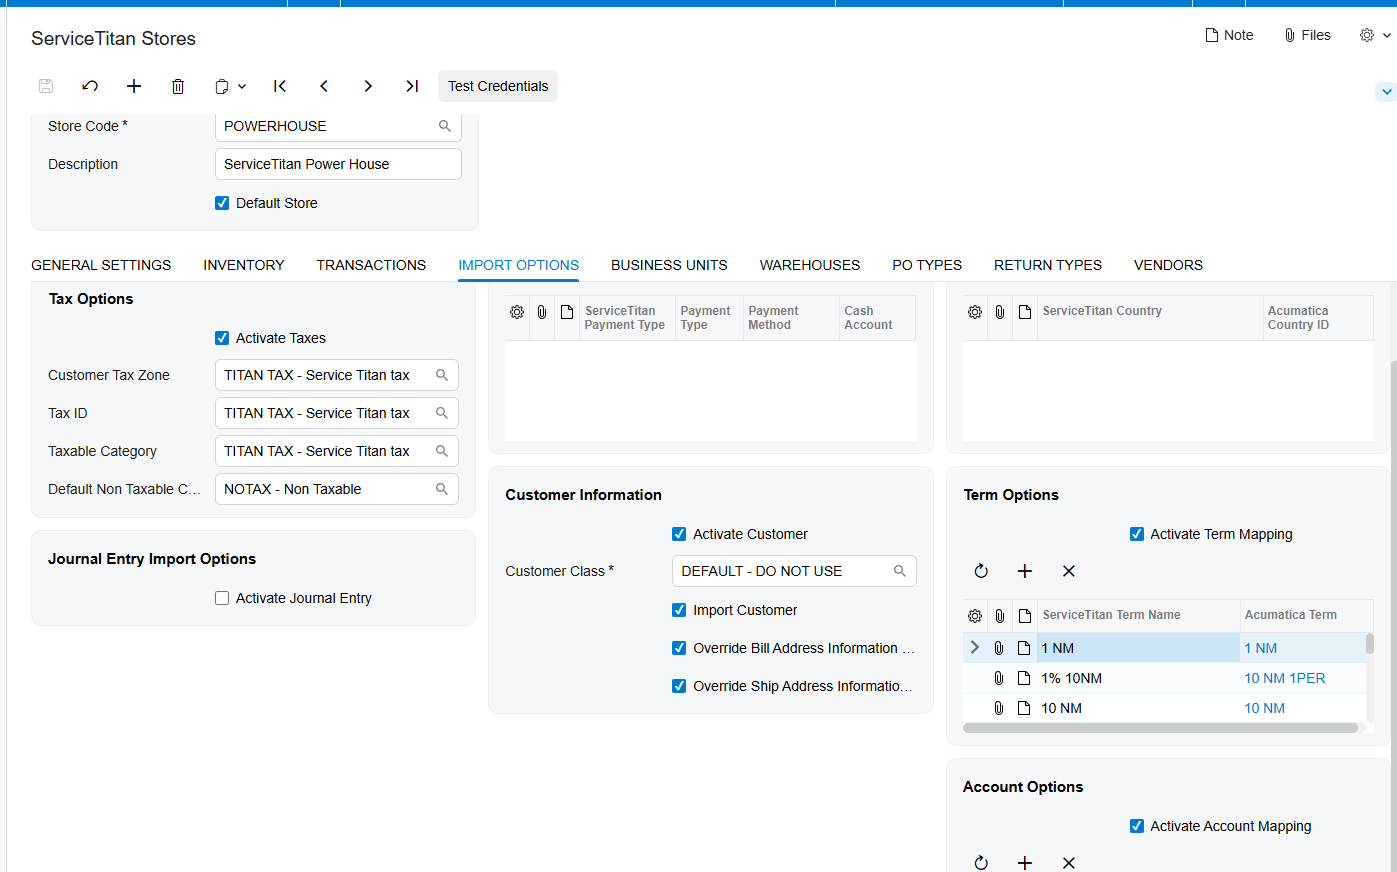
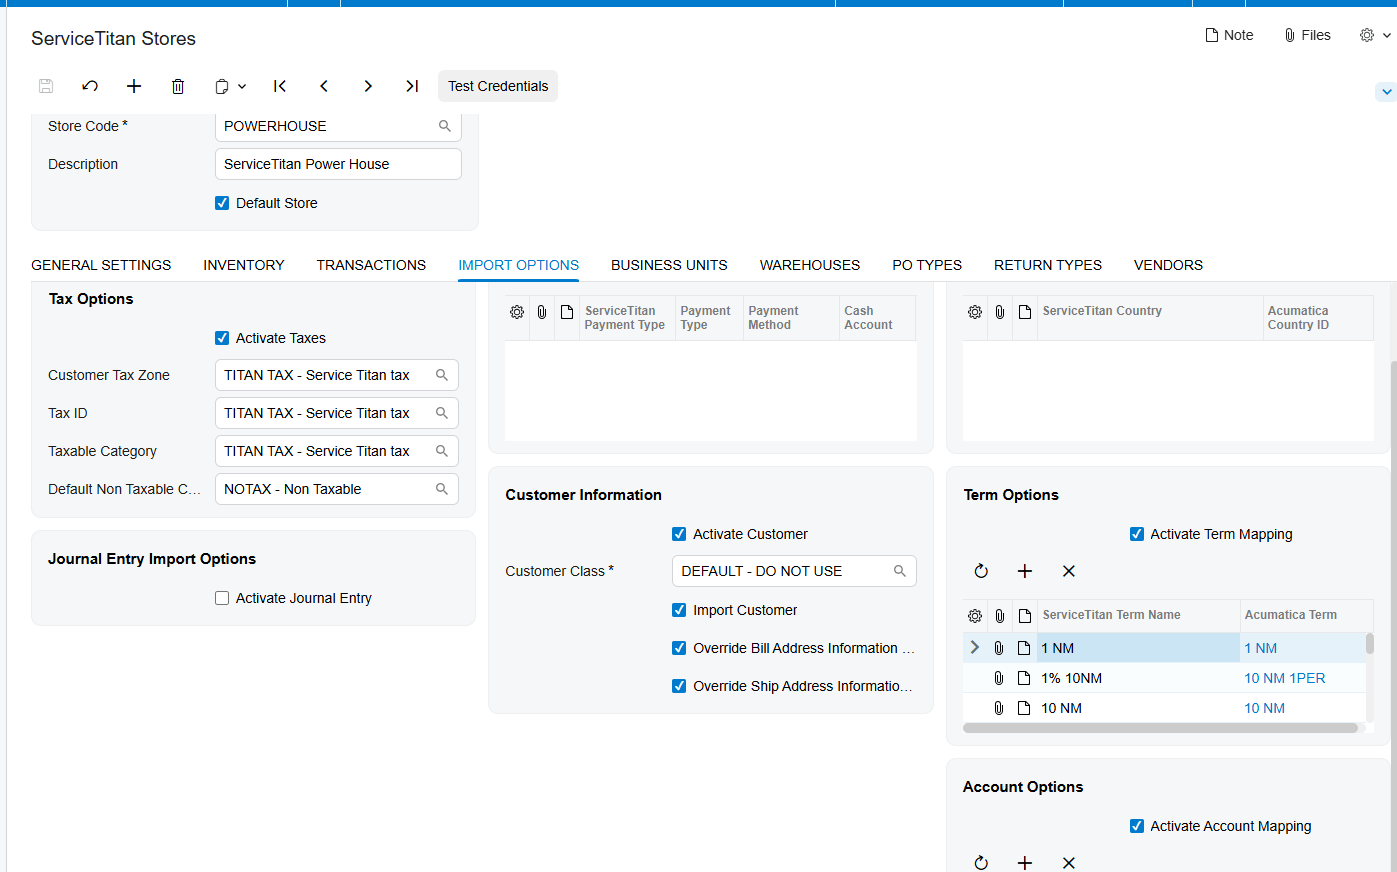
How your business handles customer records is the next preparation point, and it has real consequences for the cleanliness of your Acumatica database. If the Import Customer checkbox is left unselected, every invoice arrives assigned to a single default customer. If it is selected, the connector creates the customer in Acumatica whenever that customer is missing, using the default customer class you nominate. Decide which model fits your operation before go-live, and if you choose automatic creation, make sure the default customer class is configured with the correct general ledger accounts, terms, and statement settings, because every new customer will inherit them.
Address handling is controlled separately. The Override Bill Address Information from Invoice and Override Ship Address Information from Invoice checkboxes allow the customer’s billing and shipping addresses to be imported into Acumatica from the invoice itself. Enable these when the field-captured address should be treated as authoritative. Alongside addresses, review the Country Options, since country names are passed to Acumatica in International Organization for Standardization, or ISO, country code format. Note that when the Activate Payment checkbox is selected, the Country options become hidden, so plan your review of this section accordingly.
Two mapping tables round out this stage of the ServiceTitan Acumatica setup. Term Options aligns ServiceTitan term values with the corresponding Acumatica terms, and Account Options maps ServiceTitan general ledger accounts to your Acumatica chart of accounts. Complete both with your controller in the room. An unmapped term or GL account is the kind of gap that does not surface until the first import run, and by then it is already producing exceptions.
Step Four: Configure Inventory Items and Transaction Settings
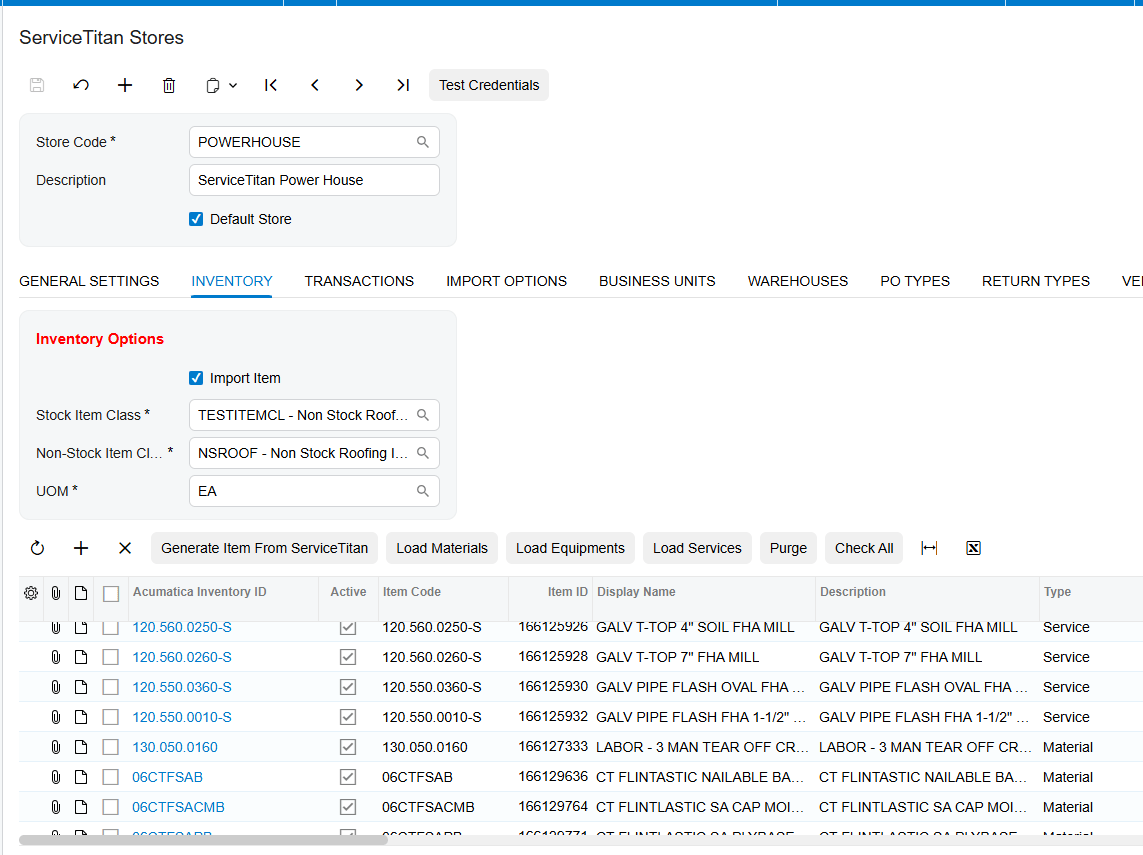
Inventory preparation is where most of the pre-launch data work lives. When the Import Item checkbox is selected, the Generate Item from ServiceTitan option becomes available, and the connector will create non-stock and stock items in Acumatica based on the Stock Item Class, Non-Stock Item Class, and Unit of Measure values you designate. Those three values are prerequisites, so confirm they exist and are correctly configured before enabling generation. Your business can also skip automatic creation entirely and map ServiceTitan items to existing Acumatica items by hand, which is often the better path for companies with a mature, curated item master.
Use the Load Materials, Load Equipment, Load Services action to retrieve the corresponding ServiceTitan items and display them on the Inventory tab, and understand the rule the system applies: Materials and Equipment become stock items, while Services become non-stock items. Reviewing that list before go-live is one of the highest-value validation steps on this checklist, because it is your last comfortable opportunity to spot duplicates, retired parts, or items that should never have been synchronized.
On the Transactions tab, configure each transaction type your business actually uses. Receipts, Transfers, Adjustments, and Returns each have their own setup options, along with a corresponding Release Receipt After Import, Release Transfer After Import, Release Adjustment After Import, and Release Return After Import checkbox. Selecting a release checkbox means those documents are imported into Acumatica and released in the same pass. The Activate Bill checkbox on this tab allows bills to be imported together with their receipts. As with payments, we generally recommend leaving automatic release unselected for the first cycle so your team can inspect the documents in a balanced state before they post.
Step Five: Map Business Units, Warehouses, PO Types, and Vendors
The Biz-Tech Services Service Titan Acumatica connector needs to know how your ServiceTitan structure corresponds to your Acumatica structure, and these mappings are mandatory. Begin with Business Units, where ServiceTitan Business Unit identifiers are mapped to Acumatica branches. Pressing Load Business Units retrieves the available ServiceTitan values so your team can pair them manually with the correct branch. Get this right and every imported document lands in the correct branch for reporting. Get it wrong and your branch profitability numbers will be wrong from day one.
Warehouses follow the same pattern. The Warehouses tab maps Acumatica warehouses to ServiceTitan Warehouse and Truck identifiers, and the Load Warehouses action retrieves those values for manual pairing. Because trucks are treated as inventory locations, this mapping is what makes technician van stock visible and accurate in your ERP, so give it real attention rather than treating it as a formality.
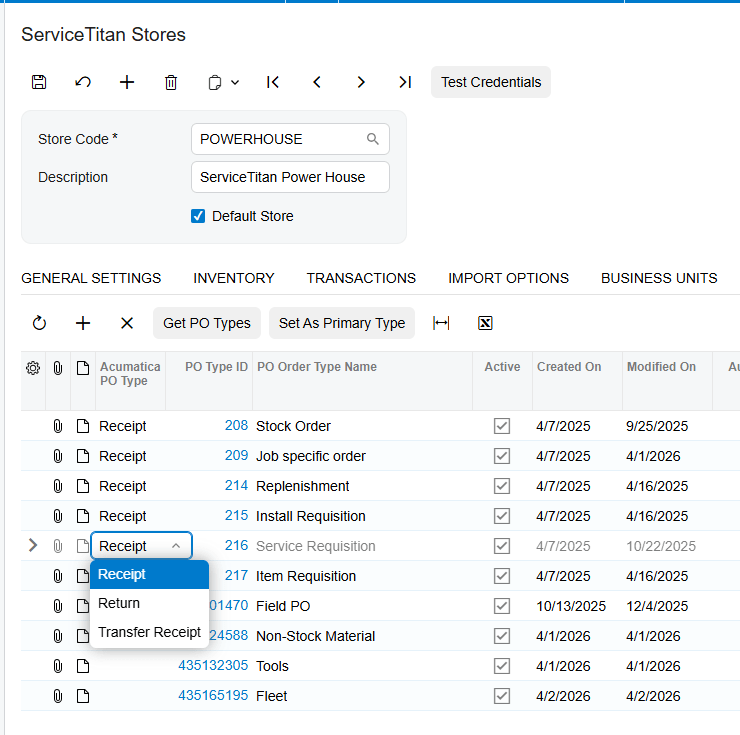
Finally, complete the purchasing mappings. The PO Types tab maps ServiceTitan purchase receipt order type names to Acumatica purchase order types, and Load PO Types retrieves the available values. Return Types maps ServiceTitan return types to the corresponding Acumatica purchase order types. On the Vendors tab, selecting the Import Vendor checkbox lets the connector create ServiceTitan vendors in Acumatica, while Load Vendors retrieves the full vendor list from ServiceTitan so your team can map existing vendors manually instead. For most established businesses, manual mapping of your top vendors combined with automatic creation for the long tail strikes the right balance.
Step Six: Import ServiceTitan Purchase Orders, Receipts, and Bills in Order
This section of the checklist is less about a setting and more about a rule your team must understand, because it is the single most common source of go-live confusion in a ServiceTitan Acumatica integration. The Purchase Order module workflow requires that ServiceTitan purchase receipts and bills cannot be imported into Acumatica unless the related ServiceTitan purchase order has already been imported. Sequence matters, and it is not negotiable.
Purchase orders are brought in through the Import ServiceTitan Purchase Orders screen and are created in Acumatica as purchase orders, retrieved based on their updated date. If a ServiceTitan purchase receipt or bill already exists at the moment the purchase order is imported, it comes across in the same process. If the receipt or bill does not yet exist in ServiceTitan, it is simply not imported, and it can be brought over later through its own screen once it has been created. Before importing purchase orders at all, confirm that the required preferences have been configured on the ServiceTitan Stores screen, since the import depends on them.
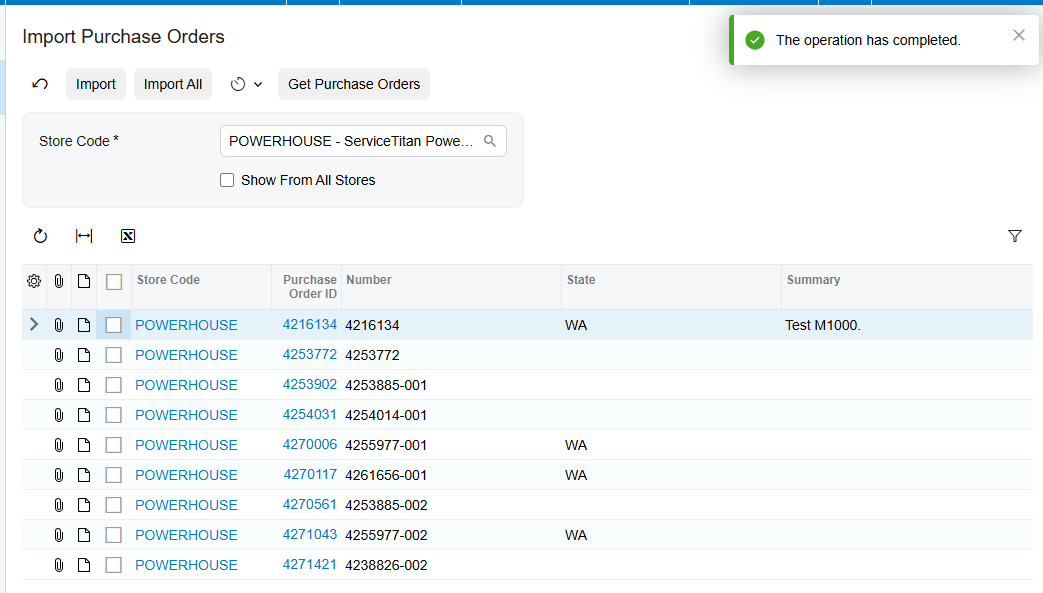
The Import Receipts screen retrieves purchase order receipts based on the date and status defined in your Receipt Options, and it can be run manually or automatically through the scheduler. If a receipt is imported before its purchase order exists in Acumatica, the system stops and returns a message such as POOrder document for Receipt 433272225 has not been created yet. That message is not a defect. It is the sequencing rule protecting your data. When the purchase order is already present, the connector locates it and attaches the receipt document to the PO History tab of the Purchase Orders screen. The receipt arrives with a Released status if the release checkbox is selected in the store setup, and with a balanced status if it is not. Where a receipt includes a bill, that bill is imported in the same pass and attached to the same PO History tab.
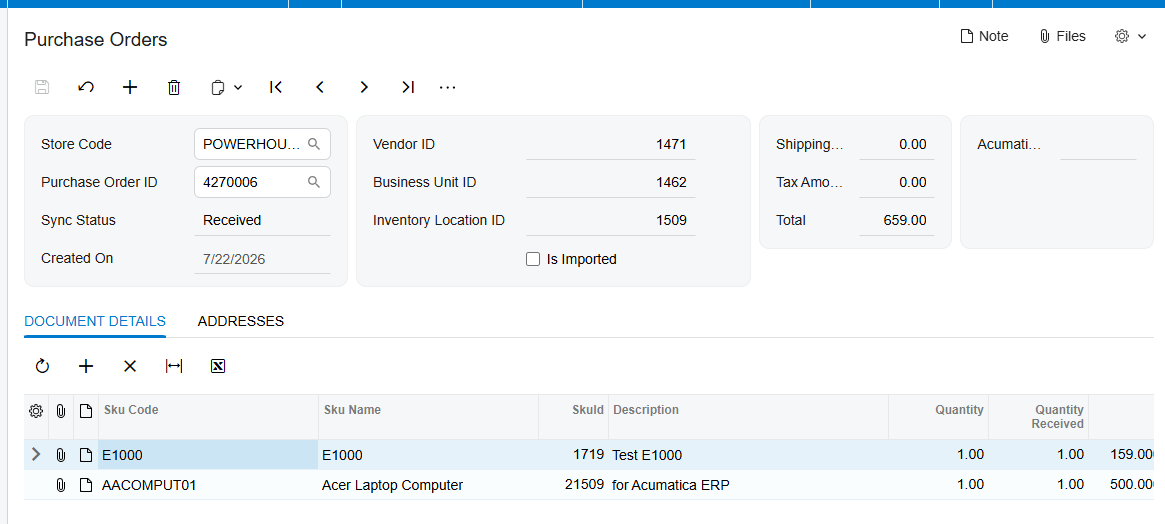
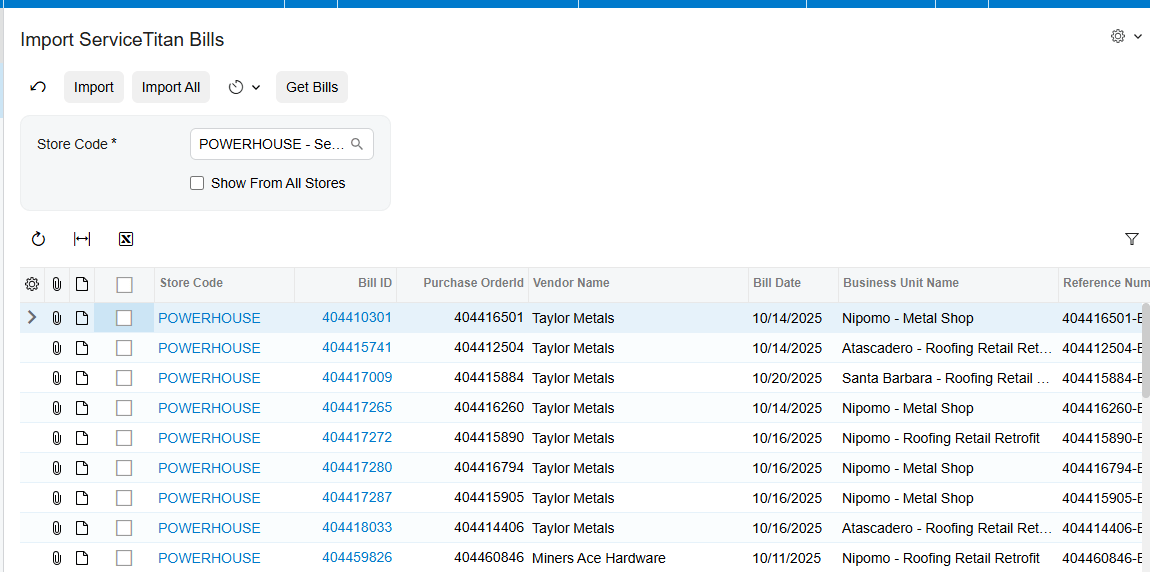
Bills follow identical logic on the Import ServiceTitan Bills screen, retrieved by their updated date. A bill cannot be imported on its own without its corresponding purchase order, and attempting to do so produces an error. If you import a purchase order while its related bill is sitting on the processing screen, the bill is imported alongside it and disappears from that screen. If the purchase order was imported earlier, importing the bill later automatically locates the parent document and attaches it. One additional field belongs on your configuration checklist here: the Branch For Bills field, which applies specifically when bills are imported and Bills and Adjustments documents are created in Acumatica.
Step Seven: Validate ServiceTitan Invoice and Payment Import
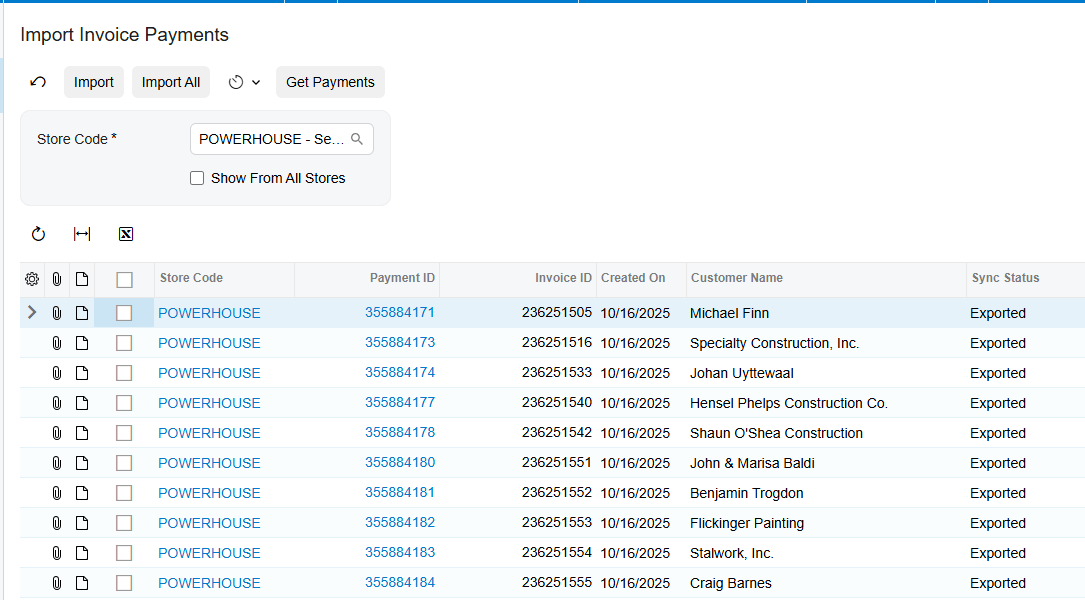
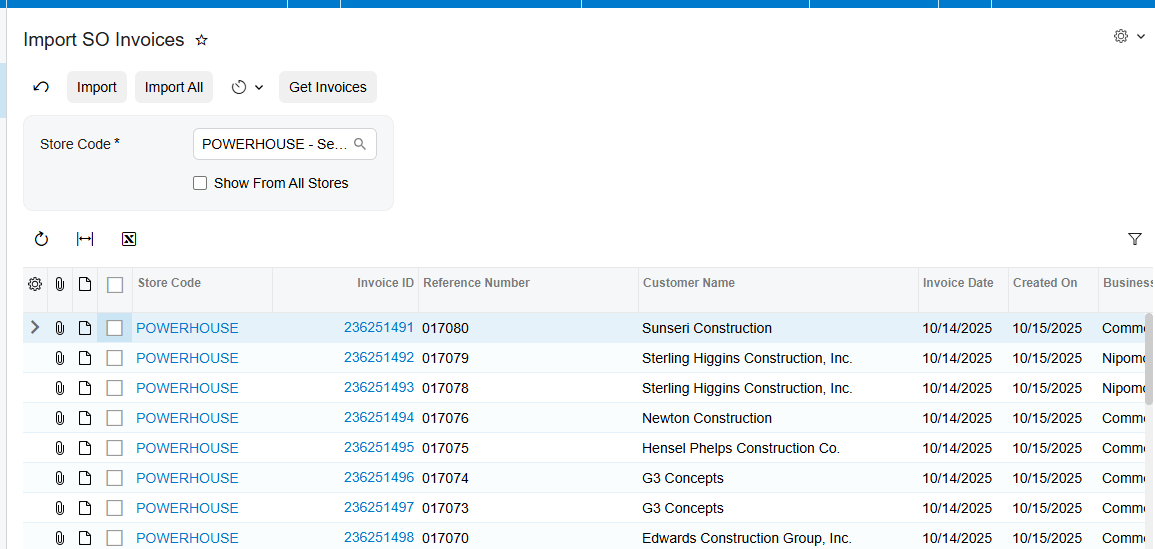
Before you declare go-live readiness, run a controlled test of the invoice and payment path, because there are three distinct scenarios and your team should recognize all of them. Invoices are retrieved on the Import SO Invoices screen based on their updated date and the statuses you selected. In the first scenario, an invoice that already carries a payment at the moment it is retrieved is imported together with that payment. The invoice is created on the Invoices and Memos screen, the payment is created and applied under the Applications tab of that invoice, and the corresponding payment identifier disappears from the Import Invoice Payments screen because it has already been processed.
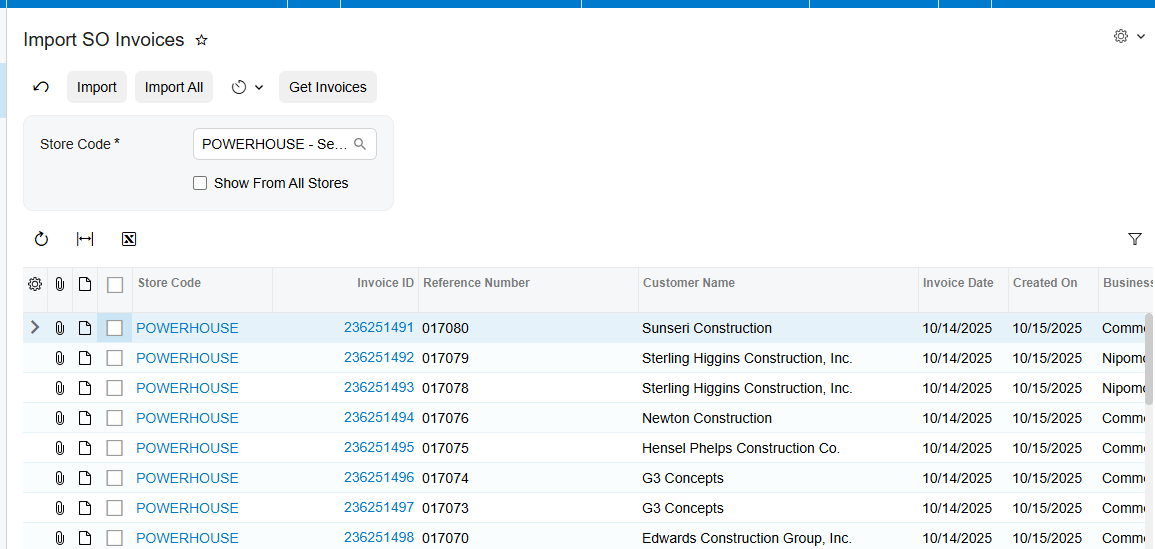
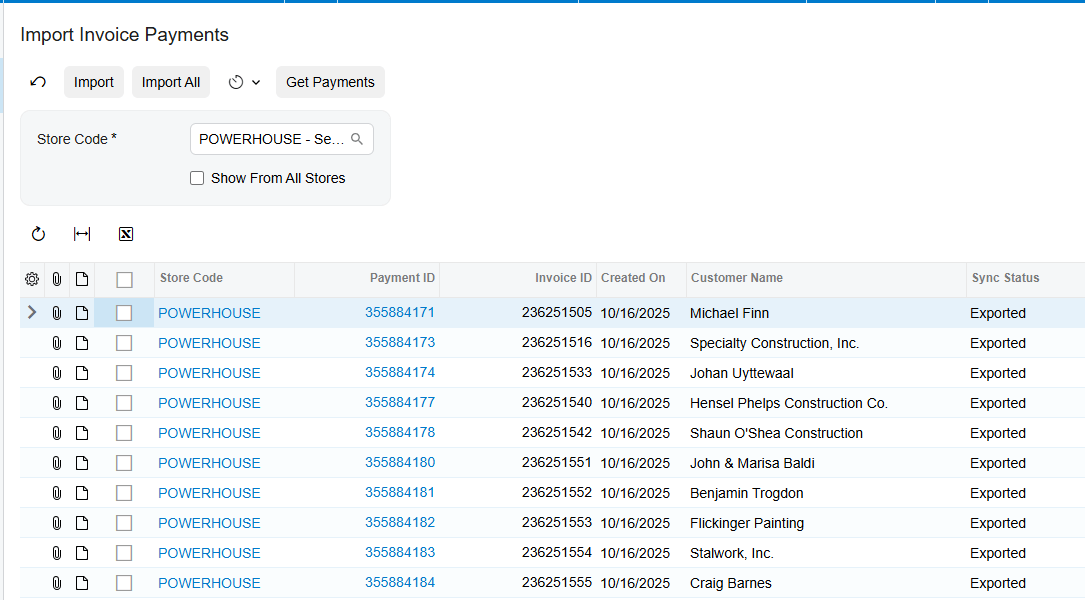
In the second scenario, the invoice has already been imported but the payment is still waiting on the processing screen. Here the connector locates the matching invoice during the payment import and applies the payment automatically. The third scenario is the reverse: the payment was taken first and the invoice is imported afterward, in which case the system matches the two on its own. The Import Invoice Payments screen retrieves all payments from ServiceTitan and shows the associated Invoice ID, and payments can be imported separately, either as a deposit or after the invoice already exists. In every case the outcome is the same, which is that the payment ends up matched to the correct invoice in Acumatica. Test all three paths with real data in a sandbox tenant before go-live and your finance team will know exactly what they are looking at on launch day.
Step Eight: Journal Entries, Scheduling, and User Access
If your business intends to bring journal entries across rather than invoices, activate the Journal Entry checkbox on the Import Options tab while the Activate Invoice checkbox is disabled. Pay close attention to one detail that catches teams out: the Begin Journal Entry Date is not set automatically the first time, so a user must enter it manually. The Last Journal Entry Date then records the most recent import, and you should also define which statuses qualify for import. Put this on the checklist explicitly, because an unset beginning date is a silent failure rather than a visible error.
Turning to operations, decide how synchronization will run. Every processing screen can be executed manually or automatically through the Acumatica scheduler, and documents are retrieved based on their updated date. We recommend running manually for the first several cycles so your team sees each batch before it posts, then moving to a scheduled cadence once the results are consistently clean. Confirm at the same time that user access is correct. The staff responsible for each processing screen need the appropriate Acumatica roles, and the ServiceTitan credentials used by the connector should belong to a dedicated integration account rather than an individual employee whose access might be revoked.
ServiceTitan Acumatica Integration Checklist: Quick Reference
Before you launch, walk through this final go-live readiness checklist with your project team:
- The ServiceTitan Store is created, the Default Store flag is set, and Test Credentials returns a successful result.
- Invoice type, import statuses, and the Begin Invoice Date are configured to match your intended cutover point.
- Customer creation, default customer class, and address override behavior reflect an agreed policy.
- Term and general ledger account mappings are complete and reviewed by your controller.
- Item classes and unit of measure values exist, and the loaded ServiceTitan item list has been inspected.
- Business units, warehouses and trucks, purchase order types, return types, and vendors are all mapped.
- The Branch For Bills field is set if your business imports bills.
- Your team understands that purchase orders must be imported before receipts and bills.
- All three invoice and payment scenarios have been tested in a sandbox environment.
- Release-after-import options are set deliberately, and the scheduler plan is agreed.
- Acumatica roles are assigned, and the connector uses a dedicated ServiceTitan integration account.
ServiceTitan Acumatica Integration FAQ
What is the first step in setting up a ServiceTitan Acumatica integration?
Configuring the ServiceTitan Store is always the first step. The Store controls invoice import rules, customer creation, inventory handling, warehouse and branch mapping, vendor and business unit mapping, and the purchase order workflow. Until the Store is set up and Test Credentials returns a successful result, no data can be imported into Acumatica.
Can ServiceTitan receipts and bills be imported without the purchase order?
No. ServiceTitan purchase receipts and bills cannot be imported into Acumatica unless the related purchase order has already been imported. Attempting to import a receipt first produces an error message identifying the missing purchase order document. Import purchase orders first, and any receipt or bill that already exists in ServiceTitan will come across in the same process.
Does the connector create customers and vendors in Acumatica automatically?
It can. Selecting the Import Customer checkbox creates a customer in Acumatica whenever one is missing, using your default customer class. Selecting the Import Vendor checkbox does the same for vendors. If you prefer tighter control, leave these unselected and use a default customer, or map ServiceTitan vendors to existing Acumatica vendors manually with the Load Vendors action.
How are ServiceTitan items created in Acumatica?
When Import Item is selected, the Generate Item from ServiceTitan option creates items using your Stock Item Class, Non-Stock Item Class, and Unit of Measure values. Materials and Equipment become stock items, while Services become non-stock items. You can also map ServiceTitan items to existing Acumatica items manually instead of generating them.
How are ServiceTitan payments matched to Acumatica invoices?
Three scenarios are handled automatically. If the invoice carries a payment when it is retrieved, both import together and the payment is applied under the Applications tab. If the invoice was imported earlier, the payment import locates it and applies the payment. If the payment was taken first, the system matches it when the invoice arrives. In all three cases the payment ends up applied to the correct invoice.
Can the ServiceTitan Acumatica integration run automatically?
Yes. Every processing screen can run manually or on a schedule through the Acumatica scheduler, with documents retrieved by their updated date. We recommend running manually for the first several cycles so your team can review each batch, then switching to a scheduled cadence once results are consistently clean.
Get Started With the ServiceTitan Acumatica Connector
The Biz-Tech Services ServiceTitan Acumatica Connector is built for field service businesses that need their operational reality and their financial records to agree without anyone retyping a thing. Purchase orders, receipts, bills, invoices, payments, inventory transactions, and journal entries all flow into Acumatica along a defined path, and the quality of that flow is determined by the configuration work you complete before you begin. Working through this ServiceTitan Acumatica integration checklist methodically is what separates a launch that quietly succeeds from one that consumes weeks of cleanup.
If your business is preparing to connect ServiceTitan to Acumatica, we are glad to help at every stage, from initial scoping through configuration, validation, and go-live support. Visit https://biz-techservices.com to learn more about our integration expertise or to schedule a personalized demonstration of the Biz-Tech Services ServiceTitan Acumatica Connector.
SEO Metadata (for the publisher, remove before posting)
Focus keyword: ServiceTitan Acumatica integration
Secondary keywords: ServiceTitan Acumatica connector; ServiceTitan integration checklist; ServiceTitan Acumatica setup; import ServiceTitan invoices into Acumatica; ServiceTitan purchase order import; field service ERP integration; ServiceTitan Stores configuration
SEO title (58 characters): ServiceTitan Acumatica Integration Configuration Checklist
Meta description (154 characters): Complete pre-launch configuration checklist for the ServiceTitan Acumatica integration: store setup, mappings, imports, validation, and go-live readiness.
URL slug: servicetitan-acumatica-integration-configuration-checklist
Suggested internal links: ServiceTitan Connector product page; Acumatica integrations overview; Salesforce Acumatica Integration Configuration Checklist
Schema markup: Article plus FAQPage. The FAQ section is written for FAQ rich results.
Image alt text: Set on all seven images inside this document; carries over on paste into a CMS.
ServiceTitan Acumatica Integration Configuration Checklist
A successful ServiceTitan Acumatica integration is decided long before the first invoice ever crosses between the two systems. It is decided during configuration. Field service companies live in two platforms at once: dispatchers, technicians, and sales staff work inside ServiceTitan every hour of the day capturing jobs, invoices, purchase orders, and payments in the field, while the controller and accounting team depend on Acumatica to manage inventory, branches, vendors, and the general ledger. When those two systems are not connected, the result is predictable. The same invoice gets keyed twice, purchase receipts pile up waiting to be reconciled, and nobody can say with confidence what a job actually cost.
The Biz-Tech Services ServiceTitan Connector closes that gap so the work recorded in the field lands in your Enterprise Resource Planning, or ERP, system exactly once and exactly right. A connector, however, is only as reliable as the configuration behind it, and the most common cause of a rough go-live is not the software but a mapping that was never completed or a date filter that was never set. This ServiceTitan Acumatica integrator configuration checklist walks through every required setting, the data you need to prepare in advance, the points where you should stop and validate, the user access to confirm, and the tests to run before you switch on automatic synchronization.
Step One: Configure the ServiceTitan Store in Acumatica
Every ServiceTitan Acumatica integration begins with the ServiceTitan Store. This is the single most important step in the entire setup process and it belongs on the first line of your checklist. The Store is the foundation on which every other setting depends, because it controls your invoice import rules, your customer creation rules, your inventory and item handling, your warehouse and branch mapping, your vendor and business unit mapping, your transaction processing logic, and the way purchase orders, receipts, and bills flow into Acumatica. If the ServiceTitan Store is not configured correctly, the system will not work and no data can be imported at all.
Start by assigning a Store Code, the lookup value that identifies the corresponding ServiceTitan store, and give it a clear Description so your team can recognize it later. If you select the Default Store checkbox, will tell the system to set and display that store code automatically on every processing screen, removing a small but repetitive step from your users’ daily routine. Companies operating several stores should decide up front which one carries the default flag.
With the Store record in place, move to the General Settings tab and enter the credentials generated on the ServiceTitan side to authorize the connection. Once those values are saved, use the Test Credentials action before going any further. This validation step confirms that Acumatica can reach your ServiceTitan store through the Application Programming Interface, or API, and it is the earliest safe point to catch a mistyped key or an authorization that was never granted. Do not begin any mapping work until this test succeeds.
Step Two: Set Invoice, Tax, and Payment Import Options
The next item on the ServiceTitan integration checklist is the Import Options tab, where your business decides what actually comes across. Selecting the Activate Invoice checkbox opens the invoice section and lets you import invoices along with their taxes, payment methods, customer data, and general ledger accounts. You will need to specify the Invoice Type, which determines what kind of document ServiceTitan invoices become in Acumatica, and choose whether to import invoices with one preferred status or with all statuses at once.
Date filtering deserves particular attention during preparation, because it governs how much history you pull in on day one. The Begin Invoice Date defines the point from which the first import should reach back, and the Last Invoice Date records when the most recent import ran, which subsequent import processes then use as their starting point. Choose your beginning date deliberately. Setting it too far back can pull years of closed transactions into a fresh system, while setting it too late can leave open invoices stranded in ServiceTitan.
Tax handling is a simple checkbox that enables importing invoices with their taxes included, but confirm with your accounting team that the resulting tax treatment matches how they expect revenue to post. For payments, selecting the Activate Payment checkbox allows invoices to arrive with their payment information attached. Two decisions follow. First, the Payment Type determines whether payments imported from ServiceTitan are created in Acumatica as payments or as prepayments. Second, Release Payment After Import controls whether those payments are released automatically or left for your team to review. Many businesses leave automatic release turned off during the first few weeks and enable it once they trust the results.
Step Three: Prepare Customer, Country, Term, and GL Account Data
How your business handles customer records is the next preparation point, and it has real consequences for the cleanliness of your Acumatica database. If the Import Customer checkbox is left unselected, every invoice arrives assigned to a single default customer. If it is selected, the connector creates the customer in Acumatica whenever that customer is missing, using the default customer class you nominate. Decide which model fits your operation before go-live, and if you choose automatic creation, make sure the default customer class is configured with the correct general ledger accounts, terms, and statement settings, because every new customer will inherit them.
Address handling is controlled separately. The Override Bill Address Information from Invoice and Override Ship Address Information from Invoice checkboxes allow the customer’s billing and shipping addresses to be imported into Acumatica from the invoice itself. Enable these when the field-captured address should be treated as authoritative. Alongside addresses, review the Country Options, since country names are passed to Acumatica in International Organization for Standardization, or ISO, country code format. Note that when the Activate Payment checkbox is selected, the Country options become hidden, so plan your review of this section accordingly.
Two mapping tables round out this stage of the ServiceTitan Acumatica setup. Term Options aligns ServiceTitan term values with the corresponding Acumatica terms, and Account Options maps ServiceTitan general ledger accounts to your Acumatica chart of accounts. Complete both with your controller in the room. An unmapped term or GL account is the kind of gap that does not surface until the first import run, and by then it is already producing exceptions.
Step Four: Configure Inventory Items and Transaction Settings
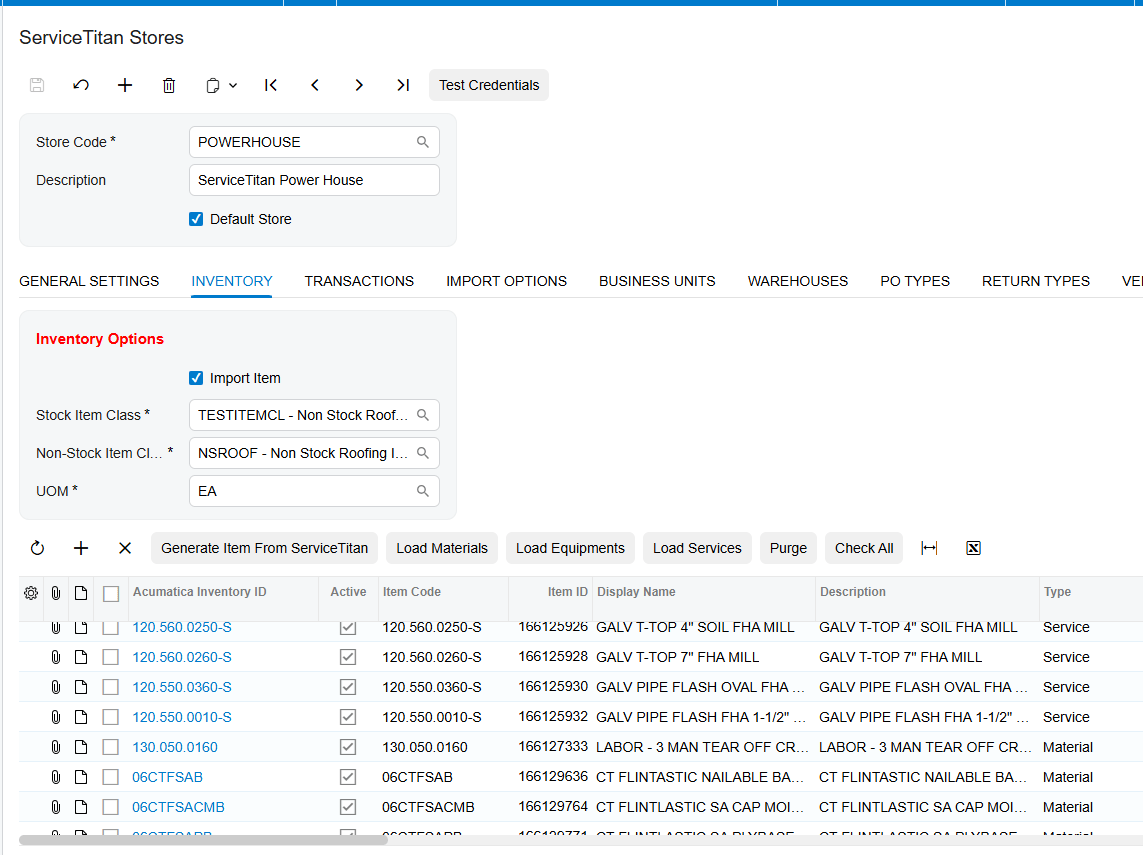
Inventory preparation is where most of the pre-launch data work lives. When the Import Item checkbox is selected, the Generate Item from ServiceTitan option becomes available, and the connector will create non-stock and stock items in Acumatica based on the Stock Item Class, Non-Stock Item Class, and Unit of Measure values you designate. Those three values are prerequisites, so confirm they exist and are correctly configured before enabling generation. Your business can also skip automatic creation entirely and map ServiceTitan items to existing Acumatica items by hand, which is often the better path for companies with a mature, curated item master.
Use the Load Materials, Load Equipment, Load Services action to retrieve the corresponding ServiceTitan items and display them on the Inventory tab, and understand the rule the system applies: Materials and Equipment become stock items, while Services become non-stock items. Reviewing that list before go-live is one of the highest-value validation steps on this checklist, because it is your last comfortable opportunity to spot duplicates, retired parts, or items that should never have been synchronized.
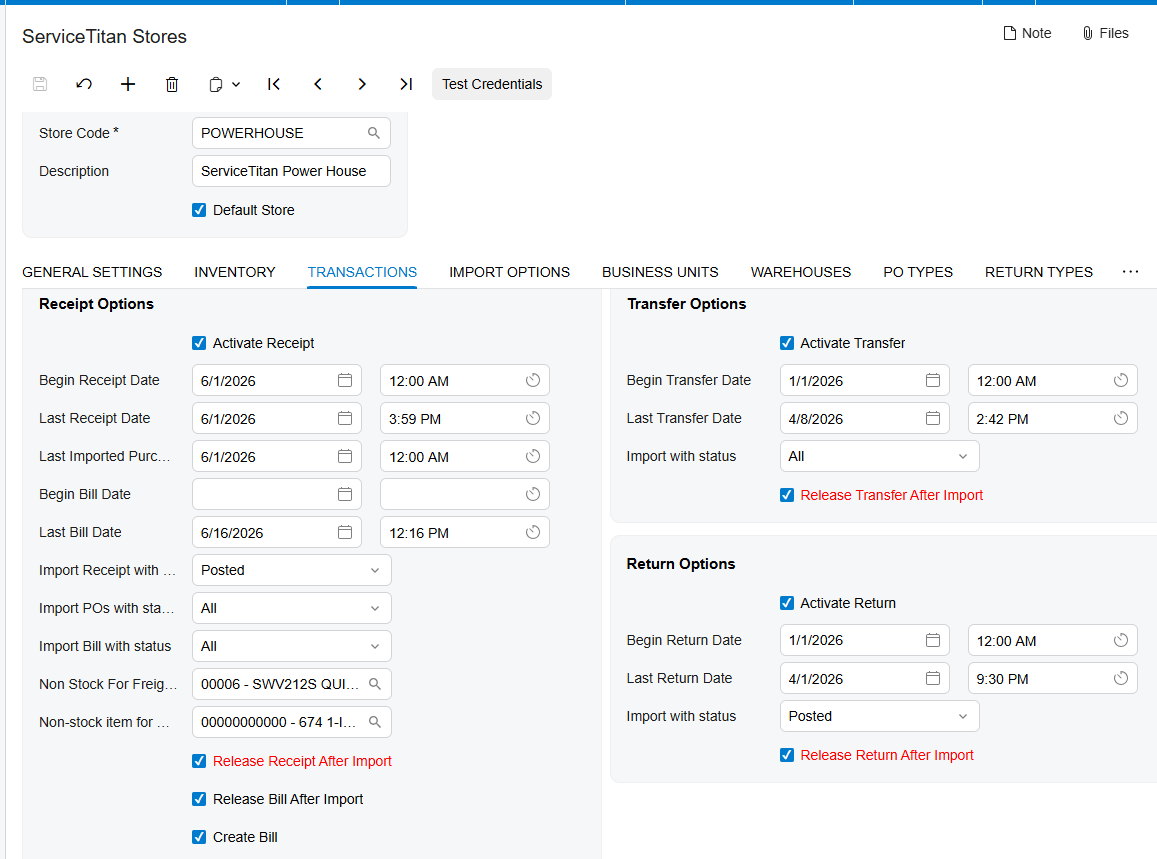
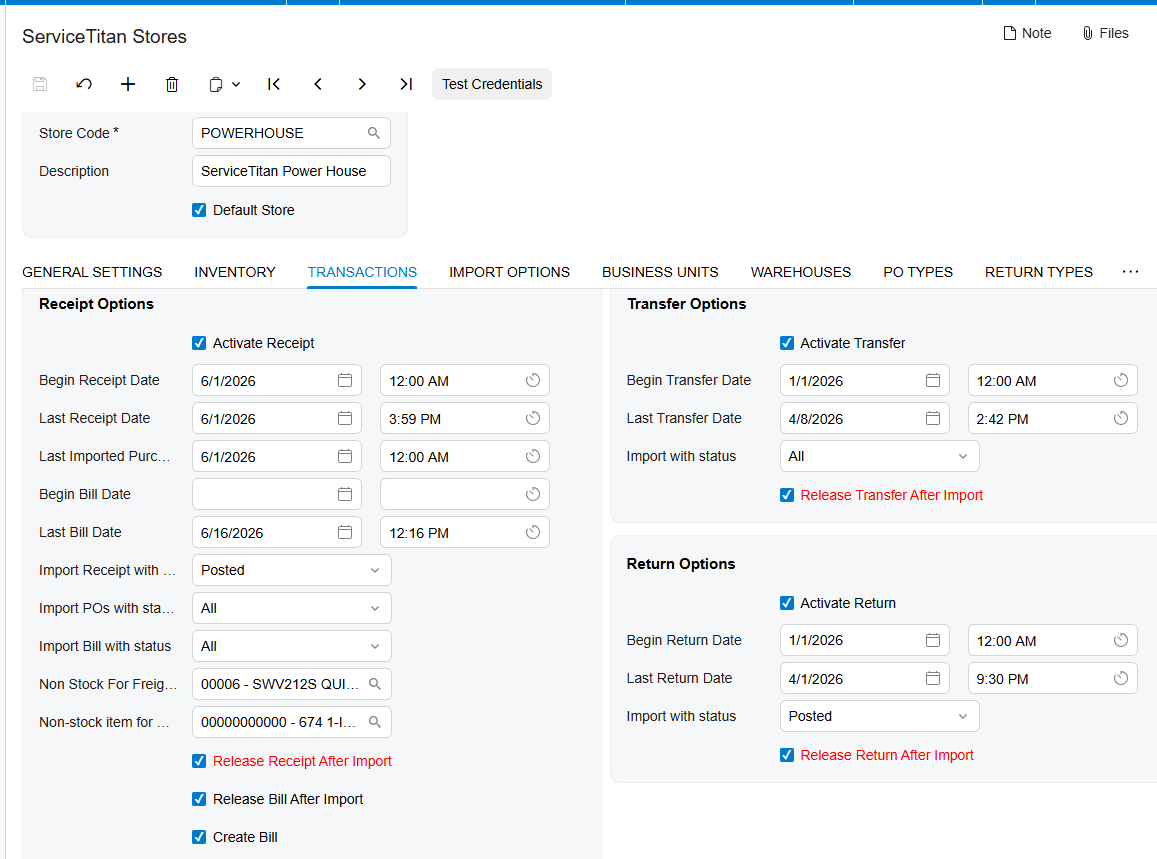
On the Transactions tab, configure each transaction type your business actually uses. Receipts, Transfers, Adjustments, and Returns each have their own setup options, along with a corresponding Release Receipt After Import, Release Transfer After Import, Release Adjustment After Import, and Release Return After Import checkbox. Selecting a release checkbox means those documents are imported into Acumatica and released in the same pass. The Activate Bill checkbox on this tab allows bills to be imported together with their receipts. As with payments, we generally recommend leaving automatic release unselected for the first cycle so your team can inspect the documents in a balanced state before they post.
Step Five: Map Business Units, Warehouses, PO Types, and Vendors
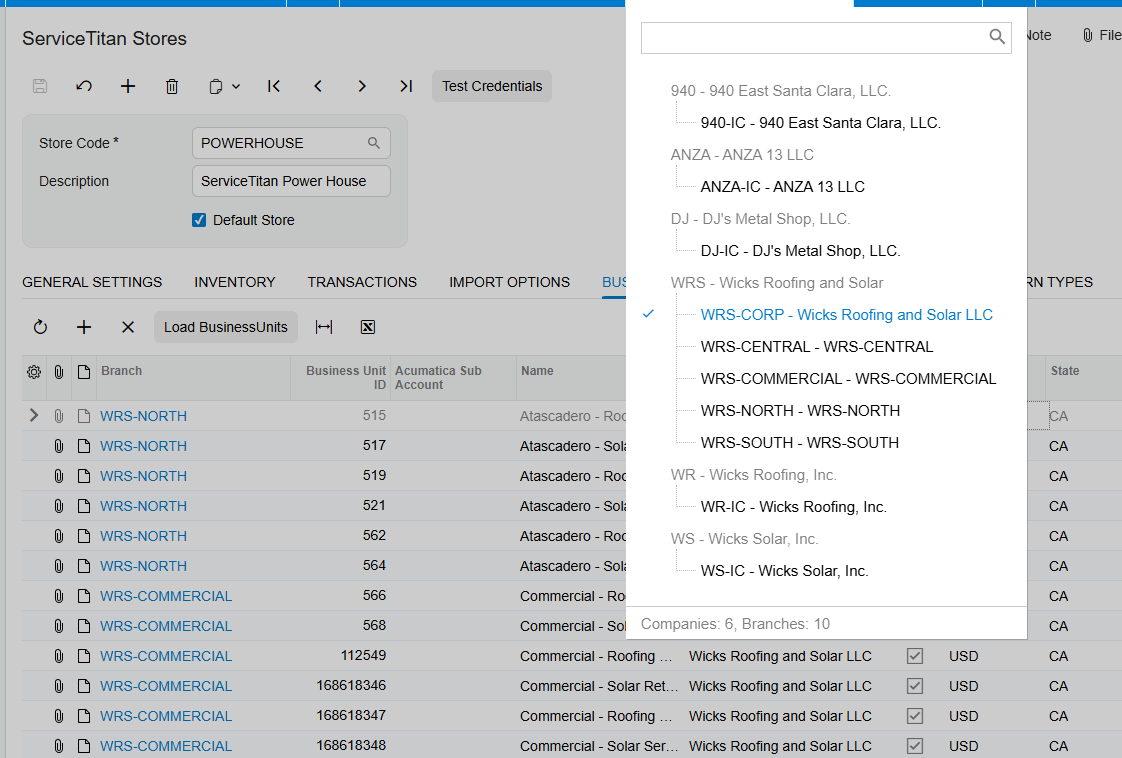
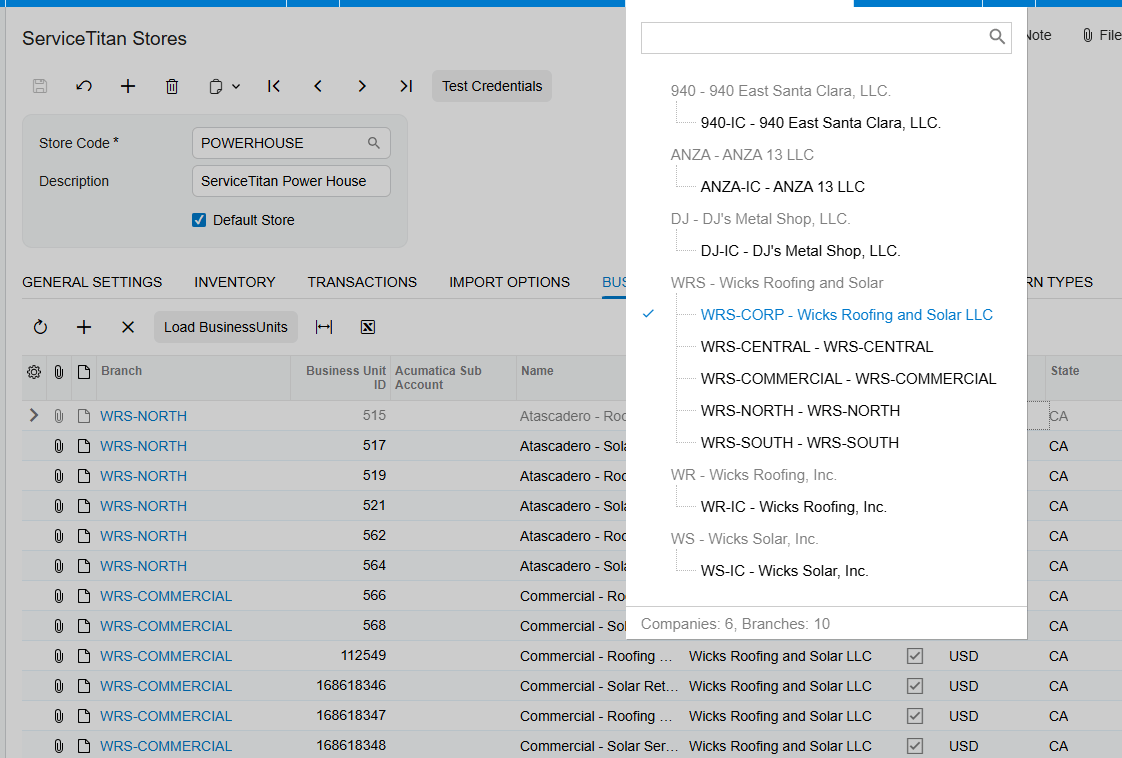
The Biz-Tech Services Service Titan Acumatica connector needs to know how your ServiceTitan structure corresponds to your Acumatica structure, and these mappings are mandatory. Begin with Business Units, where ServiceTitan Business Unit identifiers are mapped to Acumatica branches. Pressing Load Business Units retrieves the available ServiceTitan values so your team can pair them manually with the correct branch. Get this right and every imported document lands in the correct branch for reporting. Get it wrong and your branch profitability numbers will be wrong from day one.
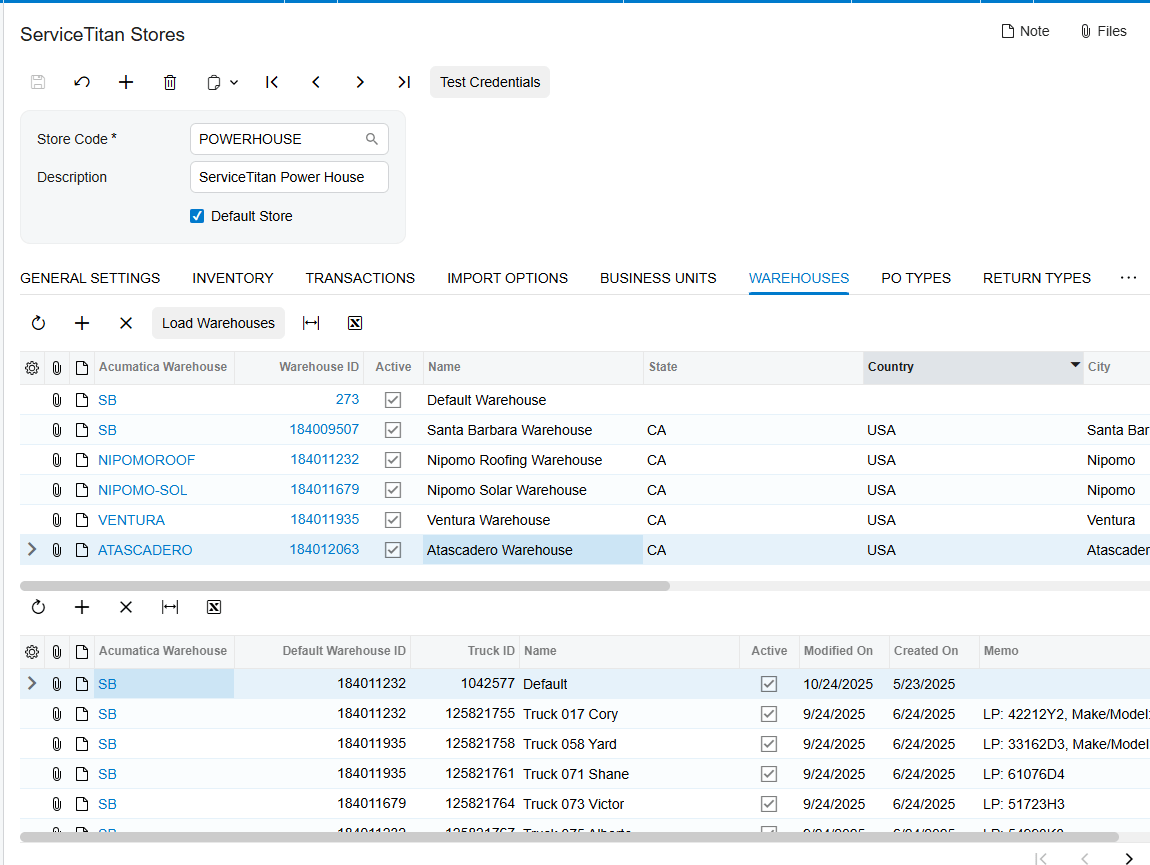
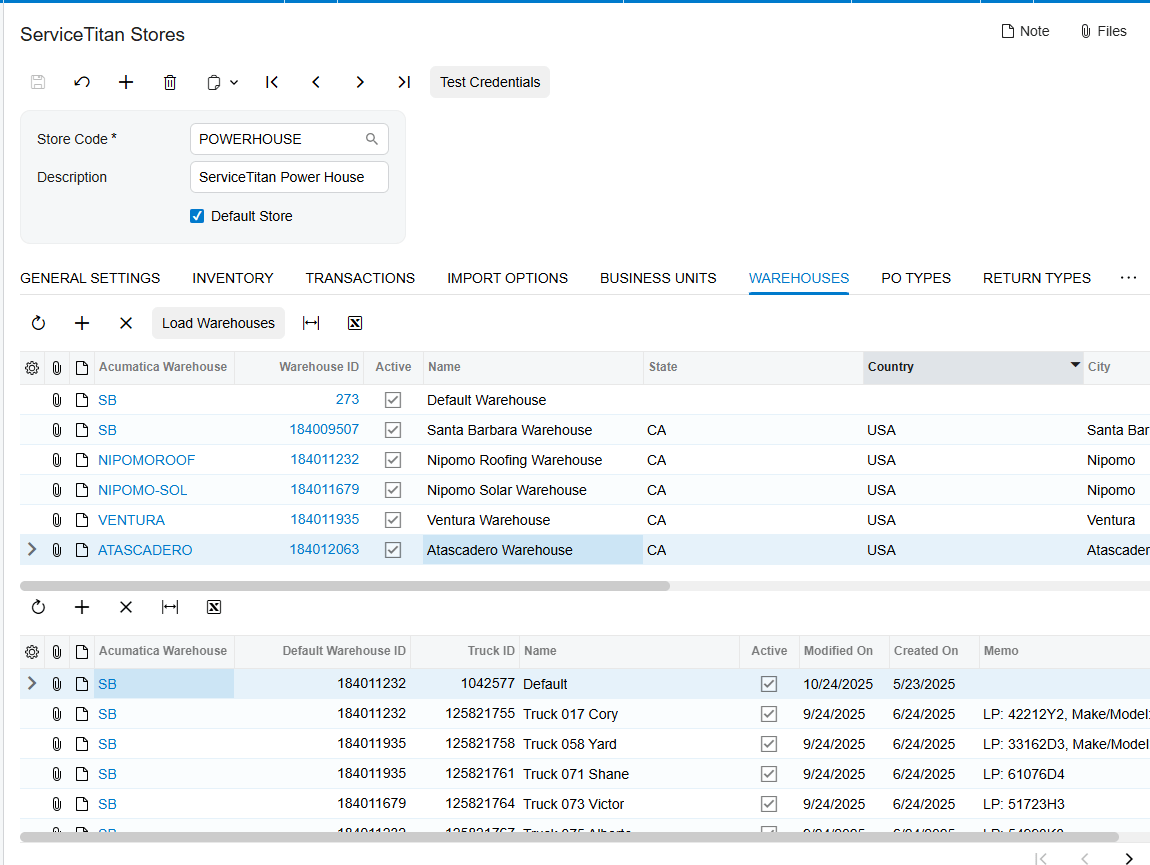
Warehouses follow the same pattern. The Warehouses tab maps Acumatica warehouses to ServiceTitan Warehouse and Truck identifiers, and the Load Warehouses action retrieves those values for manual pairing. Because trucks are treated as inventory locations, this mapping is what makes technician van stock visible and accurate in your ERP, so give it real attention rather than treating it as a formality.
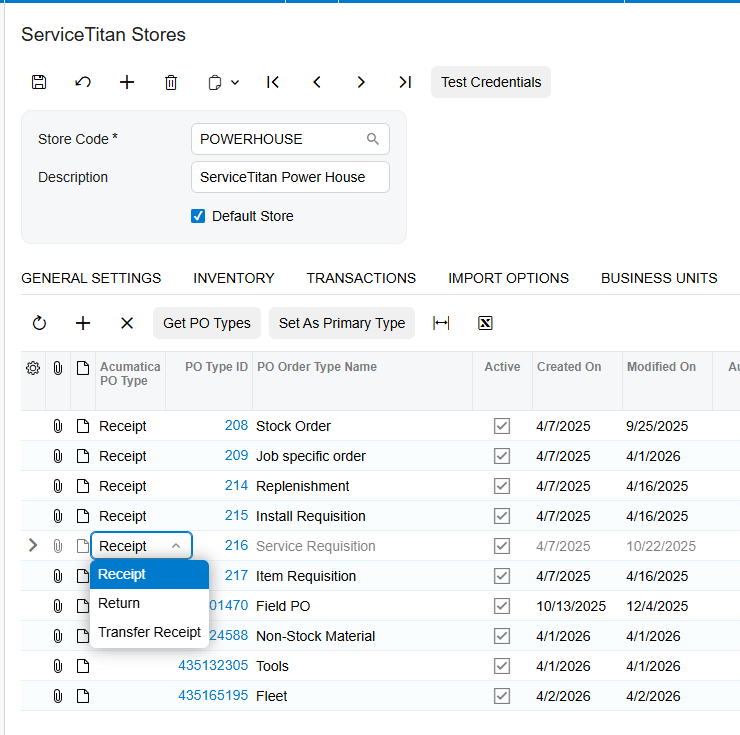
Finally, complete the purchasing mappings. The PO Types tab maps ServiceTitan purchase receipt order type names to Acumatica purchase order types, and Load PO Types retrieves the available values. Return Types maps ServiceTitan return types to the corresponding Acumatica purchase order types. On the Vendors tab, selecting the Import Vendor checkbox lets the connector create ServiceTitan vendors in Acumatica, while Load Vendors retrieves the full vendor list from ServiceTitan so your team can map existing vendors manually instead. For most established businesses, manual mapping of your top vendors combined with automatic creation for the long tail strikes the right balance.
Step Six: Import ServiceTitan Purchase Orders, Receipts, and Bills in Order
This section of the checklist is less about a setting and more about a rule your team must understand, because it is the single most common source of go-live confusion in a ServiceTitan Acumatica integration. The Purchase Order module workflow requires that ServiceTitan purchase receipts and bills cannot be imported into Acumatica unless the related ServiceTitan purchase order has already been imported. Sequence matters, and it is not negotiable.
Purchase orders are brought in through the Import ServiceTitan Purchase Orders screen and are created in Acumatica as purchase orders, retrieved based on their updated date. If a ServiceTitan purchase receipt or bill already exists at the moment the purchase order is imported, it comes across in the same process. If the receipt or bill does not yet exist in ServiceTitan, it is simply not imported, and it can be brought over later through its own screen once it has been created. Before importing purchase orders at all, confirm that the required preferences have been configured on the ServiceTitan Stores screen, since the import depends on them.
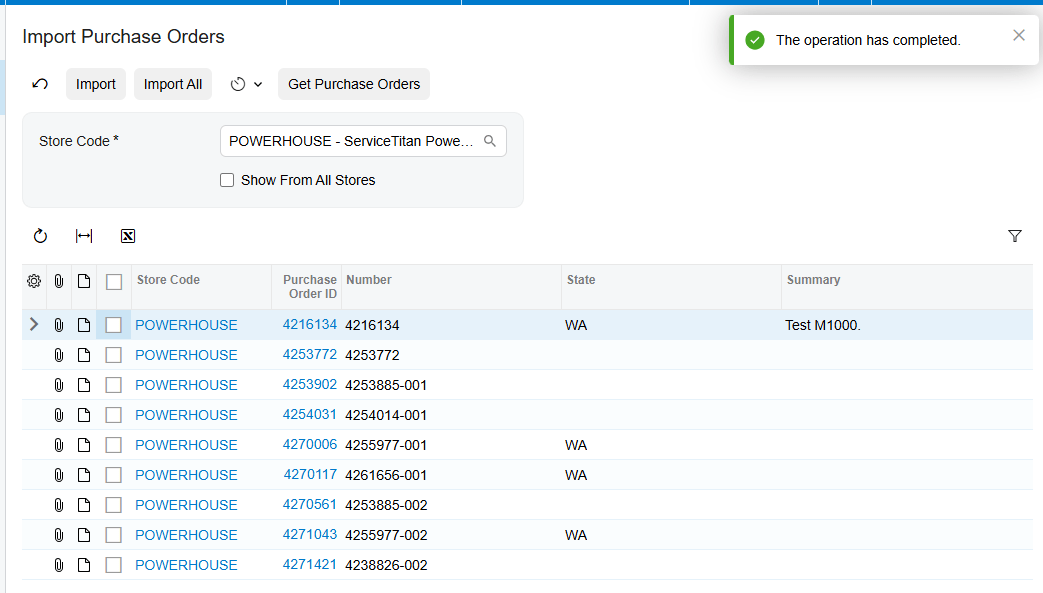
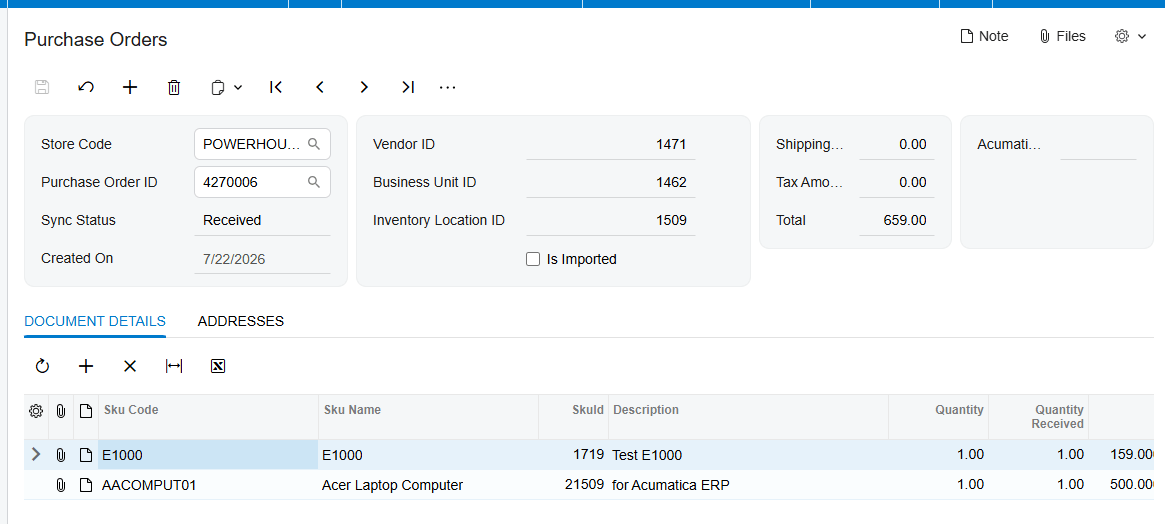
The Import Receipts screen retrieves purchase order receipts based on the date and status defined in your Receipt Options, and it can be run manually or automatically through the scheduler. If a receipt is imported before its purchase order exists in Acumatica, the system stops and returns a message such as POOrder document for Receipt 433272225 has not been created yet. That message is not a defect. It is the sequencing rule protecting your data. When the purchase order is already present, the connector locates it and attaches the receipt document to the PO History tab of the Purchase Orders screen. The receipt arrives with a Released status if the release checkbox is selected in the store setup, and with a balanced status if it is not. Where a receipt includes a bill, that bill is imported in the same pass and attached to the same PO History tab.
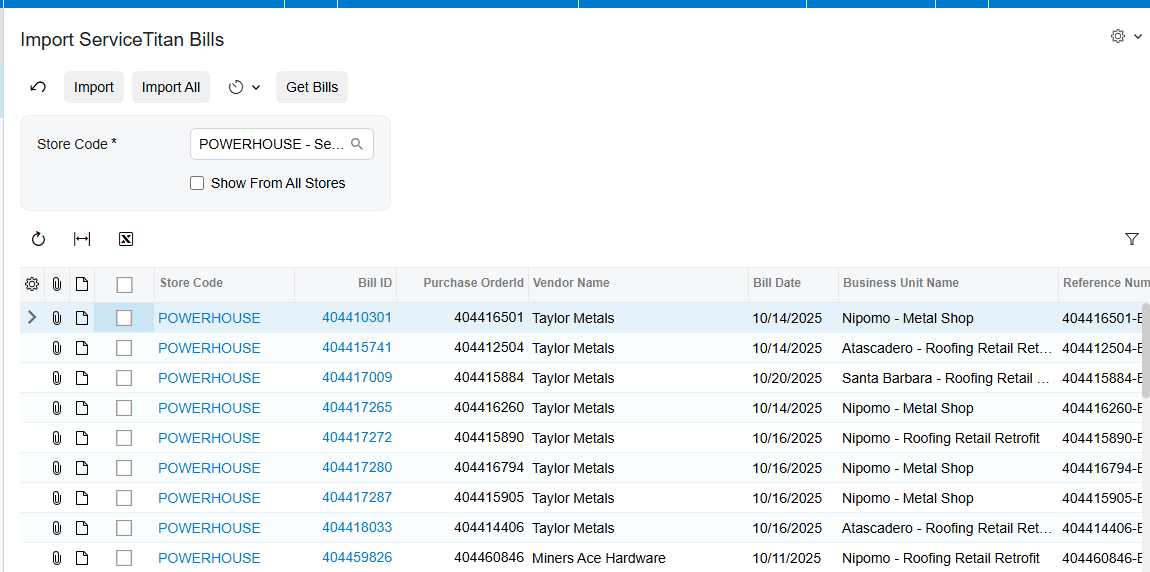
Bills follow identical logic on the Import ServiceTitan Bills screen, retrieved by their updated date. A bill cannot be imported on its own without its corresponding purchase order, and attempting to do so produces an error. If you import a purchase order while its related bill is sitting on the processing screen, the bill is imported alongside it and disappears from that screen. If the purchase order was imported earlier, importing the bill later automatically locates the parent document and attaches it. One additional field belongs on your configuration checklist here: the Branch For Bills field, which applies specifically when bills are imported and Bills and Adjustments documents are created in Acumatica.
Step Seven: Validate ServiceTitan Invoice and Payment Import
Before you declare go-live readiness, run a controlled test of the invoice and payment path, because there are three distinct scenarios and your team should recognize all of them. Invoices are retrieved on the Import SO Invoices screen based on their updated date and the statuses you selected. In the first scenario, an invoice that already carries a payment at the moment it is retrieved is imported together with that payment. The invoice is created on the Invoices and Memos screen, the payment is created and applied under the Applications tab of that invoice, and the corresponding payment identifier disappears from the Import Invoice Payments screen because it has already been processed.
In the second scenario, the invoice has already been imported but the payment is still waiting on the processing screen. Here the connector locates the matching invoice during the payment import and applies the payment automatically. The third scenario is the reverse: the payment was taken first and the invoice is imported afterward, in which case the system matches the two on its own. The Import Invoice Payments screen retrieves all payments from ServiceTitan and shows the associated Invoice ID, and payments can be imported separately, either as a deposit or after the invoice already exists. In every case the outcome is the same, which is that the payment ends up matched to the correct invoice in Acumatica. Test all three paths with real data in a sandbox tenant before go-live and your finance team will know exactly what they are looking at on launch day.
Step Eight: Journal Entries, Scheduling, and User Access
If your business intends to bring journal entries across rather than invoices, activate the Journal Entry checkbox on the Import Options tab while the Activate Invoice checkbox is disabled. Pay close attention to one detail that catches teams out: the Begin Journal Entry Date is not set automatically the first time, so a user must enter it manually. The Last Journal Entry Date then records the most recent import, and you should also define which statuses qualify for import. Put this on the checklist explicitly, because an unset beginning date is a silent failure rather than a visible error.
Turning to operations, decide how synchronization will run. Every processing screen can be executed manually or automatically through the Acumatica scheduler, and documents are retrieved based on their updated date. We recommend running manually for the first several cycles so your team sees each batch before it posts, then moving to a scheduled cadence once the results are consistently clean. Confirm at the same time that user access is correct. The staff responsible for each processing screen need the appropriate Acumatica roles, and the ServiceTitan credentials used by the connector should belong to a dedicated integration account rather than an individual employee whose access might be revoked.
ServiceTitan Acumatica Integration Checklist: Quick Reference
Before you launch, walk through this final go-live readiness checklist with your project team:
- The ServiceTitan Store is created, the Default Store flag is set, and Test Credentials returns a successful result.
- Invoice type, import statuses, and the Begin Invoice Date are configured to match your intended cutover point.
- Customer creation, default customer class, and address override behavior reflect an agreed policy.
- Term and general ledger account mappings are complete and reviewed by your controller.
- Item classes and unit of measure values exist, and the loaded ServiceTitan item list has been inspected.
- Business units, warehouses and trucks, purchase order types, return types, and vendors are all mapped.
- The Branch For Bills field is set if your business imports bills.
- Your team understands that purchase orders must be imported before receipts and bills.
- All three invoice and payment scenarios have been tested in a sandbox environment.
- Release-after-import options are set deliberately, and the scheduler plan is agreed.
- Acumatica roles are assigned, and the connector uses a dedicated ServiceTitan integration account.
ServiceTitan Acumatica Integration FAQ
What is the first step in setting up a ServiceTitan Acumatica integration?
Configuring the ServiceTitan Store is always the first step. The Store controls invoice import rules, customer creation, inventory handling, warehouse and branch mapping, vendor and business unit mapping, and the purchase order workflow. Until the Store is set up and Test Credentials returns a successful result, no data can be imported into Acumatica.
Can ServiceTitan receipts and bills be imported without the purchase order?
No. ServiceTitan purchase receipts and bills cannot be imported into Acumatica unless the related purchase order has already been imported. Attempting to import a receipt first produces an error message identifying the missing purchase order document. Import purchase orders first, and any receipt or bill that already exists in ServiceTitan will come across in the same process.
Does the connector create customers and vendors in Acumatica automatically?
It can. Selecting the Import Customer checkbox creates a customer in Acumatica whenever one is missing, using your default customer class. Selecting the Import Vendor checkbox does the same for vendors. If you prefer tighter control, leave these unselected and use a default customer, or map ServiceTitan vendors to existing Acumatica vendors manually with the Load Vendors action.
How are ServiceTitan items created in Acumatica?
When Import Item is selected, the Generate Item from ServiceTitan option creates items using your Stock Item Class, Non-Stock Item Class, and Unit of Measure values. Materials and Equipment become stock items, while Services become non-stock items. You can also map ServiceTitan items to existing Acumatica items manually instead of generating them.
How are ServiceTitan payments matched to Acumatica invoices?
Three scenarios are handled automatically. If the invoice carries a payment when it is retrieved, both import together and the payment is applied under the Applications tab. If the invoice was imported earlier, the payment import locates it and applies the payment. If the payment was taken first, the system matches it when the invoice arrives. In all three cases the payment ends up applied to the correct invoice.
Can the ServiceTitan Acumatica integration run automatically?
Yes. Every processing screen can run manually or on a schedule through the Acumatica scheduler, with documents retrieved by their updated date. We recommend running manually for the first several cycles so your team can review each batch, then switching to a scheduled cadence once results are consistently clean.
Get Started With the ServiceTitan Acumatica Connector
The Biz-Tech Services ServiceTitan Acumatica Connector is built for field service businesses that need their operational reality and their financial records to agree without anyone retyping a thing. Purchase orders, receipts, bills, invoices, payments, inventory transactions, and journal entries all flow into Acumatica along a defined path, and the quality of that flow is determined by the configuration work you complete before you begin. Working through this ServiceTitan Acumatica integration checklist methodically is what separates a launch that quietly succeeds from one that consumes weeks of cleanup.
If your business is preparing to connect ServiceTitan to Acumatica, we are glad to help at every stage, from initial scoping through configuration, validation, and go-live support. Visit https://biz-techservices.com to learn more about our integration expertise or to schedule a personalized demonstration of the Biz-Tech Services ServiceTitan Acumatica Connector.
SEO Metadata (for the publisher, remove before posting)
Focus keyword: ServiceTitan Acumatica integration
Secondary keywords: ServiceTitan Acumatica connector; ServiceTitan integration checklist; ServiceTitan Acumatica setup; import ServiceTitan invoices into Acumatica; ServiceTitan purchase order import; field service ERP integration; ServiceTitan Stores configuration
SEO title (58 characters): ServiceTitan Acumatica Integration Configuration Checklist
Meta description (154 characters): Complete pre-launch configuration checklist for the ServiceTitan Acumatica integration: store setup, mappings, imports, validation, and go-live readiness.
URL slug: servicetitan-acumatica-integration-configuration-checklist
Suggested internal links: ServiceTitan Connector product page; Acumatica integrations overview; Salesforce Acumatica Integration Configuration Checklist
Schema markup: Article plus FAQPage. The FAQ section is written for FAQ rich results.
Image alt text: Set on all seven images inside this document; carries over on paste into a CMS.

