
How Gift Card Processing Works in Acumatica from Sale to Redemption
How Gift Card Processing Works in Acumatica from Sale to Redemption
Gift Card Processing in Acumatica turns a gift card into two things at once: an item you sell and a payment method you later accept. That dual nature is what makes the data flow worth understanding. A gift card item is sold on a sales order, a serial number is generated and stored, a gift card record appears on the Payment Methods screen carrying its own balance, and every later redemption draws that balance down until nothing remains. Knowing where each record is created, which field holds the balance, and where to check the result is what keeps gift card liability accurate.
The Biz-Tech Services Gift Card Processing product, built for Acumatica, allows companies to sell serialized gift cards and then process those sold gift cards as payment. Gift cards grow sales, reinforce brand awareness, and are consistently preferred by customers over paper gift certificates. This article follows a gift card through the entire Acumatica data flow, from the preferences that define how it is numbered to the redemption that finally spends it, and points out the fields worth monitoring at every step.
What Gift Card Processing in Acumatica Does
Gift Card Processing is an Acumatica ERP customization that manages the full lifecycle of serialized gift cards. It lets you sell gift cards as either non-stock or stock inventory items, assigns each card a unique serial number, stores the card's value against the customer and order that created it, and then allows that stored value to be redeemed as a payment method on sales orders, invoices, and payments. Acumatica maintains a running Used Amount and Remaining Amount for every card, so the outstanding gift card balance is always visible and auditable. Cards can also be created directly from an external system through the API.
The Gift Card Data Flow at a Glance
Before looking at individual screens, it helps to see the path a gift card record travels through Acumatica:
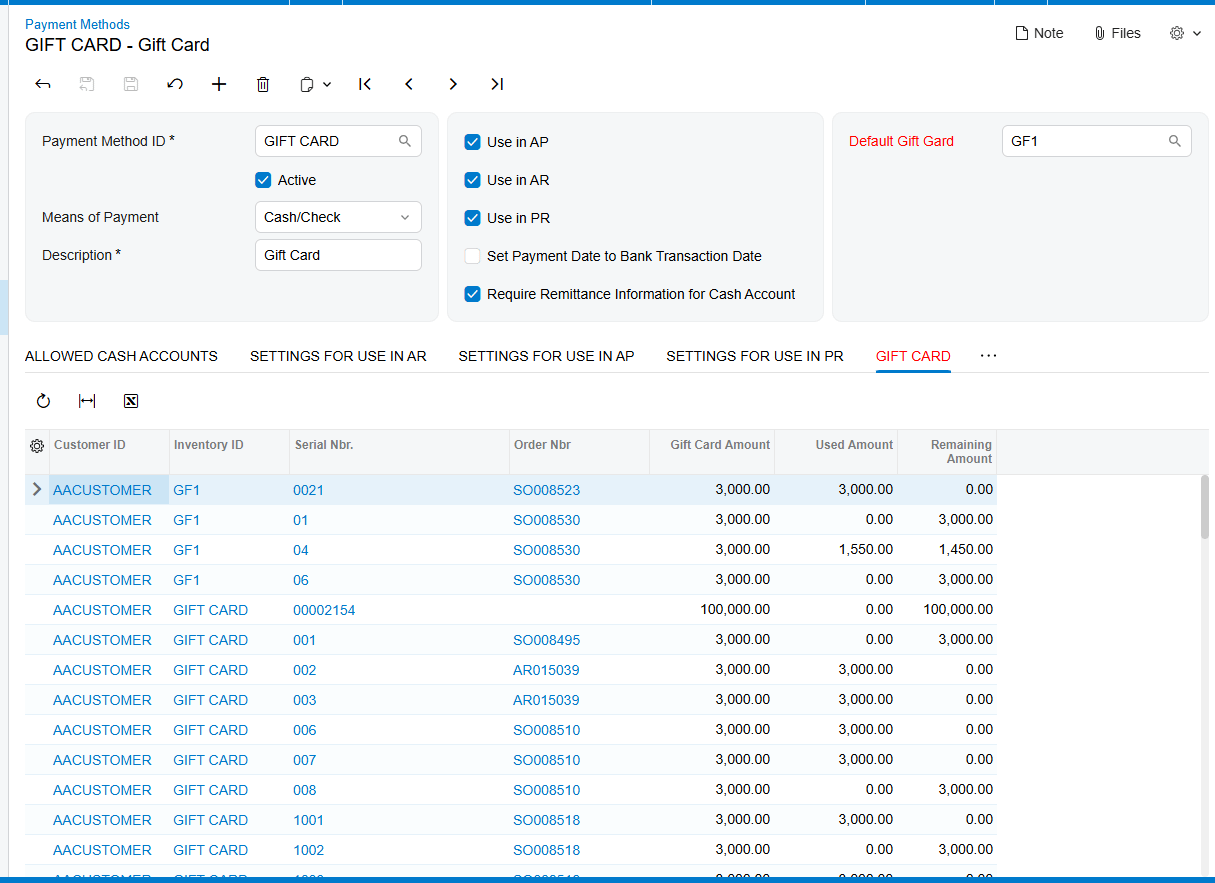
- A gift card payment method is configured on the Payment Methods (CA204000) screen and linked to a dedicated cash account.
- Gift Card Preferences (BZ102000) defines how card numbers are generated and how external gift cards map to Acumatica items.
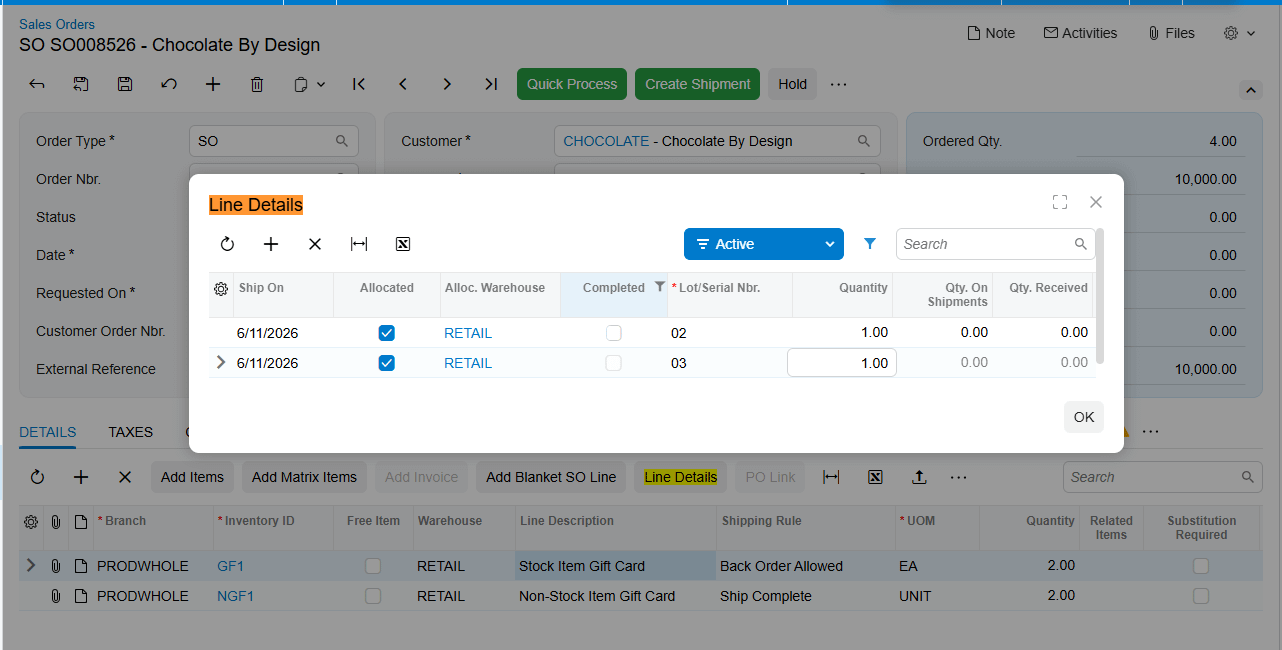
- A gift card item is sold on the Sales Orders (SO301000) screen, either as a non-stock item or as a serialized stock item.
- A serial number is generated and stored, and a gift card record appears on the Gift Cards tab of the Payment Methods screen with its customer, order, and amount.
- The card is redeemed as a payment method on a sales order, on Payments and Applications (AR302000), or on an invoice, with the serial number identifying which balance to draw from.
- Used Amount and Remaining Amount update on both the Payment Methods screen and the Gift Card History (BZ407099) screen after the payment is released.
Every field discussed below sits somewhere on that path. Identifying the stage tells you which screen holds the answer.
Setting the Foundation: The Gift Card Payment Method
The flow starts with a payment method, because a gift card is ultimately money. Payment methods are defined and viewed on the Payment Methods (CA204000) screen, and setting up gift cards begins by creating a new payment method there. Because payment methods are linked to cash accounts, it is strongly recommended to create a new general ledger account dedicated to the gift card item. Keeping gift card liability in its own account is what allows finance to see outstanding gift card value as a distinct number rather than buried in a general cash account.
Once that general ledger account exists, add the gift card cash account under the Allowed Cash Accounts tab of the payment method. One further field saves users time throughout the rest of the flow: the Default Gift Card field on the Payment Methods screen lets you nominate the gift card that will appear automatically in the Gift Card field of the Create Payment popup. With a default set, redemption becomes a matter of entering a serial number rather than selecting a card first.
Gift Card Preferences (BZ102000): Numbering and External Mapping
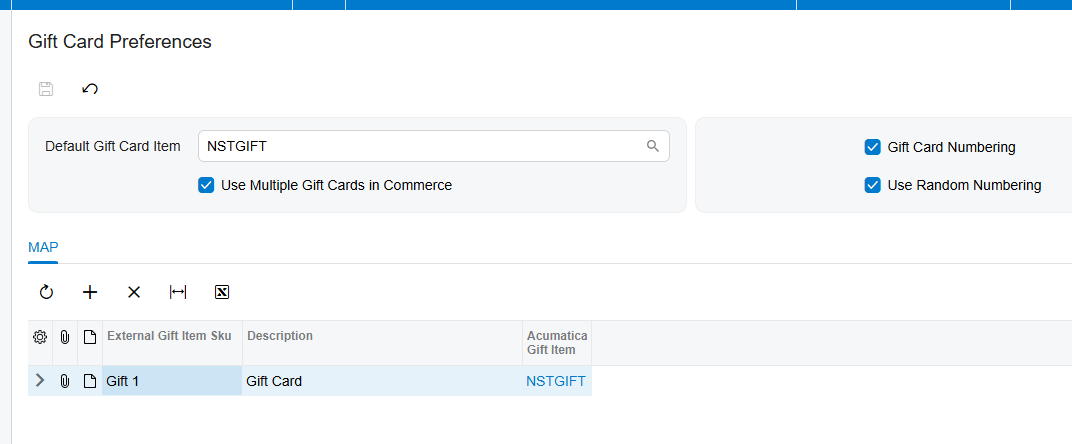
The Gift Card Preferences screen configures two things that shape every card created afterward: how gift card numbers are generated inside Acumatica, and how external gift cards map to Acumatica gift card items during order import.
Default Gift Card Item identifies the non-stock item treated as the default gift card during the order import process. Use Multiple Gift Cards in Commerce extends this by letting you map an external gift card SKU to its corresponding Acumatica gift card item, which is what makes orders containing several different gift cards import correctly. The fallback behavior is worth remembering: if Use Multiple Gift Cards in Commerce is not selected, the system defaults to the non-stock item named in Default Gift Card Item for every imported external order.
Sequential numbering versus random numbering
Selecting the Gift Card Numbering checkbox makes the Numbering Segments tab available, where you define the numbering structure for non-stock gift cards. Acumatica then generates card numbers according to that configuration. One detail is essential rather than optional: the Auto-Incremental Value must be configured in the Numbering Segments tab for gift card numbers to generate automatically.
Use Random Numbering takes the opposite approach and hides the Numbering Segments tab entirely. In this mode, Acumatica generates random numbers when a gift card item is entered on a sales order and a quantity is specified. The system produces as many random numbers as the entered quantity and displays them in the Gift Card Numbers popup. The security rationale matters: random numbering prevents anyone from guessing valid gift cards by following a predictable sequence. For cards distributed at scale, this is usually the safer choice.
Two Kinds of Gift Card Item: Non-Stock and Stock
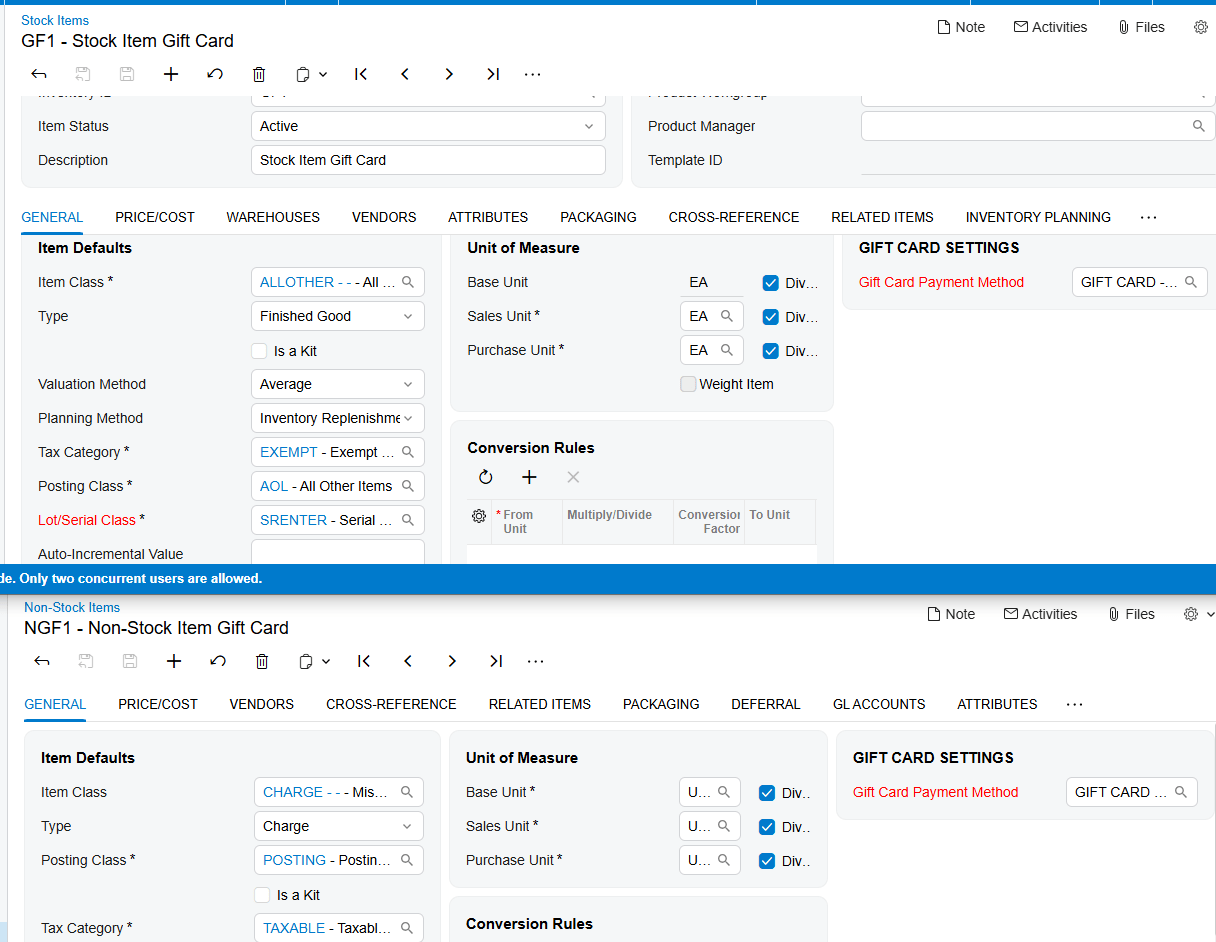
Acumatica supports gift cards as either non-stock items or stock items, and the choice determines the shape of the early data flow. A non-stock gift card is the lighter path, suited to digital cards and to cards imported from external commerce systems. A stock gift card is a serialized physical inventory item that must be received before it can be sold, suited to physical cards held in a warehouse. Both converge on the same gift card record and the same redemption process, so the difference is confined to how the card comes into existence.
Selling a Non-Stock Gift Card Item in Acumatica
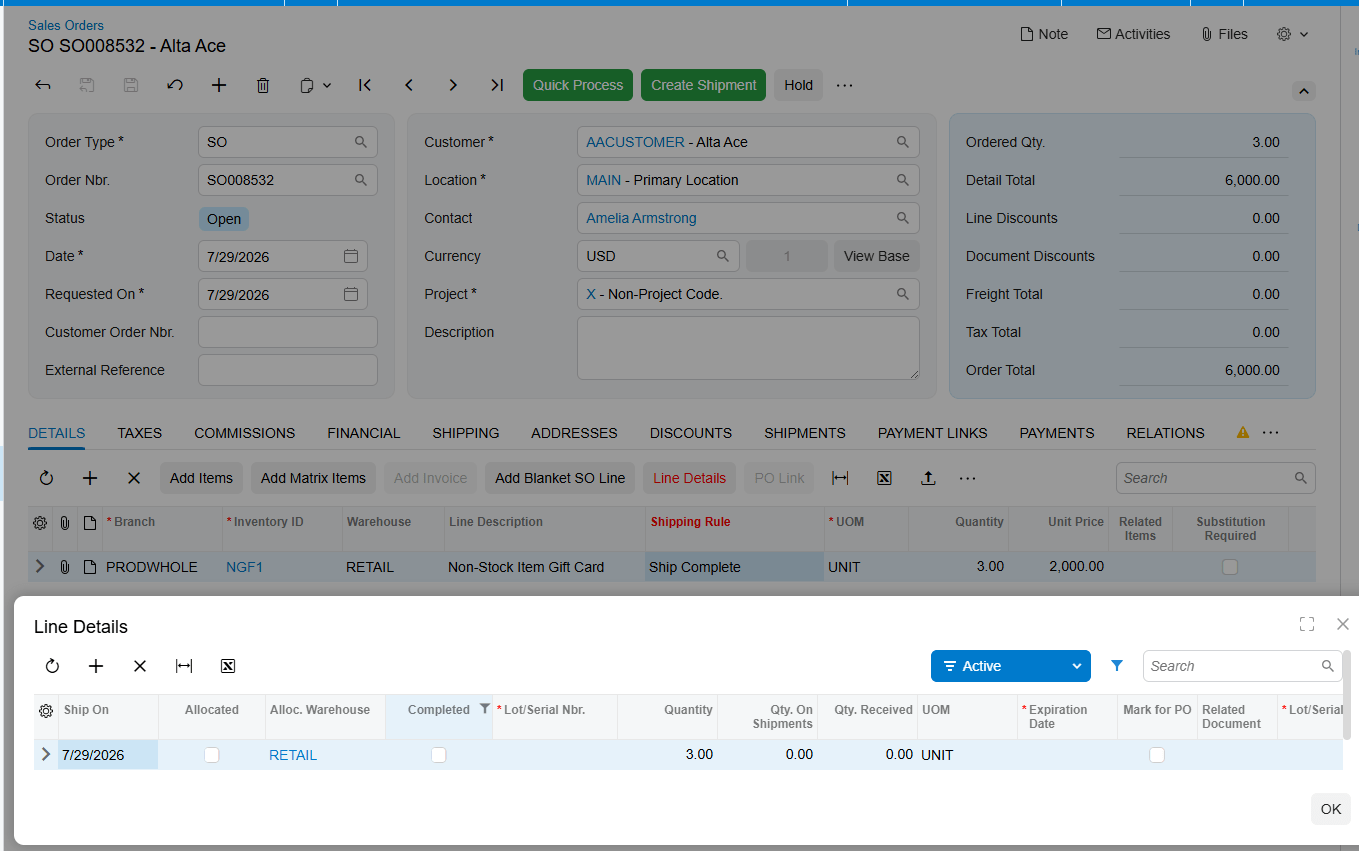
Non-stock gift card items are sold to customers on the standard Acumatica Sales Orders screen. The card can be sold directly within Acumatica or imported from an external system, after which the order proceeds to fulfillment as normal. The gift card number is generated and displayed in the Gift Card Numbers field on the Details tab of the sales order, and also in the Gift Card Numbers popup during order creation.
For orders created inside Acumatica, the gift card number can either be entered manually or generated according to the numbering setup in Gift Card Preferences. Three behaviors are worth knowing before users encounter them. The Gift Card Numbers popup displays the number belonging to the currently selected item line, so selecting a different line changes what you see. When the gift card quantity is greater than one, all of the generated numbers appear in that popup rather than on the line itself. And the shipping rule for a non-stock gift card automatically becomes Ship Complete on the sales order line.
Creating and Selling a Stock Gift Card Item
A stock gift card item is created from the Stock Items (IN202500) screen. Two configuration points make it function as a gift card. First, you must select the payment method to associate with the item for gift card payments. Second, because that field is enabled only for serialized items, a serial class specifically for the gift card item must be created on the Lot/Serial Classes screen. Serialization is what gives each physical card its own identity and its own balance.
Expiration dates are handled through the Track Expiration Date checkbox, which should be selected if gift cards are to expire. The timing matters: the gift card expiration date is established during the gift card receipt process, not at item creation.
The gift card receipt process
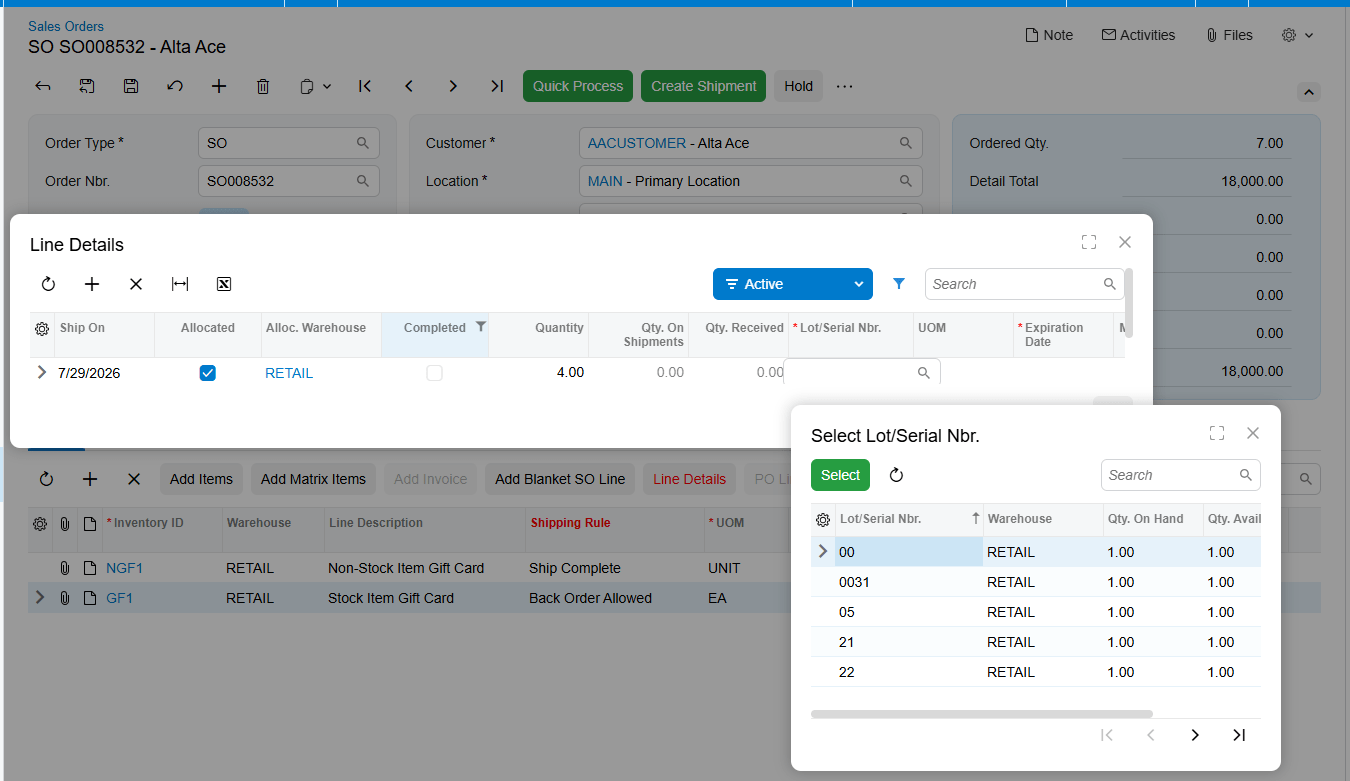
Stock gift cards must be received into inventory before they can be sold. Add the gift card item to the Receipts screen, enter the quantity, and generate the serial numbers together with their respective expiration dates from the Line Details popup window. Expiration dates appear here only when Track Expiration Date is selected on the serial class. At the end of this process, you hold a set of uniquely numbered, dated cards in inventory ready to sell.
Fulfilling a stock gift card order
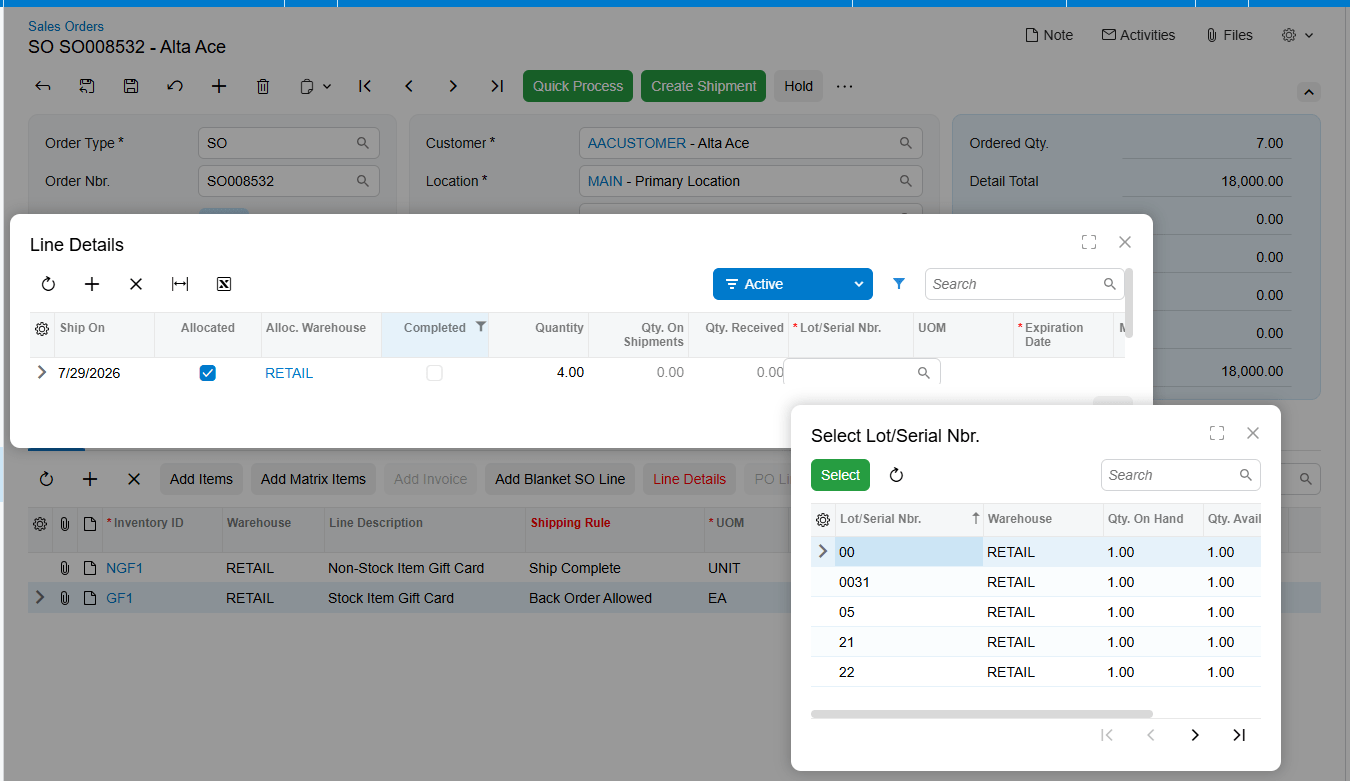
Stock gift card items are sold on the same Sales Orders (SO301000) screen, but with one important difference: allocation is required for all stock gift card items. The specific card being sold must be chosen by selecting its serial number from the Lot/Serial Nbr field on the Line Details tab, which displays all available gift card serial numbers along with their expiration dates. This is the step that ties a physical card in your warehouse to a specific customer order.
Where the Gift Card Record Lives After the Sale
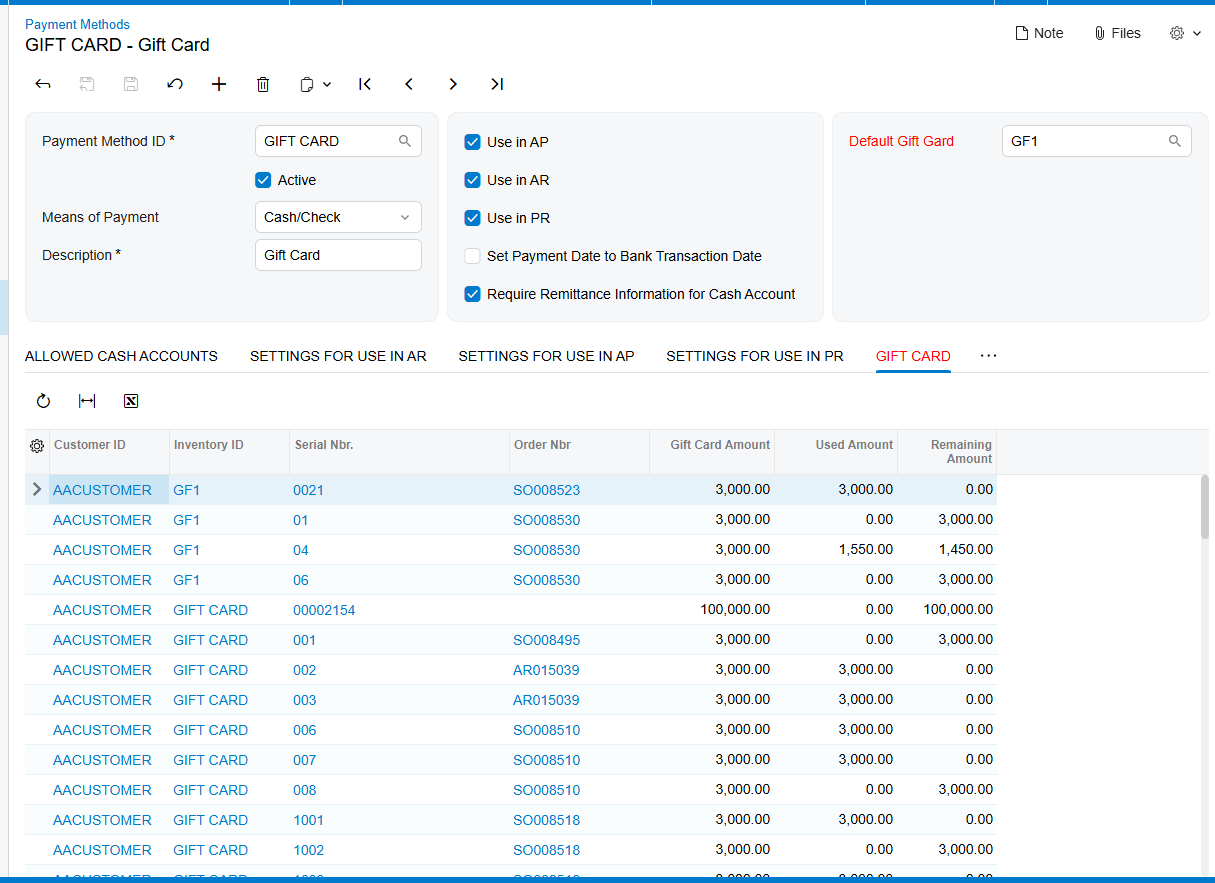
Once a gift card item is sold, whether stock or non-stock, the customer information, order information, and gift card amount are stored on the Gift Cards tab of the Payment Methods screen. This tab is the master record of every gift card in the system, and it displays Customer ID, Inventory ID, Gift Card Serial Number, Order Number, Gift Card Amount, Used Amount, and Remaining Amount.
Those last two fields are the ones to watch. As a gift card is used, Acumatica updates the Used Amount and Remaining Amount on this tab, so the outstanding balance of any card is always one screen away. Clicking a serial number opens the Gift Card History screen, which shows all transactions related to that card. Together these two views answer the two questions users actually ask: what is left on this card, and what has been done with it.
Redeeming a Gift Card as a Payment Method in Acumatica
Redemption is where a sold gift card becomes tender, and Acumatica supports three routes. All three follow the same underlying pattern: choose the gift card payment method, identify the specific card by serial number, and release the payment.
Redeeming on a sales order
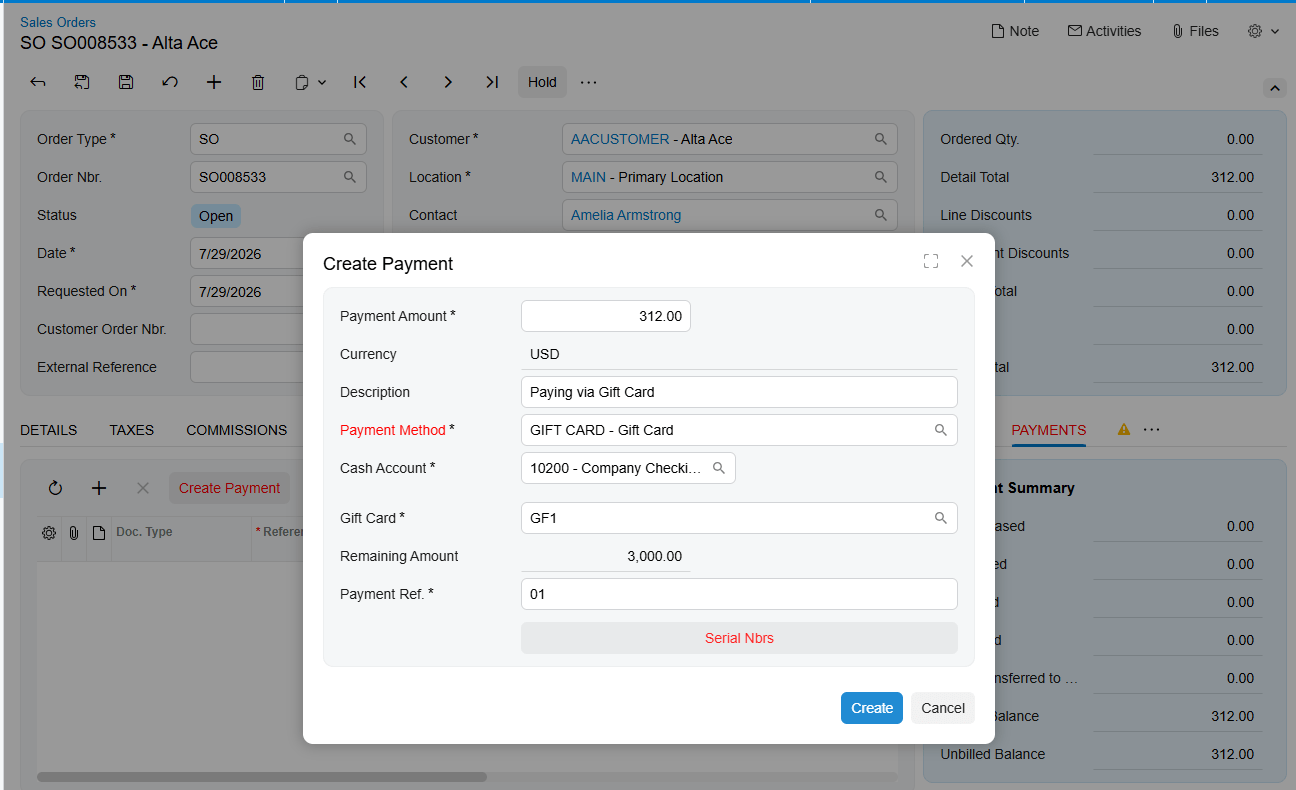
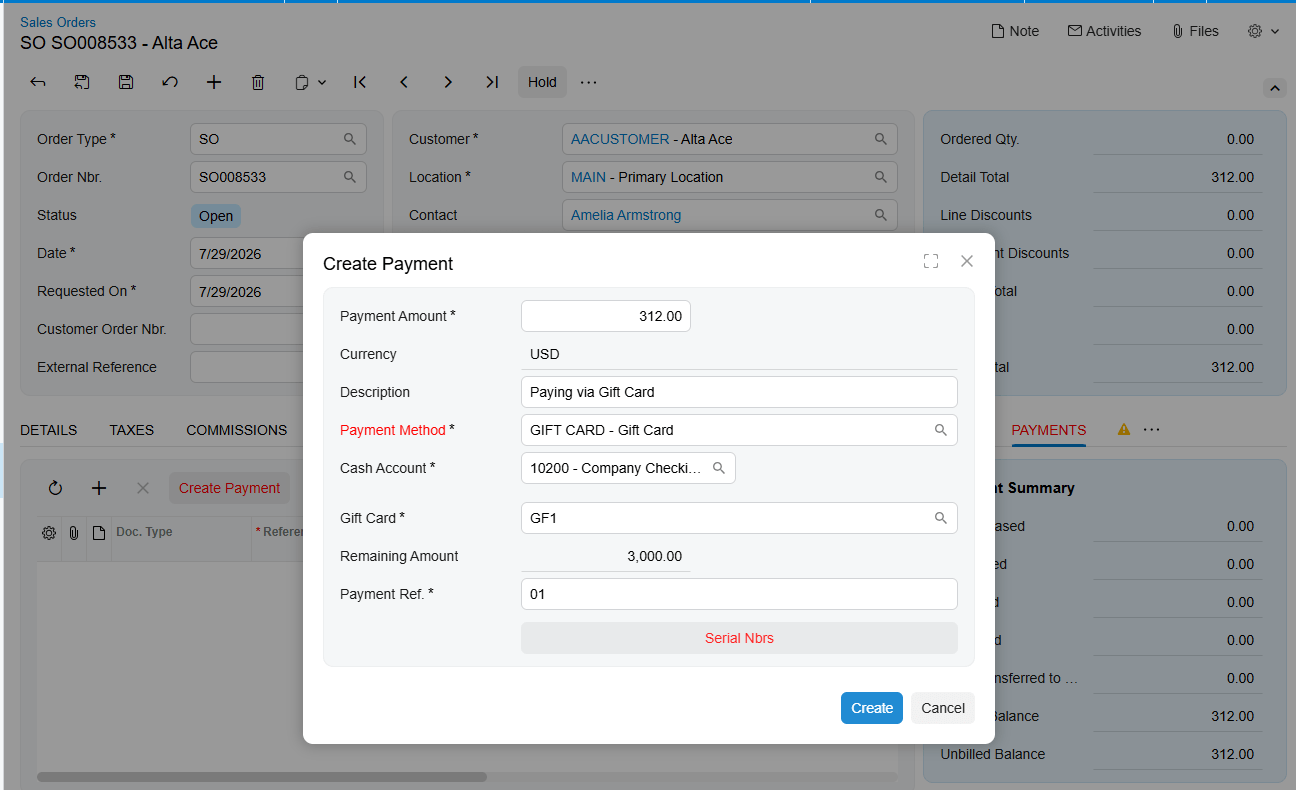
On the Sales Orders (SO301000) screen, select Gift Card Payment as the payment method. This reveals the Gift Card field in the Create Payment popup. If a default gift card has been configured on the payment method, it appears automatically; if not, select it manually. Then enter the serial number of the card being redeemed, which can also be typed manually. Proceed with order fulfillment afterward, and note that the payment for the order must be released for the redemption to take effect.
Redeeming on Payments and Applications
Gift cards can also be processed on the Payments and Applications (AR302000) screen. Navigate to the screen and select the appropriate payment method and cash account, after which the Gift Card field appears. The default card populates automatically if one is configured, otherwise select it manually and enter the serial number. Once all required fields are complete, release the payment.
Redeeming against an invoice
The third route runs through the Invoices (SO303000) screen. Create an invoice by adding either the corresponding sales order or the relevant items. Create a payment from the Applications tab within the invoice, choose the gift card payment method, which displays the Gift Card field in the Create Payment popup, select the card if no default is set, and enter its serial number. Release the invoice and complete the payment process.
After both the invoice and the payment have been released, Acumatica updates the Used Amount and Remaining Amount fields in two places at once: the Gift Card tab of the Payment Methods screen and the Gift Card History screen. Those two screens agreeing is the confirmation that a redemption posted correctly.
The Gift Card Return Process
Returns follow standard Acumatica return-for-credit mechanics. Create a return order of the RC type on the Sales Orders (SO301000) form and add the line or lines from the sales invoice prepared for the original order. Receive the returned items back into inventory on the Shipments (SO302000) form by creating a shipment with the Receipt operation and confirming it. Then create a credit memo to decrease the customer's debt by the amount of the returned items, review its details on the Invoices (SO303000) form, and release it.
For gift card items specifically, the return can also be handled by adding the corresponding gift card items to an RC type return order on the Sales Orders form and selecting the serial number from the Sold Serial Numbers tab of the Line Details. That tab exists precisely so that a returned card can be matched to the exact serial that was sold. Once the return transaction is processed, Acumatica updates the amount information on the Gift Card History screen, which is where you verify that the returned card's balance was corrected.
Gift Card History and Gift Card Summary Screens
The Gift Card History (BZ407099) screen displays all information related to a given gift card and serves as the transaction ledger for that card. It is also a creation point: the Create Gift Card button opens a popup where the required data can be entered and confirmed with OK to create a card directly, without going through a sales order.
Two flags on this screen classify each card and are useful when filtering or troubleshooting. External Gift Card indicates that the card was imported from an external system, and Is Stock Gift Card indicates whether the card is a stock or non-stock item. The separate Gift Card Summary screen displays all related information for a gift card in consolidated form, and it also serves as the outbound channel for sending gift card summary details from Acumatica to an external system.
Creating Gift Cards from an External System via API
Gift card information can be imported into Acumatica from an external system through the API using the Biztech endpoint. The Create Gift Card action within the Gift Card History endpoint is what accepts inbound card data. Once the API request is processed, the gift card details, including customer information, serial number, and amount, appear on the Payment Methods screen under the Gift Card tab, and the same information becomes available on both the Gift
Card Summary and Gift Card History screens.
This matters for the data flow because it means a gift card does not have to originate from an Acumatica sales order. A card sold in an external commerce platform, a point of sale system, or a marketing campaign can enter Acumatica through the API and then behave exactly like any internally sold card, including being redeemed as a payment method and tracked through the same balance fields.
Where to Monitor Gift Card Processing Results in Acumatica
When training users or investigating a gift card that does not behave as expected, these are the fields and screens that show what the system actually did:
- Gift Card Serial Number on the Gift Cards tab of the Payment Methods screen, which uniquely identifies every card and links to its history.
- Gift Card Amount, Used Amount, and Remaining Amount, which together give the original value, the consumed value, and the current balance.
- Customer ID, Inventory ID, and Order Number on the same tab, which tie a card back to who bought it and on which order.
- The Gift Card History (BZ407099) screen, reached by clicking a serial number, which lists all transactions for that card and reflects return adjustments.
- The Gift Card Numbers popup on the sales order, remembering that it shows numbers for the selected line and lists every number when the quantity exceeds one.
- Lot/Serial Nbr on the Line Details tab for stock gift cards, which shows available serial numbers with their expiration dates during allocation.
- The Sold Serial Numbers tab of Line Details, used to match a returned card to the serial number originally sold.
- External Gift Card and Is Stock Gift Card flags on the Gift Card History screen, which classify how a card entered the system and what type it is.
- The dedicated gift card cash account and general ledger account, which is where outstanding gift card liability should be reviewed by finance.
Gift Card Processing in Acumatica: Frequently Asked Questions
What is Gift Card Processing in Acumatica?
Gift Card Processing is an Acumatica ERP customization from Biz-Tech Services that lets companies sell serialized gift cards and then accept those cards as a payment method. Each card carries a unique serial number and its own balance, tracked through Gift Card Amount, Used Amount, and Remaining Amount fields on the Payment Methods screen, with a full transaction history available on the Gift Card History screen.
What is the difference between a stock and a non-stock gift card item?
A non-stock gift card is created and sold without inventory receipt, which suits digital cards and cards imported from external commerce systems. A stock gift card is a serialized inventory item created on the Stock Items (IN202500) screen that must be received through the gift card receipt process before it can be sold, and it requires allocation of a specific serial number at the time of sale. Both card types produce the same gift card record and are redeemed identically.
How are gift card numbers generated in Acumatica?
Gift Card Preferences (BZ102000) controls this. With the Gift Card Numbering checkbox selected, numbers follow the structure defined on the Numbering Segments tab, and the Auto-Incremental Value must be configured for automatic generation. With Use Random Numbering selected instead, the Numbering Segments tab is hidden and Acumatica generates random numbers based on the quantity entered on the sales order, which prevents anyone from predicting valid card numbers. Numbers can also be entered manually for orders created inside Acumatica.
How do you redeem a gift card in Acumatica?
There are three routes. On the Sales Orders (SO301000) screen, select Gift Card Payment as the payment method, then supply the card and its serial number in the Create Payment popup. On Payments and Applications (AR302000), select the payment method and cash account, then the card and serial number. On the Invoices (SO303000) screen, create a payment from the Applications tab and do the same. In every case the payment must be released for the balance to update.
Where do you check a gift card balance in Acumatica?
Open the Gift Cards tab of the Payment Methods screen and locate the card by serial number. The Remaining Amount field shows the current balance, with Gift Card Amount showing the original value and Used Amount showing what has been consumed. Clicking the serial number opens the Gift Card History screen for the full transaction detail behind those figures.
Can gift cards be returned in Acumatica?
Yes. Create a return order of the RC type on the Sales Orders (SO301000) form, add the relevant lines, receive the items on the Shipments (SO302000) form using the Receipt operation, then create and release a credit memo through the Invoices (SO303000) form. For gift card items you can select the specific card from the Sold Serial Numbers tab of the Line Details. Once the return is processed, the amount information updates on the Gift Card History screen.
Can gift cards be created from an external system?
Yes. Gift card information can be imported into Acumatica through the API using the Biztech endpoint, via the Create Gift Card action in the Gift Card History endpoint. After the request is processed, the customer information, serial number, and amount appear on the Gift Card tab of the Payment Methods screen and on both the Gift Card Summary and Gift Card History screens. Cards can also be created manually with the Create Gift Card button on the Gift Card History screen.
Work With the Biz-Tech Services Gift Card Processing Product
Gift Card Processing in Acumatica becomes straightforward once the flow is clear. The payment method and its dedicated cash account establish where gift card value lives, preferences decide how cards are numbered and mapped, the sales order creates the card and its serial number, the Payment Methods screen holds the balance, redemption draws that balance down through any of three screens, and the Gift Card History screen records everything that happened along the way. Teams that know which field governs each handoff can answer any gift card question in seconds.
If your business wants to sell gift cards, accept them as payment, and keep outstanding gift card liability visible and accurate, we are glad to help you scope, configure, and roll out Gift Card Processing in Acumatica. Visit https://biz-techservices.com to learn more about our Acumatica expertise or to schedule a personalized demonstration of the Biz-Tech Services Gift Card Processing product.
How Gift Card Processing Works in Acumatica from Sale to Redemption
Gift Card Processing in Acumatica turns a gift card into two things at once: an item you sell and a payment method you later accept. That dual nature is what makes the data flow worth understanding. A gift card item is sold on a sales order, a serial number is generated and stored, a gift card record appears on the Payment Methods screen carrying its own balance, and every later redemption draws that balance down until nothing remains. Knowing where each record is created, which field holds the balance, and where to check the result is what keeps gift card liability accurate.
The Biz-Tech Services Gift Card Processing product, built for Acumatica, allows companies to sell serialized gift cards and then process those sold gift cards as payment. Gift cards grow sales, reinforce brand awareness, and are consistently preferred by customers over paper gift certificates. This article follows a gift card through the entire Acumatica data flow, from the preferences that define how it is numbered to the redemption that finally spends it, and points out the fields worth monitoring at every step.
What Gift Card Processing in Acumatica Does
Gift Card Processing is an Acumatica ERP customization that manages the full lifecycle of serialized gift cards. It lets you sell gift cards as either non-stock or stock inventory items, assigns each card a unique serial number, stores the card's value against the customer and order that created it, and then allows that stored value to be redeemed as a payment method on sales orders, invoices, and payments. Acumatica maintains a running Used Amount and Remaining Amount for every card, so the outstanding gift card balance is always visible and auditable. Cards can also be created directly from an external system through the API.
The Gift Card Data Flow at a Glance
Before looking at individual screens, it helps to see the path a gift card record travels through Acumatica:
- A gift card payment method is configured on the Payment Methods (CA204000) screen and linked to a dedicated cash account.
- Gift Card Preferences (BZ102000) defines how card numbers are generated and how external gift cards map to Acumatica items.
- A gift card item is sold on the Sales Orders (SO301000) screen, either as a non-stock item or as a serialized stock item.
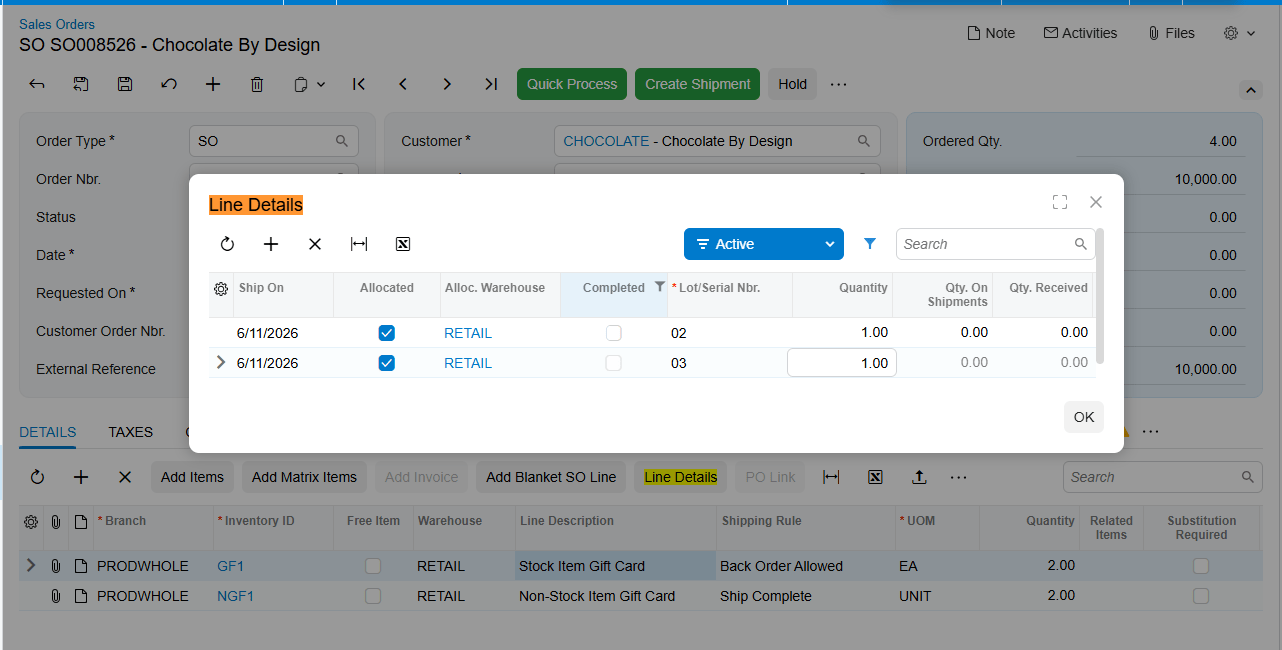
- A serial number is generated and stored, and a gift card record appears on the Gift Cards tab of the Payment Methods screen with its customer, order, and amount.
- The card is redeemed as a payment method on a sales order, on Payments and Applications (AR302000), or on an invoice, with the serial number identifying which balance to draw from.
- Used Amount and Remaining Amount update on both the Payment Methods screen and the Gift Card History (BZ407099) screen after the payment is released.
Every field discussed below sits somewhere on that path. Identifying the stage tells you which screen holds the answer.
Setting the Foundation: The Gift Card Payment Method
The flow starts with a payment method, because a gift card is ultimately money. Payment methods are defined and viewed on the Payment Methods (CA204000) screen, and setting up gift cards begins by creating a new payment method there. Because payment methods are linked to cash accounts, it is strongly recommended to create a new general ledger account dedicated to the gift card item. Keeping gift card liability in its own account is what allows finance to see outstanding gift card value as a distinct number rather than buried in a general cash account.
Once that general ledger account exists, add the gift card cash account under the Allowed Cash Accounts tab of the payment method. One further field saves users time throughout the rest of the flow: the Default Gift Card field on the Payment Methods screen lets you nominate the gift card that will appear automatically in the Gift Card field of the Create Payment popup. With a default set, redemption becomes a matter of entering a serial number rather than selecting a card first.
Gift Card Preferences (BZ102000): Numbering and External Mapping
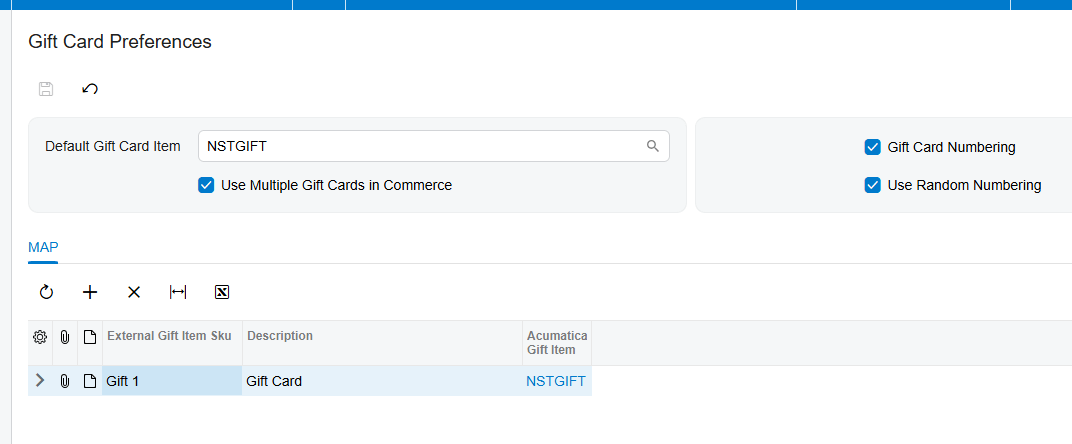
The Gift Card Preferences screen configures two things that shape every card created afterward: how gift card numbers are generated inside Acumatica, and how external gift cards map to Acumatica gift card items during order import.
Default Gift Card Item identifies the non-stock item treated as the default gift card during the order import process. Use Multiple Gift Cards in Commerce extends this by letting you map an external gift card SKU to its corresponding Acumatica gift card item, which is what makes orders containing several different gift cards import correctly. The fallback behavior is worth remembering: if Use Multiple Gift Cards in Commerce is not selected, the system defaults to the non-stock item named in Default Gift Card Item for every imported external order.
Sequential numbering versus random numbering
Selecting the Gift Card Numbering checkbox makes the Numbering Segments tab available, where you define the numbering structure for non-stock gift cards. Acumatica then generates card numbers according to that configuration. One detail is essential rather than optional: the Auto-Incremental Value must be configured in the Numbering Segments tab for gift card numbers to generate automatically.
Use Random Numbering takes the opposite approach and hides the Numbering Segments tab entirely. In this mode, Acumatica generates random numbers when a gift card item is entered on a sales order and a quantity is specified. The system produces as many random numbers as the entered quantity and displays them in the Gift Card Numbers popup. The security rationale matters: random numbering prevents anyone from guessing valid gift cards by following a predictable sequence. For cards distributed at scale, this is usually the safer choice.
Two Kinds of Gift Card Item: Non-Stock and Stock
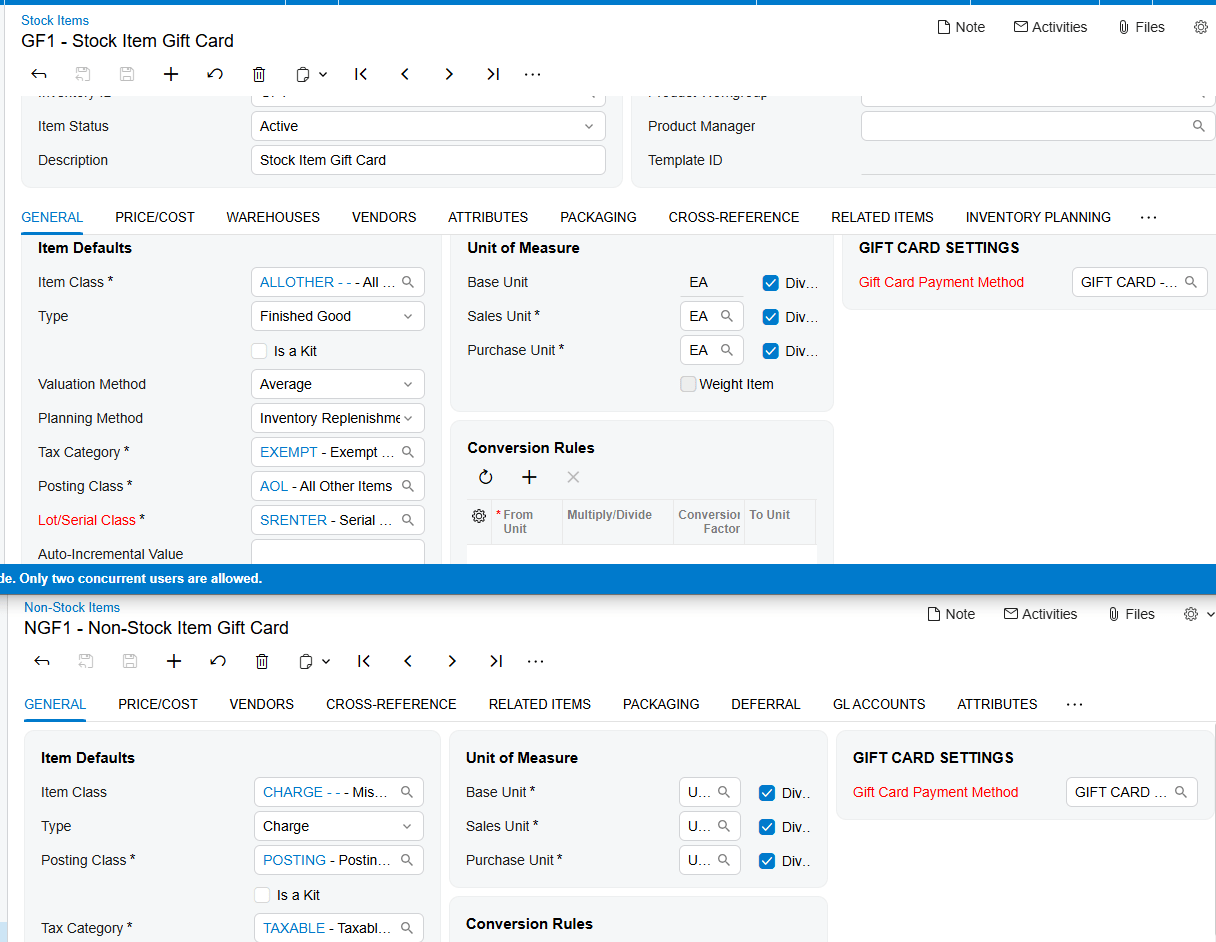
Acumatica supports gift cards as either non-stock items or stock items, and the choice determines the shape of the early data flow. A non-stock gift card is the lighter path, suited to digital cards and to cards imported from external commerce systems. A stock gift card is a serialized physical inventory item that must be received before it can be sold, suited to physical cards held in a warehouse. Both converge on the same gift card record and the same redemption process, so the difference is confined to how the card comes into existence.
Selling a Non-Stock Gift Card Item in Acumatica
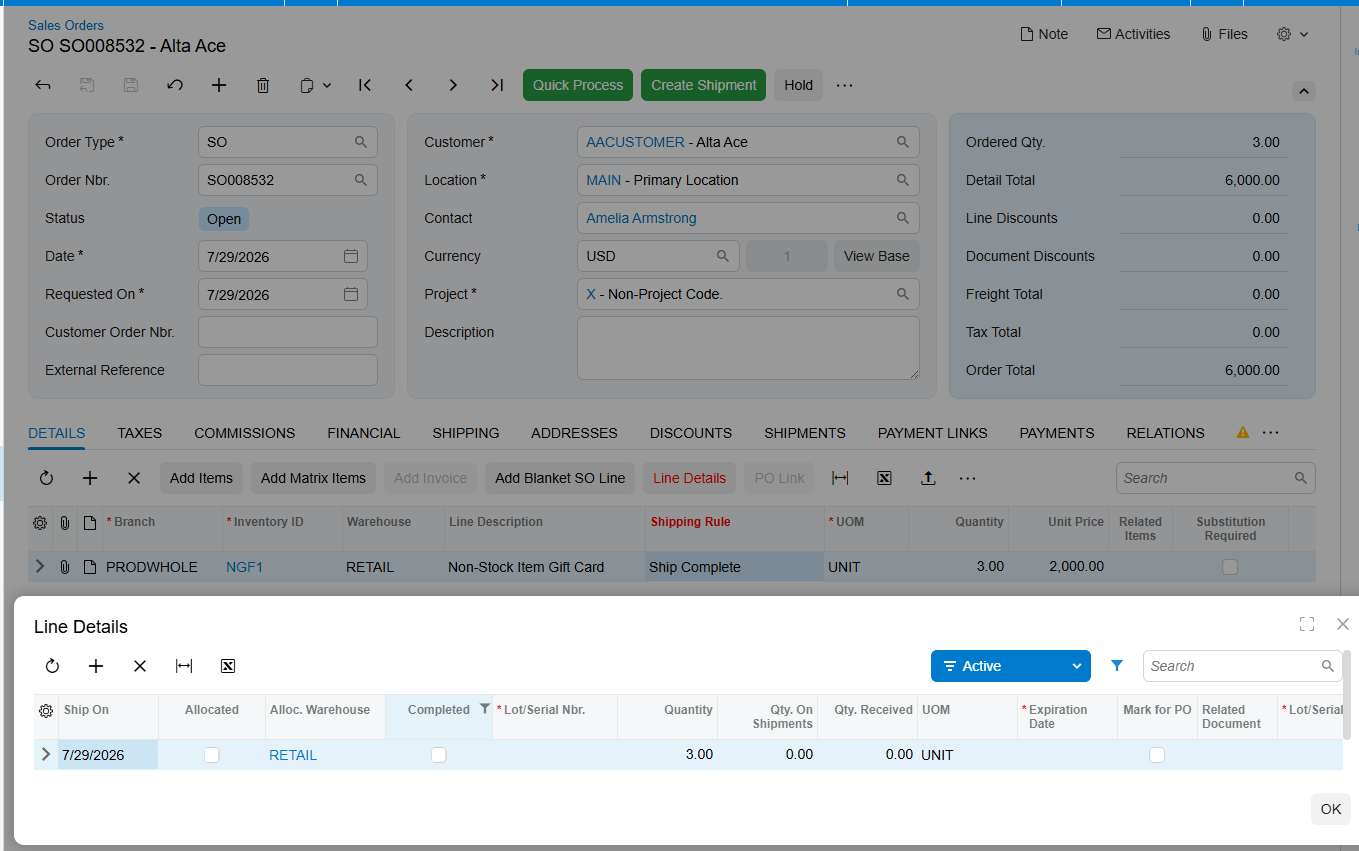
Non-stock gift card items are sold to customers on the standard Acumatica Sales Orders screen. The card can be sold directly within Acumatica or imported from an external system, after which the order proceeds to fulfillment as normal. The gift card number is generated and displayed in the Gift Card Numbers field on the Details tab of the sales order, and also in the Gift Card Numbers popup during order creation.
For orders created inside Acumatica, the gift card number can either be entered manually or generated according to the numbering setup in Gift Card Preferences. Three behaviors are worth knowing before users encounter them. The Gift Card Numbers popup displays the number belonging to the currently selected item line, so selecting a different line changes what you see. When the gift card quantity is greater than one, all of the generated numbers appear in that popup rather than on the line itself. And the shipping rule for a non-stock gift card automatically becomes Ship Complete on the sales order line.
Creating and Selling a Stock Gift Card Item
A stock gift card item is created from the Stock Items (IN202500) screen. Two configuration points make it function as a gift card. First, you must select the payment method to associate with the item for gift card payments. Second, because that field is enabled only for serialized items, a serial class specifically for the gift card item must be created on the Lot/Serial Classes screen. Serialization is what gives each physical card its own identity and its own balance.
Expiration dates are handled through the Track Expiration Date checkbox, which should be selected if gift cards are to expire. The timing matters: the gift card expiration date is established during the gift card receipt process, not at item creation.
The gift card receipt process
Stock gift cards must be received into inventory before they can be sold. Add the gift card item to the Receipts screen, enter the quantity, and generate the serial numbers together with their respective expiration dates from the Line Details popup window. Expiration dates appear here only when Track Expiration Date is selected on the serial class. At the end of this process, you hold a set of uniquely numbered, dated cards in inventory ready to sell.
Fulfilling a stock gift card order
Stock gift card items are sold on the same Sales Orders (SO301000) screen, but with one important difference: allocation is required for all stock gift card items. The specific card being sold must be chosen by selecting its serial number from the Lot/Serial Nbr field on the Line Details tab, which displays all available gift card serial numbers along with their expiration dates. This is the step that ties a physical card in your warehouse to a specific customer order.
Where the Gift Card Record Lives After the Sale
Once a gift card item is sold, whether stock or non-stock, the customer information, order information, and gift card amount are stored on the Gift Cards tab of the Payment Methods screen. This tab is the master record of every gift card in the system, and it displays Customer ID, Inventory ID, Gift Card Serial Number, Order Number, Gift Card Amount, Used Amount, and Remaining Amount.
Those last two fields are the ones to watch. As a gift card is used, Acumatica updates the Used Amount and Remaining Amount on this tab, so the outstanding balance of any card is always one screen away. Clicking a serial number opens the Gift Card History screen, which shows all transactions related to that card. Together these two views answer the two questions users actually ask: what is left on this card, and what has been done with it.
Redeeming a Gift Card as a Payment Method in Acumatica
Redemption is where a sold gift card becomes tender, and Acumatica supports three routes. All three follow the same underlying pattern: choose the gift card payment method, identify the specific card by serial number, and release the payment.
Redeeming on a sales order
On the Sales Orders (SO301000) screen, select Gift Card Payment as the payment method. This reveals the Gift Card field in the Create Payment popup. If a default gift card has been configured on the payment method, it appears automatically; if not, select it manually. Then enter the serial number of the card being redeemed, which can also be typed manually. Proceed with order fulfillment afterward, and note that the payment for the order must be released for the redemption to take effect.
Redeeming on Payments and Applications
Gift cards can also be processed on the Payments and Applications (AR302000) screen. Navigate to the screen and select the appropriate payment method and cash account, after which the Gift Card field appears. The default card populates automatically if one is configured, otherwise select it manually and enter the serial number. Once all required fields are complete, release the payment.
Redeeming against an invoice
The third route runs through the Invoices (SO303000) screen. Create an invoice by adding either the corresponding sales order or the relevant items. Create a payment from the Applications tab within the invoice, choose the gift card payment method, which displays the Gift Card field in the Create Payment popup, select the card if no default is set, and enter its serial number. Release the invoice and complete the payment process.
After both the invoice and the payment have been released, Acumatica updates the Used Amount and Remaining Amount fields in two places at once: the Gift Card tab of the Payment Methods screen and the Gift Card History screen. Those two screens agreeing is the confirmation that a redemption posted correctly.
The Gift Card Return Process
Returns follow standard Acumatica return-for-credit mechanics. Create a return order of the RC type on the Sales Orders (SO301000) form and add the line or lines from the sales invoice prepared for the original order. Receive the returned items back into inventory on the Shipments (SO302000) form by creating a shipment with the Receipt operation and confirming it. Then create a credit memo to decrease the customer's debt by the amount of the returned items, review its details on the Invoices (SO303000) form, and release it.
For gift card items specifically, the return can also be handled by adding the corresponding gift card items to an RC type return order on the Sales Orders form and selecting the serial number from the Sold Serial Numbers tab of the Line Details. That tab exists precisely so that a returned card can be matched to the exact serial that was sold. Once the return transaction is processed, Acumatica updates the amount information on the Gift Card History screen, which is where you verify that the returned card's balance was corrected.
Gift Card History and Gift Card Summary Screens
The Gift Card History (BZ407099) screen displays all information related to a given gift card and serves as the transaction ledger for that card. It is also a creation point: the Create Gift Card button opens a popup where the required data can be entered and confirmed with OK to create a card directly, without going through a sales order.
Two flags on this screen classify each card and are useful when filtering or troubleshooting. External Gift Card indicates that the card was imported from an external system, and Is Stock Gift Card indicates whether the card is a stock or non-stock item. The separate Gift Card Summary screen displays all related information for a gift card in consolidated form, and it also serves as the outbound channel for sending gift card summary details from Acumatica to an external system.
Creating Gift Cards from an External System via API
Gift card information can be imported into Acumatica from an external system through the API using the Biztech endpoint. The Create Gift Card action within the Gift Card History endpoint is what accepts inbound card data. Once the API request is processed, the gift card details, including customer information, serial number, and amount, appear on the Payment Methods screen under the Gift Card tab, and the same information becomes available on both the Gift
Card Summary and Gift Card History screens.
This matters for the data flow because it means a gift card does not have to originate from an Acumatica sales order. A card sold in an external commerce platform, a point of sale system, or a marketing campaign can enter Acumatica through the API and then behave exactly like any internally sold card, including being redeemed as a payment method and tracked through the same balance fields.
Where to Monitor Gift Card Processing Results in Acumatica
When training users or investigating a gift card that does not behave as expected, these are the fields and screens that show what the system actually did:
- Gift Card Serial Number on the Gift Cards tab of the Payment Methods screen, which uniquely identifies every card and links to its history.
- Gift Card Amount, Used Amount, and Remaining Amount, which together give the original value, the consumed value, and the current balance.
- Customer ID, Inventory ID, and Order Number on the same tab, which tie a card back to who bought it and on which order.
- The Gift Card History (BZ407099) screen, reached by clicking a serial number, which lists all transactions for that card and reflects return adjustments.
- The Gift Card Numbers popup on the sales order, remembering that it shows numbers for the selected line and lists every number when the quantity exceeds one.
- Lot/Serial Nbr on the Line Details tab for stock gift cards, which shows available serial numbers with their expiration dates during allocation.
- The Sold Serial Numbers tab of Line Details, used to match a returned card to the serial number originally sold.
- External Gift Card and Is Stock Gift Card flags on the Gift Card History screen, which classify how a card entered the system and what type it is.
- The dedicated gift card cash account and general ledger account, which is where outstanding gift card liability should be reviewed by finance.
Gift Card Processing in Acumatica: Frequently Asked Questions
What is Gift Card Processing in Acumatica?
Gift Card Processing is an Acumatica ERP customization from Biz-Tech Services that lets companies sell serialized gift cards and then accept those cards as a payment method. Each card carries a unique serial number and its own balance, tracked through Gift Card Amount, Used Amount, and Remaining Amount fields on the Payment Methods screen, with a full transaction history available on the Gift Card History screen.
What is the difference between a stock and a non-stock gift card item?
A non-stock gift card is created and sold without inventory receipt, which suits digital cards and cards imported from external commerce systems. A stock gift card is a serialized inventory item created on the Stock Items (IN202500) screen that must be received through the gift card receipt process before it can be sold, and it requires allocation of a specific serial number at the time of sale. Both card types produce the same gift card record and are redeemed identically.
How are gift card numbers generated in Acumatica?
Gift Card Preferences (BZ102000) controls this. With the Gift Card Numbering checkbox selected, numbers follow the structure defined on the Numbering Segments tab, and the Auto-Incremental Value must be configured for automatic generation. With Use Random Numbering selected instead, the Numbering Segments tab is hidden and Acumatica generates random numbers based on the quantity entered on the sales order, which prevents anyone from predicting valid card numbers. Numbers can also be entered manually for orders created inside Acumatica.
How do you redeem a gift card in Acumatica?
There are three routes. On the Sales Orders (SO301000) screen, select Gift Card Payment as the payment method, then supply the card and its serial number in the Create Payment popup. On Payments and Applications (AR302000), select the payment method and cash account, then the card and serial number. On the Invoices (SO303000) screen, create a payment from the Applications tab and do the same. In every case the payment must be released for the balance to update.
Where do you check a gift card balance in Acumatica?
Open the Gift Cards tab of the Payment Methods screen and locate the card by serial number. The Remaining Amount field shows the current balance, with Gift Card Amount showing the original value and Used Amount showing what has been consumed. Clicking the serial number opens the Gift Card History screen for the full transaction detail behind those figures.
Can gift cards be returned in Acumatica?
Yes. Create a return order of the RC type on the Sales Orders (SO301000) form, add the relevant lines, receive the items on the Shipments (SO302000) form using the Receipt operation, then create and release a credit memo through the Invoices (SO303000) form. For gift card items you can select the specific card from the Sold Serial Numbers tab of the Line Details. Once the return is processed, the amount information updates on the Gift Card History screen.
Can gift cards be created from an external system?
Yes. Gift card information can be imported into Acumatica through the API using the Biztech endpoint, via the Create Gift Card action in the Gift Card History endpoint. After the request is processed, the customer information, serial number, and amount appear on the Gift Card tab of the Payment Methods screen and on both the Gift Card Summary and Gift Card History screens. Cards can also be created manually with the Create Gift Card button on the Gift Card History screen.
Work With the Biz-Tech Services Gift Card Processing Product
Gift Card Processing in Acumatica becomes straightforward once the flow is clear. The payment method and its dedicated cash account establish where gift card value lives, preferences decide how cards are numbered and mapped, the sales order creates the card and its serial number, the Payment Methods screen holds the balance, redemption draws that balance down through any of three screens, and the Gift Card History screen records everything that happened along the way. Teams that know which field governs each handoff can answer any gift card question in seconds.
If your business wants to sell gift cards, accept them as payment, and keep outstanding gift card liability visible and accurate, we are glad to help you scope, configure, and roll out Gift Card Processing in Acumatica. Visit https://biz-techservices.com to learn more about our Acumatica expertise or to schedule a personalized demonstration of the Biz-Tech Services Gift Card Processing product.
How Consignment Processing Works in Acumatica from Shipment to Invoice
How Consignment Processing Works in Acumatica from Shipment to Invoice
Consignment Processing in Acumatica moves inventory to a customer's location without transferring ownership, then bills only for what the customer actually sells. That single idea drives an entire data flow: a consignment order ships stock into a consignment warehouse, an inventory update records the movement, a sell action turns sold quantities into a consignment invoice, and a return action brings unsold stock back. Understanding how records move between those steps, which fields carry the numbers, and where the results become visible is what makes consignment inventory management predictable rather than mysterious.
The Biz-Tech Services Consignment Processing product lets companies manage the location and sales of inventory held by customers, track quantities and valuation across multiple consignee locations, and see clearly how much consigned stock has sold and how much remains unsold. Invoices for sold items and returns for unsold items are both created directly from the consignment order, so the whole lifecycle stays in one place. This article follows a consignment order through Acumatica from the moment it ships to the moment its invoice is released.
What Consignment Processing in Acumatica Does
Consignment Processing is an Acumatica ERP customization that manages inventory placed at customer or consignee locations. Stock physically leaves your main warehouse and sits at the customer's site, but it remains yours until the customer sells or consumes it. Acumatica tracks that stock in a dedicated consignment warehouse, keeps a running count of sold and unsold quantities, and generates the invoice only when a sale is recorded. The result is accurate inventory valuation across every consignee location and a billing process tied to real consumption rather than to the original shipment.
The Consignment Data Flow at a Glance
Before looking at each screen, it helps to see the whole path a record travels. A consignment order in Acumatica moves through these stages:
- A consignment order is created on the Sales Orders (SO301000) form using the consignment order type, and the items are shipped and confirmed.
- The Update IN action issues the items from the main warehouse and receives them into the consignment warehouse, automatically generating and releasing a Transfer-type purchase receipt.
- The order status changes to Consignment or Partial Consignment, which enables the sell and return actions.
- Consignment Sell Items creates a consignment invoice order for the quantities the customer sold; releasing that invoice updates the Cons. Sold Qty. field on the consignment order.
- Consignment Return Items creates a consignment return order for unsold stock, which follows the same Update IN and purchase receipt path in reverse.
- Once everything shipped has been sold or returned, the consignment order status changes to Closed and both action buttons are disabled.
Every field discussed below sits somewhere on that path. Knowing the stage tells you which screen holds the answer.
Setting the Foundation: Consignment Settings in Sales Order Preferences
The Consignment Processing data flow is shaped before any order exists, in the Consignment Settings workspace added to the Sales Order Preferences (SO101000) form. Four fields there determine which documents the process will create, and each one depends on an order type built from the correct Acumatica template.
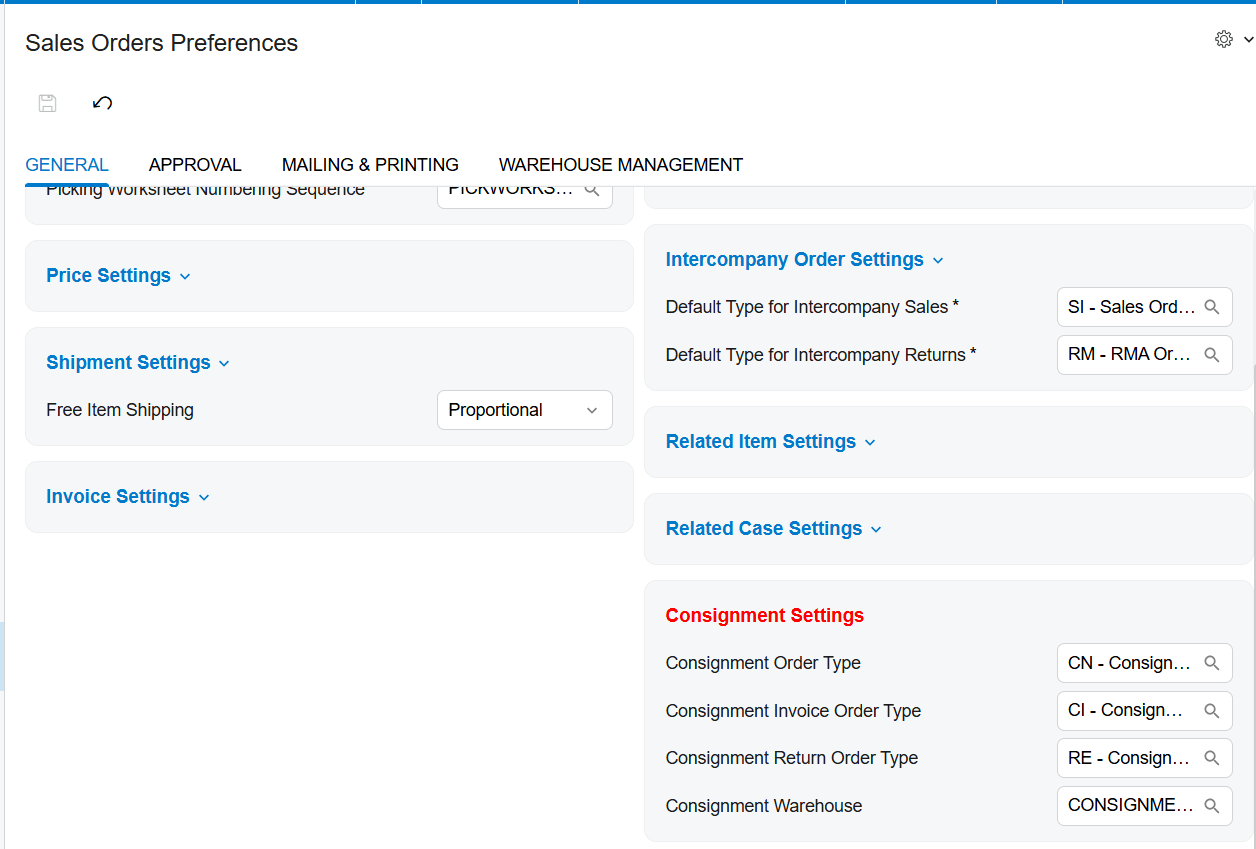
Consignment Order Type is the sales order type used for consignment orders on the Sales Orders (SO301000) form, and the corresponding order type must be created from the Transfer Order template. Consignment Invoice Order Type is the order type used for consignment invoices, and it must be created from the Invoice Order template. Consignment Return Order Type is used for consignment returns and, like the consignment order type, must be based on the Transfer Order template. Consignment Warehouse is the default warehouse selected automatically when a consignment order is chosen on the Sales Orders screen.
These template requirements are not cosmetic. Because consignment movement is physically a transfer between your warehouse and the consignee location, the order types that drive it have to behave like transfers, while the billing document has to behave like an invoice. Getting a template wrong here produces confusing behavior much later in the flow, when the transfer or the invoice fails to generate as expected.
Warehouse and Customer Rules That Control Where Consigned Stock Lands
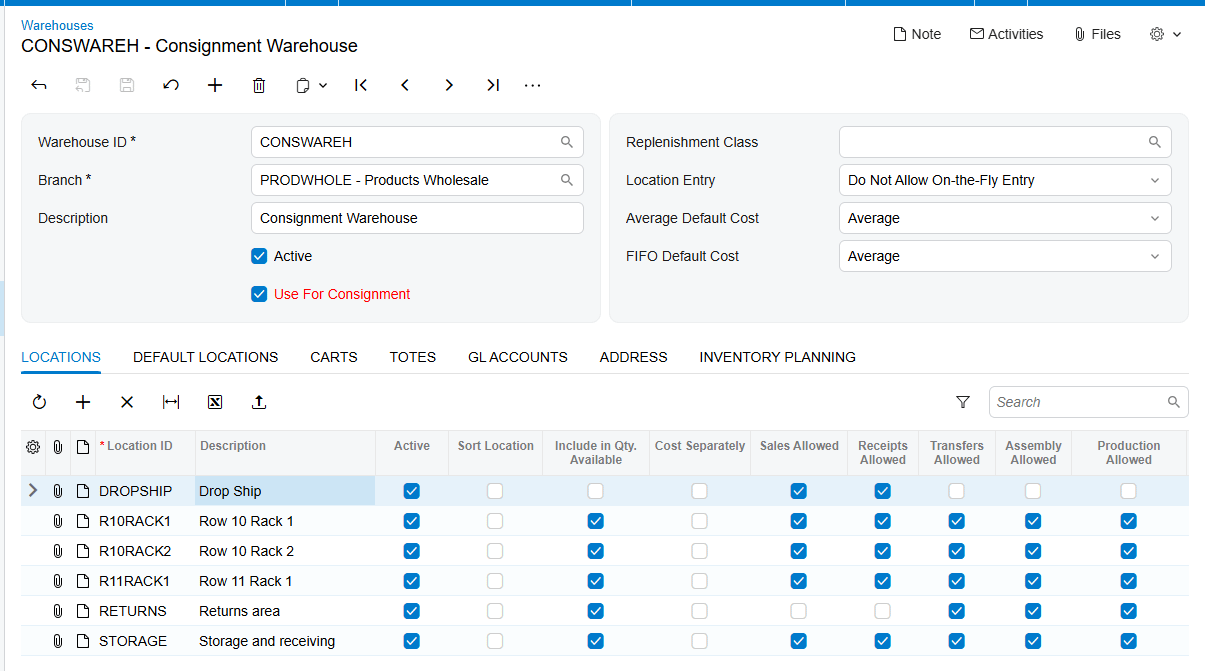
The destination of consigned inventory is governed by two settings that interact, and users should understand which one wins. On the Warehouses (IN204000) form, the Use for Consignment checkbox designates a warehouse as a consignment warehouse. Only a warehouse with this checkbox selected can be chosen in the Consignment Settings section of Sales Order Preferences.
One rule about warehouse placement causes most of the early error messages. A consignment warehouse can be selected only as the destination warehouse, while a standard, non-consignment warehouse can be selected only in the order lines. Reversing them produces an error with a corresponding notification. If a user reports that Acumatica refuses to accept a warehouse on a consignment order, this rule is almost always the reason.
Customer-level configuration then takes precedence over the global default. The specific consignment warehouse associated with the selected customer is used for the sales order, overriding any default warehouse set in Sales Order Preferences. This is what allows a business to consign stock to many different customer locations from a single set of preferences: the preference supplies a fallback, and the customer record supplies the real destination.
Stage One: Creating and Shipping the Consignment Order in Acumatica
With configuration in place, the flow begins on the Sales Orders screen. The user selects the consignment order type, identified as CN, and chooses the customer the consignment order will be associated with. The items to be shipped as part of the consignment are added to the order lines, remembering that the lines take the standard warehouse while the consignment warehouse is the destination.
From there, the order proceeds through normal shipment confirmation. This is the point where the goods physically leave your facility for the consignee location. Nothing has been invoiced and nothing has been sold; the shipment simply moves ownership-retained stock closer to the customer. The consignment-specific accounting has not happened yet, which is why the next stage matters so much.
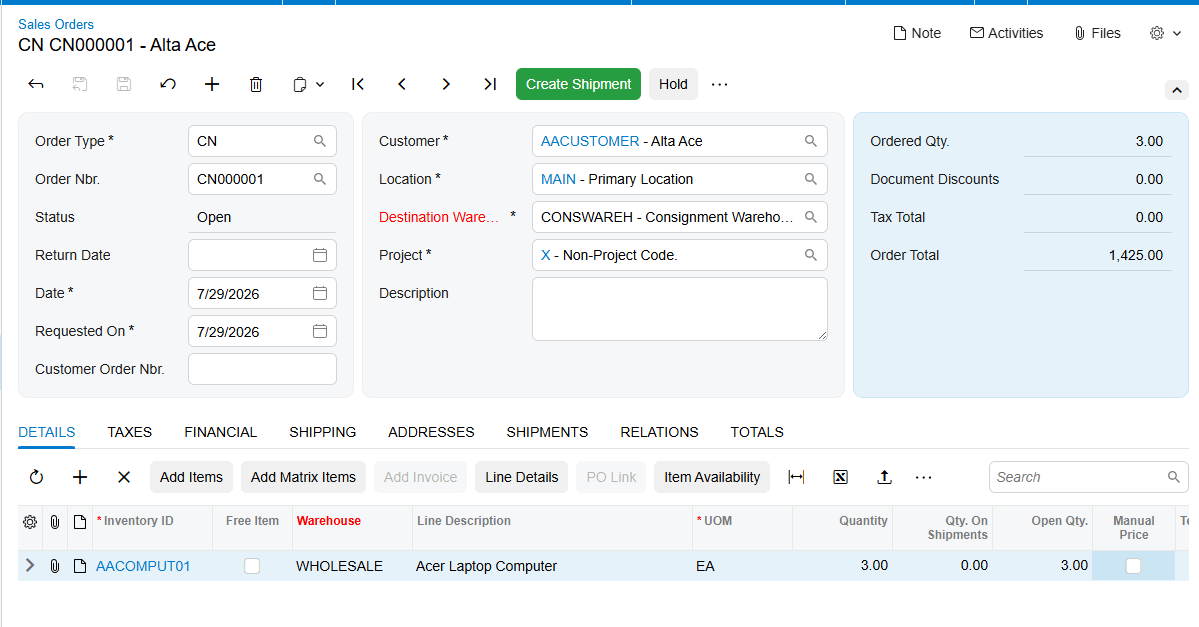
Stage Two: Update IN and the Transfer-Type Purchase Receipt
Update IN is the action that converts a confirmed shipment into a recorded inventory movement, and it is the single most important step in the entire consignment data flow. After the shipment is confirmed, the user locates the Update IN button under the Actions menu of the consignment order and clicks it.
Behind that click, Acumatica issues the corresponding items and quantities from the main warehouse and receives them into the selected consignment warehouse, automatically generating and releasing a Transfer-type purchase receipt. That purchase receipt is the audit record proving the stock moved between locations, and it is generated and released without further user intervention. Until Update IN has run, the consigned stock is not reflected in the consignment warehouse and none of the downstream consignment actions become available.
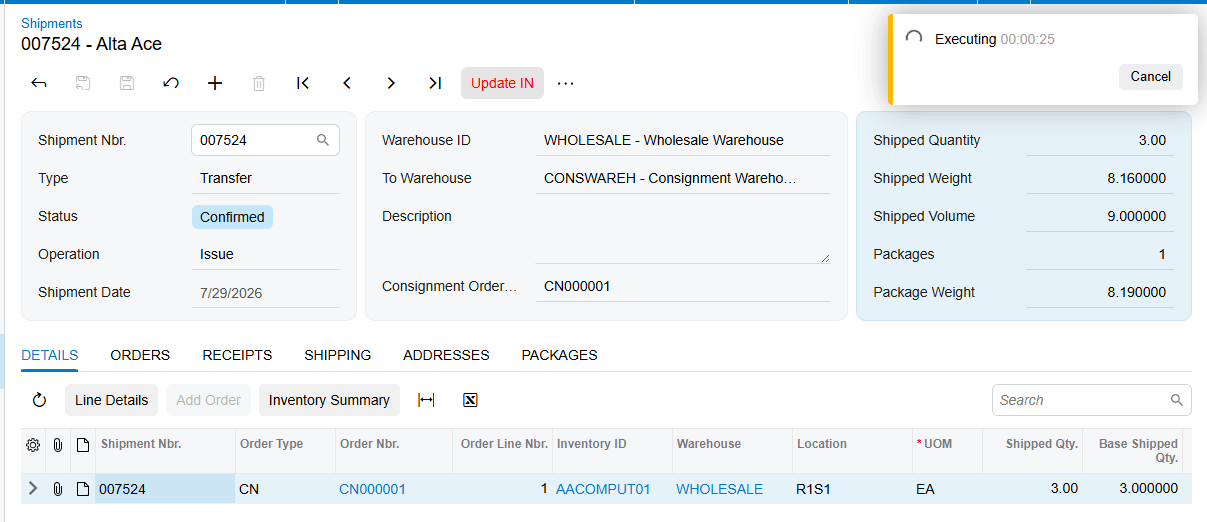
Consignment Order Statuses: Open, Consignment, Partial Consignment, and Closed
Consignment order status is the field users should watch most closely, because it tells you exactly which stage of the flow an order has reached and which actions are legal. There are four statuses:
- Open is the initial status when a consignment order is created. The order exists but none of the ordered quantities have shipped yet.
- Consignment means all ordered quantities have been shipped for consignment, so every item on the order is now part of the consignment inventory.
- Partial Consignment means only part of the ordered quantities has shipped, with the remainder still pending shipment.
- Closed means all actions related to the consignment order have been completed.
One distinction is essential and often missed during training. The statuses of consignment orders and regular sales orders are entirely separate and unrelated. They serve different purposes and operate independently within their own processes, so a consignment status should never be interpreted using the rules that apply to a standard sales order.
Status also acts as a gate on functionality. After the Update IN process, once the consignment order carries a status of Consignment or Partial Consignment, the Consignment Sell Items and Consignment Return Items buttons become enabled under the Actions menu. If those buttons are greyed out, the order has not reached the required status, which almost always means Update IN has not been run.
Stage Three: Selling Consigned Items and Generating the Consignment Invoice
Selling is where consignment inventory finally turns into revenue, and the flow is deliberately short. The Consignment Sell Items action opens the Item Selection popup, where the user selects the items and quantities the customer has sold. Clicking Add & Close generates a consignment invoice order carrying the specified warehouse, items, and quantities.
The invoice is then prepared and released from that consignment invoice order in the normal way. On release, the Cons. Sold Qty. field on the original consignment order is updated to reflect what has now been billed. This field is the running total of consigned stock that has converted to a sale, and together with the status field it gives a complete picture of where an order stands. Because the invoice is generated from the consignment order rather than created independently, the link between what shipped, what sold, and what was billed stays intact throughout.
Stage Four: Returning Unsold Consignment Items
Stock that the customer never sells has to come back, and the return path mirrors the outbound path closely. The Consignment Return Items action opens the same style of Item Selection popup, where the user specifies the items and quantities to be returned. Clicking Add & Close generates a consignment return order.
From that point the consignment return process works like the consignment order process in reverse. The return order is processed, and a purchase receipt is created once the Update IN action is executed against it. The symmetry is intentional and worth teaching explicitly: whether stock is moving out to a consignee or coming back from one, Update IN is the action that makes the inventory movement real and produces the receipt that documents it.
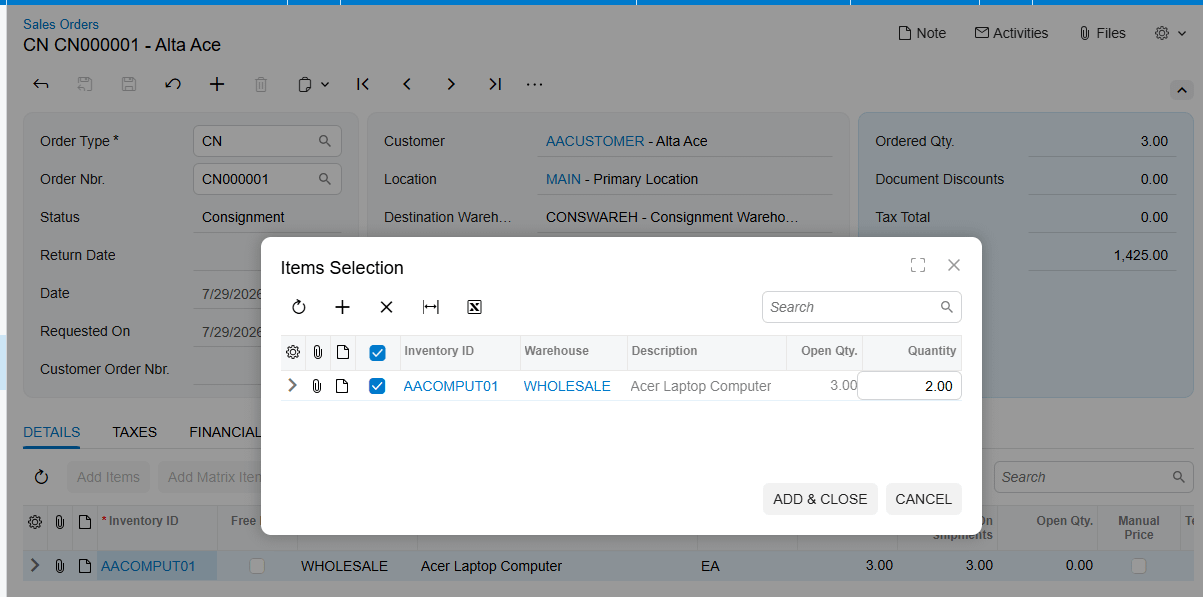
Stage Five: Closing the Consignment Order
A consignment order closes when the whole cycle is accounted for. Once all ordered items have been shipped and all shipped items have been either sold or returned, the consignment order status changes to Closed. Item quantities and statuses are updated on the consignment order screen, and both the Consignment Sell and Consignment Return buttons are disabled, since there is nothing left to act on.
Closure changes what is visible in reporting, which is important to know before someone reports missing data. The Consignment Item Details generic inquiry no longer displays item-level information for consignment orders with a Closed status. Order-level information remains available in the Consignment Orders generic inquiry. This is expected behavior, not data loss.
Physical Inventory Counts for Consignment Stock in Acumatica
Consigned stock sitting at a customer location still needs to be counted, and Acumatica supports physical inventory counts specifically for consignment stock. The process reconciles what the system believes is at the customer's site with what is actually there, and it can bill the customer automatically for the difference. For a warehouse manager reconciling consignment inventory, this is the practical alternative to waiting for the customer to report each sale.
Configuration required before the first count
Three prerequisites must be in place. On the Physical Inventory Types (IN208900) form, a PI Type must be created with the Consignment Inventory Count checkbox selected. Enabling that checkbox reveals Customer and Location fields, which must be specified for the PI Type. Finally, consignment orders must already exist in the system for the relevant customer and warehouse, since the count reads its expected quantities from them.
Step one: preparing the consignment physical count
Open the Prepare Physical Count (IN504000) form and select the PI Type ID configured for consignment inventory in the Type ID box. The system displays the related inventory IDs along with their respective Book Qty. values. This is the field that ties the count back to the consignment flow: Book Qty. displays the sum of the Open Qty. field from the Item Selection popup of the related consignment orders for the specified customer and warehouse. In other words, the count's expectation comes directly from what those consignment orders say is still unsold. Clicking Generate PI on the form toolbar creates the count document.
Step two: reviewing and counting the inventory
The system opens the Physical Inventory Review (IN305000) form. For each line, the counter enters the actual quantity found at the customer location in the Physical Qty. column. Once every quantity has been entered, the user goes to the Actions menu on the form toolbar and clicks Finish Counting.
Step three: completing the count and generating the invoice
On the same Physical Inventory Review form, clicking Complete PI finalizes the count. Acumatica then automatically generates a consignment invoice order based on the physical quantities recorded, following the standard Consignment Sell Item process described earlier. The user releases the generated invoice, and the final verification step is to confirm that the Open Qty. in the Item Selection popup of the original consignment order has been updated to reflect the new balance. That updated Open Qty. is the proof that the count, the invoice, and the consignment order are back in agreement.
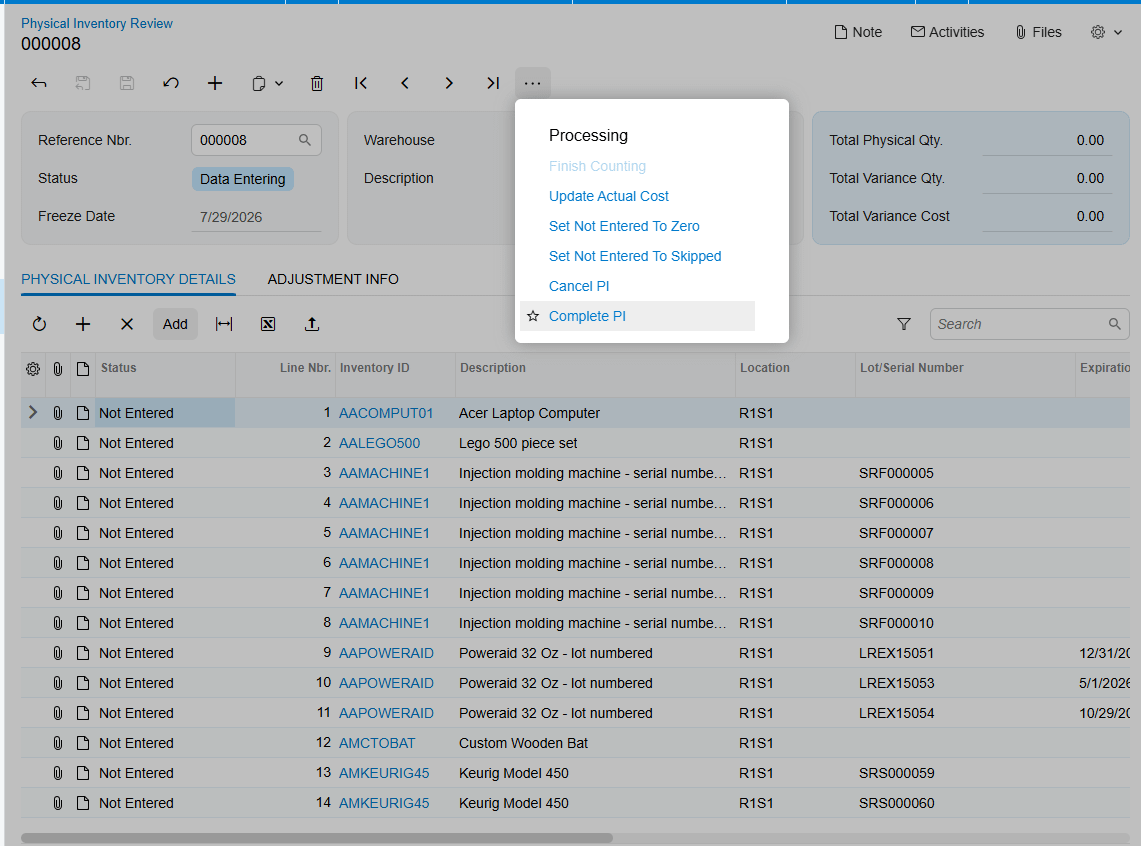
Where to Monitor Consignment Processing Results in Acumatica
When training users or investigating a consignment order that does not look right, these are the fields, screens, and inquiries that reveal what the system actually did:
- Consignment order status on the Sales Orders screen, which shows whether an order is Open, Consignment, Partial Consignment, or Closed and determines which actions are available.
- Cons. Sold Qty. on the consignment order, which updates when a consignment invoice is released and represents cumulative billed quantity.
- Open Qty. in the Item Selection popup, which represents the unsold balance still held at the consignee location and feeds the physical count.
- The Transfer-type purchase receipt generated and released by Update IN, which is the audit record for stock movement between the main and consignment warehouses.
- The Consignment Orders generic inquiry for order-level information, which remains available even after an order closes.
- The Consignment Item Details generic inquiry for item-level information, remembering that it excludes orders in Closed status by design.
- Use for Consignment on the Warehouses (IN204000) form, which controls whether a warehouse can be used as a consignment destination at all.
- The customer's assigned consignment warehouse, which overrides the default warehouse configured in Sales Order Preferences.
- Book Qty. and Physical Qty. on the physical inventory forms, which together produce the automatically generated consignment invoice.
Consignment Processing in Acumatica: Frequently Asked Questions
What is consignment inventory in Acumatica?
Consignment inventory is stock that has been shipped to a customer or consignee location but still belongs to you until the customer sells or consumes it. Acumatica Consignment Processing tracks that stock in a dedicated consignment warehouse, maintains quantities and valuation across multiple consignee locations, and shows how much has sold and how much remains unsold, so invoices are raised only for what was actually sold.
What is the difference between a consignment order and a regular sales order?
A consignment order uses a dedicated order type built from the Transfer Order template and moves stock to a consignee location without billing for it, whereas a regular sales order sells and invoices in one flow. Their statuses are also entirely distinct and unrelated: Open, Consignment, Partial Consignment, and Closed apply only to consignment orders and should not be interpreted using standard sales order logic.
What does the Update IN action do in a consignment order?
Update IN, found under the Actions menu, records the inventory movement after the shipment is confirmed. It issues the items and quantities from the main warehouse, receives them into the selected consignment warehouse, and automatically generates and releases a Transfer-type purchase receipt. Until Update IN has run, consigned stock is not reflected in the consignment warehouse and the sell and return actions stay disabled.
How is a consignment invoice created in Acumatica?
Use the Consignment Sell Items action on the consignment order to open the Item Selection popup, select the items and quantities the customer sold, and click Add & Close. Acumatica generates a consignment invoice order with the specified warehouse, items, and quantities. Once that invoice is prepared and released, the Cons. Sold Qty. field on the consignment order is updated.
How do you return unsold consignment inventory?
Use the Consignment Return Items action to open the Item Selection popup, specify the items and quantities to return, and click Add & Close. Acumatica generates a consignment return order. The return then follows the same path as the original consignment order, with a purchase receipt created once the Update IN action is executed.
Why are the Consignment Sell Items and Consignment Return Items buttons disabled?
Those buttons are enabled only when the consignment order carries a status of Consignment or Partial Consignment, which the order reaches after the Update IN process has run. If they are greyed out, either the shipment has not been confirmed and updated yet, or the order has already reached Closed status because everything shipped has been sold or returned.
Can you run a physical inventory count on consignment stock?
Yes. Create a PI Type on the Physical Inventory Types (IN208900) form with the Consignment Inventory Count checkbox selected and the Customer and Location fields specified. Prepare the count on the Prepare Physical Count (IN504000) form, where Book Qty. is drawn from the Open Qty. of related consignment orders, enter the counted amounts in Physical Qty. on the Physical Inventory Review (IN305000) form, then use Finish Counting and Complete PI. Acumatica generates a consignment invoice from the physical quantities automatically.
Work With the Biz-Tech Services Consignment Processing Product
Consignment Processing in Acumatica becomes straightforward once the data flow is clear. Preferences and warehouse settings decide where consigned stock can go, the consignment order and its shipment move it there, Update IN records the movement and produces the transfer receipt, the sell and return actions convert consigned stock into invoices or bring it home, and status plus Cons. Sold Qty. tell you where every order stands. Teams that know which field governs each handoff spend their time managing consignment inventory rather than reconstructing what happened to it.
If your business places inventory at customer locations and needs accurate visibility into what has sold, what remains, and what should be billed, we are glad to help you scope, configure, and roll out Consignment Processing in Acumatica. Visit https://biz-techservices.com to learn more about our Acumatica expertise or to schedule a personalized demonstration of the Biz-Tech Services Consignment Processing product.
How Kit Processing Works in Acumatica from Order Entry to Fulfillment
How Kit Processing Works in Acumatica from Order Entry to Fulfillment
Kit Processing in Acumatica is easiest to understand as a data flow rather than as a screen. A single kit record starts life on the Kit Specifications form, picks up defaults from your preferences screens, becomes a line on a sales order, splits into a placeholder and a set of components, and finally resolves into a shipment, an invoice, and a set of inventory transactions. Every problem a user ever reports with kits traces back to one of those handoffs. Understanding where each record is created, which field controls the next step, and where the result becomes visible is what makes the module predictable.
The Biz-Tech Services Kit Processing product lets users explode kit components directly on the Sales Orders screen, with no need to open a separate maintenance form or print a pick list just to see what a kit contains. Cost calculation for kit items is controlled from the native Sales Order Preferences screen, which gives companies flexibility without forcing maintenance adjustments to inventory items. This article follows a kit through the entire Acumatica data flow, from the specification that defines it to the released invoice that closes it out, and points out the fields worth watching at each stage.
Stage One: The Kit Specification Is the Source of Every Record
Everything downstream inherits from the Kit Specifications form, so this is where the data flow begins. The form is available only when the Kit Assembly feature is enabled on the Enable/Disable Features (CS100000) form, and you can create a kit specification only for an inventory item that has already been marked as a kit on the General tab of the Stock Items (IN202500) or Non-Stock Items (IN202000) form. That marking is the true origin point of the record. Without it, no specification can exist.
The header fields define the identity of the kit. Kit Inventory ID is the inventory identifier of the kit as assigned on the stock or non-stock item form, and Non-Stock is a read-only checkbox indicating that the kit is a non-stock kit. Revision ID uniquely identifies each revision of the specification, and Description holds a brief summary. Two checkboxes govern whether the record participates in the flow at all: Active marks the specification as usable, and Current Revision indicates which revision the system will actually use when the kit explodes on a sales order. If a kit item already has a current revision and you attempt to change it, the system warns you that saving will uncheck the previous one. Only one revision is current at a time, and that is the revision the rest of the flow will read.
Explode Kit is the field that determines whether the kit will break into its components on the Sales Orders screen. Selecting it activates three further fields that shape the entire downstream flow: Kit Placeholder Item, Explode Option, and Price Calculation. Kit has options adds Option Category and Option Codes tabs, where you define the choices a user will be asked to make during order entry. Marking an option category as Required forces the user to select a code in the Options popup before the kit order can proceed, while Sort Order controls whether categories appear in ascending or descending order in the Sales Orders dropdown. Default Code automatically includes an option code in the order without user input, which matters a great deal for any path where no human is present to choose: API calls, import scenarios, processing screens, and opportunities or sales quotes.
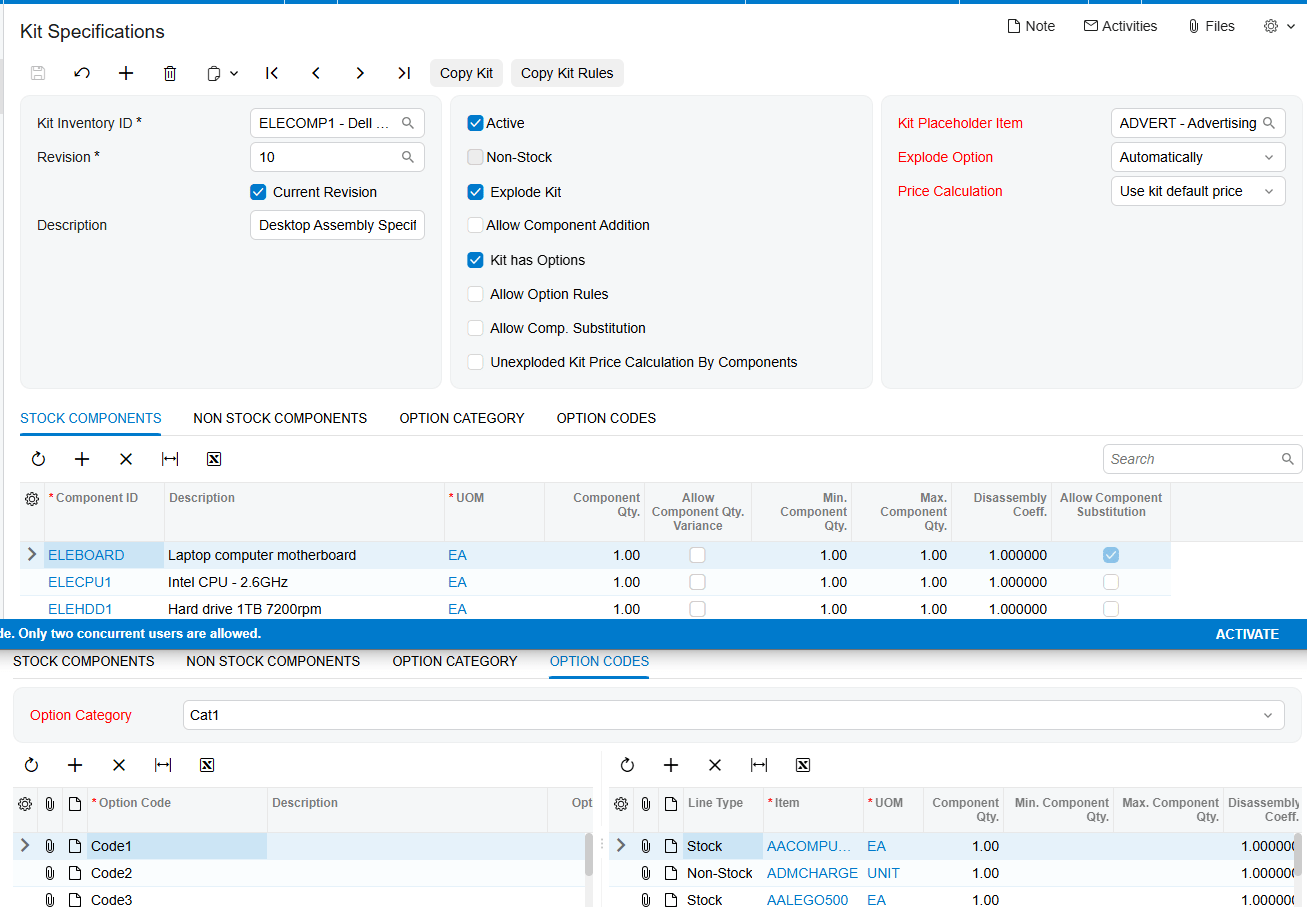
Three further checkboxes extend what users can change later in the flow. Allow Option Rules adds an Option Rule tab, where a source option category and code exclude a target option category and code on the Sales Orders screen. If Size 8x10 is configured to exclude the color Black, a user who selects 8x10 will not be offered Black; selecting a size that is not covered by a rule, such as 8x12, makes Black available again. Allow Component Substitution adds a Substitution tab and a matching column on the Stock Components tab, letting you nominate replacement items for specific components. Allow Component Addition activates the Add Row option in the Component Details dialog on the Sales Orders screen, permitting new components to be added before the kit explodes.
Two structural rules belong here because they cause real problems when missed. First, the Unit of Measure of the Kit Placeholder Item must match the Unit of Measure of the kit item, or the system raises a warning. Second, for nested kits, where a kit item is used as a component or option inside another kit, the main kit is the Parent Kit and the included kit is the Child Kit. If a non-stock kit is used as a component or option, the Explode Option for both the parent and the child must be set to Automatically. The same requirement applies when a non-stock kit contains a stock option item, because only automatic explosion ensures the stock option is allocated during shipment.
Stage Two: Acumatica Preferences Supply the Defaults That Flow Downstream
The second stage of the Acumatica Kit Processing data flow is the Biz-Tech Services Kit Processing Settings section on the Sales Orders Preferences screen, with an equivalent section on the Purchase Orders Preferences screen. Price Calculation for Kits, Kit Placeholder Item, and Explode Option are general settings that apply to every kit. The precedence rule is simple and worth teaching to every user: if those same settings are configured manually for a specific kit on the Kit Specifications screen, the system prioritizes the kit-level setting over the general one. When a kit behaves differently from what preferences suggest, the specification is almost always the reason. If the specific item has already configyration done in Kit Specifications screen, then the setup of individual item would be used
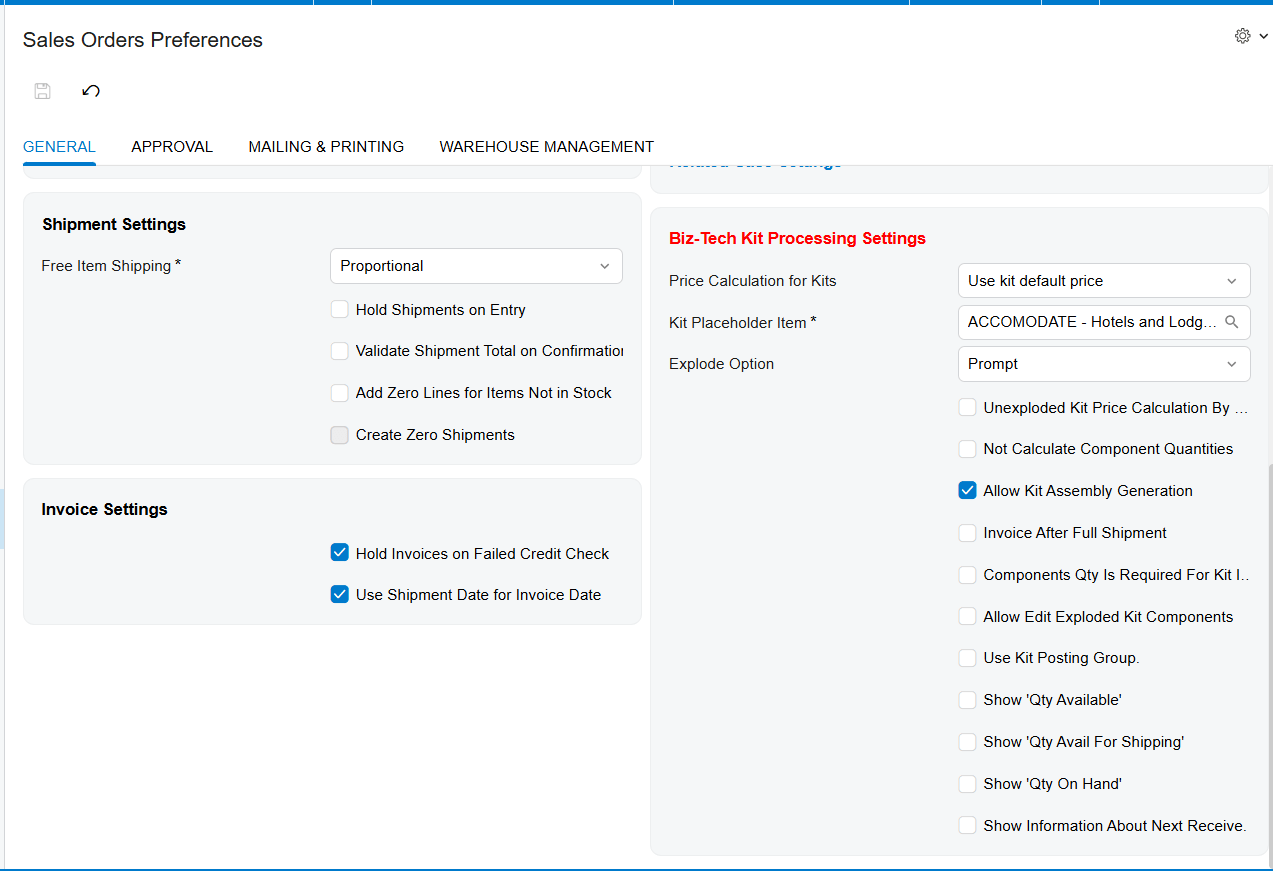
Several preference fields change how quantities and documents behave later in the flow. Not Calculate Component Quantities bases quantity calculation in sales orders on the quantity specified for the kit itself. Invoice After Full Shipment allows partial shipment and holds the placeholder item back until every component has shipped. Use Kit Posting Group places the kit item's account and subaccount values on the placeholder row after explosion, and Apply to the Components extends those same values to the component rows. Allow Kit Assembly Generation enables the assembly branch described later. Unexploded Kit Price Calculation by Components prevents the kit from exploding and calculates only the price of the components toward the order total, which is why selecting it triggers a warning that the Explode Kit checkbox should be unchecked.
Components Qty. Is Required for Kit Item Ship deserves particular attention, because it decides whether a shipment can be created at all. Selecting it reveals a dropdown with three shipping behaviors. Ship Available Qty. sets the kit or placeholder line to back order allowed and lets a shipment be created for the minimum component quantity, without requiring every component to be available. Ship Ordered Qty. requires all components to be available and allocated based on the kit quantity, so nothing ships until everything is ready. The third option allows back order without requiring component quantity to be available for shipping. Finally, Allow Edit Exploded Kit Component gives users control over component quantities after explosion and permits deletion of kit components on the Sales Orders screen, and it has the same effect on the Purchase Orders screen when set in purchase order preferences.
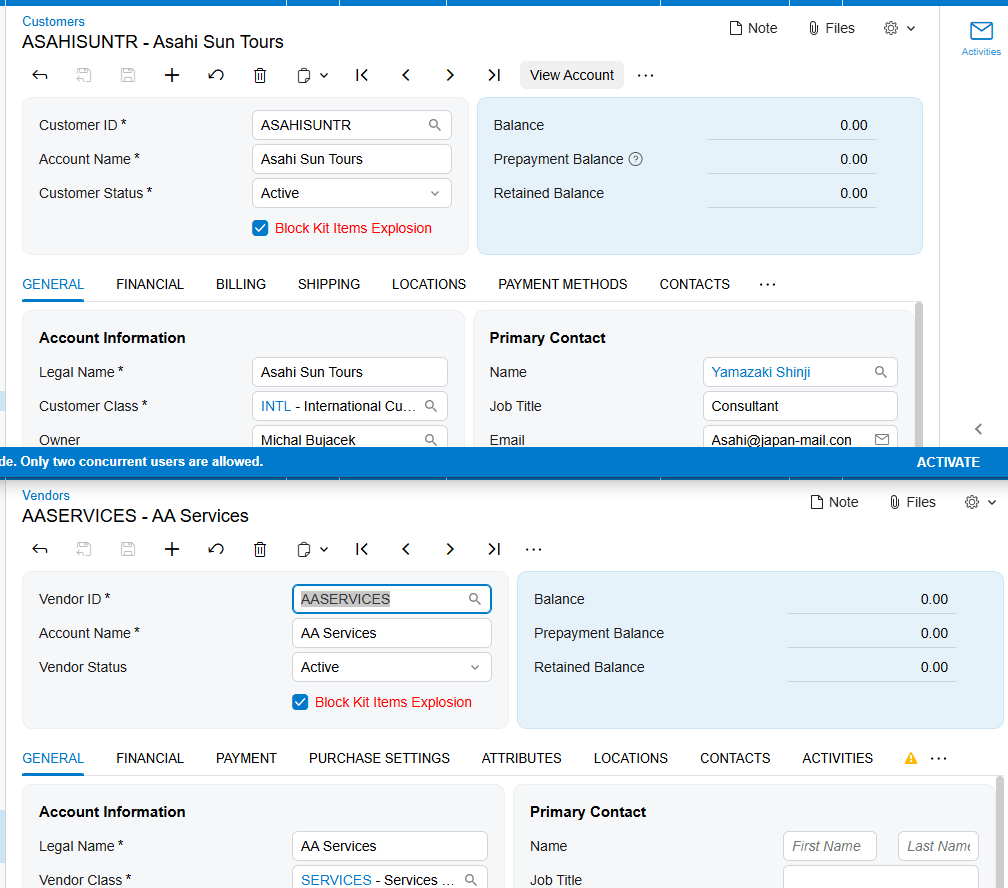
Two settings outside these screens can also stop the flow. Selecting Block Kit Items Explosion on the Customers or Vendors screen prevents kits from exploding for that business account, and the same checkbox in the Biz-Tech Kit Processing Settings on the Order Types screen prevents explosion for that order type. Both override the explode option on the kit itself, so they are the first place to look when a kit refuses to explode for one customer or one order type but works everywhere else.
Stage Three: Sales Order Entry and the Component Details Window
Once a kit item is added to a sales order, the flow moves into the Component Details popup, which is the working surface for everything that happens before explosion. If the kit has options, an Options popup opens automatically when the kit item is entered, prompting the user to select an option code for each option category before pressing OK. Those selections can still be revised without exploding the kit by using the Change Options button in Component Details; all previous option category and option code configurations remain intact unless they are manually changed.
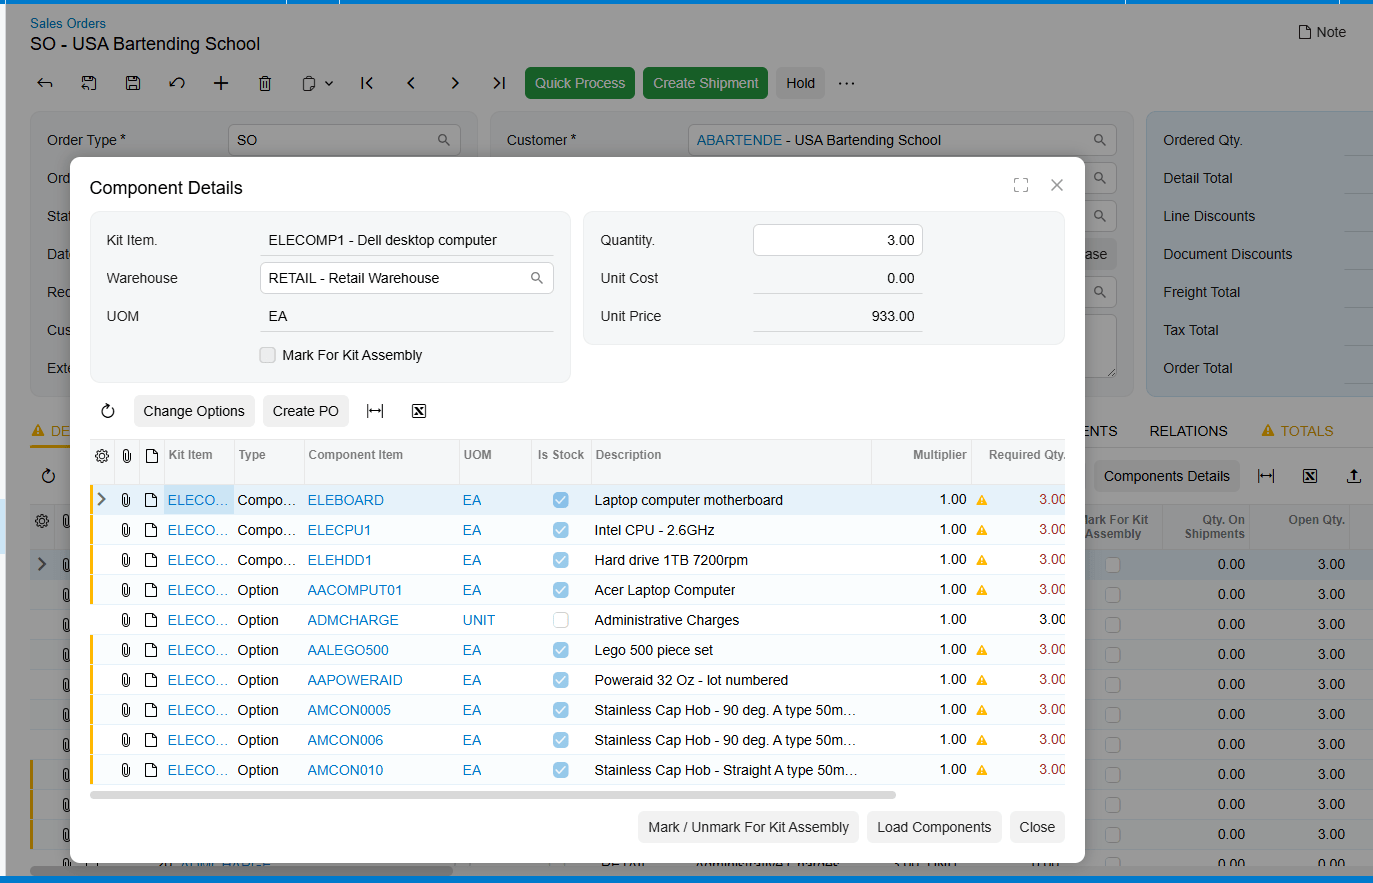
Before explosion, Component Details is where the order line is shaped. Users can add or delete components, and they can exchange a component for an approved substitute by double-clicking the item and choosing the replacement from the search icon that appears beside it. This window is also the point where purchasing can be triggered. Selecting the Mark for PO checkbox for a component and clicking Create PO generates a purchase order, and the resulting purchase order number is displayed under the PO Number field in Component Details. The required quantity must have a value for the purchase order to be created. Purchase orders are created according to the Default Vendor ID of each component, and when several components share the same vendor, a single purchase order covers them all. If that purchase order or its lines are later deleted, the number is removed from Component Details automatically, which keeps the reference trustworthy.
Stage Four: Acumatica Kit Explosion and the Placeholder Item
Explosion is the pivotal transformation in the Biz-Tech Services Acumatica Kit Processing flow, because it is the moment one order line becomes many. A kit explodes in one of two ways: by clicking Load Components in the Component Details dialog, or simply by assigning a quantity to the newly added kit on the sales order. Which of these is even possible depends on the Explode Option chosen earlier. Prompt asks the user whether to explode, Automatically explodes without user intervention, and Do Not Explode prevents explosion entirely.
When the kit explodes, the kit placeholder item and its components appear on the sales order lines with their respective prices, quantities, and costs. The placeholder is a non-stock item that replaces the kit item on the Sales Orders screen after explosion. Its purpose is financial accuracy: a kit item consists of multiple components, and when those components are added to the order as real lines, leaving the original kit item in place would double-count item cost. The placeholder behaves like the kit item in the order but contains no actual items. One field on that placeholder row is worth monitoring closely. Total Cost of Components is calculated as the component's unit cost at the time the sales order was created, which does not change afterward, multiplied by the quantity. It is displayed on the kit placeholder row and carried forward to the invoice, making it the natural checkpoint for verifying kit margin.
Price Calculation determines what the customer is charged, and it offers three methods. Use Kit Default Price applies the kit's own default price, plus any manually added price for its options. Use Component Default Price bases the price on each component's default price and sets the kit item price to zero. Use Combined Default Price adds the kit's default price to the default prices of the components. The choice matters beyond the order total, because it changes how partial shipments are invoiced, as described in the fulfillment stage below.
Editing rules tighten once explosion has occurred, and this catches users out more than any other behavior in the module. After the kit has exploded, components can no longer be added or deleted from the Component Details popup; only Quantity and Warehouse remain editable there. To add or remove components at that point, users must work with the [X] and [+] buttons on the Document Details tab of the sales order. Before explosion, the picture is different again: if Allow Component Addition is off, new components cannot be added, although existing components can still be deleted.
Stage Five: The Acumatica Kit Assembly Branch
Kit Assembly is an optional branch in the Acumatica data flow rather than a mandatory step, and it is available only when the Kit Assembly feature is enabled on the Enable/Disable Features (CS100000) form. A kit assembly document contains the required stock components with their quantities and costs, calculated according to the kit specification revision you specify. Assemblies can be created directly on the Kit Assembly screen by entering the kit item in the Inventory ID field, selecting the revision, choosing a warehouse, and entering a quantity. Components can be added or removed before the assembly is released.
The more interesting path runs from the sales order, because it lets you assemble without exploding the kit. The user enters the kit on the sales order, optionally adjusts components in the Component Details popup, selects the Mark for Kit Assembly checkbox on the Details tab, and then clicks Generate Kit Assembly from the Actions list followed by Save. The same action is available through the Mark/Unmark for Kit Assembly button in the Component Details dialog. The generated assembly places a link number in the Kit Assembly field on the Details tab of the sales order, and clicking that link opens the Kit Assembly form. The relationship is visible from both ends: the Orders tab of the Kit Assembly screen shows the linked sales order number the assembly came from. Two constraints apply. Kit assemblies generated from sales orders always use the current revision specified on the Kit Specifications screen, and for non-stock kit items the Mark for Assembly button is disabled.
Stage Six: Kit Order Fulfillment in Acumatica
With explosion complete, the order moves into the standard Acumatica fulfillment cycle, and the kit records follow the components rather than the kit. The sequence is four steps. First, click Create Shipment on the toolbar and confirm the Specify Shipment Parameters window with OK. Second, on the Shipments screen to which you are redirected, click Confirm Shipment. Third, on the Invoices screen, click Prepare Invoice. Fourth, release the invoice with the Release button. At that point the inventory and financial impact of the kit is fully posted.
Partial shipments introduce one behavior that finance teams should know before it appears on a customer document. When Use Kit Default Price is the selected price calculation method and the order ships partially, the invoice for the first shipment carries the total kit price, and the invoice price for the remaining items is zero. This is intentional, since the kit is priced once rather than per component, but it looks surprising on a second invoice if nobody was expecting it. Where this is undesirable, Invoice After Full Shipment holds the placeholder back until all components have shipped, so the kit is invoiced only once everything is out the door.
The Purchase Order Side of Kit Processing
Kit Processing in Acumatica is not limited to the sell side. The Purchase Orders Preferences screen carries the same Biz-Tech Kit Processing Settings section, with the same precedence rule that kit-level configuration overrides the general settings, and the same Unexploded Kit Price Calculation by Components and Allow Edit Exploded Kit Component behaviors. Adding a kit item to a purchase order gives access to the same Component Details popup, where components can be added, deleted, or exchanged for substitutes and options can be changed before explosion. The kit is exploded either by clicking Load Components or by assigning a quantity to the kit line, exactly as on the sales order.
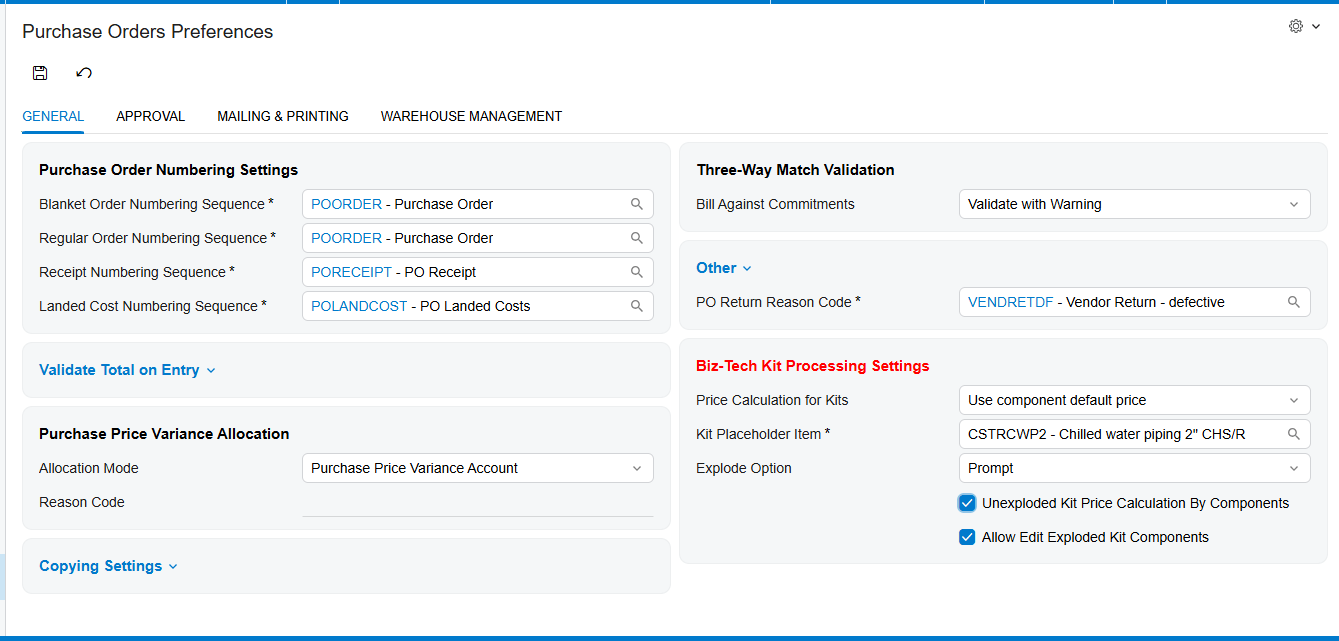
The inbound flow then completes in three moves. A purchase order containing the kit items is created and exploded. When the components are received, a purchase receipt for the ordered items is created. On release of that purchase receipt, the system automatically generates an inventory receipt reflecting the items in inventory. That automatic inventory receipt is the point at which purchased kit components become available stock, so it is the record to check when component availability does not look right after a delivery.
Where the Flow Starts Earlier: Opportunities and Sales Quotes
For businesses that quote before they sell, the kit data flow begins one step earlier. A kit item is added on the Details tab of the Opportunities screen and a quote is generated with the Create Quote button. The kit will not explode on the Opportunities screen itself.
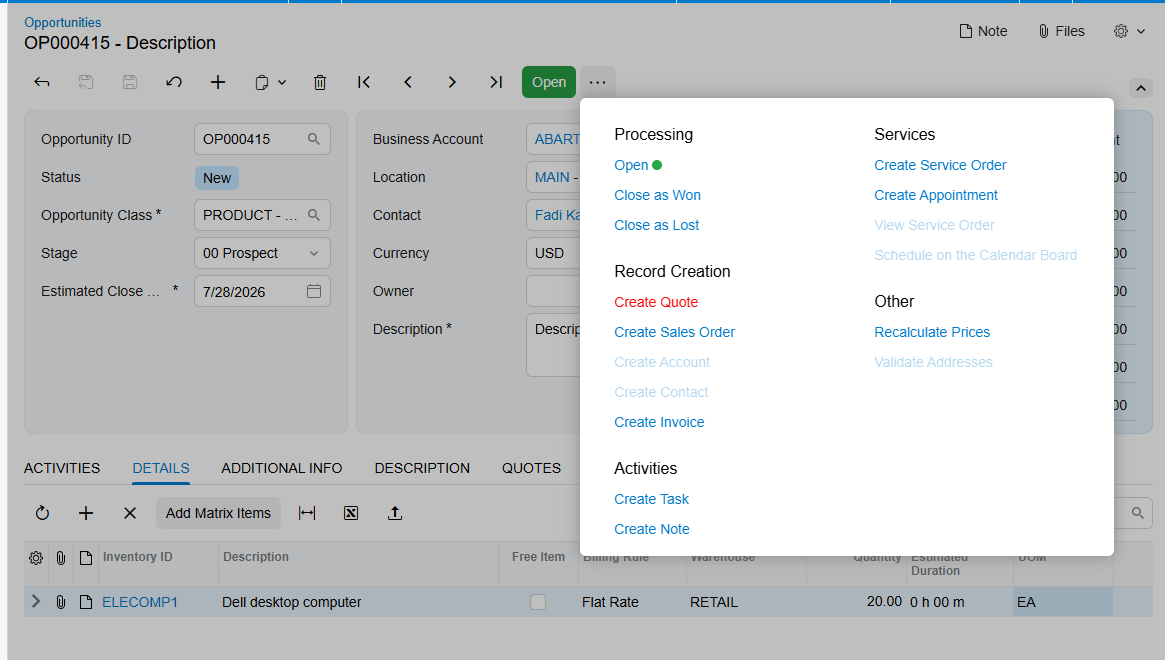
Explosion happens on the Sales Quotes screen, either by giving the kit a quantity or by clicking Load Components on the Details tab. After saving, the exploded kit is reflected back in the Details tab of the Opportunities screen, and from then on any change made to the exploded kit updates in both screens. This is also the path where Default Code earns its place, since no user is prompted to pick options during automated or quote-driven creation.
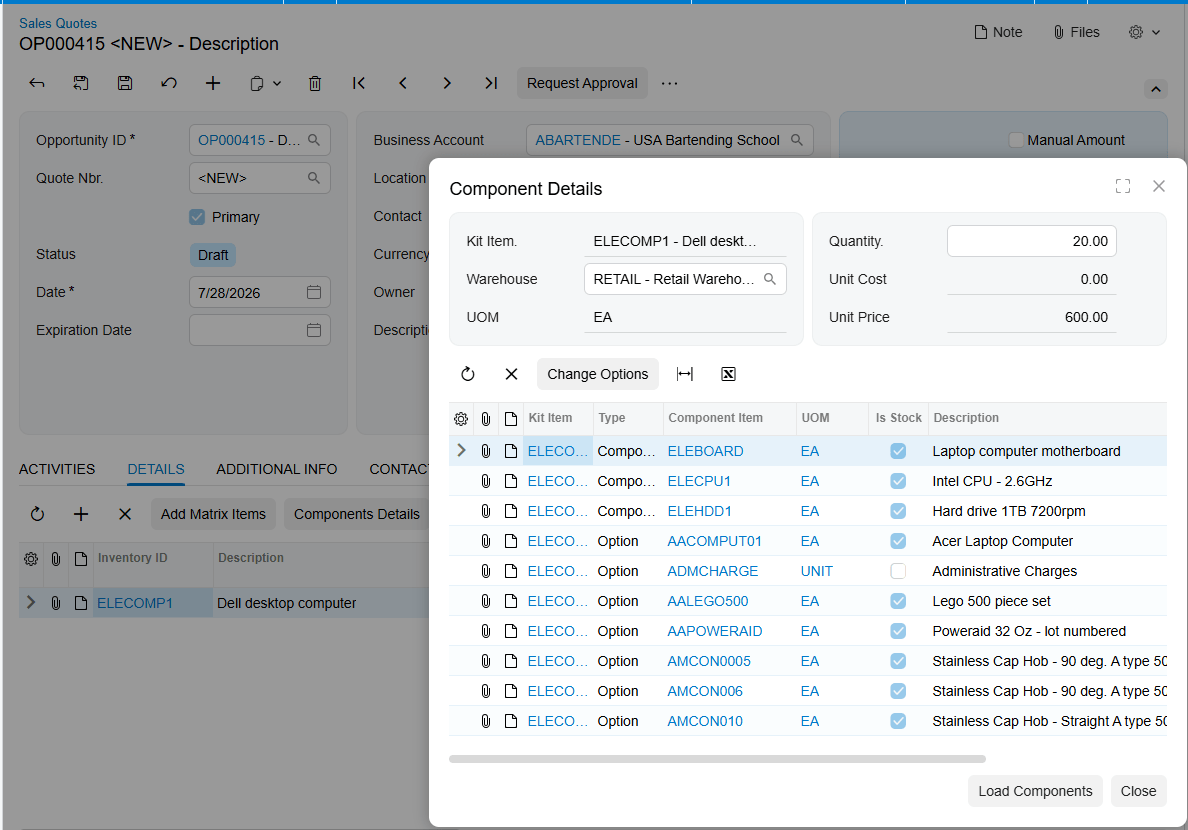
Kit Pricing Summary: Where Pricing Is Reviewed and Applied
Kit Pricing Summary is the analysis point of the Acumatica Kit Processing flow, and it uses the same explosion logic as the order screens. For a kit to appear here, its specification must have the Active checkbox selected and the Revision field filled in. Selecting the kit in the Kit Inventory ID field loads the kit together with its components, stock components first and non-stock components after. Each component line displays Quantity, Unit Price, Min Markup %, Markup %, Extended Price, and Surcharge, and the calculated totals of Extended Price and Surcharge appear on the last line.
Two formulas govern the numbers. Surcharge is calculated as quantity multiplied by unit price multiplied by minimum markup, divided by one hundred. Total with Surcharge is the sum of the extended price and surcharge amounts across the component lines. Clicking Apply Price takes the total surcharge from the last line and applies it to the kit item's default price, which is how component-level markup becomes a kit-level price. The screen works for nested kits as well: after the parent kit is exploded, the components of both kits load together and the totals line sums their extended prices and surcharges. The whole summary can be exported to Excel, which makes it a practical review artifact for a pricing meeting.
Where to Monitor Kit Processing Results in Acumatica
If you are training users or troubleshooting a kit order in Acumatica, these are the fields and screens that tell you what the system actually did:
- Current Revision on Kit Specifications, which determines the revision every downstream document reads.
- Explode Option and Explode Kit, which decide whether the order line ever becomes components.
- Block Kit Items Explosion on the Customers, Vendors, and Order Types screens, which silently overrides the kit's own explode setting.
- Total Cost of Components on the kit placeholder row, which carries the frozen unit cost forward to the invoice.
- PO Number in the Component Details popup, which confirms whether a component was purchased and stays accurate if the purchase order is deleted.
- Kit Assembly on the sales order Details tab, which links to the generated assembly, and the Orders tab of the Kit Assembly screen, which links back.
- The Component Availability section of Component Details, which can display Qty. Available, Qty. Avail. for Shipping, and Qty. on Hand.
- Next receive information in the same window, including next receive type and reference number, with Inc. In Receipt, Inc. In Transfer, Inc. PO, Inc. PO Receipt, and Inc. PO Transfer controlling which documents are considered when calculating the next receive date and quantity.
- The totals line on Kit Pricing Summary, where extended price and surcharge are reviewed before Apply Price changes the kit's default price.
One note on availability display: if any kit component has a quantity of zero and the kit item is not set to back order allowed, an error message appears when the availability checkbox is selected. That message is a genuine signal about allocation, not a display fault.
Loading Kits in Bulk with Acumatica Import Scenarios
Kit items do not have to be built by hand. Acumatica import scenarios support structured, automated entry of kit data from external sources, and the product ships with a set of scenarios that map to the stages described above. BZ-Import Is a Kit Check Box in Non-Stock and BZ-Import Is a Kit Check Box in Stock enable the Is a Kit checkbox on the respective item forms, which is the prerequisite for everything else. BZ-Import Kit Header configures the header section of the Kit Specifications screen. BZ-Import Kit Stock Components and BZ-Import Kit Non-Stock Components add components to the kit. BZ-Import Kit Option Category adds option categories, option codes, and the stock and non-stock components associated with each code, and BZ-Import Kit Substitution adds substitute items for the relevant components. Before running any of them, confirm that data mapping between the external source and the corresponding Acumatica fields is correct, and remember that Default Code matters here because an import has no user to answer an options prompt.
Kit Processing in Acumatica: Frequently Asked Questions
What is the kit placeholder item and why does Acumatica use one?
The kit placeholder item is a non-stock item that replaces the kit item on the Sales Orders screen after explosion. Because the components are added to the order as their own lines, keeping the original kit item would double-count item cost. The placeholder behaves like the kit item in the order but contains no actual items. Its unit of measure must match the unit of measure of the kit item, or the system raises a warning.
Why will my kit not explode on the sales order?
Check four things in order. The kit specification must have Explode Kit selected and a current revision marked. The Explode Option must not be set to Do Not Explode. The Block Kit Items Explosion checkbox may be selected on the Customers or Vendors screen, or in the Biz-Tech Kit Processing Settings on the Order Types screen, either of which prevents explosion. Finally, Unexploded Kit Price Calculation by Components deliberately prevents explosion and prices the kit by its components instead.
Can components be changed after a kit has exploded?
Only partially. Once the kit has exploded, components can no longer be added or deleted from the Component Details popup, where just Quantity and Warehouse remain editable. To add or remove components after explosion, use the [X] and [+] buttons on the Document Details tab of the sales order. Editing component quantities and deleting components on the order screen also requires Allow Edit Exploded Kit Component to be enabled in preferences.
How does Acumatica price a kit that ships partially?
When Use Kit Default Price is the selected price calculation method, the invoice for the first shipment carries the total kit price and the invoice price for the remaining items is zero, because the kit is priced once rather than per component. If you would rather invoice only when the order is complete, enable Invoice After Full Shipment, which permits partial shipment but holds the placeholder item back until every component has shipped.
Can a kit contain another kit?
Yes. Kit items can be configured as nested components or options inside both stock and non-stock kit specifications, with the outer kit acting as the Parent Kit and the included kit as the Child Kit. If a non-stock kit is used as a component or option, the Explode Option for both the parent and the child must be set to Automatically. The Copy Kit function and the Kit Pricing Summary screen both support nested kits.
How do I create a purchase order for a single kit component?
Add the kit to the sales order and, without exploding it, open the Component Details popup. Select the Mark for PO checkbox for the component you need and click Create PO. The required quantity must have a value. The purchase order is created against the component's Default Vendor ID, several components sharing a vendor are combined into one purchase order, and the resulting number appears in the PO Number field of the popup.
Work With the Biz-Tech Services Kit Processing Product
Kit Processing in Acumatica rewards teams who understand the flow rather than memorizing screens. The specification defines the kit, preferences supply the defaults, order entry shapes the line, explosion turns one line into a placeholder plus components, and fulfillment converts those components into shipments, invoices, and inventory transactions. Once users know which field governs each handoff and where to look when a result is unexpected, kit orders stop being a special case and become routine.
If your business sells or purchases configured products and wants kit components visible and controllable right on the order, we are glad to help you scope, configure, and roll out Kit Processing. Visit https://biz-techservices.com to learn more about our Acumatica expertise or to schedule a personalized demonstration of the Biz-Tech Services Kit Processing product.
How Kit Processing Works in Acumatica from Order Entry to Fulfillment
Kit Processing in Acumatica is easiest to understand as a data flow rather than as a screen. A single kit record starts life on the Kit Specifications form, picks up defaults from your preferences screens, becomes a line on a sales order, splits into a placeholder and a set of components, and finally resolves into a shipment, an invoice, and a set of inventory transactions. Every problem a user ever reports with kits traces back to one of those handoffs. Understanding where each record is created, which field controls the next step, and where the result becomes visible is what makes the module predictable.
The Biz-Tech Services Kit Processing product lets users explode kit components directly on the Sales Orders screen, with no need to open a separate maintenance form or print a pick list just to see what a kit contains. Cost calculation for kit items is controlled from the native Sales Order Preferences screen, which gives companies flexibility without forcing maintenance adjustments to inventory items. This article follows a kit through the entire Acumatica data flow, from the specification that defines it to the released invoice that closes it out, and points out the fields worth watching at each stage.
Stage One: The Kit Specification Is the Source of Every Record
Everything downstream inherits from the Kit Specifications form, so this is where the data flow begins. The form is available only when the Kit Assembly feature is enabled on the Enable/Disable Features (CS100000) form, and you can create a kit specification only for an inventory item that has already been marked as a kit on the General tab of the Stock Items (IN202500) or Non-Stock Items (IN202000) form. That marking is the true origin point of the record. Without it, no specification can exist.
The header fields define the identity of the kit. Kit Inventory ID is the inventory identifier of the kit as assigned on the stock or non-stock item form, and Non-Stock is a read-only checkbox indicating that the kit is a non-stock kit. Revision ID uniquely identifies each revision of the specification, and Description holds a brief summary. Two checkboxes govern whether the record participates in the flow at all: Active marks the specification as usable, and Current Revision indicates which revision the system will actually use when the kit explodes on a sales order. If a kit item already has a current revision and you attempt to change it, the system warns you that saving will uncheck the previous one. Only one revision is current at a time, and that is the revision the rest of the flow will read.
Explode Kit is the field that determines whether the kit will break into its components on the Sales Orders screen. Selecting it activates three further fields that shape the entire downstream flow: Kit Placeholder Item, Explode Option, and Price Calculation. Kit has options adds Option Category and Option Codes tabs, where you define the choices a user will be asked to make during order entry. Marking an option category as Required forces the user to select a code in the Options popup before the kit order can proceed, while Sort Order controls whether categories appear in ascending or descending order in the Sales Orders dropdown. Default Code automatically includes an option code in the order without user input, which matters a great deal for any path where no human is present to choose: API calls, import scenarios, processing screens, and opportunities or sales quotes.
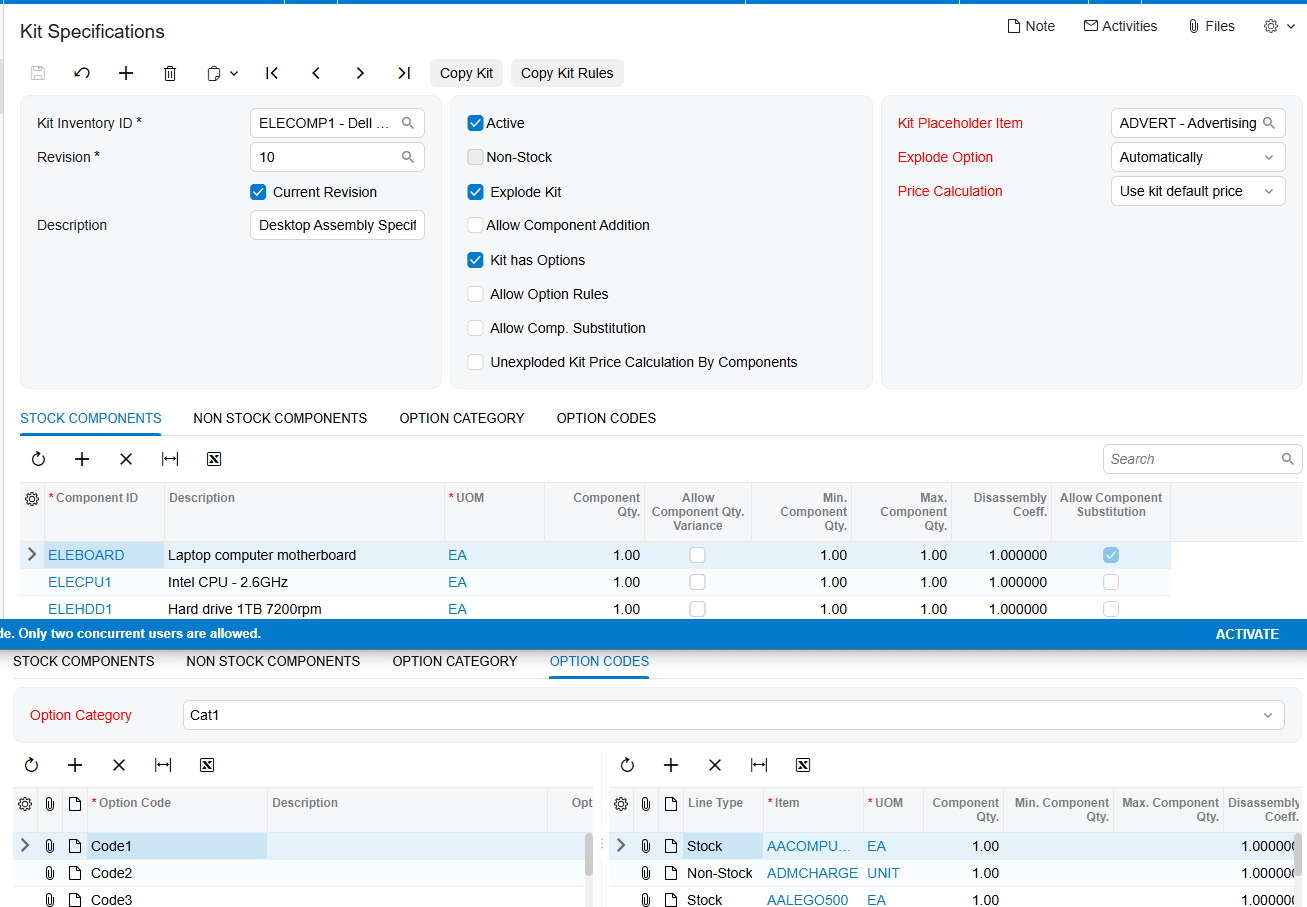
Three further checkboxes extend what users can change later in the flow. Allow Option Rules adds an Option Rule tab, where a source option category and code exclude a target option category and code on the Sales Orders screen. If Size 8x10 is configured to exclude the color Black, a user who selects 8x10 will not be offered Black; selecting a size that is not covered by a rule, such as 8x12, makes Black available again. Allow Component Substitution adds a Substitution tab and a matching column on the Stock Components tab, letting you nominate replacement items for specific components. Allow Component Addition activates the Add Row option in the Component Details dialog on the Sales Orders screen, permitting new components to be added before the kit explodes.
Two structural rules belong here because they cause real problems when missed. First, the Unit of Measure of the Kit Placeholder Item must match the Unit of Measure of the kit item, or the system raises a warning. Second, for nested kits, where a kit item is used as a component or option inside another kit, the main kit is the Parent Kit and the included kit is the Child Kit. If a non-stock kit is used as a component or option, the Explode Option for both the parent and the child must be set to Automatically. The same requirement applies when a non-stock kit contains a stock option item, because only automatic explosion ensures the stock option is allocated during shipment.
Stage Two: Acumatica Preferences Supply the Defaults That Flow Downstream
The second stage of the Acumatica Kit Processing data flow is the Biz-Tech Services Kit Processing Settings section on the Sales Orders Preferences screen, with an equivalent section on the Purchase Orders Preferences screen. Price Calculation for Kits, Kit Placeholder Item, and Explode Option are general settings that apply to every kit. The precedence rule is simple and worth teaching to every user: if those same settings are configured manually for a specific kit on the Kit Specifications screen, the system prioritizes the kit-level setting over the general one. When a kit behaves differently from what preferences suggest, the specification is almost always the reason. If the specific item has already configyration done in Kit Specifications screen, then the setup of individual item would be used
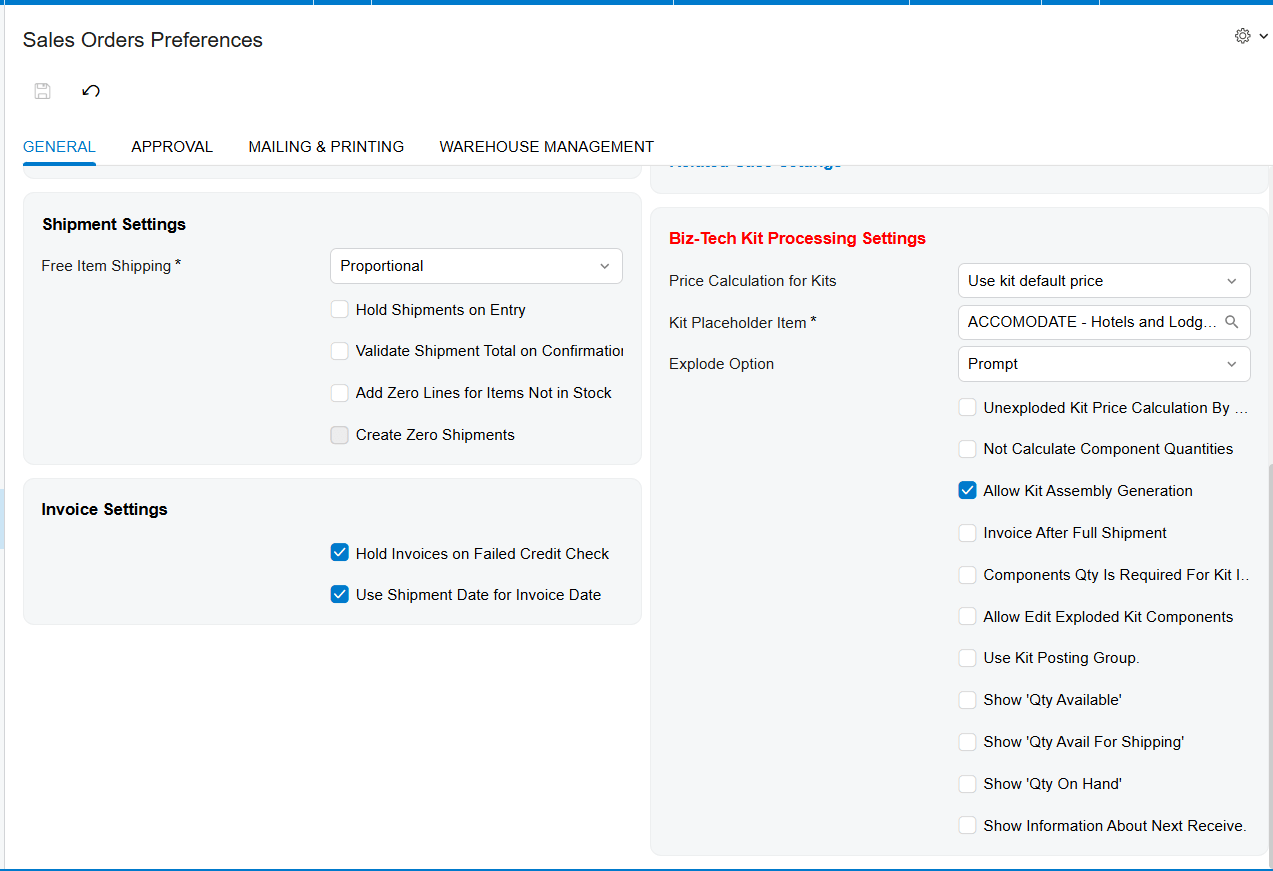
Several preference fields change how quantities and documents behave later in the flow. Not Calculate Component Quantities bases quantity calculation in sales orders on the quantity specified for the kit itself. Invoice After Full Shipment allows partial shipment and holds the placeholder item back until every component has shipped. Use Kit Posting Group places the kit item's account and subaccount values on the placeholder row after explosion, and Apply to the Components extends those same values to the component rows. Allow Kit Assembly Generation enables the assembly branch described later. Unexploded Kit Price Calculation by Components prevents the kit from exploding and calculates only the price of the components toward the order total, which is why selecting it triggers a warning that the Explode Kit checkbox should be unchecked.
Components Qty. Is Required for Kit Item Ship deserves particular attention, because it decides whether a shipment can be created at all. Selecting it reveals a dropdown with three shipping behaviors. Ship Available Qty. sets the kit or placeholder line to back order allowed and lets a shipment be created for the minimum component quantity, without requiring every component to be available. Ship Ordered Qty. requires all components to be available and allocated based on the kit quantity, so nothing ships until everything is ready. The third option allows back order without requiring component quantity to be available for shipping. Finally, Allow Edit Exploded Kit Component gives users control over component quantities after explosion and permits deletion of kit components on the Sales Orders screen, and it has the same effect on the Purchase Orders screen when set in purchase order preferences.
Two settings outside these screens can also stop the flow. Selecting Block Kit Items Explosion on the Customers or Vendors screen prevents kits from exploding for that business account, and the same checkbox in the Biz-Tech Kit Processing Settings on the Order Types screen prevents explosion for that order type. Both override the explode option on the kit itself, so they are the first place to look when a kit refuses to explode for one customer or one order type but works everywhere else.
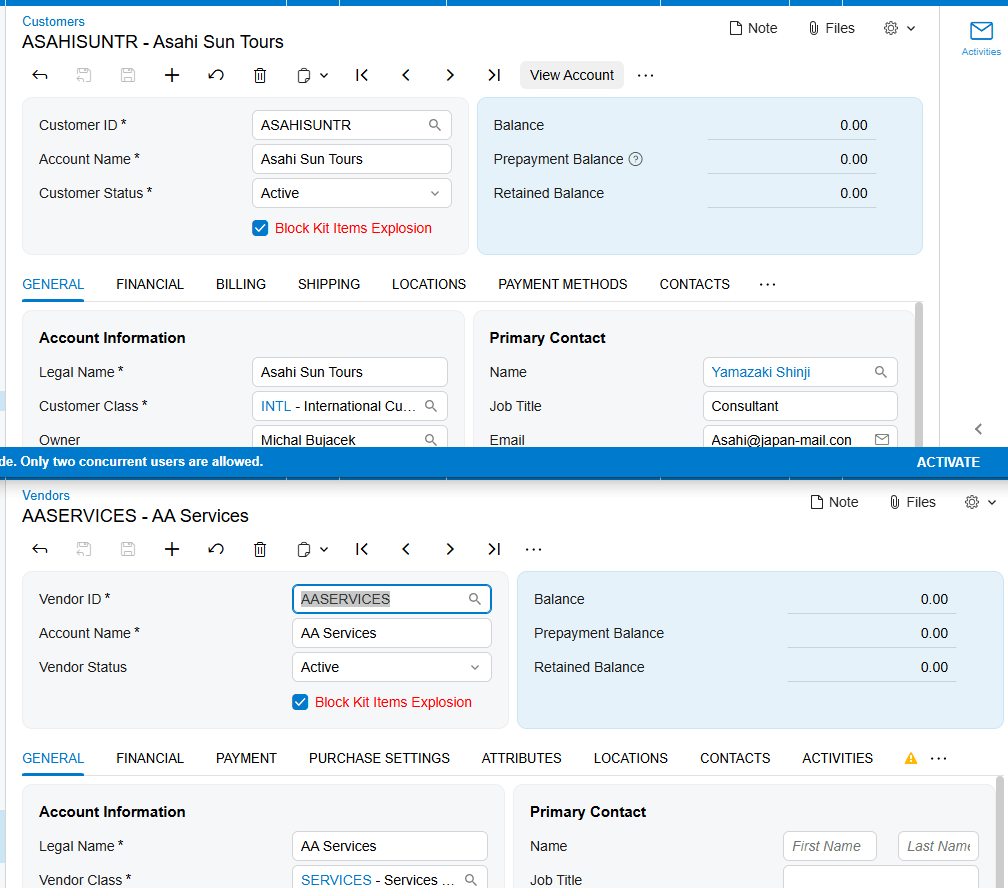
Stage Three: Sales Order Entry and the Component Details Window
Once a kit item is added to a sales order, the flow moves into the Component Details popup, which is the working surface for everything that happens before explosion. If the kit has options, an Options popup opens automatically when the kit item is entered, prompting the user to select an option code for each option category before pressing OK. Those selections can still be revised without exploding the kit by using the Change Options button in Component Details; all previous option category and option code configurations remain intact unless they are manually changed.
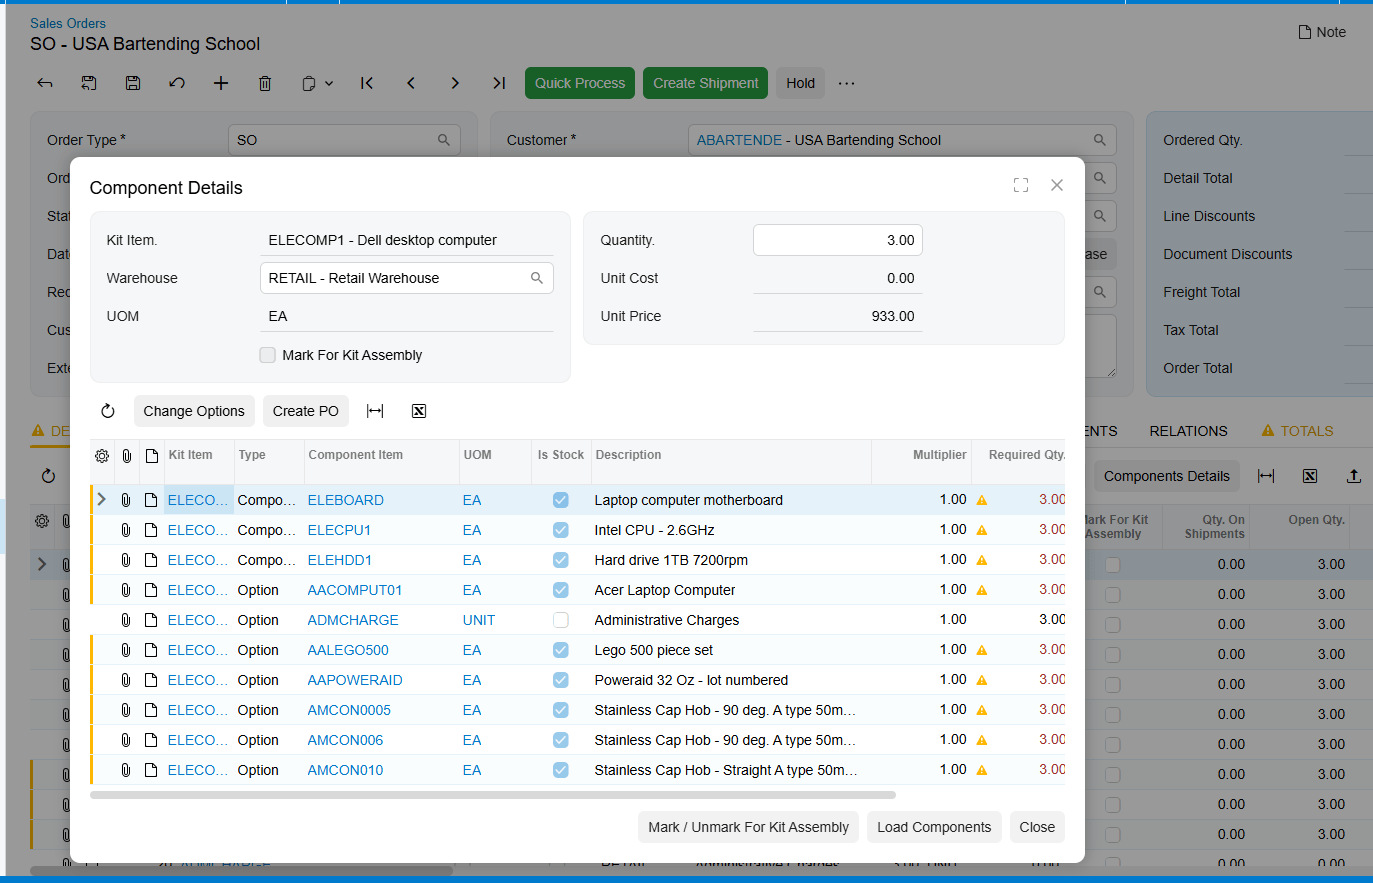
Before explosion, Component Details is where the order line is shaped. Users can add or delete components, and they can exchange a component for an approved substitute by double-clicking the item and choosing the replacement from the search icon that appears beside it. This window is also the point where purchasing can be triggered. Selecting the Mark for PO checkbox for a component and clicking Create PO generates a purchase order, and the resulting purchase order number is displayed under the PO Number field in Component Details. The required quantity must have a value for the purchase order to be created. Purchase orders are created according to the Default Vendor ID of each component, and when several components share the same vendor, a single purchase order covers them all. If that purchase order or its lines are later deleted, the number is removed from Component Details automatically, which keeps the reference trustworthy.
Stage Four: Acumatica Kit Explosion and the Placeholder Item
Explosion is the pivotal transformation in the Biz-Tech Services Acumatica Kit Processing flow, because it is the moment one order line becomes many. A kit explodes in one of two ways: by clicking Load Components in the Component Details dialog, or simply by assigning a quantity to the newly added kit on the sales order. Which of these is even possible depends on the Explode Option chosen earlier. Prompt asks the user whether to explode, Automatically explodes without user intervention, and Do Not Explode prevents explosion entirely.
When the kit explodes, the kit placeholder item and its components appear on the sales order lines with their respective prices, quantities, and costs. The placeholder is a non-stock item that replaces the kit item on the Sales Orders screen after explosion. Its purpose is financial accuracy: a kit item consists of multiple components, and when those components are added to the order as real lines, leaving the original kit item in place would double-count item cost. The placeholder behaves like the kit item in the order but contains no actual items. One field on that placeholder row is worth monitoring closely. Total Cost of Components is calculated as the component's unit cost at the time the sales order was created, which does not change afterward, multiplied by the quantity. It is displayed on the kit placeholder row and carried forward to the invoice, making it the natural checkpoint for verifying kit margin.
Price Calculation determines what the customer is charged, and it offers three methods. Use Kit Default Price applies the kit's own default price, plus any manually added price for its options. Use Component Default Price bases the price on each component's default price and sets the kit item price to zero. Use Combined Default Price adds the kit's default price to the default prices of the components. The choice matters beyond the order total, because it changes how partial shipments are invoiced, as described in the fulfillment stage below.
Editing rules tighten once explosion has occurred, and this catches users out more than any other behavior in the module. After the kit has exploded, components can no longer be added or deleted from the Component Details popup; only Quantity and Warehouse remain editable there. To add or remove components at that point, users must work with the [X] and [+] buttons on the Document Details tab of the sales order. Before explosion, the picture is different again: if Allow Component Addition is off, new components cannot be added, although existing components can still be deleted.
Stage Five: The Acumatica Kit Assembly Branch
Kit Assembly is an optional branch in the Acumatica data flow rather than a mandatory step, and it is available only when the Kit Assembly feature is enabled on the Enable/Disable Features (CS100000) form. A kit assembly document contains the required stock components with their quantities and costs, calculated according to the kit specification revision you specify. Assemblies can be created directly on the Kit Assembly screen by entering the kit item in the Inventory ID field, selecting the revision, choosing a warehouse, and entering a quantity. Components can be added or removed before the assembly is released.
The more interesting path runs from the sales order, because it lets you assemble without exploding the kit. The user enters the kit on the sales order, optionally adjusts components in the Component Details popup, selects the Mark for Kit Assembly checkbox on the Details tab, and then clicks Generate Kit Assembly from the Actions list followed by Save. The same action is available through the Mark/Unmark for Kit Assembly button in the Component Details dialog. The generated assembly places a link number in the Kit Assembly field on the Details tab of the sales order, and clicking that link opens the Kit Assembly form. The relationship is visible from both ends: the Orders tab of the Kit Assembly screen shows the linked sales order number the assembly came from. Two constraints apply. Kit assemblies generated from sales orders always use the current revision specified on the Kit Specifications screen, and for non-stock kit items the Mark for Assembly button is disabled.
Stage Six: Kit Order Fulfillment in Acumatica
With explosion complete, the order moves into the standard Acumatica fulfillment cycle, and the kit records follow the components rather than the kit. The sequence is four steps. First, click Create Shipment on the toolbar and confirm the Specify Shipment Parameters window with OK. Second, on the Shipments screen to which you are redirected, click Confirm Shipment. Third, on the Invoices screen, click Prepare Invoice. Fourth, release the invoice with the Release button. At that point the inventory and financial impact of the kit is fully posted.
Partial shipments introduce one behavior that finance teams should know before it appears on a customer document. When Use Kit Default Price is the selected price calculation method and the order ships partially, the invoice for the first shipment carries the total kit price, and the invoice price for the remaining items is zero. This is intentional, since the kit is priced once rather than per component, but it looks surprising on a second invoice if nobody was expecting it. Where this is undesirable, Invoice After Full Shipment holds the placeholder back until all components have shipped, so the kit is invoiced only once everything is out the door.
The Purchase Order Side of Kit Processing
Kit Processing in Acumatica is not limited to the sell side. The Purchase Orders Preferences screen carries the same Biz-Tech Kit Processing Settings section, with the same precedence rule that kit-level configuration overrides the general settings, and the same Unexploded Kit Price Calculation by Components and Allow Edit Exploded Kit Component behaviors. Adding a kit item to a purchase order gives access to the same Component Details popup, where components can be added, deleted, or exchanged for substitutes and options can be changed before explosion. The kit is exploded either by clicking Load Components or by assigning a quantity to the kit line, exactly as on the sales order.
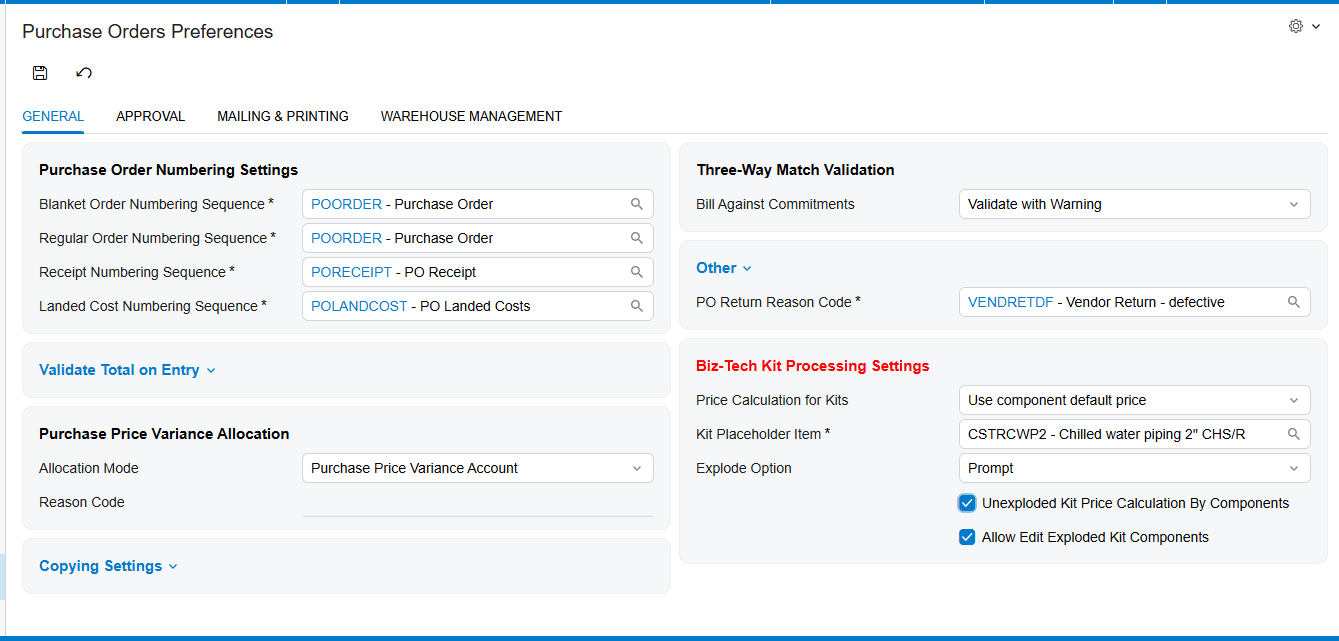
The inbound flow then completes in three moves. A purchase order containing the kit items is created and exploded. When the components are received, a purchase receipt for the ordered items is created. On release of that purchase receipt, the system automatically generates an inventory receipt reflecting the items in inventory. That automatic inventory receipt is the point at which purchased kit components become available stock, so it is the record to check when component availability does not look right after a delivery.
Where the Flow Starts Earlier: Opportunities and Sales Quotes
For businesses that quote before they sell, the kit data flow begins one step earlier. A kit item is added on the Details tab of the Opportunities screen and a quote is generated with the Create Quote button. The kit will not explode on the Opportunities screen itself.
Explosion happens on the Sales Quotes screen, either by giving the kit a quantity or by clicking Load Components on the Details tab. After saving, the exploded kit is reflected back in the Details tab of the Opportunities screen, and from then on any change made to the exploded kit updates in both screens. This is also the path where Default Code earns its place, since no user is prompted to pick options during automated or quote-driven creation.
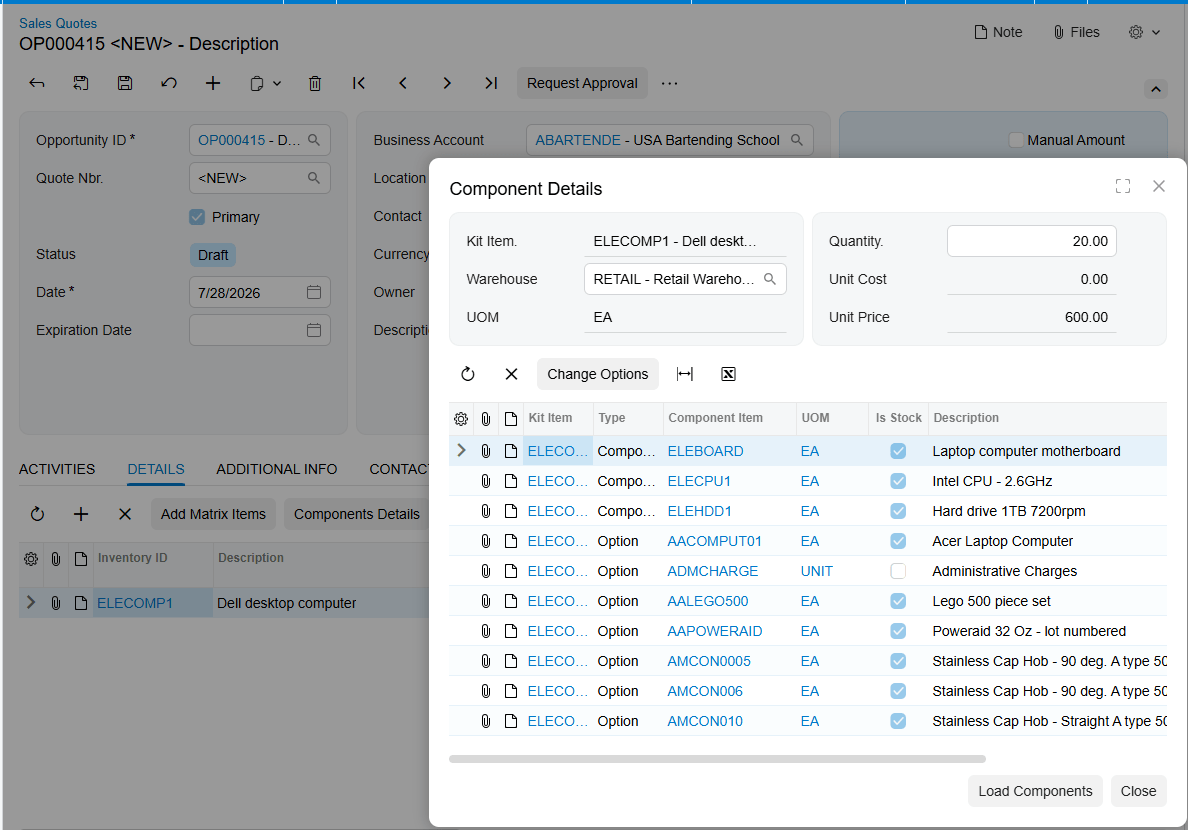
Kit Pricing Summary: Where Pricing Is Reviewed and Applied
Kit Pricing Summary is the analysis point of the Acumatica Kit Processing flow, and it uses the same explosion logic as the order screens. For a kit to appear here, its specification must have the Active checkbox selected and the Revision field filled in. Selecting the kit in the Kit Inventory ID field loads the kit together with its components, stock components first and non-stock components after. Each component line displays Quantity, Unit Price, Min Markup %, Markup %, Extended Price, and Surcharge, and the calculated totals of Extended Price and Surcharge appear on the last line.
Two formulas govern the numbers. Surcharge is calculated as quantity multiplied by unit price multiplied by minimum markup, divided by one hundred. Total with Surcharge is the sum of the extended price and surcharge amounts across the component lines. Clicking Apply Price takes the total surcharge from the last line and applies it to the kit item's default price, which is how component-level markup becomes a kit-level price. The screen works for nested kits as well: after the parent kit is exploded, the components of both kits load together and the totals line sums their extended prices and surcharges. The whole summary can be exported to Excel, which makes it a practical review artifact for a pricing meeting.
Where to Monitor Kit Processing Results in Acumatica
If you are training users or troubleshooting a kit order in Acumatica, these are the fields and screens that tell you what the system actually did:
- Current Revision on Kit Specifications, which determines the revision every downstream document reads.
- Explode Option and Explode Kit, which decide whether the order line ever becomes components.
- Block Kit Items Explosion on the Customers, Vendors, and Order Types screens, which silently overrides the kit's own explode setting.
- Total Cost of Components on the kit placeholder row, which carries the frozen unit cost forward to the invoice.
- PO Number in the Component Details popup, which confirms whether a component was purchased and stays accurate if the purchase order is deleted.
- Kit Assembly on the sales order Details tab, which links to the generated assembly, and the Orders tab of the Kit Assembly screen, which links back.
- The Component Availability section of Component Details, which can display Qty. Available, Qty. Avail. for Shipping, and Qty. on Hand.
- Next receive information in the same window, including next receive type and reference number, with Inc. In Receipt, Inc. In Transfer, Inc. PO, Inc. PO Receipt, and Inc. PO Transfer controlling which documents are considered when calculating the next receive date and quantity.
- The totals line on Kit Pricing Summary, where extended price and surcharge are reviewed before Apply Price changes the kit's default price.
One note on availability display: if any kit component has a quantity of zero and the kit item is not set to back order allowed, an error message appears when the availability checkbox is selected. That message is a genuine signal about allocation, not a display fault.
Loading Kits in Bulk with Acumatica Import Scenarios
Kit items do not have to be built by hand. Acumatica import scenarios support structured, automated entry of kit data from external sources, and the product ships with a set of scenarios that map to the stages described above. BZ-Import Is a Kit Check Box in Non-Stock and BZ-Import Is a Kit Check Box in Stock enable the Is a Kit checkbox on the respective item forms, which is the prerequisite for everything else. BZ-Import Kit Header configures the header section of the Kit Specifications screen. BZ-Import Kit Stock Components and BZ-Import Kit Non-Stock Components add components to the kit. BZ-Import Kit Option Category adds option categories, option codes, and the stock and non-stock components associated with each code, and BZ-Import Kit Substitution adds substitute items for the relevant components. Before running any of them, confirm that data mapping between the external source and the corresponding Acumatica fields is correct, and remember that Default Code matters here because an import has no user to answer an options prompt.
Kit Processing in Acumatica: Frequently Asked Questions
What is the kit placeholder item and why does Acumatica use one?
The kit placeholder item is a non-stock item that replaces the kit item on the Sales Orders screen after explosion. Because the components are added to the order as their own lines, keeping the original kit item would double-count item cost. The placeholder behaves like the kit item in the order but contains no actual items. Its unit of measure must match the unit of measure of the kit item, or the system raises a warning.
Why will my kit not explode on the sales order?
Check four things in order. The kit specification must have Explode Kit selected and a current revision marked. The Explode Option must not be set to Do Not Explode. The Block Kit Items Explosion checkbox may be selected on the Customers or Vendors screen, or in the Biz-Tech Kit Processing Settings on the Order Types screen, either of which prevents explosion. Finally, Unexploded Kit Price Calculation by Components deliberately prevents explosion and prices the kit by its components instead.
Can components be changed after a kit has exploded?
Only partially. Once the kit has exploded, components can no longer be added or deleted from the Component Details popup, where just Quantity and Warehouse remain editable. To add or remove components after explosion, use the [X] and [+] buttons on the Document Details tab of the sales order. Editing component quantities and deleting components on the order screen also requires Allow Edit Exploded Kit Component to be enabled in preferences.
How does Acumatica price a kit that ships partially?
When Use Kit Default Price is the selected price calculation method, the invoice for the first shipment carries the total kit price and the invoice price for the remaining items is zero, because the kit is priced once rather than per component. If you would rather invoice only when the order is complete, enable Invoice After Full Shipment, which permits partial shipment but holds the placeholder item back until every component has shipped.
Can a kit contain another kit?
Yes. Kit items can be configured as nested components or options inside both stock and non-stock kit specifications, with the outer kit acting as the Parent Kit and the included kit as the Child Kit. If a non-stock kit is used as a component or option, the Explode Option for both the parent and the child must be set to Automatically. The Copy Kit function and the Kit Pricing Summary screen both support nested kits.
How do I create a purchase order for a single kit component?
Add the kit to the sales order and, without exploding it, open the Component Details popup. Select the Mark for PO checkbox for the component you need and click Create PO. The required quantity must have a value. The purchase order is created against the component's Default Vendor ID, several components sharing a vendor are combined into one purchase order, and the resulting number appears in the PO Number field of the popup.
Work With the Biz-Tech Services Kit Processing Product
Kit Processing in Acumatica rewards teams who understand the flow rather than memorizing screens. The specification defines the kit, preferences supply the defaults, order entry shapes the line, explosion turns one line into a placeholder plus components, and fulfillment converts those components into shipments, invoices, and inventory transactions. Once users know which field governs each handoff and where to look when a result is unexpected, kit orders stop being a special case and become routine.
If your business sells or purchases configured products and wants kit components visible and controllable right on the order, we are glad to help you scope, configure, and roll out Kit Processing. Visit https://biz-techservices.com to learn more about our Acumatica expertise or to schedule a personalized demonstration of the Biz-Tech Services Kit Processing product.
ServiceTitan Acumatica Integration Configuration Checklist
ServiceTitan Acumatica Integration Configuration Checklist
A successful ServiceTitan Acumatica integration is decided long before the first invoice ever crosses between the two systems. It is decided during configuration. Field service companies live in two platforms at once: dispatchers, technicians, and sales staff work inside ServiceTitan every hour of the day capturing jobs, invoices, purchase orders, and payments in the field, while the controller and accounting team depend on Acumatica to manage inventory, branches, vendors, and the general ledger. When those two systems are not connected, the result is predictable. The same invoice gets keyed twice, purchase receipts pile up waiting to be reconciled, and nobody can say with confidence what a job actually cost.
The Biz-Tech Services ServiceTitan Connector closes that gap so the work recorded in the field lands in your Enterprise Resource Planning, or ERP, system exactly once and exactly right. A connector, however, is only as reliable as the configuration behind it, and the most common cause of a rough go-live is not the software but a mapping that was never completed or a date filter that was never set. This ServiceTitan Acumatica integrator configuration checklist walks through every required setting, the data you need to prepare in advance, the points where you should stop and validate, the user access to confirm, and the tests to run before you switch on automatic synchronization.
Step One: Configure the ServiceTitan Store in Acumatica
Every ServiceTitan Acumatica integration begins with the ServiceTitan Store. This is the single most important step in the entire setup process and it belongs on the first line of your checklist. The Store is the foundation on which every other setting depends, because it controls your invoice import rules, your customer creation rules, your inventory and item handling, your warehouse and branch mapping, your vendor and business unit mapping, your transaction processing logic, and the way purchase orders, receipts, and bills flow into Acumatica. If the ServiceTitan Store is not configured correctly, the system will not work and no data can be imported at all.
Start by assigning a Store Code, the lookup value that identifies the corresponding ServiceTitan store, and give it a clear Description so your team can recognize it later. If you select the Default Store checkbox, will tell the system to set and display that store code automatically on every processing screen, removing a small but repetitive step from your users' daily routine. Companies operating several stores should decide up front which one carries the default flag.
With the Store record in place, move to the General Settings tab and enter the credentials generated on the ServiceTitan side to authorize the connection. Once those values are saved, use the Test Credentials action before going any further. This validation step confirms that Acumatica can reach your ServiceTitan store through the Application Programming Interface, or API, and it is the earliest safe point to catch a mistyped key or an authorization that was never granted. Do not begin any mapping work until this test succeeds.
Step Two: Set Invoice, Tax, and Payment Import Options
The next item on the ServiceTitan integration checklist is the Import Options tab, where your business decides what actually comes across. Selecting the Activate Invoice checkbox opens the invoice section and lets you import invoices along with their taxes, payment methods, customer data, and general ledger accounts. You will need to specify the Invoice Type, which determines what kind of document ServiceTitan invoices become in Acumatica, and choose whether to import invoices with one preferred status or with all statuses at once.
Date filtering deserves particular attention during preparation, because it governs how much history you pull in on day one. The Begin Invoice Date defines the point from which the first import should reach back, and the Last Invoice Date records when the most recent import ran, which subsequent import processes then use as their starting point. Choose your beginning date deliberately. Setting it too far back can pull years of closed transactions into a fresh system, while setting it too late can leave open invoices stranded in ServiceTitan.
Tax handling is a simple checkbox that enables importing invoices with their taxes included, but confirm with your accounting team that the resulting tax treatment matches how they expect revenue to post. For payments, selecting the Activate Payment checkbox allows invoices to arrive with their payment information attached. Two decisions follow. First, the Payment Type determines whether payments imported from ServiceTitan are created in Acumatica as payments or as prepayments. Second, Release Payment After Import controls whether those payments are released automatically or left for your team to review. Many businesses leave automatic release turned off during the first few weeks and enable it once they trust the results.
Step Three: Prepare Customer, Country, Term, and GL Account Data
How your business handles customer records is the next preparation point, and it has real consequences for the cleanliness of your Acumatica database. If the Import Customer checkbox is left unselected, every invoice arrives assigned to a single default customer. If it is selected, the connector creates the customer in Acumatica whenever that customer is missing, using the default customer class you nominate. Decide which model fits your operation before go-live, and if you choose automatic creation, make sure the default customer class is configured with the correct general ledger accounts, terms, and statement settings, because every new customer will inherit them.
Address handling is controlled separately. The Override Bill Address Information from Invoice and Override Ship Address Information from Invoice checkboxes allow the customer's billing and shipping addresses to be imported into Acumatica from the invoice itself. Enable these when the field-captured address should be treated as authoritative. Alongside addresses, review the Country Options, since country names are passed to Acumatica in International Organization for Standardization, or ISO, country code format. Note that when the Activate Payment checkbox is selected, the Country options become hidden, so plan your review of this section accordingly.
Two mapping tables round out this stage of the ServiceTitan Acumatica setup. Term Options aligns ServiceTitan term values with the corresponding Acumatica terms, and Account Options maps ServiceTitan general ledger accounts to your Acumatica chart of accounts. Complete both with your controller in the room. An unmapped term or GL account is the kind of gap that does not surface until the first import run, and by then it is already producing exceptions.
Step Four: Configure Inventory Items and Transaction Settings
Inventory preparation is where most of the pre-launch data work lives. When the Import Item checkbox is selected, the Generate Item from ServiceTitan option becomes available, and the connector will create non-stock and stock items in Acumatica based on the Stock Item Class, Non-Stock Item Class, and Unit of Measure values you designate. Those three values are prerequisites, so confirm they exist and are correctly configured before enabling generation. Your business can also skip automatic creation entirely and map ServiceTitan items to existing Acumatica items by hand, which is often the better path for companies with a mature, curated item master.
Use the Load Materials, Load Equipment, Load Services action to retrieve the corresponding ServiceTitan items and display them on the Inventory tab, and understand the rule the system applies: Materials and Equipment become stock items, while Services become non-stock items. Reviewing that list before go-live is one of the highest-value validation steps on this checklist, because it is your last comfortable opportunity to spot duplicates, retired parts, or items that should never have been synchronized.
On the Transactions tab, configure each transaction type your business actually uses. Receipts, Transfers, Adjustments, and Returns each have their own setup options, along with a corresponding Release Receipt After Import, Release Transfer After Import, Release Adjustment After Import, and Release Return After Import checkbox. Selecting a release checkbox means those documents are imported into Acumatica and released in the same pass. The Activate Bill checkbox on this tab allows bills to be imported together with their receipts. As with payments, we generally recommend leaving automatic release unselected for the first cycle so your team can inspect the documents in a balanced state before they post.
Step Five: Map Business Units, Warehouses, PO Types, and Vendors
The Biz-Tech Services Service Titan Acumatica connector needs to know how your ServiceTitan structure corresponds to your Acumatica structure, and these mappings are mandatory. Begin with Business Units, where ServiceTitan Business Unit identifiers are mapped to Acumatica branches. Pressing Load Business Units retrieves the available ServiceTitan values so your team can pair them manually with the correct branch. Get this right and every imported document lands in the correct branch for reporting. Get it wrong and your branch profitability numbers will be wrong from day one.
Warehouses follow the same pattern. The Warehouses tab maps Acumatica warehouses to ServiceTitan Warehouse and Truck identifiers, and the Load Warehouses action retrieves those values for manual pairing. Because trucks are treated as inventory locations, this mapping is what makes technician van stock visible and accurate in your ERP, so give it real attention rather than treating it as a formality.
Finally, complete the purchasing mappings. The PO Types tab maps ServiceTitan purchase receipt order type names to Acumatica purchase order types, and Load PO Types retrieves the available values. Return Types maps ServiceTitan return types to the corresponding Acumatica purchase order types. On the Vendors tab, selecting the Import Vendor checkbox lets the connector create ServiceTitan vendors in Acumatica, while Load Vendors retrieves the full vendor list from ServiceTitan so your team can map existing vendors manually instead. For most established businesses, manual mapping of your top vendors combined with automatic creation for the long tail strikes the right balance.
Step Six: Import ServiceTitan Purchase Orders, Receipts, and Bills in Order
This section of the checklist is less about a setting and more about a rule your team must understand, because it is the single most common source of go-live confusion in a ServiceTitan Acumatica integration. The Purchase Order module workflow requires that ServiceTitan purchase receipts and bills cannot be imported into Acumatica unless the related ServiceTitan purchase order has already been imported. Sequence matters, and it is not negotiable.
Purchase orders are brought in through the Import ServiceTitan Purchase Orders screen and are created in Acumatica as purchase orders, retrieved based on their updated date. If a ServiceTitan purchase receipt or bill already exists at the moment the purchase order is imported, it comes across in the same process. If the receipt or bill does not yet exist in ServiceTitan, it is simply not imported, and it can be brought over later through its own screen once it has been created. Before importing purchase orders at all, confirm that the required preferences have been configured on the ServiceTitan Stores screen, since the import depends on them.
The Import Receipts screen retrieves purchase order receipts based on the date and status defined in your Receipt Options, and it can be run manually or automatically through the scheduler. If a receipt is imported before its purchase order exists in Acumatica, the system stops and returns a message such as POOrder document for Receipt 433272225 has not been created yet. That message is not a defect. It is the sequencing rule protecting your data. When the purchase order is already present, the connector locates it and attaches the receipt document to the PO History tab of the Purchase Orders screen. The receipt arrives with a Released status if the release checkbox is selected in the store setup, and with a balanced status if it is not. Where a receipt includes a bill, that bill is imported in the same pass and attached to the same PO History tab.
Bills follow identical logic on the Import ServiceTitan Bills screen, retrieved by their updated date. A bill cannot be imported on its own without its corresponding purchase order, and attempting to do so produces an error. If you import a purchase order while its related bill is sitting on the processing screen, the bill is imported alongside it and disappears from that screen. If the purchase order was imported earlier, importing the bill later automatically locates the parent document and attaches it. One additional field belongs on your configuration checklist here: the Branch For Bills field, which applies specifically when bills are imported and Bills and Adjustments documents are created in Acumatica.
Step Seven: Validate ServiceTitan Invoice and Payment Import
Before you declare go-live readiness, run a controlled test of the invoice and payment path, because there are three distinct scenarios and your team should recognize all of them. Invoices are retrieved on the Import SO Invoices screen based on their updated date and the statuses you selected. In the first scenario, an invoice that already carries a payment at the moment it is retrieved is imported together with that payment. The invoice is created on the Invoices and Memos screen, the payment is created and applied under the Applications tab of that invoice, and the corresponding payment identifier disappears from the Import Invoice Payments screen because it has already been processed.
In the second scenario, the invoice has already been imported but the payment is still waiting on the processing screen. Here the connector locates the matching invoice during the payment import and applies the payment automatically. The third scenario is the reverse: the payment was taken first and the invoice is imported afterward, in which case the system matches the two on its own. The Import Invoice Payments screen retrieves all payments from ServiceTitan and shows the associated Invoice ID, and payments can be imported separately, either as a deposit or after the invoice already exists. In every case the outcome is the same, which is that the payment ends up matched to the correct invoice in Acumatica. Test all three paths with real data in a sandbox tenant before go-live and your finance team will know exactly what they are looking at on launch day.
Step Eight: Journal Entries, Scheduling, and User Access
If your business intends to bring journal entries across rather than invoices, activate the Journal Entry checkbox on the Import Options tab while the Activate Invoice checkbox is disabled. Pay close attention to one detail that catches teams out: the Begin Journal Entry Date is not set automatically the first time, so a user must enter it manually. The Last Journal Entry Date then records the most recent import, and you should also define which statuses qualify for import. Put this on the checklist explicitly, because an unset beginning date is a silent failure rather than a visible error.
Turning to operations, decide how synchronization will run. Every processing screen can be executed manually or automatically through the Acumatica scheduler, and documents are retrieved based on their updated date. We recommend running manually for the first several cycles so your team sees each batch before it posts, then moving to a scheduled cadence once the results are consistently clean. Confirm at the same time that user access is correct. The staff responsible for each processing screen need the appropriate Acumatica roles, and the ServiceTitan credentials used by the connector should belong to a dedicated integration account rather than an individual employee whose access might be revoked.
ServiceTitan Acumatica Integration Checklist: Quick Reference
Before you launch, walk through this final go-live readiness checklist with your project team:
- The ServiceTitan Store is created, the Default Store flag is set, and Test Credentials returns a successful result.
- Invoice type, import statuses, and the Begin Invoice Date are configured to match your intended cutover point.
- Customer creation, default customer class, and address override behavior reflect an agreed policy.
- Term and general ledger account mappings are complete and reviewed by your controller.
- Item classes and unit of measure values exist, and the loaded ServiceTitan item list has been inspected.
- Business units, warehouses and trucks, purchase order types, return types, and vendors are all mapped.
- The Branch For Bills field is set if your business imports bills.
- Your team understands that purchase orders must be imported before receipts and bills.
- All three invoice and payment scenarios have been tested in a sandbox environment.
- Release-after-import options are set deliberately, and the scheduler plan is agreed.
- Acumatica roles are assigned, and the connector uses a dedicated ServiceTitan integration account.
ServiceTitan Acumatica Integration FAQ
What is the first step in setting up a ServiceTitan Acumatica integration?
Configuring the ServiceTitan Store is always the first step. The Store controls invoice import rules, customer creation, inventory handling, warehouse and branch mapping, vendor and business unit mapping, and the purchase order workflow. Until the Store is set up and Test Credentials returns a successful result, no data can be imported into Acumatica.
Can ServiceTitan receipts and bills be imported without the purchase order?
No. ServiceTitan purchase receipts and bills cannot be imported into Acumatica unless the related purchase order has already been imported. Attempting to import a receipt first produces an error message identifying the missing purchase order document. Import purchase orders first, and any receipt or bill that already exists in ServiceTitan will come across in the same process.
Does the connector create customers and vendors in Acumatica automatically?
It can. Selecting the Import Customer checkbox creates a customer in Acumatica whenever one is missing, using your default customer class. Selecting the Import Vendor checkbox does the same for vendors. If you prefer tighter control, leave these unselected and use a default customer, or map ServiceTitan vendors to existing Acumatica vendors manually with the Load Vendors action.
How are ServiceTitan items created in Acumatica?
When Import Item is selected, the Generate Item from ServiceTitan option creates items using your Stock Item Class, Non-Stock Item Class, and Unit of Measure values. Materials and Equipment become stock items, while Services become non-stock items. You can also map ServiceTitan items to existing Acumatica items manually instead of generating them.
How are ServiceTitan payments matched to Acumatica invoices?
Three scenarios are handled automatically. If the invoice carries a payment when it is retrieved, both import together and the payment is applied under the Applications tab. If the invoice was imported earlier, the payment import locates it and applies the payment. If the payment was taken first, the system matches it when the invoice arrives. In all three cases the payment ends up applied to the correct invoice.
Can the ServiceTitan Acumatica integration run automatically?
Yes. Every processing screen can run manually or on a schedule through the Acumatica scheduler, with documents retrieved by their updated date. We recommend running manually for the first several cycles so your team can review each batch, then switching to a scheduled cadence once results are consistently clean.
Get Started With the ServiceTitan Acumatica Connector
The Biz-Tech Services ServiceTitan Acumatica Connector is built for field service businesses that need their operational reality and their financial records to agree without anyone retyping a thing. Purchase orders, receipts, bills, invoices, payments, inventory transactions, and journal entries all flow into Acumatica along a defined path, and the quality of that flow is determined by the configuration work you complete before you begin. Working through this ServiceTitan Acumatica integration checklist methodically is what separates a launch that quietly succeeds from one that consumes weeks of cleanup.
If your business is preparing to connect ServiceTitan to Acumatica, we are glad to help at every stage, from initial scoping through configuration, validation, and go-live support. Visit https://biz-techservices.com to learn more about our integration expertise or to schedule a personalized demonstration of the Biz-Tech Services ServiceTitan Acumatica Connector.
SEO Metadata (for the publisher, remove before posting)
Focus keyword: ServiceTitan Acumatica integration
Secondary keywords: ServiceTitan Acumatica connector; ServiceTitan integration checklist; ServiceTitan Acumatica setup; import ServiceTitan invoices into Acumatica; ServiceTitan purchase order import; field service ERP integration; ServiceTitan Stores configuration
SEO title (58 characters): ServiceTitan Acumatica Integration Configuration Checklist
Meta description (154 characters): Complete pre-launch configuration checklist for the ServiceTitan Acumatica integration: store setup, mappings, imports, validation, and go-live readiness.
URL slug: servicetitan-acumatica-integration-configuration-checklist
Suggested internal links: ServiceTitan Connector product page; Acumatica integrations overview; Salesforce Acumatica Integration Configuration Checklist
Schema markup: Article plus FAQPage. The FAQ section is written for FAQ rich results.
Image alt text: Set on all seven images inside this document; carries over on paste into a CMS.
ServiceTitan Acumatica Integration Configuration Checklist
A successful ServiceTitan Acumatica integration is decided long before the first invoice ever crosses between the two systems. It is decided during configuration. Field service companies live in two platforms at once: dispatchers, technicians, and sales staff work inside ServiceTitan every hour of the day capturing jobs, invoices, purchase orders, and payments in the field, while the controller and accounting team depend on Acumatica to manage inventory, branches, vendors, and the general ledger. When those two systems are not connected, the result is predictable. The same invoice gets keyed twice, purchase receipts pile up waiting to be reconciled, and nobody can say with confidence what a job actually cost.
The Biz-Tech Services ServiceTitan Connector closes that gap so the work recorded in the field lands in your Enterprise Resource Planning, or ERP, system exactly once and exactly right. A connector, however, is only as reliable as the configuration behind it, and the most common cause of a rough go-live is not the software but a mapping that was never completed or a date filter that was never set. This ServiceTitan Acumatica integrator configuration checklist walks through every required setting, the data you need to prepare in advance, the points where you should stop and validate, the user access to confirm, and the tests to run before you switch on automatic synchronization.
Step One: Configure the ServiceTitan Store in Acumatica
Every ServiceTitan Acumatica integration begins with the ServiceTitan Store. This is the single most important step in the entire setup process and it belongs on the first line of your checklist. The Store is the foundation on which every other setting depends, because it controls your invoice import rules, your customer creation rules, your inventory and item handling, your warehouse and branch mapping, your vendor and business unit mapping, your transaction processing logic, and the way purchase orders, receipts, and bills flow into Acumatica. If the ServiceTitan Store is not configured correctly, the system will not work and no data can be imported at all.
Start by assigning a Store Code, the lookup value that identifies the corresponding ServiceTitan store, and give it a clear Description so your team can recognize it later. If you select the Default Store checkbox, will tell the system to set and display that store code automatically on every processing screen, removing a small but repetitive step from your users' daily routine. Companies operating several stores should decide up front which one carries the default flag.
With the Store record in place, move to the General Settings tab and enter the credentials generated on the ServiceTitan side to authorize the connection. Once those values are saved, use the Test Credentials action before going any further. This validation step confirms that Acumatica can reach your ServiceTitan store through the Application Programming Interface, or API, and it is the earliest safe point to catch a mistyped key or an authorization that was never granted. Do not begin any mapping work until this test succeeds.
Step Two: Set Invoice, Tax, and Payment Import Options
The next item on the ServiceTitan integration checklist is the Import Options tab, where your business decides what actually comes across. Selecting the Activate Invoice checkbox opens the invoice section and lets you import invoices along with their taxes, payment methods, customer data, and general ledger accounts. You will need to specify the Invoice Type, which determines what kind of document ServiceTitan invoices become in Acumatica, and choose whether to import invoices with one preferred status or with all statuses at once.
Date filtering deserves particular attention during preparation, because it governs how much history you pull in on day one. The Begin Invoice Date defines the point from which the first import should reach back, and the Last Invoice Date records when the most recent import ran, which subsequent import processes then use as their starting point. Choose your beginning date deliberately. Setting it too far back can pull years of closed transactions into a fresh system, while setting it too late can leave open invoices stranded in ServiceTitan.
Tax handling is a simple checkbox that enables importing invoices with their taxes included, but confirm with your accounting team that the resulting tax treatment matches how they expect revenue to post. For payments, selecting the Activate Payment checkbox allows invoices to arrive with their payment information attached. Two decisions follow. First, the Payment Type determines whether payments imported from ServiceTitan are created in Acumatica as payments or as prepayments. Second, Release Payment After Import controls whether those payments are released automatically or left for your team to review. Many businesses leave automatic release turned off during the first few weeks and enable it once they trust the results.
Step Three: Prepare Customer, Country, Term, and GL Account Data
How your business handles customer records is the next preparation point, and it has real consequences for the cleanliness of your Acumatica database. If the Import Customer checkbox is left unselected, every invoice arrives assigned to a single default customer. If it is selected, the connector creates the customer in Acumatica whenever that customer is missing, using the default customer class you nominate. Decide which model fits your operation before go-live, and if you choose automatic creation, make sure the default customer class is configured with the correct general ledger accounts, terms, and statement settings, because every new customer will inherit them.
Address handling is controlled separately. The Override Bill Address Information from Invoice and Override Ship Address Information from Invoice checkboxes allow the customer's billing and shipping addresses to be imported into Acumatica from the invoice itself. Enable these when the field-captured address should be treated as authoritative. Alongside addresses, review the Country Options, since country names are passed to Acumatica in International Organization for Standardization, or ISO, country code format. Note that when the Activate Payment checkbox is selected, the Country options become hidden, so plan your review of this section accordingly.
Two mapping tables round out this stage of the ServiceTitan Acumatica setup. Term Options aligns ServiceTitan term values with the corresponding Acumatica terms, and Account Options maps ServiceTitan general ledger accounts to your Acumatica chart of accounts. Complete both with your controller in the room. An unmapped term or GL account is the kind of gap that does not surface until the first import run, and by then it is already producing exceptions.
Step Four: Configure Inventory Items and Transaction Settings
Inventory preparation is where most of the pre-launch data work lives. When the Import Item checkbox is selected, the Generate Item from ServiceTitan option becomes available, and the connector will create non-stock and stock items in Acumatica based on the Stock Item Class, Non-Stock Item Class, and Unit of Measure values you designate. Those three values are prerequisites, so confirm they exist and are correctly configured before enabling generation. Your business can also skip automatic creation entirely and map ServiceTitan items to existing Acumatica items by hand, which is often the better path for companies with a mature, curated item master.
Use the Load Materials, Load Equipment, Load Services action to retrieve the corresponding ServiceTitan items and display them on the Inventory tab, and understand the rule the system applies: Materials and Equipment become stock items, while Services become non-stock items. Reviewing that list before go-live is one of the highest-value validation steps on this checklist, because it is your last comfortable opportunity to spot duplicates, retired parts, or items that should never have been synchronized.
On the Transactions tab, configure each transaction type your business actually uses. Receipts, Transfers, Adjustments, and Returns each have their own setup options, along with a corresponding Release Receipt After Import, Release Transfer After Import, Release Adjustment After Import, and Release Return After Import checkbox. Selecting a release checkbox means those documents are imported into Acumatica and released in the same pass. The Activate Bill checkbox on this tab allows bills to be imported together with their receipts. As with payments, we generally recommend leaving automatic release unselected for the first cycle so your team can inspect the documents in a balanced state before they post.
Step Five: Map Business Units, Warehouses, PO Types, and Vendors
The Biz-Tech Services Service Titan Acumatica connector needs to know how your ServiceTitan structure corresponds to your Acumatica structure, and these mappings are mandatory. Begin with Business Units, where ServiceTitan Business Unit identifiers are mapped to Acumatica branches. Pressing Load Business Units retrieves the available ServiceTitan values so your team can pair them manually with the correct branch. Get this right and every imported document lands in the correct branch for reporting. Get it wrong and your branch profitability numbers will be wrong from day one.
Warehouses follow the same pattern. The Warehouses tab maps Acumatica warehouses to ServiceTitan Warehouse and Truck identifiers, and the Load Warehouses action retrieves those values for manual pairing. Because trucks are treated as inventory locations, this mapping is what makes technician van stock visible and accurate in your ERP, so give it real attention rather than treating it as a formality.
Finally, complete the purchasing mappings. The PO Types tab maps ServiceTitan purchase receipt order type names to Acumatica purchase order types, and Load PO Types retrieves the available values. Return Types maps ServiceTitan return types to the corresponding Acumatica purchase order types. On the Vendors tab, selecting the Import Vendor checkbox lets the connector create ServiceTitan vendors in Acumatica, while Load Vendors retrieves the full vendor list from ServiceTitan so your team can map existing vendors manually instead. For most established businesses, manual mapping of your top vendors combined with automatic creation for the long tail strikes the right balance.
Step Six: Import ServiceTitan Purchase Orders, Receipts, and Bills in Order
This section of the checklist is less about a setting and more about a rule your team must understand, because it is the single most common source of go-live confusion in a ServiceTitan Acumatica integration. The Purchase Order module workflow requires that ServiceTitan purchase receipts and bills cannot be imported into Acumatica unless the related ServiceTitan purchase order has already been imported. Sequence matters, and it is not negotiable.
Purchase orders are brought in through the Import ServiceTitan Purchase Orders screen and are created in Acumatica as purchase orders, retrieved based on their updated date. If a ServiceTitan purchase receipt or bill already exists at the moment the purchase order is imported, it comes across in the same process. If the receipt or bill does not yet exist in ServiceTitan, it is simply not imported, and it can be brought over later through its own screen once it has been created. Before importing purchase orders at all, confirm that the required preferences have been configured on the ServiceTitan Stores screen, since the import depends on them.
The Import Receipts screen retrieves purchase order receipts based on the date and status defined in your Receipt Options, and it can be run manually or automatically through the scheduler. If a receipt is imported before its purchase order exists in Acumatica, the system stops and returns a message such as POOrder document for Receipt 433272225 has not been created yet. That message is not a defect. It is the sequencing rule protecting your data. When the purchase order is already present, the connector locates it and attaches the receipt document to the PO History tab of the Purchase Orders screen. The receipt arrives with a Released status if the release checkbox is selected in the store setup, and with a balanced status if it is not. Where a receipt includes a bill, that bill is imported in the same pass and attached to the same PO History tab.
Bills follow identical logic on the Import ServiceTitan Bills screen, retrieved by their updated date. A bill cannot be imported on its own without its corresponding purchase order, and attempting to do so produces an error. If you import a purchase order while its related bill is sitting on the processing screen, the bill is imported alongside it and disappears from that screen. If the purchase order was imported earlier, importing the bill later automatically locates the parent document and attaches it. One additional field belongs on your configuration checklist here: the Branch For Bills field, which applies specifically when bills are imported and Bills and Adjustments documents are created in Acumatica.
Step Seven: Validate ServiceTitan Invoice and Payment Import
Before you declare go-live readiness, run a controlled test of the invoice and payment path, because there are three distinct scenarios and your team should recognize all of them. Invoices are retrieved on the Import SO Invoices screen based on their updated date and the statuses you selected. In the first scenario, an invoice that already carries a payment at the moment it is retrieved is imported together with that payment. The invoice is created on the Invoices and Memos screen, the payment is created and applied under the Applications tab of that invoice, and the corresponding payment identifier disappears from the Import Invoice Payments screen because it has already been processed.
In the second scenario, the invoice has already been imported but the payment is still waiting on the processing screen. Here the connector locates the matching invoice during the payment import and applies the payment automatically. The third scenario is the reverse: the payment was taken first and the invoice is imported afterward, in which case the system matches the two on its own. The Import Invoice Payments screen retrieves all payments from ServiceTitan and shows the associated Invoice ID, and payments can be imported separately, either as a deposit or after the invoice already exists. In every case the outcome is the same, which is that the payment ends up matched to the correct invoice in Acumatica. Test all three paths with real data in a sandbox tenant before go-live and your finance team will know exactly what they are looking at on launch day.
Step Eight: Journal Entries, Scheduling, and User Access
If your business intends to bring journal entries across rather than invoices, activate the Journal Entry checkbox on the Import Options tab while the Activate Invoice checkbox is disabled. Pay close attention to one detail that catches teams out: the Begin Journal Entry Date is not set automatically the first time, so a user must enter it manually. The Last Journal Entry Date then records the most recent import, and you should also define which statuses qualify for import. Put this on the checklist explicitly, because an unset beginning date is a silent failure rather than a visible error.
Turning to operations, decide how synchronization will run. Every processing screen can be executed manually or automatically through the Acumatica scheduler, and documents are retrieved based on their updated date. We recommend running manually for the first several cycles so your team sees each batch before it posts, then moving to a scheduled cadence once the results are consistently clean. Confirm at the same time that user access is correct. The staff responsible for each processing screen need the appropriate Acumatica roles, and the ServiceTitan credentials used by the connector should belong to a dedicated integration account rather than an individual employee whose access might be revoked.
ServiceTitan Acumatica Integration Checklist: Quick Reference
Before you launch, walk through this final go-live readiness checklist with your project team:
- The ServiceTitan Store is created, the Default Store flag is set, and Test Credentials returns a successful result.
- Invoice type, import statuses, and the Begin Invoice Date are configured to match your intended cutover point.
- Customer creation, default customer class, and address override behavior reflect an agreed policy.
- Term and general ledger account mappings are complete and reviewed by your controller.
- Item classes and unit of measure values exist, and the loaded ServiceTitan item list has been inspected.
- Business units, warehouses and trucks, purchase order types, return types, and vendors are all mapped.
- The Branch For Bills field is set if your business imports bills.
- Your team understands that purchase orders must be imported before receipts and bills.
- All three invoice and payment scenarios have been tested in a sandbox environment.
- Release-after-import options are set deliberately, and the scheduler plan is agreed.
- Acumatica roles are assigned, and the connector uses a dedicated ServiceTitan integration account.
ServiceTitan Acumatica Integration FAQ
What is the first step in setting up a ServiceTitan Acumatica integration?
Configuring the ServiceTitan Store is always the first step. The Store controls invoice import rules, customer creation, inventory handling, warehouse and branch mapping, vendor and business unit mapping, and the purchase order workflow. Until the Store is set up and Test Credentials returns a successful result, no data can be imported into Acumatica.
Can ServiceTitan receipts and bills be imported without the purchase order?
No. ServiceTitan purchase receipts and bills cannot be imported into Acumatica unless the related purchase order has already been imported. Attempting to import a receipt first produces an error message identifying the missing purchase order document. Import purchase orders first, and any receipt or bill that already exists in ServiceTitan will come across in the same process.
Does the connector create customers and vendors in Acumatica automatically?
It can. Selecting the Import Customer checkbox creates a customer in Acumatica whenever one is missing, using your default customer class. Selecting the Import Vendor checkbox does the same for vendors. If you prefer tighter control, leave these unselected and use a default customer, or map ServiceTitan vendors to existing Acumatica vendors manually with the Load Vendors action.
How are ServiceTitan items created in Acumatica?
When Import Item is selected, the Generate Item from ServiceTitan option creates items using your Stock Item Class, Non-Stock Item Class, and Unit of Measure values. Materials and Equipment become stock items, while Services become non-stock items. You can also map ServiceTitan items to existing Acumatica items manually instead of generating them.
How are ServiceTitan payments matched to Acumatica invoices?
Three scenarios are handled automatically. If the invoice carries a payment when it is retrieved, both import together and the payment is applied under the Applications tab. If the invoice was imported earlier, the payment import locates it and applies the payment. If the payment was taken first, the system matches it when the invoice arrives. In all three cases the payment ends up applied to the correct invoice.
Can the ServiceTitan Acumatica integration run automatically?
Yes. Every processing screen can run manually or on a schedule through the Acumatica scheduler, with documents retrieved by their updated date. We recommend running manually for the first several cycles so your team can review each batch, then switching to a scheduled cadence once results are consistently clean.
Get Started With the ServiceTitan Acumatica Connector
The Biz-Tech Services ServiceTitan Acumatica Connector is built for field service businesses that need their operational reality and their financial records to agree without anyone retyping a thing. Purchase orders, receipts, bills, invoices, payments, inventory transactions, and journal entries all flow into Acumatica along a defined path, and the quality of that flow is determined by the configuration work you complete before you begin. Working through this ServiceTitan Acumatica integration checklist methodically is what separates a launch that quietly succeeds from one that consumes weeks of cleanup.
If your business is preparing to connect ServiceTitan to Acumatica, we are glad to help at every stage, from initial scoping through configuration, validation, and go-live support. Visit https://biz-techservices.com to learn more about our integration expertise or to schedule a personalized demonstration of the Biz-Tech Services ServiceTitan Acumatica Connector.
SEO Metadata (for the publisher, remove before posting)
Focus keyword: ServiceTitan Acumatica integration
Secondary keywords: ServiceTitan Acumatica connector; ServiceTitan integration checklist; ServiceTitan Acumatica setup; import ServiceTitan invoices into Acumatica; ServiceTitan purchase order import; field service ERP integration; ServiceTitan Stores configuration
SEO title (58 characters): ServiceTitan Acumatica Integration Configuration Checklist
Meta description (154 characters): Complete pre-launch configuration checklist for the ServiceTitan Acumatica integration: store setup, mappings, imports, validation, and go-live readiness.
URL slug: servicetitan-acumatica-integration-configuration-checklist
Suggested internal links: ServiceTitan Connector product page; Acumatica integrations overview; Salesforce Acumatica Integration Configuration Checklist
Schema markup: Article plus FAQPage. The FAQ section is written for FAQ rich results.
Image alt text: Set on all seven images inside this document; carries over on paste into a CMS.
Acumatica Implementation Cost 2026: Pricing, Timeline, Integrations, and Total Cost of Ownership
Acumatica Implementation Cost 2026: Pricing, Timeline, Integrations, and Total Cost of Ownership
“How much does Acumatica cost?” sounds like a simple question.
In practice, it is one of the most important and most frequently misunderstood questions in an ERP selection project.
There is no universal Acumatica implementation cost that applies equally to every company. A growing distributor with two warehouses, a manufacturer with production planning, a construction company with project accounting, and an eCommerce business processing thousands of marketplace orders may all use Acumatica Cloud ERP—but they will not require the same applications, integrations, data migration, customization, reporting, or implementation services.
That is why a reliable Acumatica pricing estimate cannot be created from employee count alone.
The complete cost depends on:
- the Acumatica applications and industry edition required;
- expected transaction volume and resource usage;
- deployment and licensing preferences;
- the number of companies, branches, warehouses, and operating entities;
- the complexity and quality of legacy data;
- the number and depth of external integrations;
- required workflows and customizations;
- reporting, dashboard, and analytics requirements;
- training and change management;
- testing, go-live, and post-implementation support.
A meaningful Acumatica ERP cost comparison must therefore separate software pricing from implementation pricing.
The Acumatica subscription or license gives the company access to the platform and selected applications. The implementation project makes that platform work inside the actual business. Data migration brings trusted operational and financial information into the new ERP. Integrations connect Acumatica to eCommerce, marketplaces, warehouses, payments, shipping platforms, CRM, EDI, and other systems. Training prepares employees to use the platform correctly. Ongoing support keeps the ERP stable and aligned with future business growth.
Each component affects the final Acumatica ERP budget.
As an Acumatica Gold Partner, BizTech helps companies build a complete implementation estimate rather than presenting an unrealistically low software-only number. Our team evaluates software scope, business processes, data migration, integrations, customization, testing, training, deployment, and support before defining the project plan.
The objective is not to produce the cheapest initial quote.
The objective is to create an Acumatica implementation that produces measurable business value and remains maintainable after go-live.
How Much Does Acumatica Cost in 2026?
Acumatica does not publish one universal list price for every customer.
According to the official Acumatica pricing model, pricing is tailored using three primary factors:
- The applications the business needs;
- Expected usage and resource requirements;
- Deployment and license preferences.
Acumatica also emphasizes an important distinction from seat-based ERP licensing:
Customers pay for the functionality and resources they need rather than purchasing a separate full ERP license for every user.
This makes Acumatica attractive to businesses that want broad ERP adoption across finance, sales, purchasing, warehouse teams, manufacturing, project management, customer service, executives, and other departments.
However, unlimited user access does not mean every Acumatica project has the same price.
The total cost still varies according to functional scope, transaction volume, storage, resource requirements, industry applications, integrations, customizations, implementation services, and support.
A complete Acumatica implementation estimate normally includes several separate categories.
| Cost category | What it covers | Typical cost type |
|---|---|---|
| Acumatica software | Applications, resource tier, data storage, deployment, and license model | Recurring or license-based |
| Implementation consulting | Discovery, process mapping, architecture, configuration, and project management | Primarily one-time |
| Data migration | Extraction, cleansing, mapping, import, validation, and reconciliation | One-time, sometimes phased |
| Integrations | eCommerce, marketplaces, payments, warehouses, shipping, CRM, EDI, and APIs | Implementation plus possible recurring support |
| Customization | Custom screens, fields, logic, actions, workflows, and enhancements | One-time development plus maintenance |
| Reporting and analytics | Financial reports, dashboards, Generic Inquiries, KPIs, and BI integrations | One-time and ongoing improvement |
| Training and change management | Role-based training, documentation, videos, workshops, and adoption support | Primarily one-time |
| Support and optimization | Monitoring, issue resolution, updates, enhancements, and performance improvement | Recurring |
The correct answer to “How much does Acumatica cost?” is therefore:
Acumatica cost is tailored to the software capabilities, technical resources, implementation services, and operational complexity required by the business.
A responsible Acumatica partner should explain every component separately.
Acumatica Software Cost vs. Acumatica Implementation Cost
One of the most common ERP budgeting mistakes is treating software and implementation as the same expense.
They are related, but they are not interchangeable.
Acumatica Software Cost
The software component covers access to Acumatica and the selected applications.
Depending on business requirements, applications may include:
- Financial Management;
- General Ledger;
- Accounts Payable;
- Accounts Receivable;
- Cash Management;
- Distribution Management;
- Inventory Management;
- Sales Order Management;
- Purchase Order Management;
- Warehouse Management;
- Manufacturing Management;
- Construction Management;
- Project Accounting;
- Field Service Management;
- CRM;
- Retail and Commerce functionality;
- Payroll;
- Reporting, dashboards, and analytics.
Software cost is also influenced by business usage, transaction volume, storage, resource requirements, and deployment preference.
Acumatica Implementation Cost
Implementation cost covers the professional work required to transform the Acumatica platform into a working business system.
This includes activities such as:
- business process discovery;
- requirements documentation;
- solution architecture;
- module configuration;
- company and branch setup;
- chart of accounts design;
- customer, vendor, item, and warehouse setup;
- data migration;
- integration development;
- customization;
- workflow automation;
- report and dashboard creation;
- testing;
- training;
- go-live preparation;
- post-go-live support.
A software quote without implementation scope is incomplete.
An implementation quote without clearly defined software scope is equally incomplete.
The two must be evaluated together.
The Complete Acumatica Total Cost Formula
The practical formula for evaluating Acumatica total cost of ownership is:
Acumatica software + implementation services + data migration + integrations + customization + reporting + training + support + third-party systems + internal project effort.
Businesses should analyze this formula over several years rather than evaluating only the initial implementation invoice.
A low first-year cost can become expensive if the system requires extensive corrective work, duplicate applications, manual processes, or repeated custom development.
A higher-quality implementation can create a lower total cost of ownership by reducing:
- manual data entry;
- duplicate software subscriptions;
- spreadsheet dependency;
- inventory errors;
- order processing delays;
- financial reconciliation effort;
- reporting delays;
- integration failures;
- support emergencies;
- future redevelopment.
The correct goal is not the lowest implementation invoice.
The correct goal is the strongest business value at a sustainable long-term cost.
What Determines Acumatica Licensing Cost?
The official Acumatica pricing structure uses three broad dimensions.
1. Applications and Functional Scope
The more business functions managed inside Acumatica, the broader the software scope.
A company implementing only core financials will have a different application profile from a company implementing financials, distribution, warehouse management, manufacturing, field service, project accounting, and commerce functionality.
Businesses should define which capabilities are:
- required for initial go-live;
- important for the next phase;
- valuable but not immediately necessary;
- already provided effectively by another integrated system.
This prevents the company from paying for unnecessary functionality while preserving a clear expansion roadmap.
2. Business Usage and Resource Requirements
Acumatica pricing reflects expected system use.
Relevant factors can include:
- transaction volume;
- number of sales and purchase documents;
- inventory movement volume;
- API activity;
- integration frequency;
- automation volume;
- data storage;
- file and document storage;
- processing intensity;
- future growth assumptions.
A high-volume eCommerce company importing thousands of orders and synchronizing inventory across multiple channels may require more resources than a professional services company with lower transaction volume.
3. Deployment and License Preferences
Deployment decisions can affect both software and operational cost.
The business may evaluate:
- Acumatica SaaS;
- private cloud deployment;
- partner-hosted environments;
- infrastructure and security requirements;
- backup and disaster recovery;
- internal IT management responsibilities;
- compliance and data-location requirements.
The right deployment decision should reflect operational requirements, risk tolerance, infrastructure capabilities, and long-term cost—not only the lowest initial price.
Why Unlimited User Pricing Changes the Cost Model
Acumatica’s unlimited user pricing philosophy is one of the most important components of its value proposition.
Many ERP systems charge according to the number or type of user licenses. That can cause companies to limit ERP access in order to control cost.
Limiting access often creates operational problems:
- employees rely on shared accounts;
- some departments remain outside the ERP;
- users request exported spreadsheets instead of accessing live data;
- approvals are delayed;
- management depends on intermediaries;
- data becomes incomplete;
- the ERP fails to become the company’s true system of record.
Acumatica’s model allows the business to focus more on usage and functionality than seat count.
This can be especially valuable for:
- warehouse operations with many occasional users;
- construction companies with field and project teams;
- manufacturers with supervisors and shop-floor users;
- distributors with sales, purchasing, warehouse, and customer service teams;
- organizations with many executives and report consumers;
- businesses expecting rapid employee growth.
Unlimited user access does not eliminate every cost. Training, support, security design, and resource requirements may still grow as more people use the platform.
However, it reduces the direct commercial penalty for expanding participation.
That can improve user adoption and ERP return on investment.
What Determines Acumatica Implementation Cost?
The largest implementation cost drivers are normally business complexity, data complexity, integration scope, and organizational readiness.
Number of Companies and Branches
A single-company implementation is usually simpler than an environment involving:
- multiple legal entities;
- multiple branches;
- intercompany transactions;
- consolidated reporting;
- multiple currencies;
- different tax structures;
- shared customers, vendors, or inventory;
- different operational processes by entity.
Each additional entity can affect configuration, migration, testing, security, reporting, and training.
Industry and Operational Complexity
A financial-only implementation generally has a different scope from:
- multi-warehouse distribution;
- discrete manufacturing;
- construction project accounting;
- field service operations;
- high-volume retail and eCommerce;
- complex recurring billing;
- consignment inventory;
- configurable kit processing;
- EDI retail networks.
Industry complexity affects design, configuration, testing, integration, and training.
Data Quality and Migration History
Clean master data with a limited amount of history is less expensive to migrate than:
- multiple legacy databases;
- duplicate customer records;
- inconsistent item identifiers;
- unreconciled financial balances;
- missing warehouse information;
- poor address quality;
- custom legacy fields;
- many years of detailed transactional history.
Data migration cost often reflects the condition of the data more than its raw file size.
Number of Integrations
Every external system adds architecture, mapping, testing, monitoring, and support requirements.
A simple one-direction customer export is different from a complete integration synchronizing:
- orders;
- customers;
- products;
- prices;
- inventory;
- payments;
- taxes;
- shipments;
- tracking;
- returns;
- refunds.
Customization Requirements
Standard configuration is generally more efficient to maintain than custom code.
Implementation cost increases when the business requires:
- custom screens;
- specialized document types;
- new business logic;
- complex approval processes;
- special inventory behavior;
- industry-specific compliance;
- custom processing actions;
- advanced automation.
Reporting and Analytics
Reporting cost depends on whether the company needs:
- standard financial statements;
- custom financial reports;
- Generic Inquiries;
- executive dashboards;
- operational KPIs;
- profitability analysis;
- multi-entity consolidation;
- Power BI or Tableau integration;
- custom data models.
Internal Team Availability
ERP implementation requires decisions from the client.
If internal subject matter experts are unavailable, approvals and testing may be delayed. Delays increase project management effort and can expand cost.
The client should assign clear process owners for finance, sales, purchasing, inventory, warehouse operations, manufacturing, projects, integrations, and reporting.
Acumatica Implementation Cost by Project Type
There is no reliable universal price for each project type, but businesses can compare relative scope and complexity.
| Project type | Typical scope | Relative complexity | Major cost drivers |
|---|---|---|---|
| Core financial implementation | GL, AP, AR, Cash Management, basic reporting | Lower to moderate | Chart of accounts, opening balances, reporting, entities |
| Distribution implementation | Financials, sales orders, purchasing, inventory, warehouses | Moderate to high | Items, warehouses, pricing, replenishment, shipping, EDI |
| Manufacturing implementation | Financials, distribution, BOMs, production, costing, planning | High | Production data, routing, costing, materials, shop-floor workflows |
| Construction implementation | Financials, projects, job costing, commitments, billing, field workflows | High | Project structure, change orders, payroll, documents, field adoption |
| Commerce-heavy implementation | ERP plus online stores, marketplaces, payments, fulfillment, returns | Moderate to very high | Channel count, order volume, inventory rules, refunds, integrations |
| Multi-entity transformation | Multiple companies, branches, currencies, integrations, consolidation | Very high | Governance, migration, intercompany logic, security, reporting |
The table should be used for planning, not as a substitute for discovery.
Two projects in the same industry can still have significantly different costs.
Acumatica Data Migration Cost
Data migration is often one of the most underestimated components of Acumatica implementation pricing.
The business is not simply moving files. It is creating the operational and financial foundation of the new ERP.
A complete migration may include:
- customers;
- vendors;
- contacts;
- inventory items;
- non-stock items;
- warehouses and locations;
- price lists;
- opening general ledger balances;
- open accounts receivable documents;
- open accounts payable documents;
- unreconciled payments;
- open sales orders;
- open purchase orders;
- projects;
- fixed assets;
- historical transactions;
- attachments and supporting documents.
Factors That Increase Acumatica Data Migration Cost
Migration becomes more expensive when:
- data comes from several systems;
- records contain duplicates;
- legacy fields do not map cleanly to Acumatica;
- historical transactions must remain fully searchable;
- financial balances are not reconciled;
- inventory quantities are unreliable;
- item units of measure are inconsistent;
- custom legacy tables must be preserved;
- multiple test migrations are required;
- the final cutover window is very short.
How to Reduce Acumatica Migration Cost
Businesses can reduce migration effort by:
- removing inactive and duplicate records before extraction;
- standardizing customer and vendor addresses;
- cleaning item IDs and descriptions;
- reconciling financial balances before migration;
- deciding which history genuinely needs to move;
- assigning internal data owners;
- approving field mappings early;
- performing at least one full test migration;
- validating imported totals before go-live.
BizTech’s Acumatica data migration process can include extraction, cleansing, mapping, import, validation, reconciliation, user review, and final production cutover.
Acumatica Integration Cost
Integrations can be a small part of the project or the most complex part of the entire implementation.
The cost depends on what the integration must accomplish.
Simple Integration
A simple integration may:
- move one entity in one direction;
- run on a schedule;
- use standard identifiers;
- require limited transformation;
- have low transaction volume.
Complex Integration
A complex integration may:
- synchronize data in both directions;
- process events in near real time;
- support many stores or accounts;
- transform data between different business models;
- manage inventory across warehouses;
- handle payments and refunds;
- create shipments and tracking updates;
- support retries and exception queues;
- maintain detailed logs and audit history;
- process high transaction volumes.
Major Acumatica Integration Cost Drivers
Integration pricing is affected by:
- number of connected platforms;
- number of connected accounts or stores;
- number of synchronized entities;
- one-way or bidirectional synchronization;
- scheduled, batch, or webhook-based processing;
- transaction volume;
- field transformation;
- cross-reference requirements;
- duplicate prevention;
- error handling and retries;
- logging and alerting;
- security and authentication;
- testing environments;
- ongoing monitoring and support.
Existing BizTech Connector vs. Custom Acumatica Integration
Using an existing integration product can reduce implementation time and risk compared with developing every workflow from the beginning.
BizTech has developed proprietary Acumatica solutions for commerce, marketplaces, payments, warehousing, shipping, CRM, and specialized inventory workflows.
Examples include:
- Amazon FBA and FBM Connector;
- Shopify Connector;
- WooCommerce Connector;
- Magento Connector;
- PayPal Integration;
- ShipHero Connector;
- ShipStation Connector;
- DSCO Connector;
- CommerceHub Connector;
- ServiceTitan Connector;
- Salesforce Integration;
- EDI integrations;
- Kit Processing;
- Consignment Processing;
- Gift Card Processing.
An existing connector may still require configuration, mapping, testing, training, and client-specific adjustments.
However, it begins with a proven functional foundation.
Custom integration development may be necessary when:
- the external platform is proprietary;
- the required workflows are highly specialized;
- standard connectors do not support the required entities;
- the business has unique inventory or financial rules;
- several systems must be orchestrated together;
- the integration requires unusual security or infrastructure.
BizTech can evaluate whether an existing connector, connector extension, middleware approach, or fully custom integration is the most economical long-term option.
Amazon Acumatica Integration Cost
Amazon integrations can involve both Fulfillment by Merchant and Fulfillment by Amazon.
The implementation scope may include:
- Amazon store configuration;
- order import;
- FBA and FBM identification;
- customer rules;
- item cross-references;
- payment mapping;
- tax mapping;
- warehouse mapping;
- PO acknowledgments;
- fulfillment exports;
- tracking updates;
- inventory synchronization;
- FBA warehouse transfers;
- refund processing;
- profitability reporting.
The Amazon Acumatica integration cost depends on the number of marketplaces, stores, fulfillment models, warehouses, products, order volume, mapping rules, and reporting requirements.
A seller using one Amazon store with standard FBM workflows will have a different scope from a global seller using several marketplaces, FBA transfers, multi-warehouse inventory, and detailed channel profitability reporting.
Shopify Acumatica Integration Cost
A Shopify integration may include:
- Shopify credentials and store configuration;
- B2C or B2B workflows;
- customer import;
- item and variant synchronization;
- product images and attributes;
- Shopify metafields;
- order import;
- payment mapping;
- Shopify location and Acumatica warehouse mapping;
- inventory synchronization;
- fulfillment updates;
- refund webhooks;
- order export from Acumatica to Shopify.
The Shopify Acumatica integration cost increases with store count, catalog complexity, B2B functionality, inventory rules, product mapping, custom metafields, and bidirectional order workflows.
WooCommerce Acumatica Integration Cost
The WooCommerce Acumatica integration cost may include:
- WordPress and WooCommerce API setup;
- product synchronization;
- customer synchronization;
- order import;
- tax category mapping;
- category synchronization;
- price and MSRP handling;
- warehouse quantity logic;
- shipping method mapping;
- fulfillment and tracking events;
- high-volume REST API processing.
Cost is influenced by catalog size, variation complexity, store customization, plugins, warehouse structure, data quality, and order volume.
PayPal Acumatica Integration Cost
A PayPal integration may support:
- PayPal invoice creation from Acumatica;
- customer email delivery;
- payment status synchronization;
- batch payment processing;
- cancellation of unpaid requests;
- full and partial refunds;
- transaction history;
- deposit and installment workflows;
- guest checkout.
The PayPal Acumatica integration cost depends on payment workflows, refund requirements, number of entities, currency handling, reconciliation design, security, and reporting.
Acumatica Customization Cost
Customization cost should be evaluated according to the simplest maintainable method that solves the business requirement.
There are several levels.
Level 1: Standard Configuration
This may include:
- system preferences;
- numbering sequences;
- order types;
- approval settings;
- notification templates;
- security roles;
- warehouse settings;
- financial periods;
- tax configuration.
Standard configuration usually creates the lowest long-term maintenance cost.
Level 2: No-Code and Low-Code Changes
This may include:
- custom fields;
- screen layouts;
- Generic Inquiries;
- dashboards;
- workflow adjustments;
- import and export scenarios;
- business events;
- notifications.
Level 3: Acumatica Customization Project
This may include:
- custom screens;
- new processing actions;
- specialized validations;
- custom data access classes;
- document automation;
- special inventory behavior;
- new business logic;
- industry-specific functionality.
Level 4: Custom Product or Integration
This may include:
- multi-system orchestration;
- proprietary API integration;
- complex external workflows;
- custom portals;
- specialized processing engines;
- high-volume synchronization services.
Customization cost depends on analysis, development, testing, documentation, deployment, support, and future upgrade compatibility.
BizTech follows a configuration-first approach:
- use standard Acumatica functionality when it fits;
- use configuration and workflow tools when possible;
- use integration when another system already solves the problem well;
- write custom code when it creates clear and sustainable business value.
Acumatica Reporting and Dashboard Cost
Reporting is often underestimated during initial ERP budgeting.
Companies may assume that standard reports will answer every management question. After discovery, they often identify requirements for:
- custom income statements;
- departmental reporting;
- multi-entity consolidation;
- cash-flow reporting;
- inventory aging;
- warehouse performance;
- sales margins;
- project profitability;
- manufacturing variance;
- channel profitability;
- customer payment status;
- integration exceptions;
- executive KPIs.
Reporting cost is influenced by:
- number of reports;
- data sources;
- calculation complexity;
- drill-down requirements;
- security by role or branch;
- real-time or scheduled refresh;
- external BI tools;
- historical data requirements.
A well-designed reporting scope should prioritize decision-making needs rather than recreating every legacy report.
Acumatica Training Cost and User Adoption
Training is not optional.
A technically successful implementation can still fail when users:
- do not understand the new workflow;
- continue using spreadsheets;
- enter incomplete data;
- avoid dashboards;
- do not know how to handle exceptions;
- depend on one internal expert for every task.
Training scope may include:
- administrator training;
- finance training;
- sales order training;
- purchasing training;
- inventory and warehouse training;
- manufacturing training;
- project or construction training;
- reporting and dashboard training;
- integration monitoring;
- role-specific documentation;
- recorded enablement videos;
- post-go-live office hours.
Acumatica’s unlimited user model can support broad participation, but the company must still budget for role-based education and change management.
The cost of training is usually lower than the cost of poor adoption.
Acumatica Support Cost
Acumatica ERP continues evolving after go-live.
Businesses may require:
- incident response;
- user assistance;
- integration monitoring;
- performance optimization;
- security updates;
- patch management;
- backup review;
- new dashboards;
- workflow adjustments;
- new integrations;
- release testing;
- customization maintenance;
- capacity planning.
Support may be structured as:
- hourly support;
- prepaid service blocks;
- monthly maintenance plans;
- SLA-backed managed support;
- project-based enhancement work.
The appropriate support model depends on system criticality, integration count, internal expertise, transaction volume, and response-time expectations.
BizTech offers post-implementation monitoring, issue resolution, performance optimization, feature updates, and long-term maintenance options.
How Long Does Acumatica Implementation Take?
There is no universal implementation timeline.
BizTech publicly notes that many standard configurations and connector projects can be completed in approximately two to four weeks, while broader implementations or advanced customization projects may require approximately six to ten weeks.
Acumatica’s broader ERP guidance notes that complete ERP programs across the market often take approximately six months to one year from planning through a fully operational environment.
These statements are not contradictory.
They describe different project scopes.
A connector deployment using an established BizTech product is different from a complete multi-entity ERP transformation involving financials, distribution, manufacturing, data migration, integrations, training, and phased rollout.
Timeline depends on:
- functional scope;
- company size;
- number of entities;
- data quality;
- integration complexity;
- custom development;
- reporting requirements;
- client decision speed;
- testing;
- training;
- go-live strategy.
Common Acumatica Go-Live Strategies
Big Bang: all required modules and business units move to Acumatica at one time.
Phased Rollout: modules, locations, entities, or departments move in controlled stages.
Parallel Operation: Acumatica and the legacy system run simultaneously for a defined period.
A phased implementation may spread cost over time and reduce operational risk, but it requires careful coordination and temporary cross-system processes.
How Timeline Affects Acumatica Implementation Cost
A shorter timeline does not always mean a lower cost.
Accelerated projects may require:
- more consultants working simultaneously;
- faster client decisions;
- compressed testing;
- additional project management;
- weekend or after-hours cutover;
- temporary workarounds;
- limited opportunity for process redesign.
A timeline that is too long also creates cost:
- extended project management;
- repeated requirement reviews;
- staff turnover;
- changing business requirements;
- duplicate work in old and new systems;
- loss of project momentum.
The best timeline is realistic, milestone-based, and supported by available client resources.
Hidden Acumatica Implementation Costs Businesses Often Miss
A strong ERP budget should include costs beyond software and consulting invoices.
Internal Employee Time
Executives, finance teams, warehouse managers, buyers, sales leaders, IT staff, and subject matter experts must participate in discovery, design, migration, testing, and training.
Their time is part of the total project cost.
Data Cleansing
Legacy data may require extensive internal review before migration.
Process Documentation
Undocumented workflows often require interviews, workshops, and validation before configuration can begin.
Third-Party Software
The final environment may include:
- tax applications;
- shipping platforms;
- EDI providers;
- payment gateways;
- BI software;
- document management;
- specialized industry applications.
Integration Monitoring
APIs and connectors require monitoring, exception management, and occasional updates.
Parallel Operations
Running two ERP systems simultaneously can create duplicate work and extended legacy software fees.
Change Requests
New requirements identified after scope approval may increase cost and timeline.
Post-Go-Live Optimization
Some improvements should intentionally occur after users gain real production experience.
Upgrade and Release Testing
Customizations and integrations should be tested against future Acumatica releases.
Change Management
Communication, training, internal leadership, and adoption support require time and resources.
Why the Cheapest Acumatica Quote Can Become the Most Expensive
A low-cost proposal may exclude important work.
Common exclusions include:
- data cleansing;
- historical migration;
- integration error handling;
- custom reporting;
- user acceptance testing;
- training documentation;
- post-go-live support;
- project management;
- upgrade compatibility;
- performance monitoring.
When these omissions become visible later, the business may need to pay for:
- architecture redesign;
- repeat migration;
- integration redevelopment;
- corrective reporting;
- emergency support;
- additional training;
- delayed go-live;
- extended legacy system operation.
The lowest initial quote is not necessarily the lowest total cost.
Businesses should compare proposals according to scope, deliverables, assumptions, exclusions, testing, training, and support—not only the final number.
How to Reduce Acumatica Implementation Cost Without Damaging the Project
Cost control should remove waste, not quality.
Complete Discovery Before Configuration
Clear requirements reduce rework.
Prioritize Requirements
Separate requirements into:
- mandatory for go-live;
- important for the next phase;
- optional improvements;
- legacy processes that should be eliminated.
Use Standard Acumatica Functionality First
Configuration is usually easier to maintain than custom development.
Clean Data Early
Data cleansing performed before migration reduces consultant effort and testing failures.
Use Existing BizTech Connectors
A proven connector may reduce custom development and implementation risk.
Assign Internal Process Owners
Fast and informed client decisions keep the project moving.
Implement in Phases When Appropriate
A phased roadmap can prioritize the highest-value capabilities and defer optional enhancements.
Define Reports Early
Reporting requirements affect data structures, workflows, and integrations.
Test Complete Business Scenarios
End-to-end testing reduces expensive production corrections.
Train by Role
Focused role-based training is more effective than generic system demonstrations.
Establish Change Control
Every proposed addition should be evaluated for business value, cost, timeline, and maintenance impact.
Acumatica Total Cost of Ownership
A complete Acumatica TCO analysis should cover the full ownership period.
| Cost area | Initial year | Ongoing years |
|---|---|---|
| Software | Subscription or license setup | Renewal, resources, storage, added applications |
| Implementation | Discovery, configuration, migration, testing, training | Normally limited after stabilization |
| Integrations | Setup, mapping, testing, deployment | Monitoring, API changes, new features |
| Customization | Initial development | Maintenance, release testing, enhancements |
| Support | Go-live stabilization | Managed support and optimization |
| Internal labor | Heavy project participation | Administration, process ownership, training |
A complete TCO analysis should also subtract expected savings and productivity gains.
How to Calculate Acumatica ROI
Acumatica return on investment should be evaluated against measurable operational outcomes.
Possible ROI categories include:
Reduced Manual Data Entry
Measure employee hours spent entering orders, payments, shipments, inventory adjustments, and financial data before and after implementation.
Faster Financial Close
Measure the number of days and employee hours required to close each period.
Improved Inventory Accuracy
Measure stock adjustments, write-offs, overselling, emergency purchasing, and lost sales.
Faster Order Processing
Measure order cycle time from receipt to shipment and invoice.
Lower Software Duplication
Identify legacy tools, spreadsheets, databases, reporting applications, and integration services that can be retired.
Improved User Adoption
Evaluate whether more employees can access live ERP data without additional seat-based licensing.
Reduced Integration Failures
Measure manual corrections, delayed orders, missing tracking, duplicate customers, and reconciliation work.
Better Margin Visibility
Evaluate whether leadership can identify profitability by product, customer, channel, project, or warehouse.
Scalability Without Equivalent Headcount Growth
Measure transaction growth relative to administrative staffing.
The strongest Acumatica ROI model uses company-specific operational data rather than generic industry assumptions.
How BizTech Builds an Acumatica Implementation Estimate
BizTech does not calculate implementation cost from one generic questionnaire.
A useful estimate requires structured discovery.
Step 1: Business Profile
BizTech reviews:
- industry;
- revenue and transaction profile;
- legal entities;
- branches;
- warehouses;
- sales channels;
- current systems;
- growth plans.
Step 2: Functional Scope
We identify the required Acumatica applications and modules.
Step 3: Process Mapping
We review order-to-cash, procure-to-pay, record-to-report, inventory, warehouse, production, project, service, and commerce workflows.
Step 4: Data Migration Assessment
We evaluate data sources, record volume, quality, history, mapping, and reconciliation requirements.
Step 5: Integration Inventory
We identify all eCommerce platforms, marketplaces, payment systems, warehouses, CRM tools, EDI providers, shipping systems, BI tools, and proprietary applications.
Step 6: Customization Assessment
We determine which requirements can be handled through standard Acumatica, configuration, existing BizTech products, or custom development.
Step 7: Reporting and Dashboard Scope
We identify financial, operational, executive, and compliance reporting requirements.
Step 8: Training and Change Management
We define user groups, documentation, training sessions, videos, and go-live support.
Step 9: Testing and Deployment
We define test cycles, user acceptance testing, migration rehearsals, go-live strategy, and stabilization support.
Step 10: Ongoing Support Plan
We identify monitoring, maintenance, response-time, and future enhancement requirements.
The resulting estimate should clearly separate:
- software;
- implementation;
- migration;
- integrations;
- customization;
- reporting;
- training;
- support;
- assumptions;
- exclusions.
Information Needed for an Acumatica Implementation Quote
A company can prepare for an estimate by collecting the following information:
- current ERP and accounting systems;
- number of legal entities and branches;
- number of warehouses and locations;
- required currencies and tax jurisdictions;
- current transaction volume;
- expected growth;
- required Acumatica modules;
- legacy data sources;
- historical data requirements;
- external integrations;
- custom workflows;
- reporting requirements;
- number and roles of users;
- desired go-live date;
- internal project team availability;
- support requirements.
Better input produces a more reliable estimate.
Questions to Ask Before Accepting an Acumatica Quote
Businesses should ask:
- Which Acumatica applications are included?
- What resource level is assumed?
- Which deployment model is included?
- Which implementation phases are covered?
- How much data history will be migrated?
- Are data cleansing and reconciliation included?
- Which integrations are included?
- Does integration scope include refunds, errors, retries, and monitoring?
- Which reports and dashboards are included?
- How many training sessions are included?
- Who is responsible for user acceptance testing?
- What support is included after go-live?
- How are change requests priced?
- What assumptions could change the cost?
- How will customizations be tested against upgrades?
A transparent quote should make these answers clear.
Why Work with BizTech for Acumatica Implementation?
BizTech is an Acumatica Gold Partner specializing in ERP implementation, customization, integrations, data migration, reporting, automation, training, testing, and support.
BizTech’s website reports more than 500 successful integrations and experience serving businesses across more than 35 countries.
Our main advantage is the combination of functional ERP expertise and product development.
BizTech does not only configure Acumatica.
We also build solutions that extend Acumatica into:
- eCommerce;
- marketplaces;
- payments;
- warehouse fulfillment;
- shipping;
- retail networks;
- CRM;
- EDI;
- custom inventory processes;
- industry-specific workflows.
This creates one accountable partner relationship for implementation and integration.
BizTech can help businesses:
- define ERP strategy;
- calculate software and implementation scope;
- configure Acumatica;
- migrate and reconcile data;
- deploy existing connectors;
- build custom integrations;
- develop specialized functionality;
- create dashboards and reports;
- train users;
- support the system after go-live.
Is Acumatica Worth the Cost?
Acumatica can be a strong investment for businesses that have outgrown disconnected accounting, inventory, order, warehouse, project, and eCommerce systems.
The platform is especially valuable when the company needs:
- one source of financial and operational truth;
- broader user access;
- multi-warehouse inventory visibility;
- automated purchasing and order management;
- manufacturing or construction functionality;
- eCommerce and marketplace integration;
- payment synchronization;
- real-time dashboards;
- workflow automation;
- open APIs and custom integration;
- a scalable midmarket ERP platform.
Acumatica may not be worth the investment if the business is unwilling to assign internal process owners, clean its data, test workflows, train users, or change inefficient legacy processes.
ERP value does not come from software alone.
It comes from combining the platform, implementation partner, internal team, and operational discipline.
Final Conclusion: Understanding Acumatica Implementation Cost
There is no honest universal answer to the question:
“How much does Acumatica cost?”
The software price depends on applications, usage, resources, and deployment preferences.
The implementation cost depends on business scope, data, integrations, customization, reporting, training, testing, timeline, and support.
A complete Acumatica budget may include:
- Acumatica software;
- implementation consulting;
- data migration;
- system integrations;
- custom development;
- reports and dashboards;
- training;
- go-live support;
- ongoing optimization.
The correct objective is not finding the smallest proposal.
The objective is understanding the total investment required to build a reliable, scalable, and maintainable ERP system.
Acumatica’s unlimited user philosophy can make the platform especially attractive for growing companies because it supports broad adoption without charging a separate full license for every user.
Its open APIs, cloud architecture, industry applications, workflows, dashboards, and customization tools also make Acumatica a strong foundation for connected business operations.
As an Acumatica Gold Partner, BizTech helps companies calculate the complete scope before implementation begins.
We combine:
- Acumatica consulting;
- ERP configuration;
- data migration;
- customization;
- eCommerce integration;
- marketplace automation;
- payment integration;
- warehouse connectivity;
- reporting;
- training;
- support.
For companies searching for:
- Acumatica Implementation Cost;
- Acumatica Pricing 2026;
- Acumatica ERP Pricing;
- How Much Does Acumatica Cost;
- Acumatica Implementation Estimate;
- Acumatica Data Migration Cost;
- Acumatica Integration Cost;
- Acumatica Customization Cost;
- Acumatica Total Cost of Ownership;
- Acumatica Gold Partner;
- BizTech Acumatica Implementation;
the next step is a structured discovery and scope assessment.
Acumatica provides the platform.
BizTech helps determine what it will take to make that platform work for your business.
FAQ: Acumatica Pricing and Implementation Cost
How much does Acumatica cost?
Acumatica does not have one universal public price. Software cost is tailored according to the applications required, expected business usage and resource requirements, and deployment or license preferences.
Does Acumatica charge per user?
Acumatica promotes unlimited user access and pricing based on functionality and resource consumption rather than purchasing a separate full ERP seat for every user.
How much does Acumatica implementation cost?
Implementation cost depends on functional scope, companies, branches, warehouses, data migration, integrations, customization, reporting, training, testing, and support. A discovery process is required for a reliable estimate.
Is Acumatica software included in implementation cost?
Software and implementation are normally separate cost categories. The software provides access to Acumatica applications and resources. Implementation covers consulting, configuration, migration, integration, training, testing, and deployment.
How long does Acumatica implementation take?
Timelines vary significantly. Standard connector and configuration projects may take several weeks. Broader ERP implementations may require several months depending on functional scope, data, integrations, customization, testing, and organizational readiness.
How much does Acumatica data migration cost?
Data migration cost depends on the number of source systems, record volume, data quality, required history, custom fields, reconciliation, and the number of migration rehearsals.
Are Acumatica integrations included in the software price?
Some standard commerce capabilities may be available through Acumatica applications, but third-party connectors, partner solutions, custom configuration, integration development, mapping, and support may involve separate costs.
How much does an Acumatica API integration cost?
API integration cost depends on the number of entities, synchronization direction, transaction volume, frequency, mapping, transformation, authentication, errors, retries, monitoring, and testing.
How much does Acumatica customization cost?
Customization cost depends on whether the requirement can be solved through configuration, low-code tools, workflow changes, a customization project, or custom product development. Custom code should be used only when it creates clear maintainable value.
What is included in Acumatica total cost of ownership?
Acumatica TCO may include software, implementation, migration, integrations, customizations, reporting, training, third-party applications, support, infrastructure, internal project effort, and ongoing optimization.
Is Acumatica expensive for a small business?
The answer depends on operational complexity. Acumatica is typically considered by growing businesses that need more functionality than basic accounting software. Its unlimited user pricing philosophy may make it attractive to organizations that need broad access across departments.
Is Acumatica cheaper than NetSuite, SAP, Microsoft Dynamics 365, or Epicor?
The answer depends on modules, users, resource consumption, implementation scope, integrations, and support. Acumatica’s non-seat-based pricing philosophy can be advantageous for organizations with many users, but a complete TCO comparison is required.
Can Acumatica be implemented in phases?
Yes. A phased implementation can introduce Acumatica by module, location, entity, or business function. This may reduce immediate scope and risk, although integration and cross-system coordination must be planned carefully.
Can BizTech provide an Acumatica implementation quote?
Yes. BizTech can assess business processes, required modules, data migration, integrations, customization, reporting, training, timeline, and support to develop a structured Acumatica implementation estimate.
Why choose BizTech for Acumatica implementation?
BizTech is an Acumatica Gold Partner combining ERP consulting, implementation, data migration, custom development, proprietary connectors, eCommerce integration, marketplace automation, warehouse connectivity, payment integration, reporting, training, and post-go-live support.
[/vc_column_text][/vc_column][/vc_row]


Salesforce Acumatica Integration Configuration Checklist
Salesforce Acumatica Integration Configuration Checklist
In many fast-growing companies, an invisible wall often exists between the sales team and the finance department. Your sales representatives live and breathe in their Customer Relationship Management, or CRM, platform to close deals, while your accounting and operations teams rely on their Enterprise Resource Planning, or ERP, system to manage inventory and billing. When these two worlds do not talk to each other, your business suffers from manual data entry, duplicate records, and a lack of real-time visibility into customer health. We at Biz-Tech Services know that bridging the gap between Salesforce and Acumatica is not just a technical task, but a strategic move to streamline your entire order-to-cash cycle.
The Biz-Tech Services Salesforce Acumatica Connector is a robust integrator designed to ensure data flows smoothly between these two powerful platforms. It provides a comprehensive solution for synchronizing customer data, automating complex workflows, and maintaining accurate financial reporting. To help your business prepare for a successful integration, we have developed a practical configuration checklist that covers everything from technical foundations to go-live readiness.
The Essential Technical Foundation
The first step in your configuration journey is ensuring your system meets the basic requirements for the Biz-Tech Services SalesForce Acumatica integration. Before we begin the setup, your business must have the correct license installed on your Acumatica system, such as a Software as a Service, or SAAS, or a Perpetual license. Once the license is in place, the primary technical task is establishing a secure link through the Application Programming Interface.
You will need to gather several key pieces of information from your Salesforce instance to facilitate this connection. First, you must identify your specific instance URL and the Username and Password for the integrator account. Second, you will need a Client ID and a Client Secret, which act as the digital keys for the Biz-Tech Services SalesForce Acumatica integrator. After entering these credentials into the general information area, we use the actions feature to Test Credentials. This validation step confirms the correctness of the login details and ensures the two systems can communicate before any data begins to move.
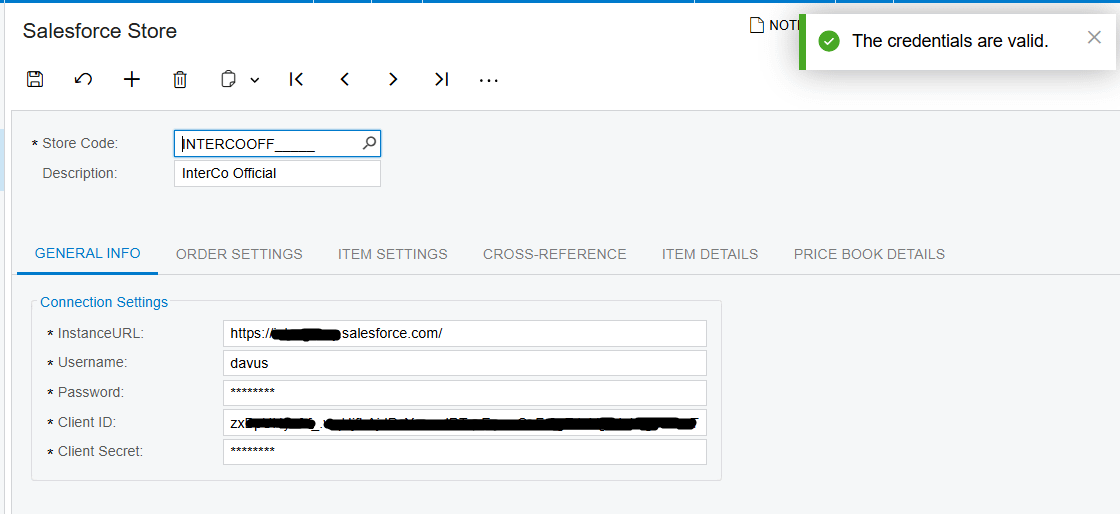
Defining Your Order and Customer Logic
Once the technical bridge is built, your business must decide how information should be organized as it enters your ERP. The first item on this part of the checklist is defining your Default Import Options. You must select a specific order type to indicate which document category the Salesforce orders should land in, and assign a default warehouse identification number to ensure your inventory is tracked correctly. We also recommend setting a beginning date for your first import to ensure the system only retrieves the records you are ready to process.
The second consideration is how the system should handle Customer records. You have the option to enable an import customer feature that automatically creates new customer records in Acumatica during the order import process. This automated creation includes the customer's email, contact information, and assigned customer class. If you choose not to enable this, the system can be configured to use a default customer record for every imported order instead. Additionally, you must decide if the Biz-Tech Services SalesForce Acumatica integration should override existing billing and shipping address information with the data provided in the Salesforce order, ensuring your shipments always reach the correct destination.
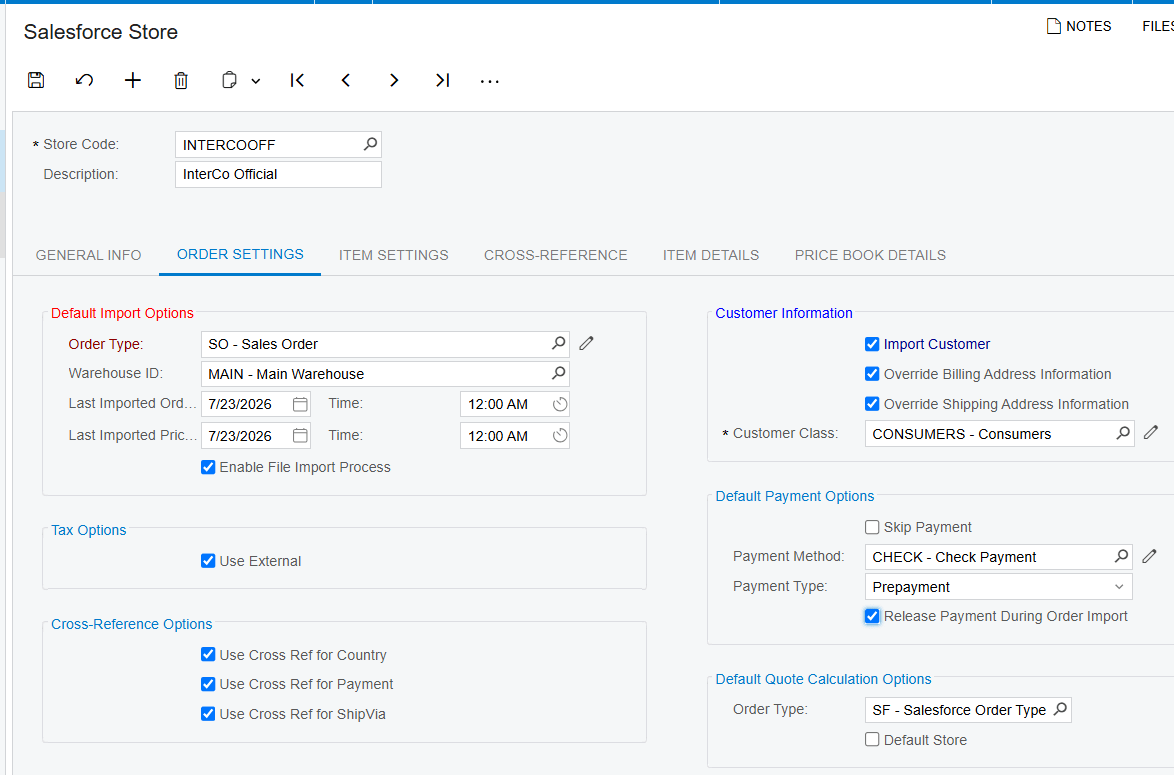
Mapping Data with Cross-References and Items
For the Biz-Tech Services SalesForce Acumatica integration to be truly seamless, the two systems must speak the same language regarding shipping and payments. This is where cross-reference options become critical. First, you must create mappings for common fields like payment methods, countries, and Ship Via services. For example, if a salesperson selects a specific shipping carrier in Salesforce, the cross-reference ensures the correct internal shipping code is applied in Acumatica.
Second, your business must prepare its inventory data. You can enable a feature on Ityem Settings tab that creates new items in your ERP based on information from Salesforce. If this is not enabled, the system will search for an existing inventory identification by using the Salesforce product Stock Keeping Unit, or SKU.
If the product does not already exist in your ERP, the system will display an error message to prevent data discrepancies. Here we have already performed Sync All From SalesFore process and got Stock Items created
Third, we look at tax options. You can choose to use your internal tax categories or enable an External Tax calculation service, such as Avalara, to handle complex tax requirements automatically.
Managing Prices, Discounts, and Payments
A vital part of your go-live readiness is ensuring your pricing and promotions are synchronized. The Biz-Tech Services SalesForce Acumatica connector allows your business to manage price books directly. You can retrieve all existing items from a Salesforce price book and display them within your ERP, allowing you to manually define or update list prices as needed. It is important to remember that items must be included in your standard price book before they can be added to any specialized price books.
Furthermore, the checklist should include your promotional strategies. When you configure discount codes in your ERP, they can be exported to Salesforce for use during the order creation process. These discounts can be applied at either the individual line level or the overall document level. Finally, you must define your default payment options. You can choose to release payments automatically during the import process or skip the payment step if you prefer to handle billing as a separate financial task.
Validation and Real-Time Synchronization
As you move toward your launch date, testing the Sync Orders to Salesforce feature is essential. This capability allows your team to update imported order data within Acumatica — such as changing a shipping address or adding a new line item — and then process those changes back to Salesforce. This ensures that your sales team always sees the most current information regarding an order's total, tax, and freight amounts. The system even retrieves internal notes from Salesforce and displays them in the sales order notes area of your ERP, though these are kept uneditable to maintain the integrity of the original sales record.
This Biz-Tech Services SalesForce Acumatica integrator is built for modern enterprises that need to eliminate the data gap between their front-office sales activities and their back-office financial functions. By following this structured configuration checklist, we ensure that your teams can make informed decisions based on up-to-date, synchronized information.
If you are ready to streamline your order processing and improve visibility across your entire organization, we are here to help you every step of the way. We invite you to visit https://biz-techservices.com to learn more about our integration expertise or to schedule a personalized demo of the Biz-Tech Services Salesforce Acumatica Connector.
PayPal Acumatica Integration Configuration Checklist
PayPal Acumatica Integration Configuration Checklist
The moment a sale is made is often the most exciting part of a business day, but the manual work required to actually collect the money can quickly dampen that enthusiasm. If your team is jumping between your accounting software and a separate payment portal to send invoices, check payment statuses, or record receipts, you are losing valuable time. This disjointed process often leads to delays in shipping, errors in financial reporting, and a slower cash flow. We at Biz-Tech Services believe that your ERP system should be the heartbeat of your operations, handling everything from the initial order to the final payment without requiring you to switch windows.
The Biz-Tech Services, Inc. PayPal Acumatica Integration ia a specialized customization that enables your business to send professional payment requests directly to customers. This bridge utilizes the PayPal invoicing Application Programming Interface to generate live payment links that your customers can pay via their PayPal account or as a guest using a credit card. Because the system is integrated, it automatically updates your financial records the moment the funds are confirmed. To ensure your business is ready for this level of automation, we have prepared a configuration checklist to guide your pre-launch preparation.
Technical and System Prerequisites
Your journey begins with ensuring your internal environment is ready to support the connection. First, your business must have the necessary Acumatica modules active, specifically the Accounts Receivable, or AR, and Sales Orders, or SO, modules. Second, you must have a PayPal Business account, as personal accounts do not support the specific invoicing API required for this Biz-Tech Services Paypal Acumatica integration.
Third, you will need to generate your digital credentials through the PayPal developer portal. This involves creating a new application to obtain a unique Client ID and a Client Secret. These act as your secure digital signature, allowing Acumatica to speak to PayPal on your behalf. Finally, ensure your network security allows for this communication. Your Acumatica server must be able to reach the PayPal API endpoints over a secure connection on port 443. We recommend verifying these technical foundations before moving into the software configuration on Biz-Tech Services Acumatica PayPal connector.
Configuring the Core Connection
Once the foundations are set, the next step is establishing the connection within Acumatica. We begin by installing the customization package through the customization projects form. After the package is published to your database, you must create a dedicated payment method.
In the Payment Methods screen, you will define a new ID, such as PAYPAL, and set the means of payment. This action reveals a specialized settings tab where you will enter the Client ID and Client Secret you gathered earlier. You must also enter the correct base web addresses for both the live and testing environments. Before saving, we always use the test credentials feature to ensure the two systems are communicating correctly. A successful test confirms that your ERP can securely request invoices and receive status updates.
Mapping Customer Data and Workflows
A critical part of your pre-launch checklist is preparing your customer records for automation. Each customer who intends to pay via this method must have a customer payment method configured with their specific PayPal email address, as you can see on Customer Payment Methods screen. This email is where PayPal will deliver the digital invoice. While the system allows you to override this email on a case-by-case basis, having it correctly mapped in the customer profile ensures your daily billing runs without manual entry.
Your business should also decide which operational workflow best fits your sales cycle. The Biz-Tech Services Paypal Acumatica integrator offers three primary entry points. First, you can send a payment request directly from a sales order, which is ideal for businesses that require payment before shipment. Second, you can send a request from an existing invoice if your billing occurs after the service or delivery. Third, you can generate a standalone payment request from the payments and applications screen to collect deposits or prepayments not yet tied to a specific document.
Testing and Go-Live Readiness
The final phase of your configuration of iz-Tech Services Acumatica PayPal connector, involves validating the payment lifecycle. We recommend using a PayPal sandbox account during the testing phase. This allows you to simulate the entire process of sending an invoice, making a test payment, and watching the status change in Acumatica without moving real money.
During this stage, your business should familiarize itself with how the system handles different scenarios. For example, if a customer makes a partial payment, the system will update a specific paid amount field but keep the record on hold until the full balance is collected. You should also test the refund and cancellation workflows. Issuing a full refund within Acumatica will automatically trigger the PayPal refund API and void the payment record in your ERP, keeping your books in perfect sync.
Launch and Management
To maintain efficiency after launch, your operations managers should use the centralized processing screen. This tool allows you to check the status of multiple outstanding payments at once. Because Acumatica does not poll for updates in the background, unless you specify automation schedule, this bulk processing screen is your primary tool for daily reconciliation, ensuring that every Sent status is updated to Paid as soon as the customer completes their transaction.
This Biz-Tech Services Acumatica PayPal integration is designed for business owners who want to eliminate the data gap between their payment portal and their accounting office. By following this structured configuration checklist, we ensure that your payment processing is as streamlined and professional as the products you sell.
If you are ready to simplify your billing and want to see how these automated payment workflows can benefit your business, we invite you to visit biz-techservices.com to learn more or to schedule a demo of our Biz-Tech Services Acumatica PayPal Acumatica Integrator.
CommerceHub Acumatica Connector Configuration Checklist
CommerceHub Acumatica Connector Configuration Checklist
Managing a growing supply chain for major retailers like Costco, Home Depot, or Lowe's often brings a unique set of technical hurdles. When your business moves from small-scale fulfillment to high-volume drop-shipping, the manual effort required to keep your vendor portals in sync with your financial records can become overwhelming. You might find your team constantly logging into different systems just to update inventory or confirm a shipment, which increases the risk of costly errors. We at Biz-Tech Services recognize that for your operations to remain efficient, your Enterprise Resource Planning, or ERP, software must handle these complex retail relationships automatically.
The Biz-Tech Services CommerceHub Acumatica Connector provides the necessary infrastructure to bridge this gap. CommerceHub is a platform that facilitates e-commerce operations by connecting retailers, brands, and suppliers. Unlike many modern integrations that rely on direct digital handshakes, CommerceHub primarily operates using Secure File Transfer Protocol, or SFTP, for data exchange. This means the information is written into text files and then read for data transmissions, rather than using standard Application Programming Interface, or API, requests. To ensure your business is prepared for this specific type of integration, we have outlined a configuration checklist to guide your pre-launch phase.
The Foundation of Secure File Transfer
The first and most critical prerequisite for your business is establishing the secure pathway for your data. Because this connector uses file-based transfers, you will need to utilize a tool like FileZilla, which is software used for transferring files between a client and a server. We use this technology to manage the automated or semi-automated synchronization of your product data between the file server and the CommerceHub platform.
Once the connector package is published in your Acumatica environment, the CommerceHub workspace and its related screens become available for setup. Your first technical task is to enter your connectivity credentials within the mappings screen. You will need to gather your Secure File Transfer Protocol host address, the specific port number, and your unique username and password. Additionally, you must define the precise transfer paths and export paths on the server where the text files will be stored and retrieved. Validating this connection is the essential first step before any retail data can move.
Tailoring Setup with Source Codes
One of the standout features of this integration is the use of store codes, which allow your business to manage distinct configurations for specific retail partners. Each store can be individually set up with unique parameters to accommodate diverse requirements. For example, your configuration for Costco might require different document types or transaction descriptions than your setup for Home Depot.
During the configuration process, you will use these store codes to define the behavior for each import and export operation. You must decide for each partner whether the transaction type is an import or an export and which default customer record in Acumatica should be associated with those orders. While the system uses a default customer for the initial sales order, it is designed to override the default address information with the actual customer address received from the imported order, ensuring your shipments always go to the right place.
The Core Configuration Checklist
To achieve a seamless flow of information, your business must complete a detailed mapping of how files are structured and how data is cross-referenced.
First, you must address the file record types and delimiters. This involves defining the specific positions of data within the text files, such as which column contains the order ID or the item description. You must also specify the file type and the delimiter used to separate data points. Second, you need to establish item cross-references. This enables the mapping of your Acumatica inventory items to the respective item identifications contained within the retail partner's files. Without this step, the system will not know which of your products matches the order being imported.
Third, your business must configure your warehouse details. You need to add the specific warehouses that should be included in the export and determine which inventory quantity should be synchronized. You can choose to export the quantity on hand, the available quantity, or the quantity available for shipment. Fourth, we utilize the inventory template to select the specific items that will be displayed in the inventory export screen. This ensures that only the relevant products are synchronized with your retail partners, keeping your data clean and focused.
Operational Readiness and Error Management
The final phase of your checklist involves preparing for the daily lifecycle of an order. You must verify that your business can handle acknowledgments, shipments, and invoices correctly. When an order is generated, it initially maintains an open status for both the acknowledgment and the purchase order acknowledgment fields. Your team must be prepared to process these through the dedicated export screens to transition the status to closed.
We also recommend a thorough review of the shipment and invoice export workflows. The system provides a screen that displays all orders with a confirmed shipment status, allowing you to export those details back to the retailer. Similarly, you can export orders that have been invoiced or released to ensure your billing is always up to date. Finally, your business should familiarize itself with the error management tools. The connector includes an error log and a dedicated screen for failed purchase orders, allowing your team to review, resolve, and re-import any orders that encountered issues during the initial synchronization.
This integration is ideal for operations managers who need to automate the complex requirements of major retail vendor portals. By following this structured configuration checklist, we help you ensure that your warehouse, sales, and accounting teams are all operating from a single, reliable source of truth.
If you are ready to streamline your retail partnerships and eliminate manual file transfers, we are here to help. We invite you to visit biz-techservices.com to learn more about our solutions or to schedule a demo of the CommerceHub Acumatica Connector.
EZCom EDI Acumatica Connector Configuration Checklist
EZCom EDI Acumatica Connector Configuration Checklist
Scaling a wholesale or retail business often means stepping into the world of major retail partners. While these partnerships bring high-volume orders, they also introduce the complexity of Electronic Data Interchange, or EDI. You might find your team buried under a mountain of manual data entry, trying to reconcile purchase orders from retail portals with your internal accounting records. When your shipping notices and invoices do not reach your partners in real time, you risk chargebacks and damaged relationships. We at Biz-Tech Services know that for your business to thrive, your back office must communicate with your retail partners without friction.
The Biz-Tech Services, Inc EZCom Connector for Acumatica is the specialized bridge built to solve this problem. It connects EZCom EDI with your ERP system. This Biz-Tech Services, Inc EZCom Acummatica integration is managed by an intermediate server that we control, ensuring a secure and stable flow of data between your business and the EZCom platform. To help you prepare for a successful integration, we have developed a practical configuration checklist to guide your pre-launch journey.
The Essential Technical Foundation
Your journey begins with the technical setup within your ERP environment. First, your business must install the customization project using the specialized deployment package provided for Acumatica. This process uses the customization projects form to modify your application and add the logic necessary for EDI communication. Once the package is published to your database, you must establish secure communication.
The second technical requirement is the configuration of your connectivity credentials. You will need to provide your account details and a unique Application Programming Interface, or API, key for each of your retail websites. Your team must also enter the login and password for your EZCom admin panel to authorize the connection. We always recommend using the Test Credentials feature to verify the connection between Acumatica and our intermediate server. This simple validation ensures the digital pathway is clear before you attempt to move any live order data.
Mapping Your Business Rules and Partners
Once the connection is established, your business must define how it will interact with each trading partner. You begin by retrieving your list of partners from the EZCom system. For each partner, you must select the default order type, such as a specialized sales order category, that will be used when new purchase orders are imported. You also need to define which order statuses in EZCom should trigger an import into Acumatica.
A critical part of this checklist is setting up your date filters. You must establish a beginning order date to ensure the system only retrieves the records you are ready to process. Additionally, you should decide if orders should be automatically acknowledged during the import process. If you choose this automation, the system will mark the order as closed in the warehouse portal without requiring manual intervention from your staff.
The Core Configuration Checklist for Data Accuracy
For the Biz-Tech Services, Inc Acumatica EZCom integration to work smoothly, your data must be perfectly synchronized. This requires a detailed mapping of several key entities.
First, you must address your inventory items. Every product in your retail partner's system must correspond to an inventory ID in Acumatica. You can choose to match these items using a Universal Product Code, or UPC, a vendor item number, or a specific customer item number. If these items are not mapped correctly, the system will generate an error during the order import process to prevent data corruption.
Second, your business must configure cross-references for shipping and location data. This includes mapping your warehouse IDs so the system knows exactly which physical location should fulfill each order. You must also map your Ship Via methods to ensure that when a partner requests a specific carrier service, your warehouse team sees the correct internal shipping code. Third, you need to define your customer identification logic. You can set the system to search for matching parent and child customer accounts based on the location number provided in the EDI data, ensuring that financial records are always associated with the correct entity.
Streamlining Shipping and Financials
The final phase of your checklist involves setting the rules for outbound communication. Your business should decide when invoices and shipments are sent back to the retail partner. You can configure the system to automatically export an invoice the moment it is released in Acumatica. Similarly, you can set the system to send shipment notifications as soon as the shipping labels and documentation are prepared.
If you prefer more control, you can leave these automated triggers off and manage outbound data through dedicated processing screens. Furthermore, you must configure your inventory availability settings. By mapping your Acumatica warehouses and selecting your quantity options, such as On Hand or Available, you ensure that your retail partners always have an accurate view of what you have in stock.
Launching with Confidence
This Biz-Tech Services, Inc integrator is designed for operations managers who need to eliminate manual errors and business owners who want to scale their retail partnerships. By following this structured configuration checklist, you ensure that your shipping, inventory, and accounting departments are all working from a single, automated source of truth.
If you are ready to remove the complexity of EDI from your daily operations, we invite you to visit biz-techservices.com to learn more or to schedule a personalized demo of the Biz-Tech Services, Inc EZCom Acumatica integration.
DSCO Acumatica Connector Configuration Checklist
DSCO Acumatica Connector Configuration Checklist
Managing a high-volume drop-ship operation often feels like trying to orchestrate a symphony where half the musicians are in different time zones. When your retail partners send orders through a platform like DSCO, but your internal team is manually re-entering that data into your accounting system, the music quickly falls out of tune. You face delayed shipments, inventory discrepancies, and the constant risk of missing a cancellation request. We at Biz-Tech Services know that for your business to scale, your Enterprise Resource Planning, or ERP, software must communicate flawlessly with your supply chain partners.
The Biz-Tech Services DSCO Acumatica DSCO Connector is designed to automate this complex exchange of data. DSCO serves as a centralized hub for retail and supplier relationships, and this connector acts as the digital bridge ensuring that orders, shipments, and inventory levels stay perfectly synchronized. To ensure a smooth transition to this automated workflow, we have compiled a practical pre-launch checklist to guide your configuration process.
Establishing the Technical Connection
The first essential step for your business is the installation of the specialized Biz-Tech Services DSCO Acumatica integration package. We begin by using the customization projects form in Acumatica, identified as Form ID SM204505, to upload and publish the project. This process adds the necessary logic to your Enterprise Resource Planning environment to support the unique requirements of the DSCO platform. Once the package is published, the platform saves the project into your database, creating a foundation for all future data exchanges.
Next, your business must establish secure communication between the two systems. This requires a specific Access Token, which is a digital credential used to authorize your application and grant permissions within the DSCO system. You will also need to confirm the Base URL, which serves as the fundamental web address for the connection. We always recommend using the built-in test credentials feature to validate this connection immediately. This simple check confirms that your digital doorway is open and that the systems can communicate effectively before any transactions occur.
Mapping Your Operational Workflow
Once the connection is live, you must define the rules of engagement for your orders. A critical configuration point is deciding whether to import DSCO orders as a standard Sales Order or directly as a Sales Order Invoice. This choice depends on how your business handles fulfillment and revenue recognition. You will also need to select the default Order Type that the Biz-Tech Services DSCO Acumatica integrator should use when creating these documents.
Your business must also decide how to handle order acknowledgments. If you choose to set orders as automatically acknowledged upon import, the system simplifies the process by assuming the order is accepted. However, if your business needs a manual review phase, you can leave this setting unchecked and send acknowledgments through a dedicated page in Acumatica later. Defining these status settings ensures that both the retailer and the supplier are always looking at the same information.
Data Preparation and Cross-Referencing
A successful launch depends heavily on the accuracy of your data mapping. First, you must address your inventory identification. The Biz-Tech Services DSCO Acumatica connector allows you to choose how to search for items, such as by Stock Keeping Unit, or SKU, Universal Product Code, or UPC, or the specific DSCO item number. For instance, if you set the search to SKU, the system will look for a matching number in DSCO and automatically associate it with the correct Inventory ID in Acumatica. Failing to map these items correctly will result in errors during the order import process.
Second, your business must configure warehouse cross-references. This is vital because the system needs to know which physical or virtual location in your ERP corresponds to the warehouse values provided by DSCO. If these values are not mapped, the import process will fail with an error stating that the warehouse does not have a value. Third, you must map your shipping rules. By defining your Ship Via cross-references, you ensure that the shipping service levels requested by your retail partner, such as Ground or 2nd Day Air, translate accurately to your internal carrier codes.
Inventory Availability and Cancellations
Maintaining accurate stock levels is perhaps the most important part of the configuration. In the inventory availability settings, you must select the specific warehouses that should be synchronized with DSCO. You can also choose how the system calculates the quantity to send, whether it should be based on what is On Hand, Available, or Available for Shipment. When multiple warehouses are selected, the Biz-Tech Services DSCO Acumatica integrator can automatically sum the quantities from all locations to provide an accurate total to your partners.
Finally, your business needs a plan for when things do not go as expected. You must add order cancel reasons to the connector and map them to DSCO cancel codes. This ensures that if an order is canceled due to fraud, an incorrect address, or a customer request, the reason is captured correctly in both systems. By setting these reason codes up beforehand, you prevent manual follow-ups and ensure your reporting remains accurate.
Validation and Readiness
The final phase of your checklist involves testing the export workflows. Your business should verify that shipments are being exported correctly when invoices are prepared. This automated step sends tracking numbers back to DSCO and updates the order status without any manual intervention from your team. Make sure the checkboxes of Default Export Options panel are selected.
This level of automation is designed for operations managers who need to eliminate the data gap between their warehouse and their back office. By following this structured configuration checklist, we ensure that your Biz-Tech Services DSCO Acumatica DSCO integration is stable, reliable, and ready to handle your growth.
If you are ready to streamline your drop-ship operations and want to see how these automated workflows can benefit your business, we invite you to visit biz-techservices.com to schedule a demo of the Biz-Tech Services DSCO Acumatica Connector.

