
How Magento Data Flows into Acumatica ERP
Magento data flows into Acumatica ERP through a connector that retrieves orders from your Magento store, imports the selected orders as Acumatica documents, and then generates fulfillment events back in Magento once the resulting shipments are confirmed. Everything else the Biz-Tech Services Magento Acumatica integration does, customer creation, payment handling, tax defaults, item creation, inventory quantity updates, and refund processing, hangs off that same inbound-then-outbound path. Understanding the order in which records move is the fastest way to know which setting to change when something does not arrive where you expect it.
The product described here is the Biz-Tech Services Magento Connector for Acumatica ERP, built by Biz-Tech Services, Inc. It links Magento, the e-commerce platform, with Acumatica, the enterprise resource planning system, using connection settings entered in Acumatica and an Application Programming Interface, or API, connection to your store. This article walks the data flow in the order records actually travel: setup and credentials first, then inbound orders, then the customer, payment and tax decisions made during import, then outbound fulfillment, then item and inventory synchronization, and finally where errors surface and what a user checks to confirm the result.
What the Magento Connector for Acumatica Does
The Biz-Tech Services Acumatica Magento Connector is an Acumatica ERP customization that connects a Magento e-commerce store to the back office so that the two systems share orders, customers, and item data. The Biz-Tech Services Acumatica Magento integration requires connection settings on the Magento Store screen. Based on those settings, the Biz-Tech Services Magento Acumatica connector reaches the corresponding store and retrieves orders, and imports the selected orders into Acumatica ERP. When a user confirms the shipments created from those imported orders, fulfillment events are generated in the store for each corresponding order. The Biz-Tech Services Acumatica Magento Integrator also requires default options and the required values for the order import process, which is why the configuration screens matter as much as the processing screens.
The Biz-Tech Services Acumatica Magento integrator is delivered as an Acumatica customization project and is installed from the Customization Projects form, screen ID SM204505. That form is where you add the project, validate it, and publish it for a tenant, and it is also where the publication can later be cancelled or the project exported as a deployment package. The Biz-Tech Services Magento Acumatica integrator must be installed on an Acumatica system carrying one of the following licenses: PCSR, PERP, or SAAS.
The Magento Data Flow at a Glance
Before looking at individual fields, here is the whole path a record travels between the two systems:
- Credentials are entered and tested on the Magento Credentials screen, where Store Code, Description, Default Store, Username, Password, and Base URL define the connection, and Test Credentials confirms that Acumatica can reach the store through the API.
- The Magento Store screen holds the configuration that determines the overall functionality of the Biz-Tech Services Acumatica Magento integrator: order import, item import and creation, payment processing, customer management, shipping options, and warehouse settings.
- Get Orders on the Import Magento Orders screen retrieves the orders, and the processing grid lists only those that hold a qualifying status in the store.
- Import or Import All creates the Acumatica document defined by Import Magento Orders To and Order Type, applying the customer, payment, tax, discount, item, and warehouse defaults configured on the store screen.
- The Magento Orders screen records the imported order and links it forward through the Sales Order Number and Invoice Number fields, so a user can trace an order into the Acumatica document chain.
- Fulfillment runs in Acumatica, and confirming the shipment generates the fulfillment event in Magento, with the Prepare Invoice and Release Invoice steps governed by their own skip and quantity-check settings.
- Outbound item processes push items, product images, inventory quantities, multi-prices, categories, and publication status from Acumatica to Magento, while the matching import processes pull items and multi-prices back the other way.
- Refunded orders are retrieved separately on the Import Magento Refunded Orders screen and processed into Customer Refund payments or credit memos depending on how far the original order has progressed.
Each setting discussed below sits at one of those handoffs, which is why a change on the Magento Store screen can alter the outcome of a process run several screens later.
Stage One: Magento Credentials and the Connection to Your Store
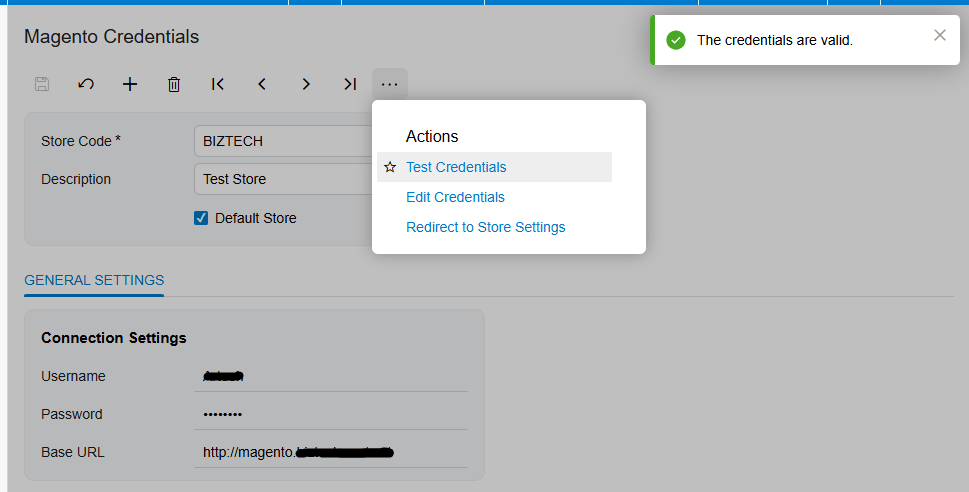
Setup begins on the Magento Credentials screen, which is where users set up the credentials that connect the two platforms and make the Biz-Tech Services Magento Acumatica integration between them possible. Store Code functions as a lookup field that identifies the corresponding store, and Description is used to provide a description of that store. Because the connector supports more than one store record, the Store Code is the value that every downstream processing screen uses to decide which store it is talking to.
Selecting the Default Store checkbox marks the store as the default store. This matters more than it looks: on processing screens where a Store Code has to be chosen before anything is retrieved, a default store removes a repeated selection step and reduces the chance of running a process against the wrong store.
What the Connection Settings tab controls
Username, Password, and Base URL are the Magento system credentials used to configure the connection settings. The information specified on the Connection Settings tab is used to test the ability of the system to connect to the store through the API. Test Credentials tests that connection using the credentials from the Connection Settings tab, so it is the correct first check whenever nothing is being retrieved at all. Edit Credentials allows editing of the store credentials, and Redirect to Store Settings opens the Magento Store screen, which is the natural next step once the connection is proven.
Stage Two: The Magento Store Screen Governs the Whole Flow
The configuration defined on the Magento Store screen determines the overall functionality of the Biz-Tech Services Acumatica Magento Connector. It controls the order import process, item import and creation, payment processing, customer management, shipping options, warehouse settings, and other related operations. Users who treat this screen as a one-time setup task tend to misdiagnose later problems, because most unexpected import results trace back to a checkbox or default value here rather than to the processing screen where the problem was noticed.
Default Import Options: what is retrieved and from when
Get Magento selects which Magento entities to retrieve into the Acumatica system. Import Magento Orders To specifies where the orders are imported in Acumatica, and Order Type is the default type of orders to be created by the Biz-Tech Services Acumatica Magento integration. Together those two fields decide what kind of Acumatica document an order turns into, so they should be settled before the first production import rather than after.
Begin Order Date allows the data retrieval to be filtered, which is how your business avoids pulling the entire order history of the store on the first run. Two read-only companions record what has already happened: Last Imported Order Date is the date when the last order was imported, and Last Refunded Order Date is the date when the last refunded order was imported. Get Refunded Data when Receiving Orders retrieves refunded orders during the Get Order process, so refunds can be collected in the same pass rather than as a separate exercise.
Error notifications during order import
Send Email Notifications for Errors informs the user about any errors encountered during the process. An email notification feature exists for failed orders during the order import process, which ensures that users are promptly alerted if an order import encounters issues or failures. Notifications go to the email address added on the order settings tab. They are sent during batch imports and during process updates for the same order, because the system checks all orders again for the selected period during that process. For a store that imports on a schedule, this notification is the practical difference between finding a failed order the same day and finding it at month end.
Inbound: How Magento Orders Become Acumatica Documents
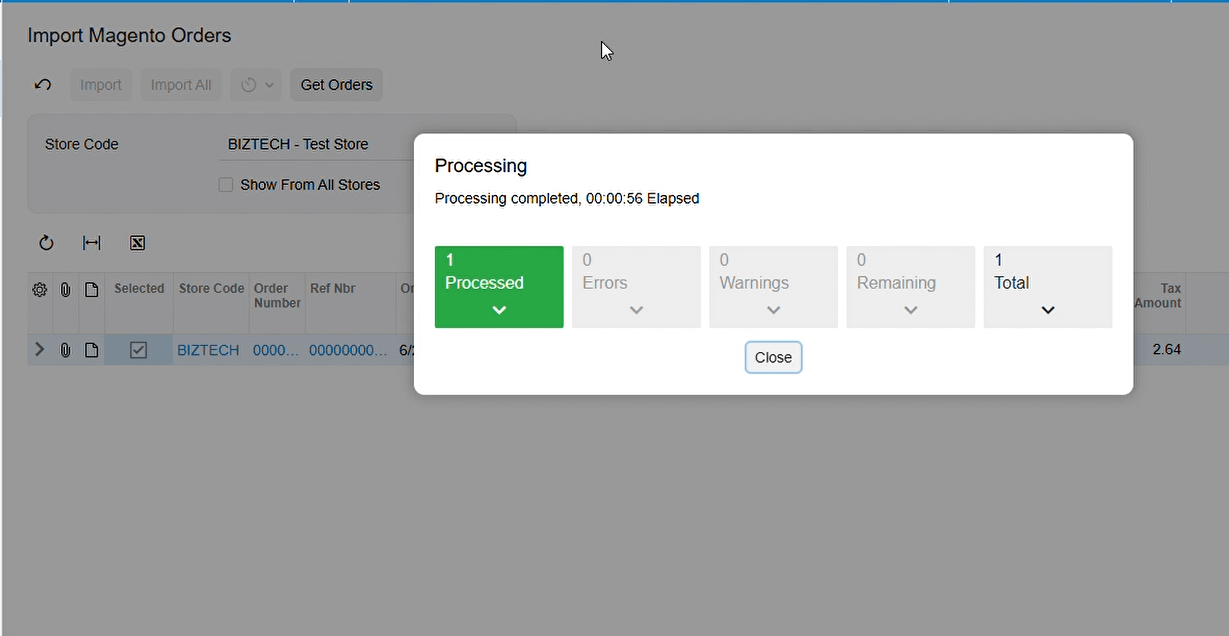
The Import Magento Orders screen allows users to retrieve and import all orders from the store into Acumatica. It is the main inbound entry point, and it is deliberately a two-step screen: retrieval and import are separate actions, so nothing is created in Acumatica simply because it was fetched.
Retrieving orders with Get Orders
The Get Orders button retrieves orders from Magento. After the button is clicked, a timer indicates the elapsed time until the process is complete, and a user can cancel the process of getting orders by clicking the loading icon next to the timer. The processing page shows only orders that hold the statuses Partially Shipped, on hold, Pending, and Processing in the Magento shop. That status filter is the single most common reason an order that exists in Magento never appears in the Acumatica grid.
The Import button enables the import of selected orders into Acumatica. Alternatively, the Import All button imports all orders displayed on the grid. Selective import is worth using during the first weeks of a go-live, because it lets your business validate the resulting documents order by order before switching to bulk runs.
Reading the Magento Orders screen
When orders are retrieved and displayed on the Import Magento Orders screen, each order carries a hyperlink, and clicking the order number navigates to the corresponding Magento Orders screen. That screen presents the initial status of the order and is the record your business returns to when tracing what happened to a given order.
The screen consists of several tabs. Document Details provides information about the items of the order. Addresses provides details about the customer address. Refund Info becomes visible only if the order has been refunded, displaying the relevant refund information. CC Payment provides information about the credit card payment method.
The header fields are where results are read. Order Number displays the Magento order ID. The Magento order status reflects the initial state of the order upon import. Status displays the Magento order status inside Acumatica. Payment Method displays the payment method used for the order, and Ship Via indicates the shipping method used. Sales Order Number displays the sales order number of the order once it is imported, and Invoice Number displays the invoice number once the order is invoiced. Those two fields are the link between the e-commerce record and the Acumatica document chain.
The amount fields complete the picture: Total Lines Amount displays the total sum of item lines, Discount Total displays the discount total for the order, Shipping Total displays the total amount of shipping, Total Tax displays the tax total, and Total shows the order total including taxes and other charges.
The three actions on the Magento Orders screen
Refresh Order updates the Magento order status in Acumatica. This matters because the status stored at import time is the initial state; if the order is later fulfilled in Magento, opening the actions menu and clicking Refresh Order updates the status of the order to match the store. Receive Orders enables the retrieval of individual orders into Acumatica by choosing the store code and setting the order ID, which is the targeted alternative to a full Get Orders run. Import Order, when selected on the corresponding Magento Orders screen, displays a confirmation popup asking whether you want to create a sales order for that order in Acumatica.
Customers, Payments, Taxes, and Discounts During Magento Order Import
The decisions the Biz-Tech Services Acumatica Magento integrator makes while an order is being imported are all configured on the Magento Store screen. These are the settings that determine whether a customer record is created, whether a payment document is produced, which tax defaults are applied, and how discounts land on the resulting Acumatica document.
Customer Information options
Import Customer means the Biz-Tech Services Magento Acumatica integration imports the customer information from Magento into a new customer record in Acumatica. Customer Class is the default customer class set on new customers that do not exist in Acumatica and are created by the Biz-Tech Services Acumatica Magento integration, so it is the field that decides which account and terms defaults a new web customer inherits.
Override Ship Address Information imports the address information of the location the order is going to be shipped to from Magento, and Override Bill Address Information imports the address information of the party who will pay the bill of the order from the store. Notify Customer for Shipment Confirmation means the Biz-Tech Services Magento Acumatica integrator notifies the customer when the order is shipped, if the checkbox is selected. Use Default Group ID allows a default group ID to be selected for the customer sync process, and Default Password for Customers allows a default password to be selected for the new customers being created in Magento.
Payment Options
Skip Magento Payment, when selected, means the order is imported from Magento without payment. That is the right choice when payment capture is handled entirely outside Acumatica. Payment Method is the payment method set on the payment during the order import process, and Payment Type is the type of payment that determines the payment type of the imported order. Release Payment during Order Import releases the payment during the Magento order import process, which removes a manual step but also commits the payment document immediately, so it should be enabled only once the mapping is proven.
Use Credit Card Payment, when selected, displays the CC Payment Mapping tab on the Magento Store screen, allowing the user to configure the corresponding mapping for the credit card payment method used for the order imported into Acumatica. The result of that mapping is what a user later reads on the CC Payment tab of the Magento Orders screen.
Tax Options
Tax ID is the default tax ID set on the orders. Customer Tax Zone is the combined tax of the effective taxes for a particular zone, defined according to the locations of the vendors or customers. Taxable Category is used to create tax categories, or edit existing tax categories, that are applied to products. Is Freight Included In Magento indicates that freight is being taxed in Magento, which is the setting that keeps the two systems from disagreeing about the tax on shipping.
Discount Option
Calculate Discount On Order Lines determines where discounts appear on the resulting document. When it is selected, the system calculates discounts per line, populating the Discount Amount and Discount Code fields in the Sales Orders Document Details table. Alternatively, the system calculates discounts for the entire order and provides the details in the Discount section. The choice affects reporting as much as data entry, because line-level discount data is what makes margin analysis by item possible.
Outbound: Fulfillment Events Sent Back to Magento
Once a Magento order has become an Acumatica document, fulfillment proceeds in Acumatica and the Biz-Tech Services Magento Acumatica integration reports the result back. When a user confirms the shipments created from the imported orders, fulfillment events are generated in the store for each corresponding order. If Notify Customer for Shipment Confirmation is selected on the Magento Store screen, the Biz-Tech Services Acumatica Magento Integration notifies the customer when the order is shipped.
Two Export Default Options on the Magento Store screen control what leaves Acumatica during invoicing. Skip Magento Shipment while Prepare Invoice means the Biz-Tech Services Acumatica Magento connector does not send a shipment creation request to Magento during the Prepare Invoice process in Acumatica. Skip API Request While Release Invoice means the Biz-Tech Services Magento Acumatica integrator sends no API request at all during the invoice release process. Both are useful when a business deliberately handles shipment records on the store side, and both are worth checking first when an expected update never reaches the store.
Two related item settings guard stock at the same points in the flow. Check Magento Qty While Prepare Invoice validates the product quantities in the store during the invoice preparation process, confirming that the required stock is available before the invoice is created. Check Magento Qty While Release Invoice validates the same quantities during the invoice release process to ensure sufficient stock is available. These checks put the quantity validation at the moment the financial document is created rather than after the fact.
Refunds: How Magento Refunded Orders Are Processed in Acumatica
Import Magento Refunded Orders allows users to import refunded orders from the store into Acumatica. The Get Orders button loads the refunded orders onto the screen, after which they can be imported. The system then manages the refunded order import based on how far the original order has already progressed in Acumatica, which is why the same Process button produces different documents in different situations.
- Case 1, when the refunded order is a sales order in Acumatica that has not progressed with any fulfillments and consists of a single item: pressing Process generates a payment with a Customer Refund type, attaches it to the Payments tab, sets the refunded amount, and closes the order. The sales order status changes to Canceled and all lines are deleted.
- Case 1, when the order consists of several items and is refunded: the refunded quantity is reduced from the order quantity, and the system creates a payment document and attaches it on the Payments tab for the refunded items, while the order status remains Open.
- Case 2, when an order shipment has been created but not confirmed: clicking Process triggers the system to find the created shipment, delete it, and then proceed with the actions of Case 1.
- Case 3, when an order shipment has been confirmed: clicking Process results in the system creating a credit memo and attaching a reference number with Customer Refund type to the Applications.
- Case 4, when the invoice is prepared but not released: the system creates a credit memo and attaches a reference number with Customer Refund type to Applications after the refunded order is processed.
- Case 5, when the invoice is released: the system reverses the invoice and generates a credit memo with a Customer Refund type in the reference number attached to Applications.
After those actions, the Processed checkbox on the Refunds tab is automatically checked on the Magento Orders screen for the corresponding order, which means the process is over and the order is Closed. To verify the financial side, follow the Reference number to view the Customer Refund type payment and the refunded amount on the Application History tab.
Customer Export: Sending Acumatica Customers to Magento
The customer export process can be run from the Customers screen as well as from the Export Magento Customer processing screen. On the Customers screen, the Sync Magento Customer button in the Actions command toolbar performs the customer export. Selecting that action from the Actions command menu is what sends the customer to the store.
The Biz-Tech Services Acumatica Magento connector syncs a customer only if three conditions are met, and each one is a common cause of a customer that silently fails to appear in the store. First, the Customer Price Class, which corresponds to Magento customer groups, must exist in both systems. Second, the customer must have a contact. Third, that contact must have a First Name, a Last Name, an Email, and a Magento Customer Password, and the password must be a mixture of letters, numbers, and special characters.
After the customer export process completes, the Magento Customer checkbox becomes checked on the Customers screen and the Magento Customer ID is added under the Magento Customers tab of the Customers screen. Those two indicators are the confirmation a user should look for rather than assuming the export worked. Customer groups themselves are handled on the Customer Groups tab of the Magento Store screen, where customer groups are synced to the Acumatica Customer Price Class.
Item and Inventory Synchronization Between Acumatica and Magento
Item data moves in both directions, and the Magento Store screen carries the settings that decide what is created, what is matched, and which quantity number is sent.
Item Information settings that govern item creation
If the Import Item checkbox is selected, new items are created in Acumatica during the synchronization of orders from Magento, based on the configured settings. If the checkbox is not selected, the program prohibits the import and creation of items unless the corresponding items have already been created in Acumatica. The system searches for the Inventory CD using the Magento Product SKU. If it is found, the system retrieves that item; if it is not found, an error message is displayed stating that the item does not exist in the system.
Import Item Type specifies the item type that should be created, and Item Class selects the item class for imported items, which groups stock or non-stock items with similar properties and provides default settings for new items. Warehouse ID is the default warehouse set on the orders imported from Magento, and UOM, the unit of measure, is used to quantify the inventory items. Replace Missing Products replaces Magento items that do not exist in Acumatica with a selected item during the order import process, if the Import Item checkbox is disabled, which keeps an order importable rather than blocking it on one unrecognized SKU.
Several further options tune the item side of the flow. Use Bulk Sync Items Functionality syncs one hundred items at once, but only if the RabbitMQ module is set up in the Magento system. Import Items on Inventory Details Tab retrieves items to the Inventory Details tab of the Magento Store screen while orders are being imported. Import Product Images allows images to be synced during synchronization if the item has one attached. Date Last Received Item indicates the last date used for retrieving products, which is the item-side equivalent of the order date trackers.
The Inventory Details tab
On the Inventory Details tab of the Magento Store screen, a user can load the items held in both systems and then sync, publish, or unpublish them in the store. Load Acumatica Items retrieves all Acumatica stock and non-stock items and displays them in the table, and the Load Magento Items button retrieves the store catalog the same way. Sync to Magento exports Acumatica items outward, and Sync from Magento brings items back into the Acumatica system.
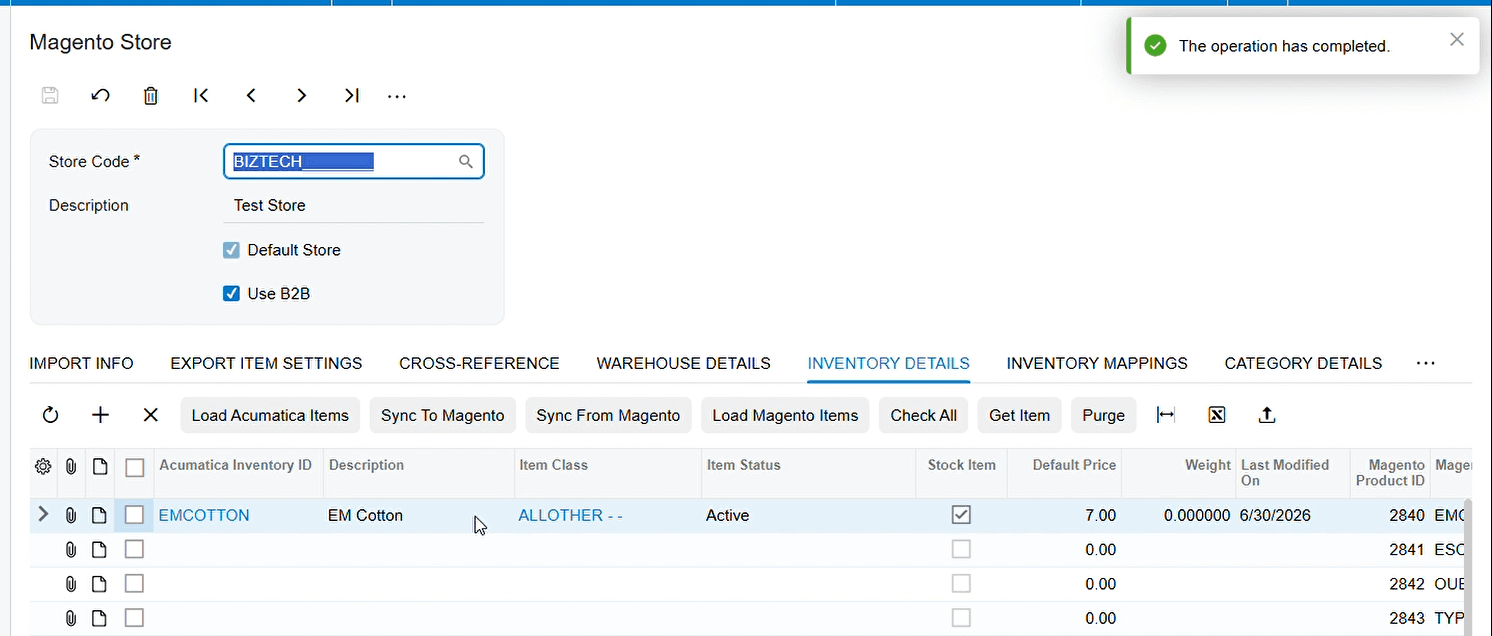
The supporting buttons make bulk work practical. Check All selects all the items displayed in the table, and clicking it a second time unchecks them. Get Item retrieves a specified item by item SKU or name. Purge deletes all the items displayed in the table. Publish Items in Magento enables the publication of selected items in the store, setting their status to Enabled, and Unpublish Items in Magento removes the Enabled status from the selected items, making them unavailable for purchase. The item details list can be exported and imported as an Excel document.
When items are synced from Acumatica to Magento, a new item is created there and a unique ID for the item is generated. That unique ID is displayed in the Acumatica Magento store record and on the Magento Inventory tab of the stock item. The processes of item synchronization, item publishing, and item unpublishing can also be carried out on the Stock Items and Non-Stock Items screens, so a user working on a single item does not have to return to the store screen.
Warehouse Details and which quantity is sent
The Warehouse Details tab is where the warehouses whose quantities need to be in sync with Magento are added. If one or more warehouses are selected there, the exported item quantity displays the sum of quantities across the selected warehouses. The quantity that is synced from Acumatica to Magento depends on the selected drop-down value: On hand, Available, or Available for Shipment. That choice is worth deliberating over, because it decides whether your store advertises physical stock or committed-adjusted stock.
The outbound item processing screens
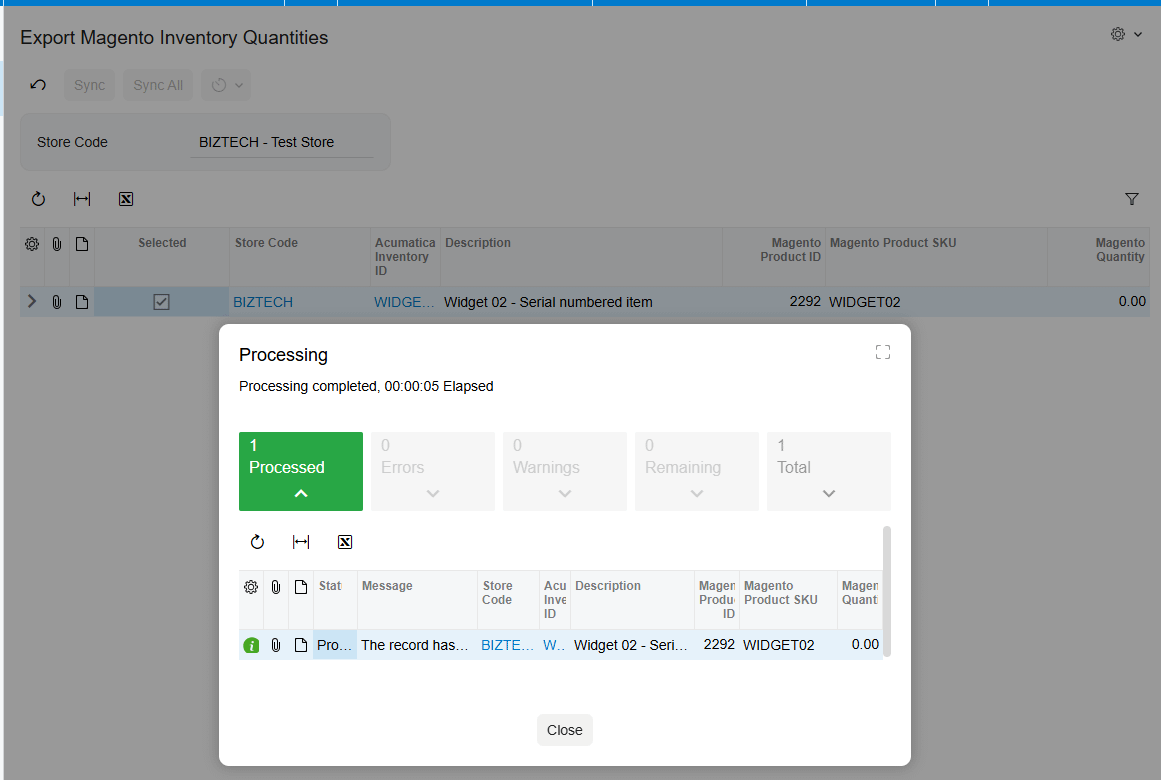
Export Magento Inventory Quantities is the screen for syncing Acumatica inventory quantities to Magento. Beforehand, the required items must be chosen on the Inventory Details tab of the Magento Store screen by checking the checkboxes and pressing Save, and the Magento Product SKU and Acumatica Inventory ID fields must also be set on that tab. Only after those actions do items appear on the Export Magento Inventory Quantities processing screen. To sync a quantity, enter the corresponding quantity in the Magento Quantity field for the item, check the checkbox, and click Sync; the item quantity in the store is updated based on that value. Sync All syncs the quantities of all items displayed on the screen.
Export Magento Items allows the export of Acumatica items outward. Items appear on that screen if the Magento Product SKU is set on the item tab of the Magento Store screen. Select the items and export them by pressing Sync or Sync All. After the synchronization process, the Price, Description, Weight, Length, Height, Width, and Category of the item are updated in the Magento shop. If the Biz-Tech Services Magento Acumatica connector does not find some items in the store during synchronization, it creates them automatically. Once the item has been synced, the Magento Item checkbox is checked and the Magento Product ID is added under the Magento Inventory tab of the Items screen.
Export Magento Product Images handles images: if an item has an attached image, the system exports it to the store from this screen. Select the corresponding items and export them by pressing Sync or Sync All.
Multi-price export and import
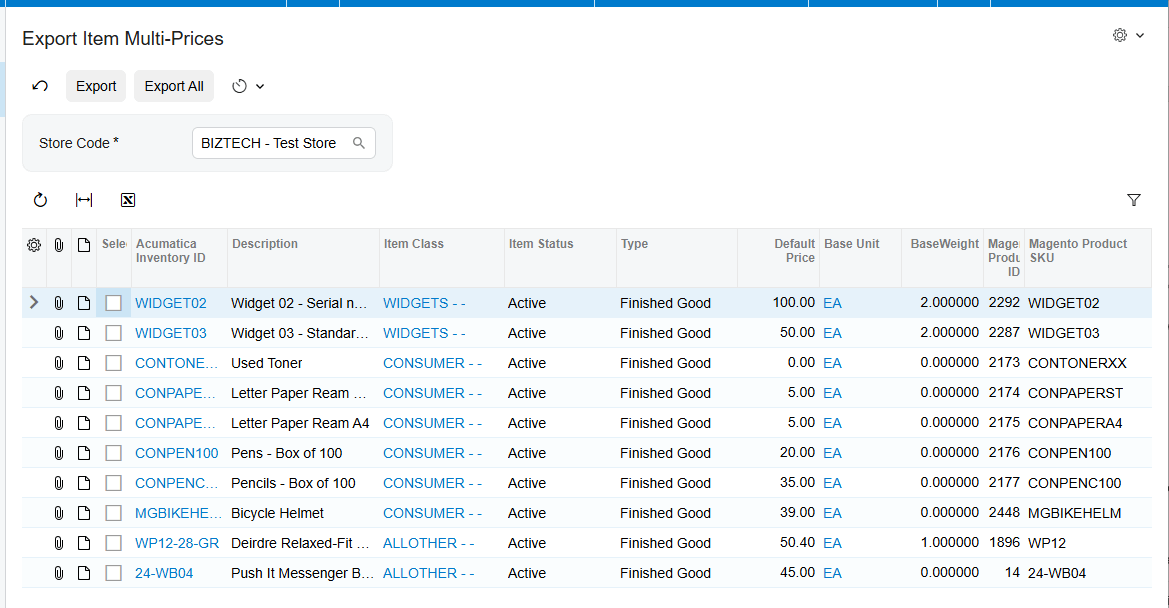
Item prices can differ based on clients, expiration date, and other factors, and the Export Item Multi-Prices screen exports item multi-prices from Acumatica to Magento. Items appear on that screen only if three conditions are met: the items must be selected and saved on the Magento Store screen, the items must have the Magento Product SKU field set on the Inventory Details tab of that same screen, and they must be added on the Sales Prices screen with their corresponding sales prices. Select the Store Code, check the items whose prices should be exported, and click Export or Export All. After synchronization, the sales price of the item is updated in the Magento store as its sales price.
Import Item Multi-Prices moves the same data the other way, importing item multi-prices from Magento to Acumatica. The same conditions must be met for the required items to appear on the screen. Select the Store Code, check the items whose prices should be imported, and click Import or Import All.
Importing Magento items into Acumatica
The Import Magento Items screen allows you to import Magento items along with their corresponding price, weight, and image into Acumatica. Run the Get Items process, after which the items are displayed on the screen, then select the corresponding items and click Import or Import All to import them into Acumatica. This is the catalog-first path for businesses whose product data is maintained in Magento rather than in the ERP.
Mapping: Cross-References, Attributes, and Categories
Mapping is what keeps the two systems agreeing on the meaning of a value, and it is configured on the Magento Store screen. Cross-Reference options select the entities that should be matched in Magento and Acumatica during the transition. The entities checked in Cross-Reference Options then appear in the drop-down field on the Cross-Reference tab, where Field selects the entity whose values should be matched and the Magento Value and Ship Via columns specify the values that correspond to each other. Separately, the Export Fields to Magento tab is where a user chooses which fields should be updated in the store during the item sync process.
The Inventory Mappings tab organizes the mapping that makes the sync of Acumatica attributes and user defined fields to Magento attributes possible. On that tab you add the properties of the particular attribute that you should choose on the Attributes tab of the Item Class screen. If the Magento property attribute does not exist in the shop, the sync process is not possible, so the store side has to be prepared first.
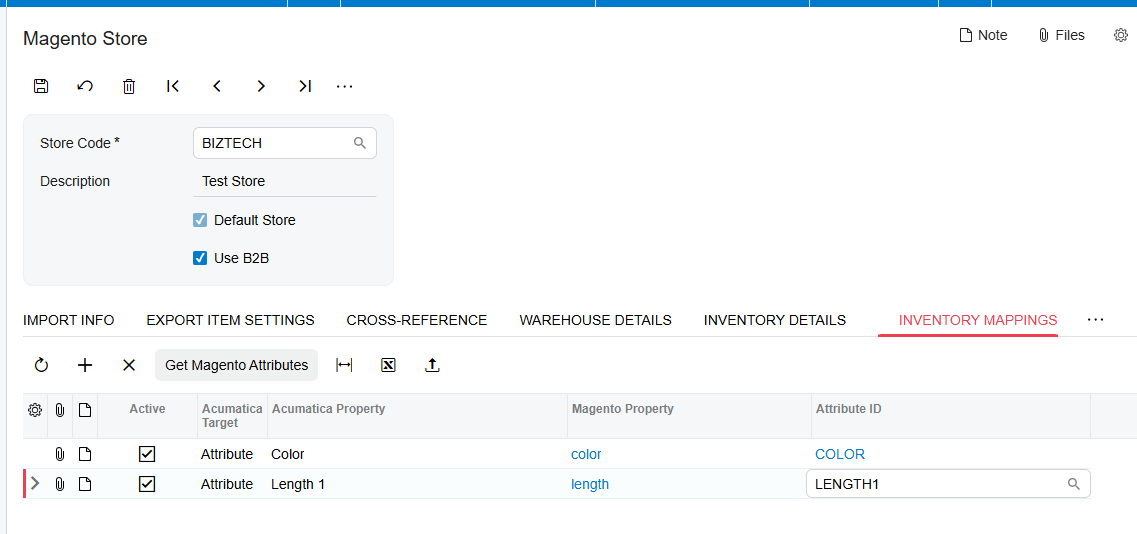
The Attribute Details tab loads the active options of a particular attribute. Retrieving them requires that the attribute properties have been added on the Inventory Mappings tab. Once the mappings are configured correctly, the active options for the attribute can be retrieved on the Attribute Details tab by pressing the Load Active Attribute Options button. The active options cannot be retrieved if the Acumatica attribute control type and the Magento attribute control type do not match, which is the first thing to check when the button returns nothing.
The Category Details tab exports and imports product categories. To retrieve product categories from Magento, click Get Magento Categories, or create a new category in Acumatica, choose it, and save; then press Sync Magento Categories to generate the new category in the store as well. The product categories list can be exported and imported as an Excel document. Attribute Sets is where a user gets Magento attribute sets.
Where to Monitor Magento Results in Acumatica
The Biz-Tech Services Acumatica Magento connector writes its results into specific fields, checkboxes, and tabs rather than into a single log, so knowing where to look is part of running it. These are the places a user checks to see what actually happened:
- The Import Magento Orders grid after Get Orders, including the timer that indicates elapsed time until the retrieval process is complete.
- The Status field on the Magento Orders screen, which displays the Magento order status in Acumatica, refreshed with the Refresh Order action when the order has since been fulfilled in the store.
- The Sales Order Number field on the Magento Orders screen, which displays the sales order number of the order once it is imported.
- The Invoice Number field on the same screen, which displays the invoice number once the order is invoiced.
- The amount fields on the Magento Orders screen: Total Lines Amount, Discount Total, Shipping Total, Total Tax, and Total.
- The Document Details tab for the items of the order, the Addresses tab for the customer address, and the CC Payment tab for the credit card payment method.
- The Refund Info tab, which becomes visible only if the order has been refunded, and the Processed checkbox on the Refunds tab, which is checked automatically once refund processing is complete and the order is Closed.
- The Payments tab of the sales order for the Customer Refund payment, and the Application History tab reached through the Reference number to confirm the refunded amount.
- The Magento Customer checkbox on the Customers screen and the Magento Customer ID under the Magento Customers tab, which together confirm a successful customer export.
- The Magento Item checkbox and the Magento Product ID under the Magento Inventory tab of the Items screen, plus the unique ID shown on that same tab of the stock item after a sync to Magento.
- The Last Imported Order Date, Last Refunded Order Date, and Date Last Received Item fields on the Magento Store screen, which show how far each retrieval process has progressed.
- The error email sent to the address on the order settings tab when Send Email Notifications for Errors is selected, which reports failed orders during batch imports and process updates.
Magento Acumatica Integration: Frequently Asked Questions
How do I connect Magento to Acumatica?
Connection settings are entered on the Magento Credentials screen, where you supply the Store Code, Description, Username, Password, and Base URL, and optionally mark the record as the Default Store. The information on the Connection Settings tab is used to test whether the system can connect to the store through the API, and the Test Credentials button runs that test. Once the credentials are valid, Redirect to Store Settings opens the Magento Store screen, where the rest of the configuration is defined.
Why is a Magento order not appearing on the Import Magento Orders screen?
The processing page shows only orders that hold the statuses Partially Shipped, on hold, Pending, and Processing in the Magento shop, so an order in any other status will not be listed. The Begin Order Date field on the Magento Store screen also filters data retrieval, which means orders older than that date are excluded. If nothing at all is retrieved, run Test Credentials on the Magento Credentials screen to confirm that Acumatica can still reach the store through the API. For a single known order, the Receive Orders action on the Magento Orders screen retrieves it directly by store code and order ID.
Why was a customer not created in Magento during the export?
The Biz-Tech Services Magento Acumatica connector syncs a customer only when three conditions are met. The Customer Price Class, which corresponds to customer groups, must exist in both systems; the customer must have a contact; and that contact must have a First Name, a Last Name, an Email, and a Magento Customer Password made up of a mixture of letters, numbers, and special characters. If the export appeared to run but nothing arrived, check whether the Magento Customer checkbox was set and whether a Magento Customer ID appears under the Magento Customers tab of the Customers screen.
Why does an order import fail saying the item does not exist in the system?
During order import the system searches for the Inventory CD using the Magento Product SKU. If the SKU is not found and the Import Item checkbox is not selected, the program prohibits the import and creation of the item and displays that error, because it will only use items that already exist in Acumatica. Selecting Import Item lets new items be created during order synchronization based on the configured settings, and Replace Missing Products offers the alternative of substituting a selected item for Magento items that do not exist in Acumatica while Import Item remains disabled.
Can I import Magento orders without payment information?
Yes. Selecting Skip Magento Payment on the Magento Store screen means the order is imported without payment. When payment is imported, Payment Method sets the payment method used during the Magento order import process and Payment Type determines the payment type of the imported order, while Release Payment during Order Import releases the payment as part of the import. Use Credit Card Payment adds the CC Payment Mapping tab so that credit card methods can be mapped explicitly.
What happens in Acumatica when a Magento order is refunded?
Refunded orders are loaded on the Import Magento Refunded Orders screen with Get Orders and then handled by the Process button, and the outcome depends on the stage of the original order. An unfulfilled single-item order produces a Customer Refund payment, the order closes, and the sales order status changes to Canceled with its lines deleted. A multi-item refund reduces the refunded quantity and attaches a payment while the order remains Open. Once a shipment has been confirmed, or an invoice prepared or released, the system produces a credit memo instead, reversing the invoice first in the released case.
How do I publish or unpublish Magento items from Acumatica?
Use the Inventory Details tab of the Magento Store screen. Publish Items in Magento enables the publication of the selected items in the store and sets their status to Enabled, while Unpublish Items in Magento removes the Enabled status and makes those items unavailable for purchase. The same item synchronization, publishing, and unpublishing processes can also be carried out from the Stock Items and Non-Stock Items screens.
Which Acumatica license does the Magento Connector require?
The Biz-Tech Services Acumatica Magento Connector must be installed on an Acumatica system with one of the following licenses: PCSR, PERP, or SAAS. Installation itself is performed on the Customization Projects form, screen ID SM204505, which is used to add the customization project, validate it, and publish it for one or more tenants.
Work With the Biz-Tech Services Magento Connector
The Magento data flow into Acumatica ERP is a single path with configurable branches. Credentials on the Magento Credentials screen open the connection; the Magento Store screen sets the defaults that govern order import, customer creation, payments, taxes, discounts, items, and warehouses; Get Orders and Import move the orders in; fulfillment in Acumatica sends events back out; the item, image, quantity, and multi-price processes keep the catalog aligned in both directions; and refunds are reconciled according to how far the original order had already travelled. Once your business knows which screen owns which decision, tracing any individual record through Acumatica becomes a short exercise rather than an investigation.
If your business runs a Magento store alongside Acumatica ERP and wants order, customer, and inventory data to move between them without manual re-entry, the Biz-Tech Services Magento Acumatica Connector is built for exactly that. Visit https://biz-techservices.com to learn more about our Acumatica expertise or to schedule a personalized demonstration.

