
How ShipHero Data Flows Between WMS and Acumatica ERP
ShipHero data flows into Acumatica ERP as a round trip: orders, purchase orders and return orders travel out of Acumatica to ShipHero, the Warehouse Management System (WMS) picks, packs and ships them, and shipments, tracking numbers, labels, receipts, bin transfers and return receipts travel back into Acumatica to close the documents out. The Biz-Tech Services ShipHero Acumatica Connector is the customization that carries records in both directions, and it is built around one central configuration screen – the ShipHero Store – that decides which way each record is allowed to move.
Understanding that round trip is what makes the Biz-Tech Services Acumatica ShipHero connector predictable. Most of the questions users raise after go-live are not really integration questions; they are questions about which checkbox on the ShipHero Store told a record to move, which cross-reference translated a value from one system to the other, and which inquiry screen shows what the WMS sent back. This article walks the whole path in the order records actually travel: package installation and credentials first, then outbound documents, then inbound fulfillment, then item and inventory sync, and finally the screens and fields your business checks to confirm that each hop worked.
What the ShipHero Connector for Acumatica Does
ShipHero is a warehouse management and order fulfillment platform built to streamline logistics and supply chain processes for eCommerce businesses. Acumatica is a cloud-based enterprise resource planning (ERP) system that manages finance, inventory and customer relationships. The Biz-Tech Services ShipHero Acumatica integrator is the software integration that sits between them and handles communication and data exchange, so that the fulfillment side and the ERP side stay on the same set of records instead of two teams keying the same order twice.
The Biz-Tech Services Acumatica ShipHero integrator is delivered as an Acumatica customization package and published through the Customization Projects screen (SM204505). That screen is where you add the customization project, validate it, and publish it for a tenant or several tenants; the platform uploads the selected package, creates the corresponding customization project and saves it in the database. Once the project is published, the ShipHero screens – the ShipHero Store, the processing screens, and the ShipHero Order, Shipment, Item, Vendor and Purchase Order inquiries – become available inside your ERP.
What the Biz-Tech Services ShipHero Acumatica connector does not do is guess. Every document type, warehouse, carrier, box and reason code that crosses the boundary has to be either explicitly enabled or explicitly mapped on the ShipHero Store first. That is deliberate: it means a misconfigured record fails to appear on a processing screen rather than silently creating the wrong document in Acumatica.
The ShipHero Data Flow at a Glance
Here is the full round trip between Acumatica and the ShipHero WMS, in the order the records move:
1. Install and publish the ShipHero customization package on the Customization Projects (SM204505) screen, then open the ShipHero Store screen and enter the ShipHero Username, ShipHero Password and Base URL on the Connection Settings area of the General Info tab. Use Test Credentials to confirm the API connection before anything else.
2. Choose the Integration Option on the ShipHero Store header – either ShipHero to Acumatica or Acumatica to ShipHero. This single field determines the direction of travel and which tabs the store displays.
3. Map the values that differ between the two systems: Ship Via Cross-Reference for carriers, Warehouse Cross-Reference for warehouses, Box Mapping for the Acumatica Box ID against the ShipHero box name, and Reason Code Mapping for returns.
4. Sync master data both ways from the Inventory Details, Locations and Vendors tabs – Load Acumatica Items and Sync Acumatica Items push outward; Load ShipHero Items and Sync ShipHero Items pull inward.
5. Send documents out to the warehouse: Sales Orders through the Export ShipHero Order screen, purchase orders through Export Purchase Orders to ShipHero, and RC return orders through Export Return Orders To ShipHero.
6. ShipHero fulfills the work – it picks and ships the order, generates the shipping label and tracking number, receives the purchase order, moves stock between bins, and receives returns.
7. Bring the results back: Import Shipments from ShipHero confirms the Acumatica shipment, Import Receipts from ShipHero creates the purchase receipt, Import Bin Transfers from ShipHero creates the transfer, and Import Return Order Receipt from ShipHero creates the return document.
8. Optionally switch the whole inbound side to real time by enabling Use Webhook on the ShipHero Store header and registering shipment, PO receipt, return receipt and transfer webhooks on the Webhook Settings tab.
9. Monitor everything on the ShipHero Order, ShipHero Shipment, ShipHero Item, ShipHero Vendor and ShipHero Purchase Order inquiry screens, and on the Shipments tab of the related Sales Order.
Setup: Installing the Package and Configuring the ShipHero Store
Nothing moves until the customization is published and the store is configured. This is the part of the flow your business only does once, but every later behaviour traces back to a decision made here.
How do you install the ShipHero package in Acumatica?
The Biz-Tech Services ShipHero Acumatica connector is installed through the Customization Projects screen, Form ID SM204505. From that form you can add a new customization project – a set of changes and additional files that modify the Acumatica ERP application – open the project in the Customization Project Editor, validate one or several projects, publish a project for one tenant or multiple tenants, cancel a publication, view the XML of a published project, export the project as a deployment package, import a project from an existing deployment package, or delete a project. When you upload the ShipHero package, the platform creates the corresponding customization project and saves it in the database; publishing it is what makes the screens live.
Where do ShipHero credentials go?
Credentials live on the Ship Hero Store Credentials screen. The Connection Settings area of the General Info tab holds the ShipHero Username, ShipHero Password and Base URL – the ShipHero system credentials used during integration. Two buttons govern them: Test Credentials checks that Acumatica can reach ShipHero over the API using exactly what is on the Connection Settings tab, and Edit Credentials unlocks the fields so they can be changed. Run Test Credentials before you touch any processing screen, because a store whose credentials never validated will simply return nothing when you press Get Orders or Get Shipments, with no document to inspect afterwards.
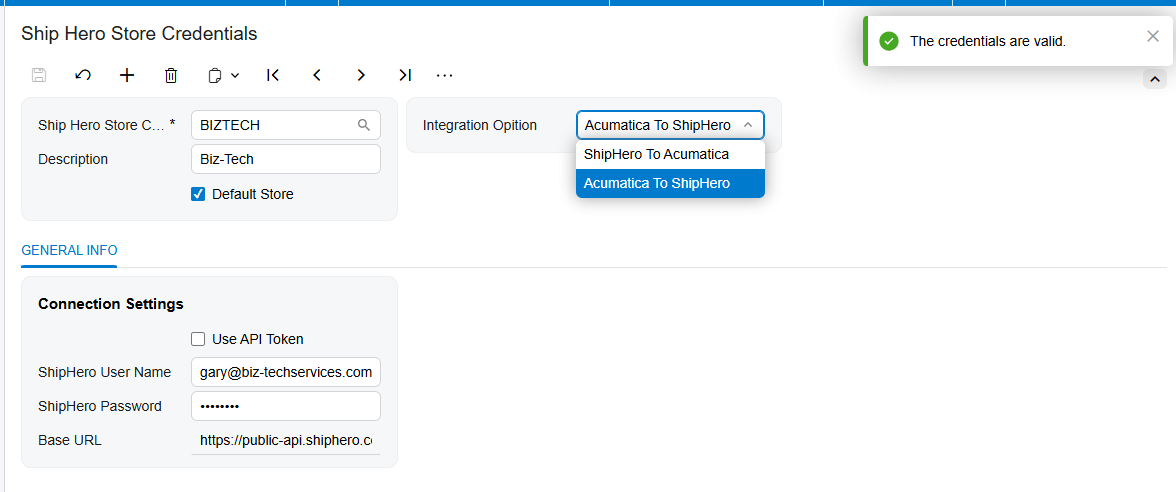
The header of the store also carries the identifying fields. ShipHero Store Code is a lookup field that points at the corresponding store in the WMS, and Description labels it for your users. The Default Store checkbox matters more than it looks: when it is selected, that store code is the one displayed during all sync processes initiated from Acumatica, which is what keeps a multi-store setup from making users pick a store on every single action.
What does the Integration Option actually change?
The Integration Option field determines the workflow direction, and it changes which tabs the ShipHero Store even displays. Set to ShipHero to Acumatica, the system brings data from the WMS into the ERP: it retrieves and imports all shipped orders together with the labels and tracking numbers already generated in ShipHero. In that mode the store shows the General Info, Import Info, Ship Via Cross Reference, Warehouse Cross Reference, Inventory Details, Sync Info and Locations tabs.
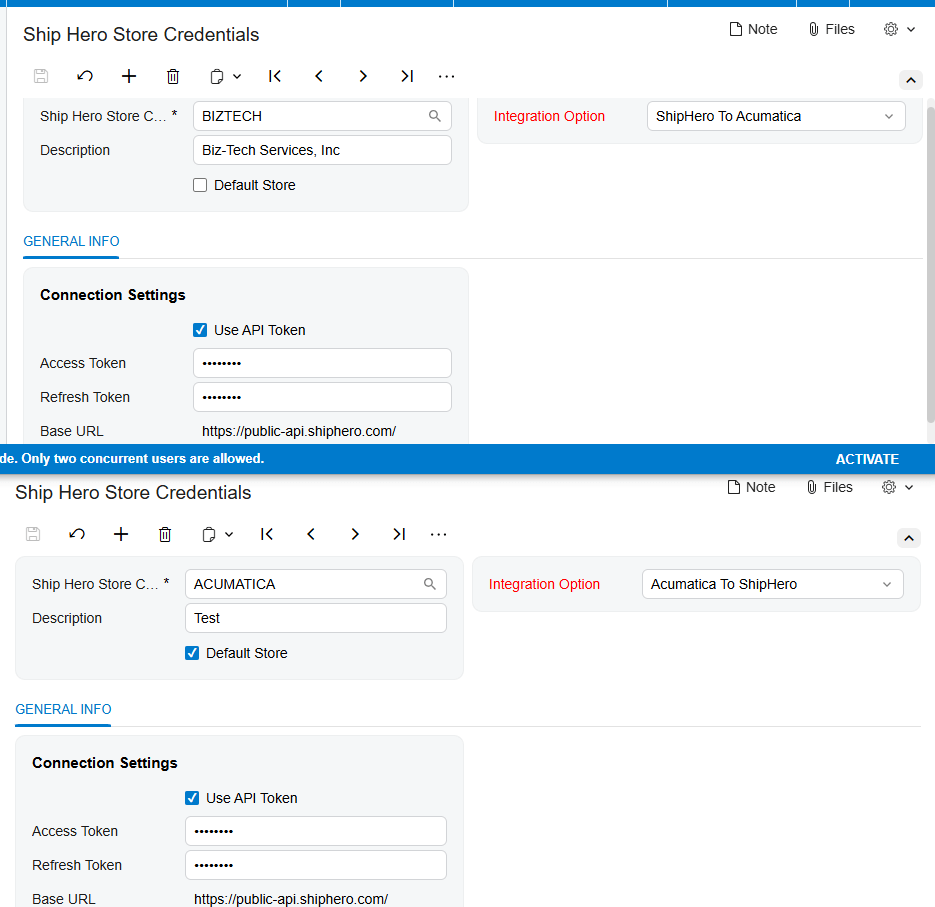
Set to Acumatica to ShipHero, the flow reverses: orders are created in the ERP and exported to ShipHero, you ship them in the WMS, and the shipments come back into Acumatica. That mode adds tabs the other direction does not need, including Box Mapping, Vendors, Order Types To Export and – once a receipt order type exists – Reason Code Mapping. If a tab you expect is missing, the Integration Option is almost always the reason.
Which import defaults should you set first?
The Import Info tab carries the Default Import Options, which populate automatically once credentials are set. Import ShipHero Orders To specifies the document type that ShipHero orders land in and is a drop-down offering Sales Order or Invoice. Order Type shows the document type the order should be imported into. Import Freight controls whether the order freight comes across at all – clear it and freight is not imported. Last Imported Order Date sets the date boundary for the first order to be imported, which is how you keep a first sync from dragging in years of history.
Two checkboxes on the same tab control mapping: Use Cross Ref for Ship Via and Use Cross Ref for Warehouse. Selecting either makes the corresponding cross-reference tab appear on the store so ShipHero values can be matched to Acumatica values. Tax behaviour sits alongside them – selecting Import Tax brings ShipHero order taxes across and exposes the Customer Tax Zone (the combined effective tax for a zone, defined by the vendor or customer locations), Tax ID (the customer tax ID) and Taxable Category, which is used to create or edit the tax categories applied to products.
How does the connector decide which customer an imported order belongs to?
Customer resolution happens in two places, and knowing the order of precedence saves a lot of confusion. On the General Info tab, the Stores to Get grid has a Customer column that sets an individual default customer per store, plus a Last Import Date showing when the last order was imported and a Selected checkbox that tells the system which stores orders and shipments should be imported from. If the Customer field on that grid is null, the system falls back to the Customer Information setup during order importation.
On the Customer Information tab, selecting Import Customer makes the Biz-Tech Services Acumatica ShipHero integrator create a new customer record from the ShipHero customer data, and exposes a Customer Class field for the default class assigned to those new customers. Leave Import Customer cleared and orders import against the single default customer named in the Customer field instead. Two override checkboxes sit here as well: Override Ship Address Information from ShipHero Order imports the address the order ships to, and Override Bill Address Information from ShipHero Order imports the billing address of whoever pays the order.
What handles packaging?
On the Packaging tab, clearing the Automatic Packaging checkbox reveals a Default Box ID field. Choose the box there, then select Automatic Packaging so that the default package is used with the order. In the Acumatica to ShipHero direction there is also a Box Mapping tab, where users map the Acumatica Box ID value to the ShipHero box name so a package created on one side is recognisable on the other.
Cross-References: Translating Values Between Acumatica and ShipHero
Cross-references are the quiet backbone of the whole data flow. They exist because the same real-world thing – a carrier, a warehouse, a return reason – carries different identifiers in each system, and a record that cannot be translated is a record that stops.
Ship Via Cross-Reference
The Ship Via Cross-Reference tab lets you select the entities that should be set up and matched in ShipHero and Acumatica during the transition. This mapping is what turns a carrier and service returned by the WMS into a Ship Via that Acumatica recognises, and it is also called out as a prerequisite for exporting returns.
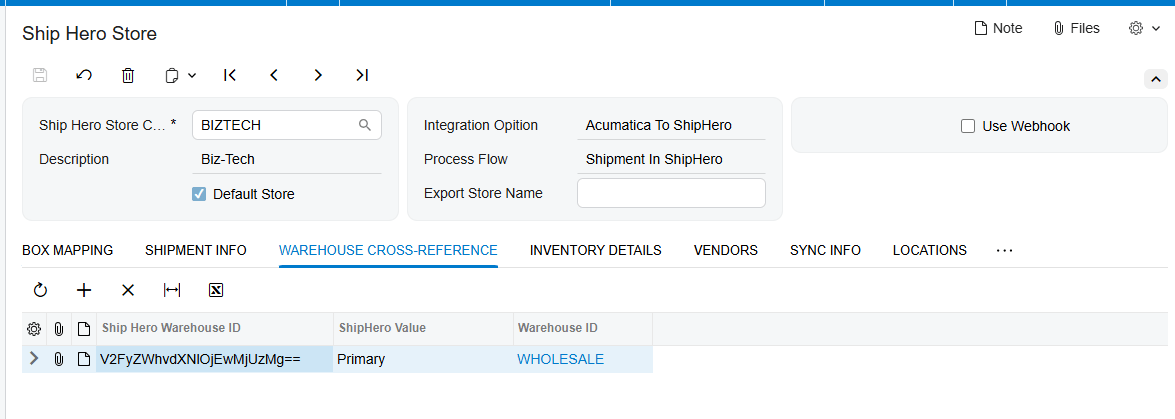
Warehouse Cross-Reference
The Warehouse Cross-Reference tab is used by two separate processes: the item sync process and the order import process. Based on this setup, the Biz-Tech Services ShipHero Acumatica integrator imports orders and assigns the mapped warehouse to the sales order screen. The same mapping applies to items – when items sync from ShipHero, the warehouse is created for the item according to this setup. It also constrains the Locations tab, because locations are only loaded for warehouses that have been set up on Warehouse Cross-Reference.
Order Types To Export and Reason Code Mapping
In the Acumatica to ShipHero direction, the Order Types To Export grid defines which Acumatica order types are allowed to leave for the WMS. Each row has an Active checkbox, and only when Active is selected can orders of that type be exported. You can also set up a receipt order type such as RC here. As soon as at least one receipt order type exists, a new Reason Code Mapping tab appears, whose grid contains Active and Is Default checkboxes; when a return order is exported, this grid maps the reason code onto the order lines.
Outbound: How Acumatica Documents Reach the ShipHero WMS
With the store configured, records begin moving. Each outbound document type has its own processing screen, and each has its own admission rule about which records are eligible to appear there.
How do sales orders get exported to ShipHero?
The Export ShipHero Order screen exports Acumatica orders to the WMS, provided the corresponding setup exists in the ShipHero Store. Two conditions decide whether an order is even listed: the order must have an Open status in Acumatica, and its order type must have been set up in the selected store. An order that fails either test does not appear on the screen at all – it does not appear with an error. Pressing Export creates the order in ShipHero.
How do purchase orders reach ShipHero?
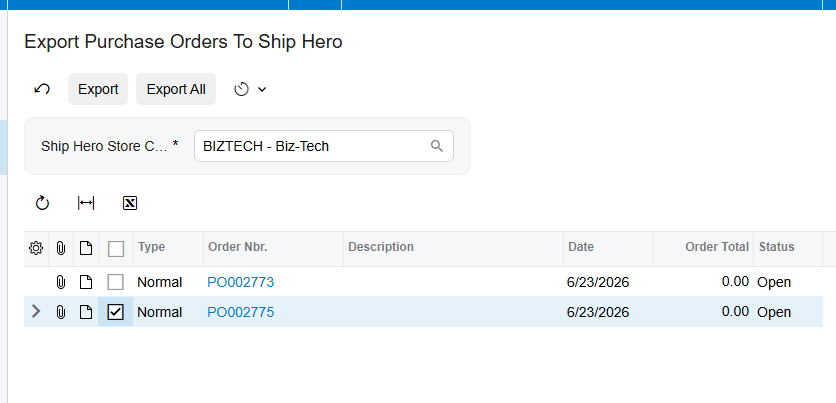
The Export Purchase Orders to ShipHero screen exports purchase orders so the warehouse knows what inbound stock to expect. Only purchase orders with an Open status appear on this screen. There is no special store setup required for it. An Export to ShipHero button has also been added and can be added manually, which lets users determine all the purchase orders that should be exported.
How do return orders get exported?
The Export Return Orders To ShipHero screen handles returns going out. If the RC order type is configured in the ShipHero Store under the Order Types to Export tab, RC orders appear on this processing screen and can be exported. Clicking Load Return Orders loads and displays all orders with the RC order type; Export sends a selected order and Export All sends all of them at once. The screen also supports an automatic scheduler, so return exports can run unattended, and the export can equally be performed from the Sales Order actions.
The return round trip has a strict sequence, and the Customer Order Number field is the key that holds it together. First create a Sales Order and set a value in Customer Order Number. Create the shipment for that order in ShipHero and import the shipment back into Acumatica; once the shipment is imported, the order status in Acumatica updates to Completed. Only then create a new order with the RC (Return for Credit) order type, for the same customer, containing the same item or items, and with a Customer Order Number that matches the original sales order. During the return process the system uses the Customer Order Number value to identify and match the correct customer associated with the returned order. After the export, the system generates and displays the ShipHero returned order ID and number. Reason Code and Ship Via mappings must exist between the two systems for return exports to work.
Inbound: How Fulfillment, Tracking and Shipments Come Back to Acumatica
The inbound leg is where the warehouse tells the ERP what actually happened. Each inbound screen follows the same two-button pattern – a Get action that pulls raw records from the WMS onto a staging inquiry, and an Import action that turns them into real Acumatica documents. That separation is useful: it lets users inspect what ShipHero sent before it becomes an accounting document.
How do you import orders created in ShipHero?
The Import ShipHero Orders screen retrieves orders from the WMS. Select the ShipHero Store Code to specify which store orders should be retrieved from. Get Orders pulls the orders across and adds them to the ShipHero Order screen, and Import then creates the Sales Order based on the setup in the store – the document type, freight, tax, customer and warehouse decisions you made on the Import Info, Customer Information and Warehouse Cross-Reference tabs.
How do shipments and tracking numbers come back?
The Import Shipments from ShipHero screen gets and imports all shipments from the WMS. ShipHero orders with an Open status or Sales Order status are displayed here. Notably, both store directions can be shown on the ShipHero Store Code field of this screen – both ShipHero to Acumatica and Acumatica to ShipHero stores – because both flows eventually need shipments back. Get Shipments retrieves the shipments, which are then displayed on the Shipments tab of the ShipHero Order screen, and Import imports the shipment into Acumatica and confirms it.
That confirmation is the point of the whole outbound leg. In the ShipHero to Acumatica direction, the Biz-Tech Services Acumatica ShipHero integration retrieves and imports shipped orders along with the labels and tracking numbers already generated in the WMS, so your business is not rekeying carrier data. The label and package information for each shipment can be found on the Packages tab of the ShipHero Shipment screen.
How do purchase receipts come back?
The Import Receipts from ShipHero screen imports purchase receipts for purchase orders that were previously exported. Get Receipts pulls receipts from the WMS and displays the ones that need to be imported; Import creates the receipt for the purchase order. Whether that receipt is released automatically is governed by the Release PO Receipt During Import Process checkbox on the Sync Info tab of the store: selected, receipts are released automatically on import; cleared, receipts are imported unreleased. If a receipt is imported partially, the last imported receipt is released.
How do bin transfers come back?
The Import Bin Transfers from ShipHero screen imports transfer bins based on the dates selected on the Sync Info tab of the ShipHero Store screen. It imports the transfers and displays them on the Transfers screen, and each line shows which location an inventory ID was transferred from and which location it went to, within the same warehouse. The Release Transfer During Import Process checkbox controls whether those transfers are released automatically on import. One hard prerequisite applies: this screen only works when the Multiple Warehouse Locations checkbox is selected.
How do return receipts come back?
The Import Return Order Receipt from ShipHero processing screen imports all returns from the WMS into Acumatica. After returns are exported and return records exist in ShipHero, you can set the tracking number and generate a return label there. Once the return is ready, it can be retrieved and imported into Acumatica and assigned to the corresponding RC order type. Import handles a selected order and Import All handles them all, an automatic scheduler can be configured for the process, and returns can also be imported directly from the Sales Order actions. When a return is imported, the system creates a return document in Acumatica and adds it to the Shipments tab of the related Sales Order, including the tracking number.
Item, Location and Vendor Sync Between Acumatica and ShipHero
Documents only flow cleanly when the master data underneath them matches. The ShipHero Store carries three sync surfaces – Inventory Details for items, Locations for bins, and Vendors – plus a Sync Info tab that defines what happens when the Biz-Tech Services Acumatica ShipHero integration meets something it has never seen before.
How does item sync work in both directions?
The Inventory Details tab loads and displays both Acumatica and ShipHero items. Load Acumatica Items loads and displays all items in Acumatica, and Sync Acumatica Items exports them to the WMS. Load ShipHero Items loads and displays all items in ShipHero, and Sync ShipHero Items imports them into Acumatica; during that import, if a stock item has a vendor or vendors already synced to ShipHero, the vendor information is synced with the item as well. Purge deletes everything currently displayed on the Inventory Details table, and Select All selects every item, with a second press clearing the selection.
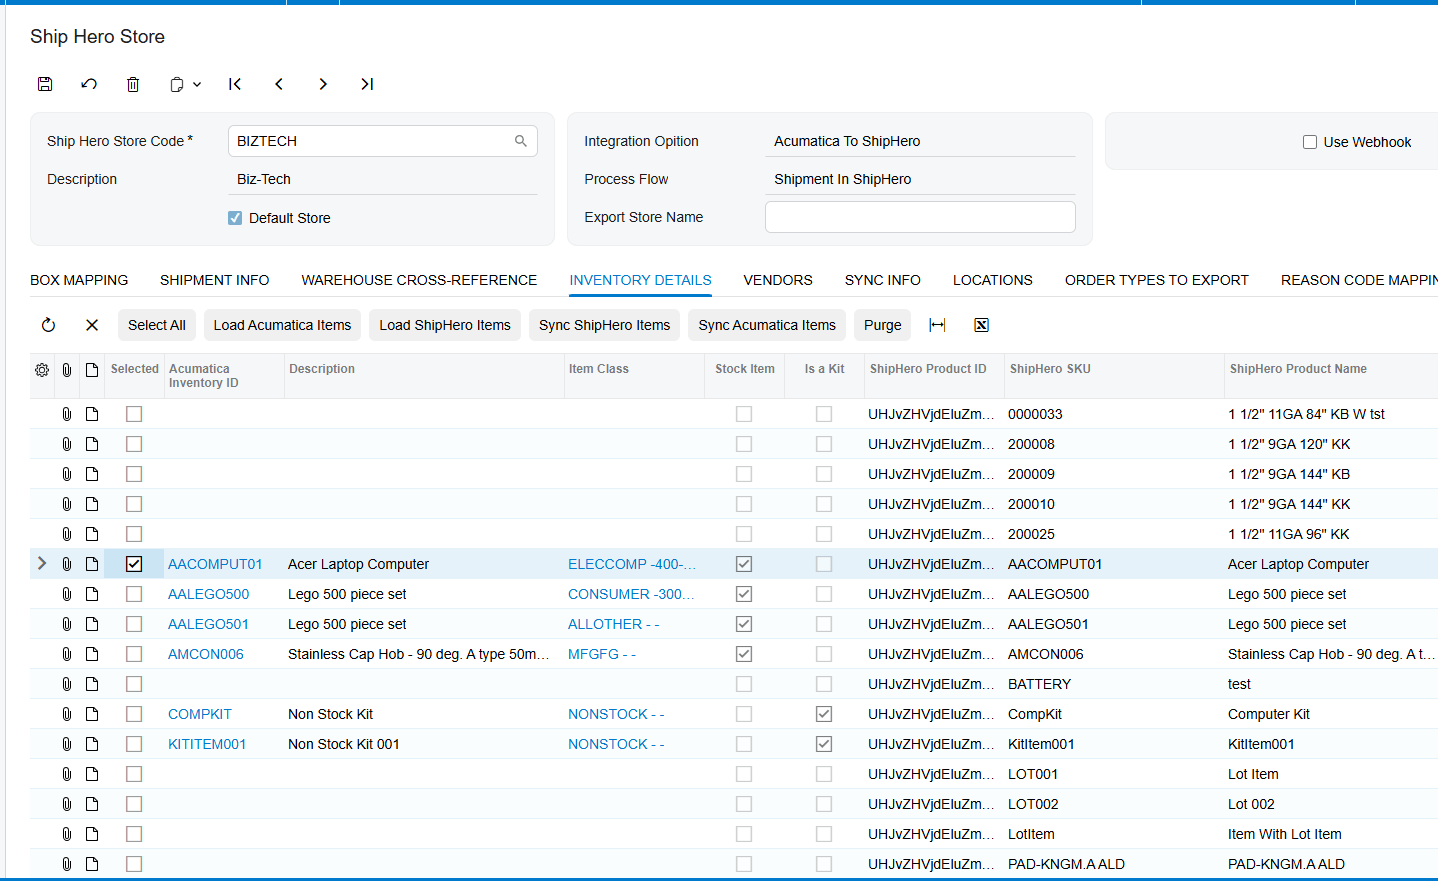
What happens when an item does not exist in Acumatica?
This is what the Import Item checkbox on the Sync Info tab decides, and it is one of the highest-impact settings in the Biz-Tech Services ShipHero Acumatica connector. Selected, the system is allowed to create a new item when it does not exist during the sync and order import processes, and it exposes Imported Item Type, Item Class, UOM and Warehouse ID fields that define the defaults for that new item. Cleared, the system does not create new items at all: when a new item arrives, it sets the default value of Replace Missing Products as the item name and takes the warehouse from the Warehouse ID field, assigning that same default item to every new item it meets.
The same tab controls what values are pushed outward. Export Price Type selects whether the default item price or the MSRP is exported, and Export Price Quantity selects whether the On Hand, Available, or Available for Shipment quantity is sent. That second field deserves thought – exporting On Hand when your business allocates stock heavily will tell the warehouse it has inventory that is already committed elsewhere.
How do warehouse locations sync?
The Locations tab is gated by the Multiple Warehouse Locations checkbox, which becomes selected when the button is activated from the Enable/Disable screen. With it selected, the Sellable Location, Non-Sellable Location, Release Transfer During Import Process and Begin Bin Transfers Date fields become available. Use Location Mapping then decides the granularity: select it and a grid appears for mapping locations one by one; leave it cleared and two locations should be set up instead.
Sellable Location and Non-Sellable Location determine the default values for sellable and non-sellable quantities in Acumatica when a purchase order is exported and a receipt is created in the WMS. There is an important exception to remember: when you create a sales order in Acumatica, export it to ShipHero and import the shipment back, the Sellable location on the lines is always set. The Locations grid itself works like Inventory Details – Load Acumatica Locations loads all Acumatica locations, Sync Acumatica Locations exports them to the WMS, Load ShipHero Locations loads all locations in ShipHero, Purge clears the grid, and Select All toggles the whole selection. Locations are only loaded for warehouses that have been set up on the Warehouse Cross-Reference tab.
How do vendors sync?
The Vendors tab loads and displays both Acumatica and ShipHero vendors and syncs them between the two systems, with Purge to clear the displayed table and Select All to toggle the selection. Before running the Sync Acumatica Vendors action, the Default Vendor Class ID must be selected on the Sync Info tab – that field also drives the Sync ShipHero Vendors button, which generates ShipHero vendors in Acumatica under the chosen class. This vendor information is used by the shipment import process from ShipHero to Acumatica.
Real-Time Flow: ShipHero Webhook Settings
Everything described so far is pull-based – a user or a scheduler presses Get and then Import. The Webhook Settings tab replaces that rhythm with real-time synchronization, so the WMS pushes events into Acumatica as they happen.
How do you set up ShipHero webhooks?
Enabling Use Webhook in the ShipHero Store header makes the Webhook Settings tab available; that tab defines which events are received from ShipHero and how they are processed. On the Webhooks screen, the Webhook Name must be selected and must match the value set as Webhook Type in the Webhook Settings tab of the store – if Webhook Name and Webhook Type do not match, the webhook will not work. Once the URL is generated on the Webhooks screen, set it in the Webhook Settings tab and press Create Webhook, which creates the webhook URL and sends it to ShipHero for POST requests. The same URL can be created for only one webhook and set only once; attempting to reuse it produces an error stating that the URL already exists.
A Branch for Webhooks must also be selected. All incoming webhook data – shipments, PO receipts, transfers and returns – is processed under that branch, and if no branch is selected, webhooks will not work at all.
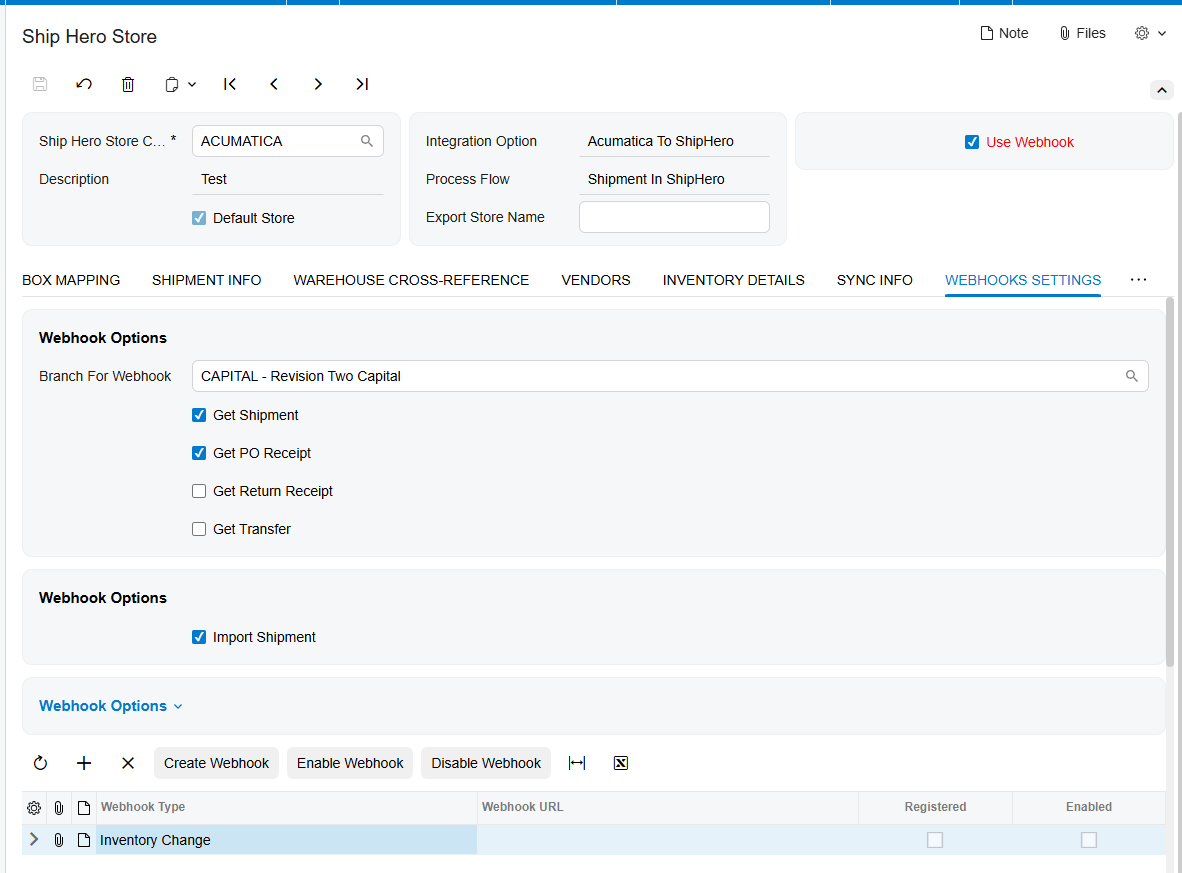
Which events can ShipHero push into Acumatica?
Shipment webhooks cover the core fulfillment loop: Get Shipment listens for shipment events from ShipHero in real time, and Import Shipment automatically imports the received shipment data into Acumatica and matches the shipment to the corresponding Sales Order. This also supports a WMS-first pattern – a sales order can be created in ShipHero and exported to Acumatica, and once a shipment is created in ShipHero the webhook retrieves and imports it and automatically matches it with the corresponding Sales Order.
Get PO Receipt listens for PO receipt events and Import PO Receipt automatically creates PO receipts and updates received quantities for purchase orders, so receipts are reflected immediately in inventory. Get Return Receipt listens for return receipt events so returned items captured in the WMS can be processed according to your return workflows. Get Transfer listens to inventory transfer events and Import Transfer automatically imports them, updating stock movement between warehouses and locations in real time.
What do the webhook grid fields mean?
Each row in the webhook grid at the bottom of the tab is one webhook registration. Webhook Type defines the event type, such as Inventory Change, Shipment or PO Receipt. Webhook URL is the URL generated and registered for that webhook. Registered indicates the webhook was successfully registered with ShipHero, and Enabled indicates it is active and processing events. Create Webhook registers the webhook and sends its URL to ShipHero for POST requests, Enable Webhook activates the selected webhook and starts real-time synchronization, and Disable Webhook deactivates it and stops incoming events while the configuration remains saved.
Where to Monitor ShipHero Results in Acumatica
When users ask what happened to an order, these are the exact screens, tabs and fields to check, roughly in the order you would walk the flow:
- ShipHero Store, General Info tab – Test Credentials confirms the API connection, and the Last Import Date column in the Stores to Get grid shows when the last order was imported for each store.
- ShipHero Store, Import Info tab – Last Imported Order Date shows the date boundary the Biz-Tech Services ShipHero Acumatica connector is working from, which explains most cases of “older orders never arrived”.
- Export ShipHero Order screen – if an Acumatica order is missing here, its status is not Open or its order type is not set up in the selected store.
- ShipHero Order screen – the header shows the order ID, Store Code, the order status in Acumatica and the ShipHero order number, plus the order status in ShipHero, the financial part of the order, the ship via and customer addresses.
- ShipHero Order, Details tab – the products that were ordered, as ShipHero has them.
- ShipHero Order, Addresses tab – the customer addresses that came across, which is where you verify the Override Ship Address and Override Bill Address behaviour.
- ShipHero Order, Shipments tab – the shipment ID for the order, rendered as a hyperlink that takes you straight to the ShipHero Shipment screen.
- ShipHero Shipment screen – the shipment detail, with the Packages tab holding the label and package information, and the Processed checkbox, which is selected automatically when the shipment is processed from the processing screens.
- ShipHero Item inquiry – the Warehouse Details tab shows item availability, the Vendors tab shows the vendor the item is connected to in ShipHero, and the Bin Transfers tab shows transfers for the item. Update Item displays all changes made to the ShipHero item, Sync ShipHero Item syncs the item into Acumatica, and Update Warehouse In ShipHero syncs and updates the item quantity in the WMS.
- ShipHero Purchase Order inquiry – synced purchase order data from Acumatica to ShipHero, where Update Order brings back to Acumatica all changes made to the synced purchase order in the WMS.
- ShipHero Vendor inquiry – ShipHero vendor information, useful when the shipment import process is not resolving a vendor.
- Transfers screen in Acumatica – bin transfers imported from ShipHero appear here, with the from and to locations on each line.
- Shipments tab of the related Sales Order – after a return is imported, the return document is added here including the tracking number, and after a shipment is imported the sales order status moves to Completed.
- Webhook Settings tab grid – the Registered and Enabled columns tell you whether a webhook is actually live, which is the first thing to check when real-time events stop arriving.
ShipHero Acumatica Integration: Frequently Asked Questions
Which direction does the ShipHero Connector move data?
Both, and the Biz-Tech Services ShipHero Acumatica Integration Option field on the ShipHero Store decides which one a given store handles. ShipHero to Acumatica retrieves and imports shipped orders with the labels and tracking numbers already generated in the WMS. Acumatica to ShipHero lets you create orders in Acumatica, export them, ship them in ShipHero and bring the shipments back. Your business can configure separate stores for each direction, and the Import Shipments from ShipHero screen shows both types.
Why did an order not reach ShipHero?
Start with the Export ShipHero Order screen. Only Acumatica orders with an Open status appear there, and the order type must have been set up in the selected ShipHero Store under Order Types To Export with the Active checkbox selected. If either condition fails, the order is simply not listed rather than flagged, so check status and order type setup before looking anywhere else. For returns specifically, the RC order type must be configured under Order Types to Export or RC orders will not appear on the Export Return Orders To ShipHero screen.
Why is tracking not coming back from ShipHero?
Tracking numbers arrive with the shipment, so the question is really why the shipment has not been imported. Check that Get Shipments was run on the Import Shipments from ShipHero screen and that the shipment is listed on the Shipments tab of the ShipHero Order screen, then that Import was run – it is the Import action that brings the shipment into Acumatica and confirms it. If you are relying on webhooks instead, confirm that the shipment webhook shows Registered and Enabled, that the Branch for Webhooks is selected, and that Webhook Name on the Webhooks screen matches Webhook Type in the Webhook Settings tab.
Why are my webhooks not working?
There are three documented causes. The Webhook Name selected on the Webhooks screen must match the Webhook Type value in the Webhook Settings tab of the ShipHero Store, or the webhook will not work. A Branch for Webhooks must be selected, because all incoming shipment, PO receipt, transfer and return data is processed under that branch. And the same URL can only be created for one webhook and set once – reusing it raises an error stating the URL already exists.
Why is the Import Bin Transfers screen not returning anything?
The Import Bin Transfers from ShipHero screen only works when the Multiple Warehouse Locations checkbox is selected. That checkbox becomes selected when the button is activated from the Enable/Disable screen. Also check the Begin Bin Transfers Date on the Locations tab and the dates on the Sync Info tab, because the screen imports transfers based on the dates selected there.
Why did an imported order come in with the wrong item?
That is the Import Item checkbox on the Sync Info tab. When it is cleared, the Biz-Tech Services Acumatica ShipHero connector does not create new items in Acumatica; instead it sets the default value of Replace Missing Products as the item name and takes the warehouse from the Warehouse ID field, assigning that default to every unrecognised item. If your business wants real items created automatically, select Import Item and set the Imported Item Type, Item Class, UOM and Warehouse ID defaults that appear.
Do purchase receipts and transfers release automatically?
Only if you tell them to. Release PO Receipt During Import Process on the Sync Info tab releases receipts automatically on import; when it is cleared, receipts are imported as not released, and if a receipt is imported partially, the last imported receipt is released. Release Transfer During Import Process does the same for transfers imported from ShipHero.
How does the connector match a return to the original order?
Through the Customer Order Number field. The original Sales Order must carry a value in Customer Order Number, and the RC (Return for Credit) order must be created for the same customer, contain the same items, and use the same Customer Order Number. The system uses that value during the return process to identify and match the correct customer associated with the returned order. Reason Code and Ship Via mappings must also exist between Acumatica and ShipHero values for return exports to work.
Work With the Biz-Tech Services ShipHero Connector
The ShipHero data flow is a loop, not a one-way feed. Documents leave Acumatica through the export screens, the WMS does the physical work and generates labels, tracking numbers, receipts and transfers, and the import screens – or the webhooks, if you run in real time – bring that reality back so sales orders, purchase orders and returns close out correctly. The ShipHero Store is where every one of those hops is authorised, from the Integration Option that sets direction, through the cross-references that translate carriers, warehouses, boxes and reason codes, to the Sync Info defaults that decide what happens when the two systems disagree. Get the store right and the monitoring screens become a formality; get it wrong and records quietly stop appearing on the processing screens.
If your business is running Acumatica alongside a ShipHero warehouse and wants the round trip configured properly the first time, the Biz-Tech Services ShipHero Connector team can help scope the store setup, the cross-references and the webhook configuration around how you actually fulfill. Visit https://biz-techservices.com to learn more about our Acumatica expertise or to schedule a personalized demonstration.

