How to Set Up CommerceHub in Acumatica
How to Set Up CommerceHub in Acumatica
Connect the CommerceHub retail network to your ERP with a secure, automated file exchange — generated in NotebookLM from the product PDF.
Scaling your business often means partnering with major retailers like Costco, Home Depot, or Lowe's. These partnerships are a massive win for your growth, but they bring a heavy administrative burden. Managing hundreds of orders, tracking shipments, and keeping inventory accurate across different platforms can quickly become a manual nightmare. You need your e-commerce operations to talk directly to your back-office system. We designed the Biz-Tech Services CommerceHub Connector for Acumatica to bridge that gap.
In this article, we are going to walk you through the initial setup and connection process. This is the foundation of your integration, ensuring that data flows smoothly and securely between your partners and your Acumatica Enterprise Resource Planning, or ERP, system.
Understanding the SFTP connection
The first thing to understand about CommerceHub is how it handles data. Most modern connectors use an API, or Application Programming Interface, for direct communication. However, CommerceHub integrator is unique because it primarily uses SFTP, which stands for Secure File Transfer Protocol.
Think of SFTP as a secure digital post office. Instead of sending messages back and forth instantly, the systems write information into text files. These files are then uploaded to or downloaded from a secure server. To make this work, we use a tool called FileZilla to manage these transfers. In your Acumatica workspace, our connector acts as the engine that reads these files and turns them into actionable data.
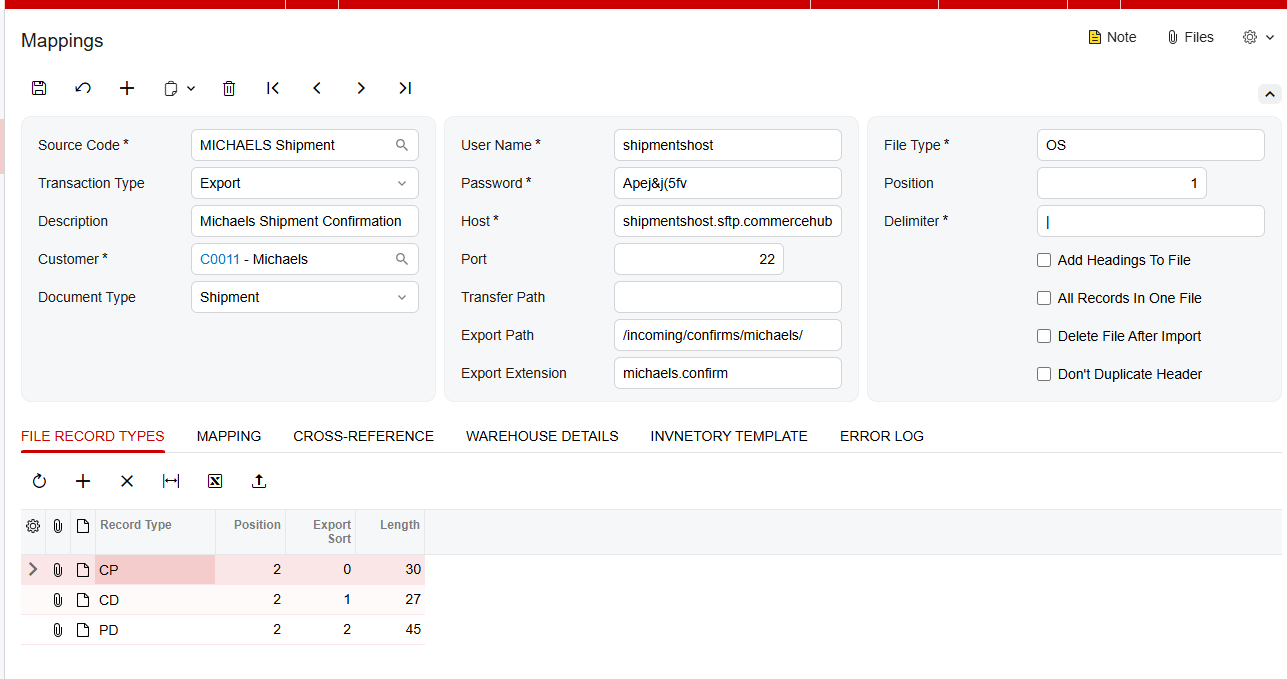
To start the setup, you go to the Mappings screen. This is where you configure the connector's behavior and define how it should talk to the outside world. You enter your CommerceHub SFTP credentials, including the host address, the port (which is typically twenty-two for secure transfers), your username, and your password. Once those are set, you define the specific paths where the connector should look for files to import, and where it should place files for export.
The power of store codes
Once your connection is established, we need to talk about store codes. Store codes are the heart of the CommerceHub integration, because they let you manage distinct configurations for each of your retail partners.
Your business doesn't treat a Costco order exactly the same way it treats a Michaels order, and with store codes you don't have to. Each store can be set up with its own unique parameters. You can define a specific transaction type, a description, and even assign a default customer in Acumatica for that retailer. This level of customization means that when an order comes in, it already fits the specific requirements of that partner.
Mapping your items
For the integration to work, Acumatica needs to know that the item named in a CommerceHub file is the same item sitting in your warehouse. We handle this through the cross-reference tab.
On this screen, you map your Acumatica inventory IDs to the specific item IDs used in the CommerceHub files. This makes sure that when you import an order, the system identifies the products correctly. Without this mapping, the automation would stop in its tracks. We also provide an inventory template screen, where the items you select are marked for synchronization, so you can export accurate quantities back to your retailers.
Managing your data files
Now that the foundation is laid, the connector manages several types of files to keep your business moving.
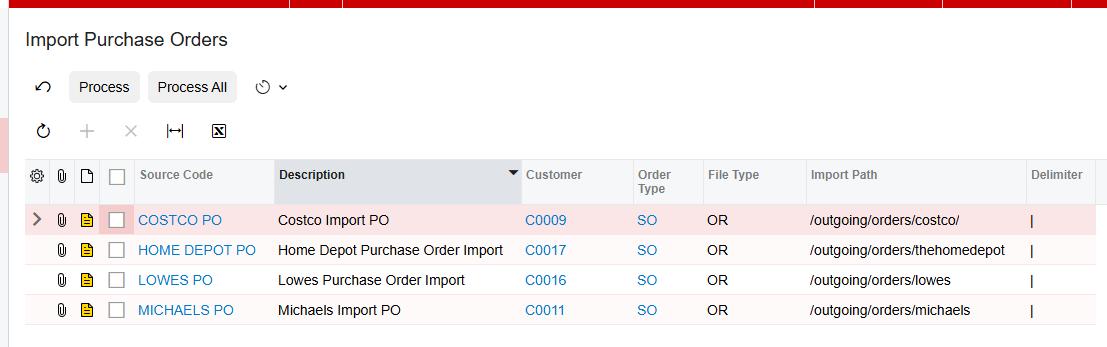
First are the purchase order files. The Import Purchase Orders screen pulls orders from CommerceHub into Acumatica. While these orders come in under a default customer, the connector is smart enough to override the address information with the actual shipping address from the order.
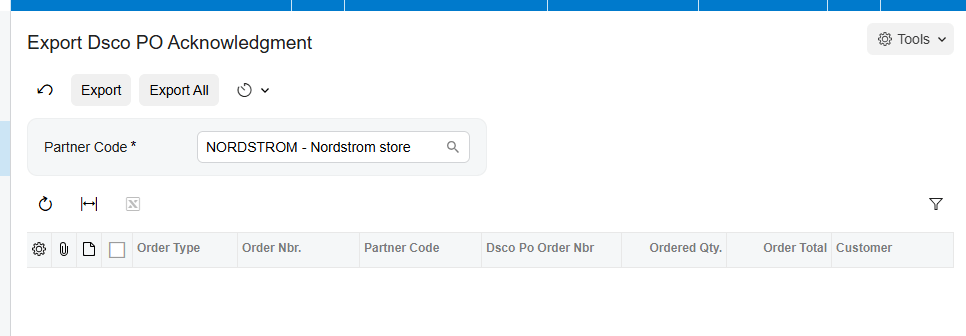
Next are the acknowledgement files. Once an order is created in Acumatica, it sits in an open status, waiting to be acknowledged. You use the export screen to send a purchase order acknowledgement back to the retailer, letting them know you've received and accepted the order.

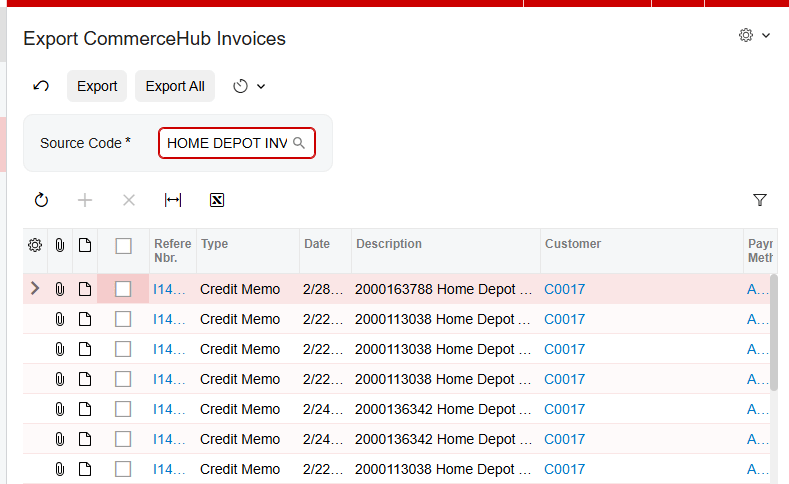
As you fulfill those orders, the system handles shipment and invoice files. The Export Shipment screen finds every order with a confirmed shipment status and prepares that data for CommerceHub. And the Export Invoices screen sends your billing information once an order has been invoiced or released in your system. The integrator contains a similar Export CommerceHub Shipment processing screen for Shimpents.
Finally, there is the inventory file. You can choose to export your on-hand, available, or available-for-shipment quantities. This keeps your retail partners updated on exactly what you have in stock, which prevents overselling.
Handling errors and failed files
Even with a great system, data issues happen. Maybe a file was formatted incorrectly, or an item ID was missing. We've built in two specific places to help you manage this.
The first is the CommerceHub Errors screen. This is a central log where you can see every error message received from CommerceHub across all processes. It gives you the date, the order number, and a detailed message, so you can resolve the issue quickly.
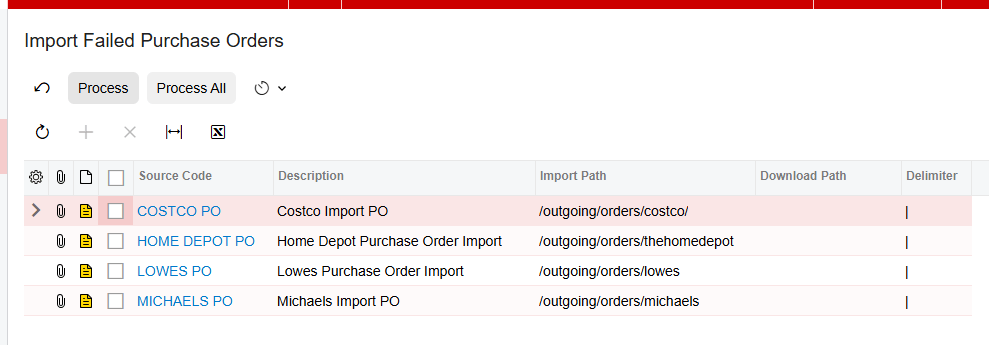
The second is the Import Failed Purchase Orders screen. If an order fails to import during the normal process, it doesn't just disappear. It moves here, where you can review the failed attempts, fix the underlying issue, like a mapping error, and then process them again, so no order is ever lost.
The bottom line
Setting up your CommerceHub integration correctly means moving away from manual data entry and toward a secure, automated file exchange that treats every retail partner with the specific attention they require. By mastering your SFTP connection and your store code configurations, you turn a complex retail requirement into a smooth part of your daily workflow.
If you'd like to see how the CommerceHub Connector can transform your e-commerce operations, visit biz-techservices.com today to request a full demo.
How to Set Up EZCom EDI in Acumatica
How to Set Up EZCom EDI in Acumatica
Generated by NotebookLM from the EZCom Connector documentation — narrator-ready.
Imagine your business is finally landing those massive contracts with national retailers. This is the growth you have worked for, but it comes with a hidden cost. Your office team is suddenly drowning in manual work. They are logging into customer portals, copying order details into your system, and manually updating inventory counts. This manual data entry is slow, expensive, and one small typo can lead to a rejected shipment or a frustrated customer. This is the real-world problem that Electronic Data Interchange, or EDI, is designed to solve.
At Biz-Tech Services, we believe your Enterprise Resource Planning system, or ERP, should be the heart of your operations. That is why we built the EZCom Connector. This integrator creates a seamless bridge between the EZCom EDI platform and Acumatica. The connection is managed by an intermediate server that we control to ensure your data flows accurately and securely. Let's walk through how to set up this connection step by step so your business can stop typing and start growing.
Installing the Framework
The journey begins with bringing the integrator into your Acumatica environment. To do this, you will use the Customization Projects form. This is the workspace where you add the deployment package we provide.
Once the package is uploaded, you must perform a document validation. This is a critical step where the system checks the new files against your specific version of Acumatica to ensure everything is compatible. After a successful validation, you publish the project. This finalizes the installation and adds the new EZCom menu and screens to your workspace.
Establishing the Connection
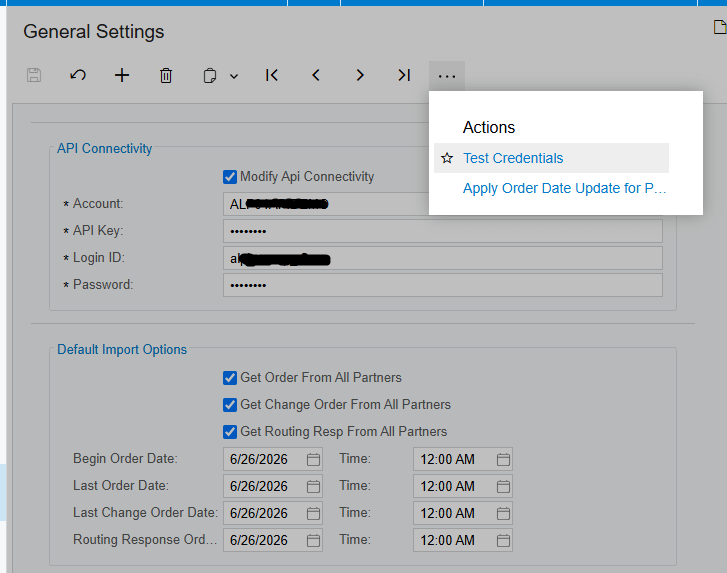
Now that the software is in place, you need to tell it how to talk to the outside world. Navigate to the General Settings screen. This is where you configure your Application Programming Interface, or API, connectivity. An API is essentially the language the two systems use to communicate.
Inside the settings, you will enter your account information, your unique API Key, and your EZCom administrative credentials. To make sure the bridge is working, use the Test Credentials action. The system will attempt to reach the Biz-Tech intermediate server and verify your account. If it passes, your system is ready to exchange data.
Configuring Your Trading Partners
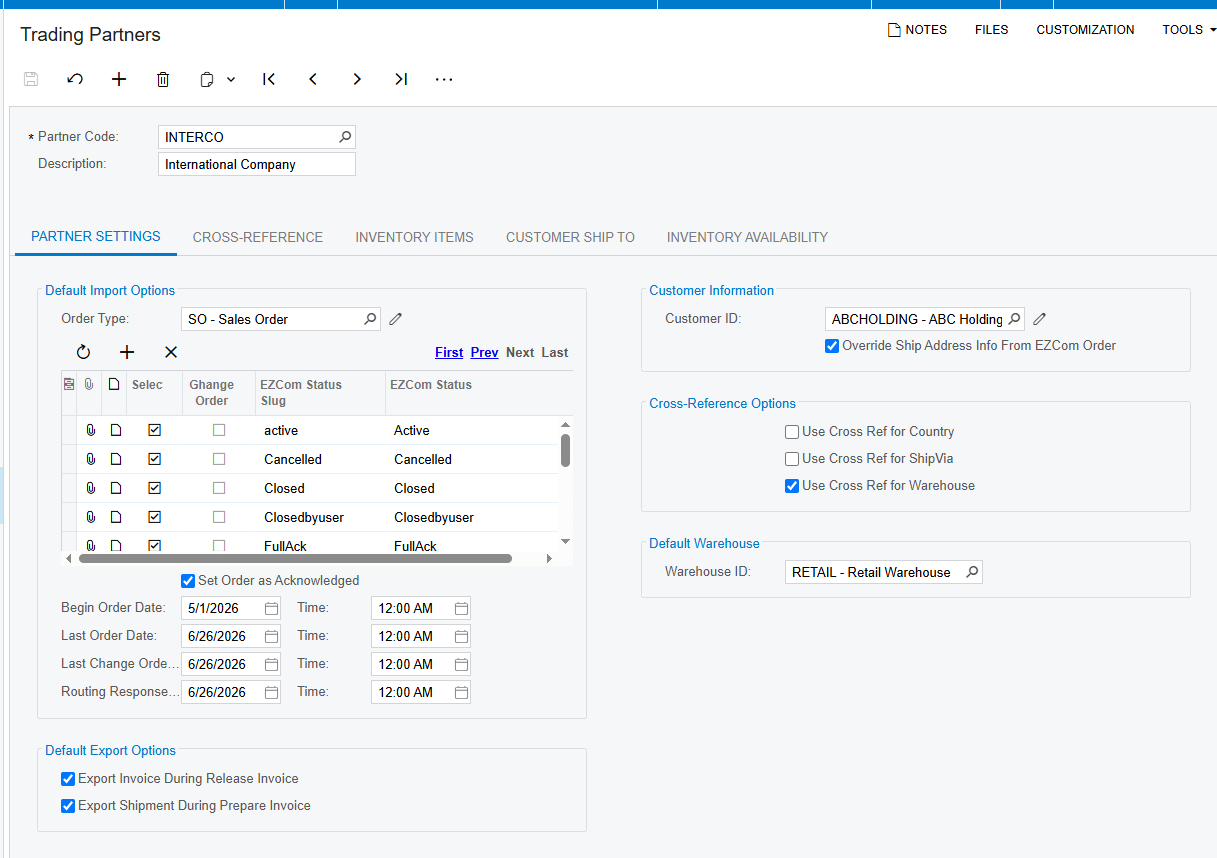
In the world of EDI, your customers are known as Trading Partners. Every partner has different requirements, so you must define the rules for each one. On the Trading Partners screen, use the action to retrieve your full list of partners directly from EZCom.
For each partner, you will choose a default Order Type for the Sales Orders that the system will create. You also select which EZCom Statuses should trigger an import. Mapping your inventory is the most important part of this step. Under the Inventory Items tab, you link your internal Acumatica IDs to the codes your customer uses, such as a Universal Product Code, or UPC. If you do not map these items correctly, the system will trigger an error during the import process because it won't know which product is which.
Managing Inbound Orders and Changes
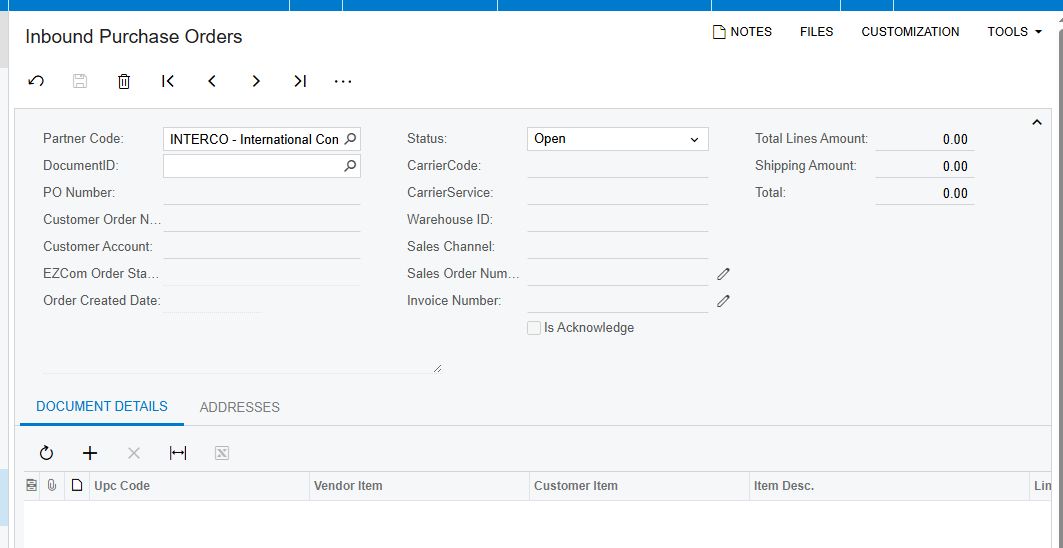
With your partners configured, you can begin processing transactions. It starts with the Purchase Order, or PO. On the Import Purchase Orders screen, you can fetch orders for specific partners or for everyone at once. Once the list appears, you can choose to import specific orders or use the Import All function to bring them all into Acumatica as Sales Orders.
Business is rarely static, and customers often modify their orders. If a partner changes an order on the EZCom platform after you have already seen it, you can use the Import Changed Purchase Orders screen. This ensures your records stay accurate without any manual intervention.
Acknowledgements and Routing
Once you have an order, your partner needs to know you have accepted it. This is handled through a Purchase Order Acknowledgement, or PO Ack. When you send a PO Ack from the dedicated outbound screen, the system updates the status in EZCom and automatically changes the status of the Sales Order in Acumatica to Closed.
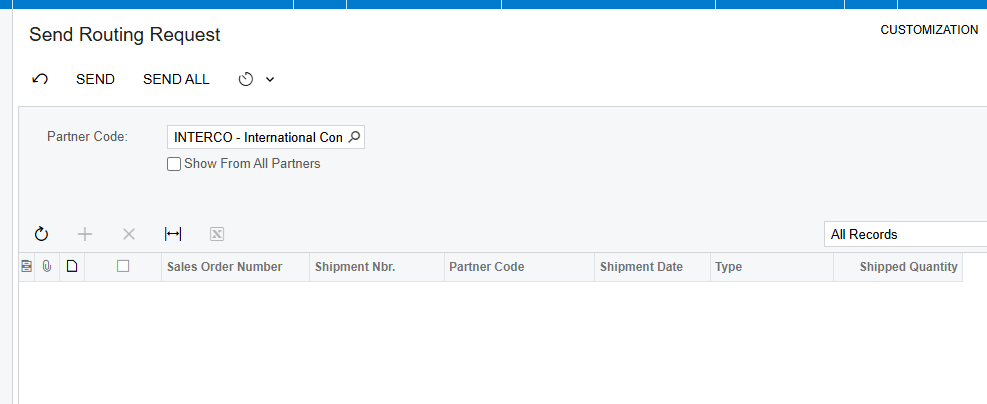
If your shipment requires specific carrier instructions, you can send a Routing Request to tell the partner the goods are ready. When the partner responds, you simply import the Routing Response. The system will then automatically update your shipment with the correct carrier and service details based on the rules you have set up.
Warehouse Integration and Fulfillment
If you use an external warehouse, the integratior keeps them in the loop too. You can send a Warehouse Order that includes item quantities and UPC codes directly to your fulfillment center. When the warehouse ships the goods, you can import the Warehouse Shipment details. This automatically brings tracking numbers and final quantities back into your Acumatica shipment record, saving you from more manual data entry.
The final step in the cycle is telling the customer the goods are on the way and the bill is ready. You can automate this so that Outbound Shipments and Outbound Invoices are sent the moment you process them in Acumatica. If you prefer more control, you can use the dedicated outbound screens to review and send these documents manually.
Your Path to Automation
The one clear takeaway from this process is that integration is the enemy of error. By taking the time to validate your documents and map your items correctly, you turn a complex web of retail requirements into a smooth, automated workflow.
If your team is spending more time typing than they are selling, we can help. Visit us at biz-techservices.com today to schedule a demo of the EZCom Connector and see how we can streamline your business.
How to Connect DSCO to Acumatica
How to Connect DSCO to Acumatica
Link the Dsco retail network to your ERP so orders flow in and acknowledgements, shipments, and invoices flow back — automatically.
Selling through retailers means moving fast
If you sell through major retailers, there's a good chance your orders come through DSCO Connector. It's the network that connects suppliers like you to the retailers you sell through, passing orders one way and acknowledgements, tracking, and invoices back the other. The catch is the pace. Retailers expect quick acknowledgements and accurate, on-time shipping, and doing all of that by hand between Dsco and Acumatica is slow and risky.
The Biz-Tech Dsco Connector takes that pressure off. DSCO Integration with Acumatica handles retail orders flow in, and acknowledgements, shipments, and invoices flow back automatically. Let's walk through how you connect them.
Step one: enter your DSCO credentials
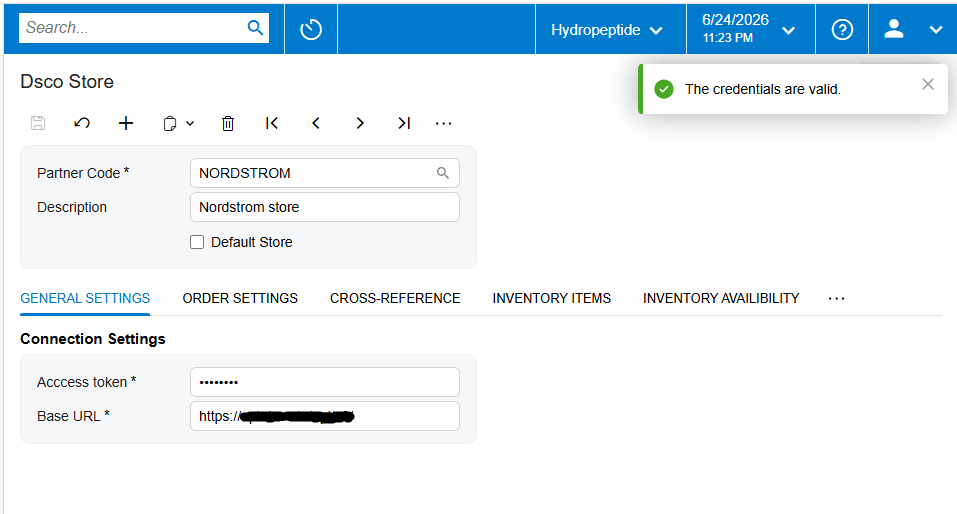
Setup starts with credentials. Once the connector is installed, a DSCO Integrator workspace appears inside Acumatica. On the Dsco Store screen you enter your connection details, which are your DSCO access token and the base web address for the Dsco service, and then you press Test Credentials. When the connection succeeds, your store is linked and you can set how everything should behave.
Setting up how orders come in
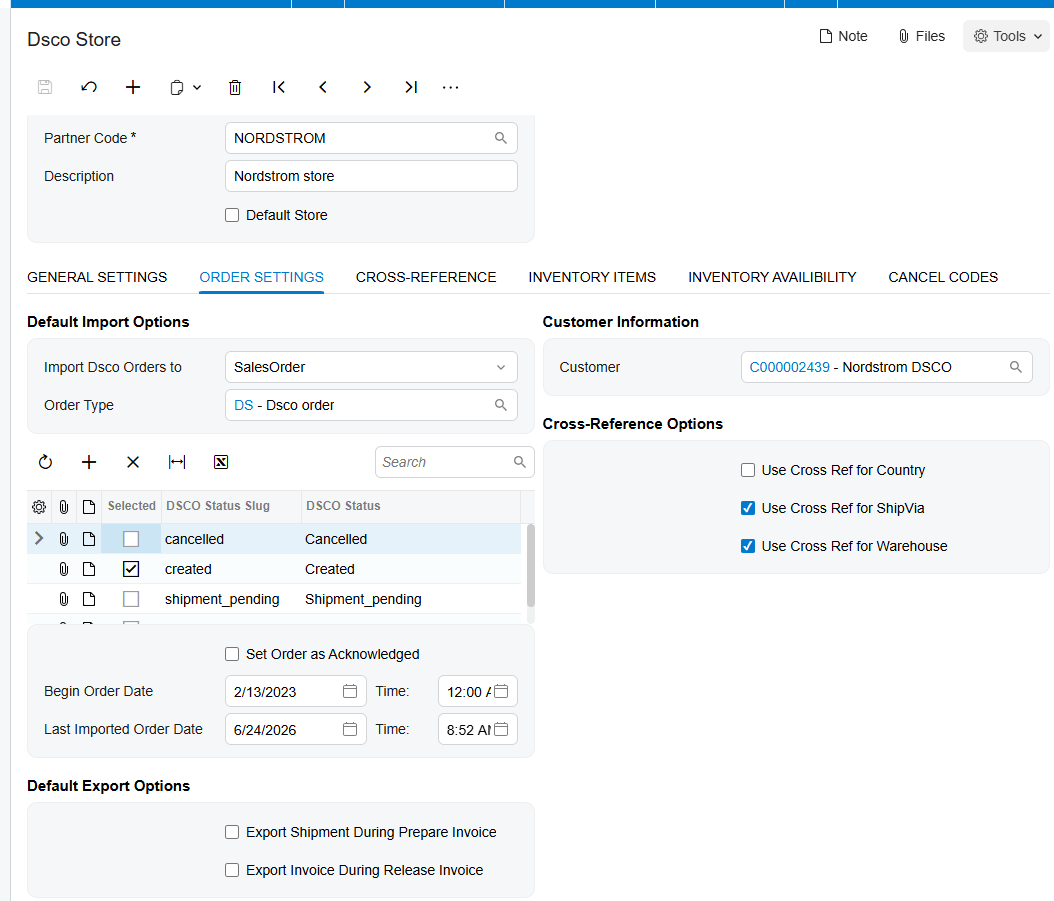
First, you decide how incoming orders are handled. You choose whether each DSCO order becomes a sales order or an invoice in Acumatica, set a default order type, and pick which Dsco order statuses to bring in. You can also decide whether orders should be treated by DSCO Integrator as automatically acknowledged, or whether you'll send the acknowledgement yourself, which matters because retailers watch that step closely.
Mapping items and warehouses
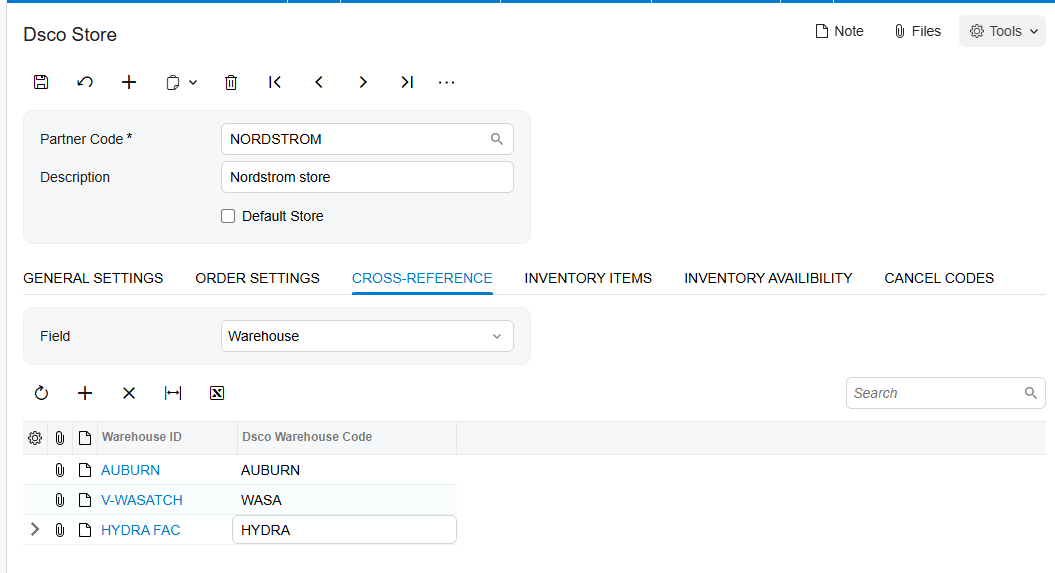
Next you connect the pieces the two systems share. The most important is item matching. In the inventory cross-reference, you tell the integrator how to find each product, usually by its SKU, and link it to the right Acumatica inventory item. You also map your Dsco warehouses to your Acumatica warehouses, so orders pull from the right stock and nothing errors out. You can also pick a default customer to stand behind these orders, so each one is booked correctly even though it arrives from the retail channel rather than a named buyer. And you set up your cancellation reason codes in advance, so they're ready the moment you need them.
The order flow: acknowledge, ship, invoice
With setup done, the order flow runs cleanly. You get and import your Dsco orders, in bulk or one at a time. If you didn't set them to auto-acknowledge, you send the purchase order acknowledgement back to Dsco to confirm you've received the order. When you ship, the connector sends the shipment confirmation to Dsco and sets the tracking number on the order. And when you release the invoice, it sends the invoice across and moves the Dsco order to shipped. Every step the retailer is waiting on happens on its own. Throughout, the order carries its Dsco status with it, so you can always see whether it's been acknowledged, shipped, or invoiced, and refresh it from Dsco if anything changes on the retailer's side.
Handling cancellations
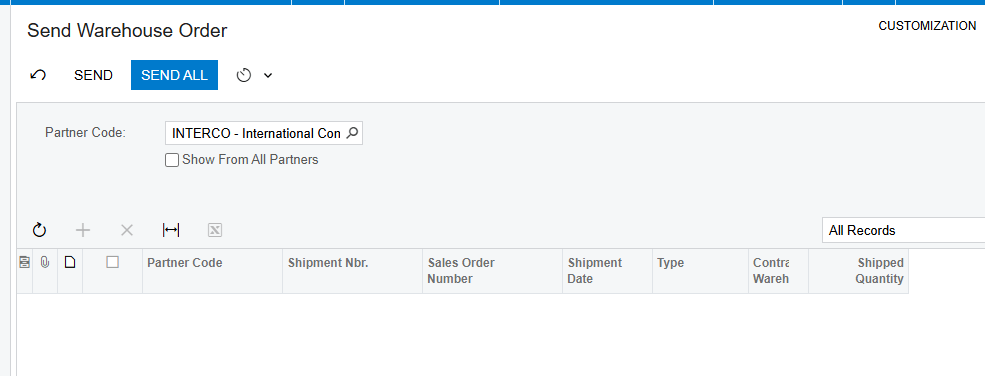
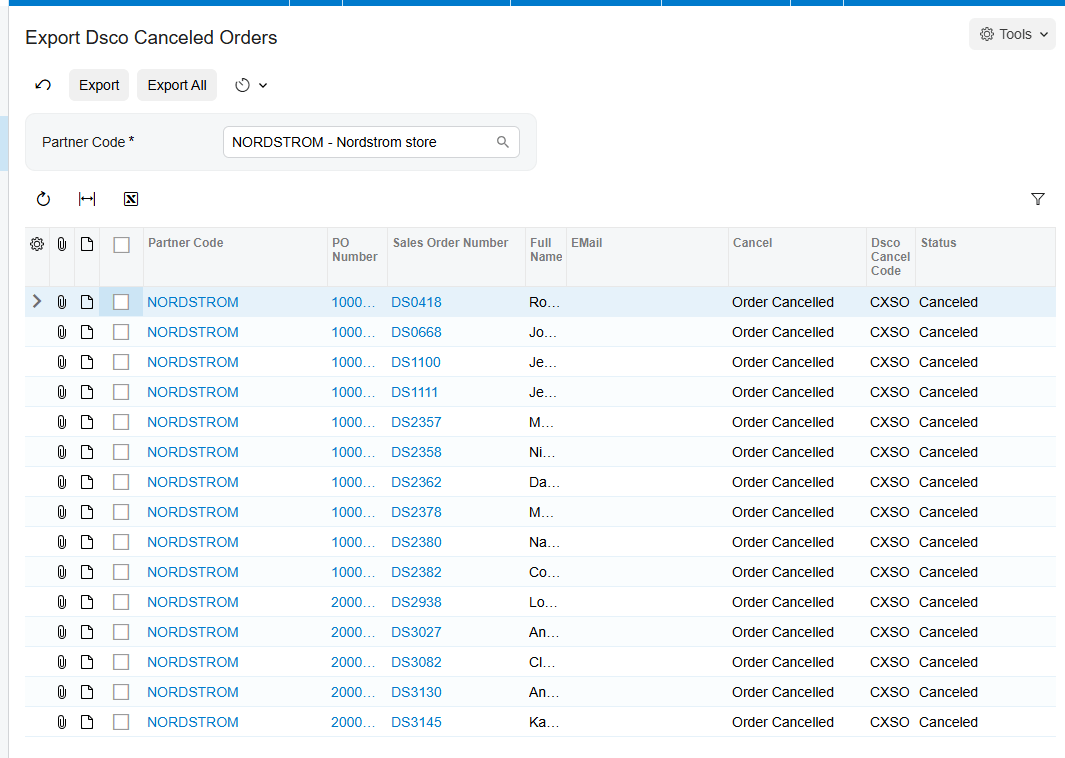
Cancellations are covered too. If you need to cancel a whole order via Export Dsco Canceled Orders screen, or just a single line, you do it right from the sales order and choose the matching DSCO cancel code. The integration then sends the cancellation to DSCO for you, so the retailer's system stays accurate and in step with yours. You can use the Export Dsco Order Item Canceled screen to cansel a single item of order or cansel all the orders to automatically cansell the whole order.
Keeping inventory current
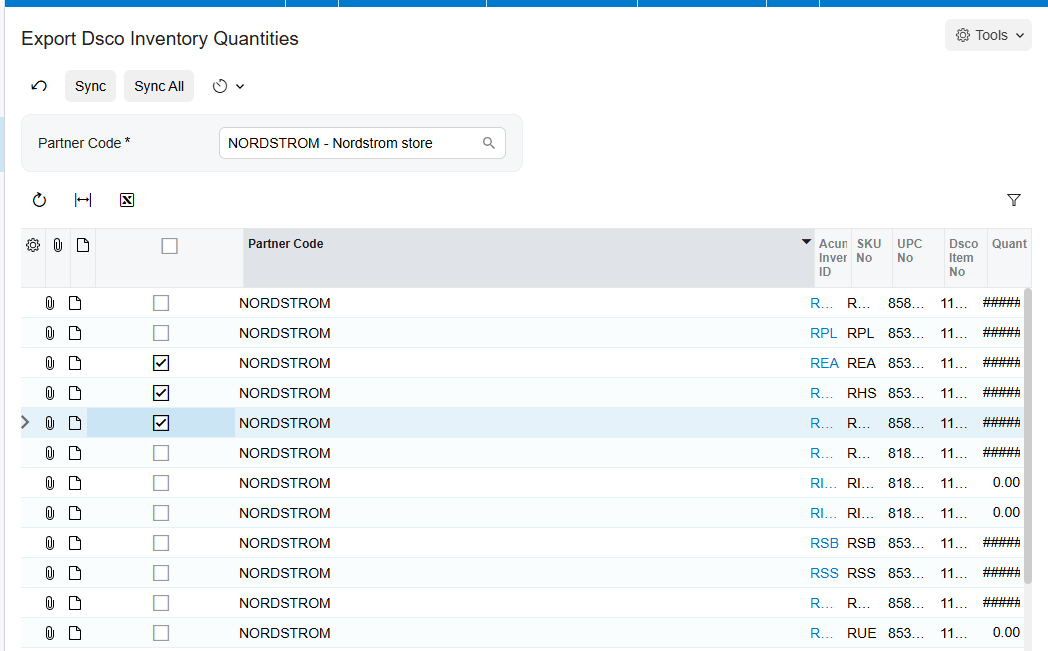
And to keep retailers from ordering what you don't have, the DSCO Integration allows to keep your inventory current in DSCO. It sends your Acumatica quantities up to DSCO, using the combined total across the warehouses you choose and the measure you prefer, like on hand or available, so the stock they see is the stock you actually have. You can let it publish your live Acumatica quantity automatically, or set a specific number to send, which gives you control when you want to hold some stock back.
The bottom line
Once it's connected, DSCO Connector and Acumatica work as one. Retail orders flow in, and acknowledgements, shipments, invoices, and inventory all flow back without anyone re-keying a thing. Your team hits the retailers' deadlines without the manual scramble.
If you'd like help connecting your own Dsco account, the team at Biz-Tech Services does exactly this. Visit biz-techservices.com to book a walkthrough and see your Dsco orders flow straight into Acumatica.
How to Connect ShipStation to Acumatica
How to Connect ShipStation to Acumatica
Link your shipping platform to your ERP so orders flow out for fulfillment and tracking flows back automatically.
Great at shipping, blind to your ERP
If you ship a lot of orders, you probably love ShipStation. It pulls orders from all your sales channels, finds the right carrier, prints labels and packing slips in batches, and emails tracking to your customers. What it doesn't do on its own is keep your ERP in the loop. So someone ends up re-keying orders and tracking numbers between ShipStation and Acumatica by hand.
The Biz-Tech ShipStation Connector removes that step. It links the two systems so orders flow to ShipStation for fulfillment, and shipments and tracking flow back into Acumatica automatically. Let's walk through how you connect them.
Step one: install the package and connect
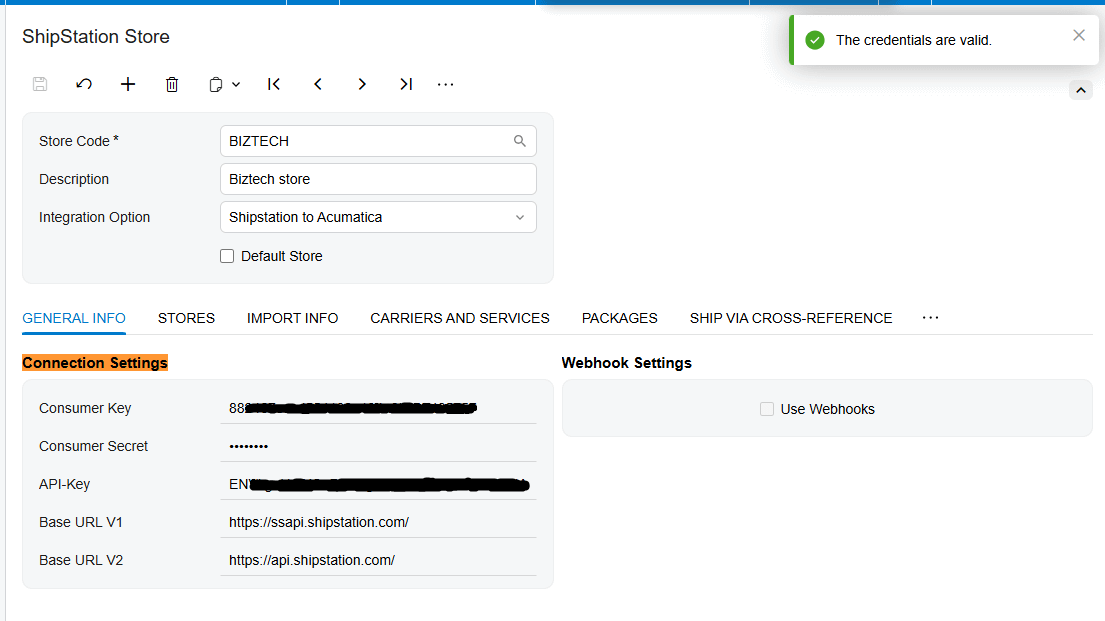
Setup begins by installing the ShipStation customization package in Acumatica, which adds a ShipStation workspace and the screens you'll use. From there you open the ShipStation Store screen and enter your connection settings, which are your ShipStation consumer key, your consumer secret, and your web address. Then you press Test Credentials, and when the connection checks out, the two systems are linked.
Choosing your direction
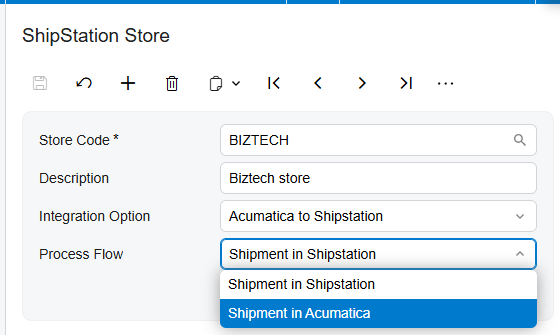
Next you choose the direction the integration runs. In one mode, ShipStation to Acumatica, ShipStation is where orders live, and the connector imports those orders, and their shipments, into Acumatica. In the other, Acumatica to ShipStation, your Acumatica orders are sent out to ShipStation to be shipped. If you pick that second direction, you also choose where the shipment itself is created, in ShipStation or in Acumatica, so the workflow matches how your team works.
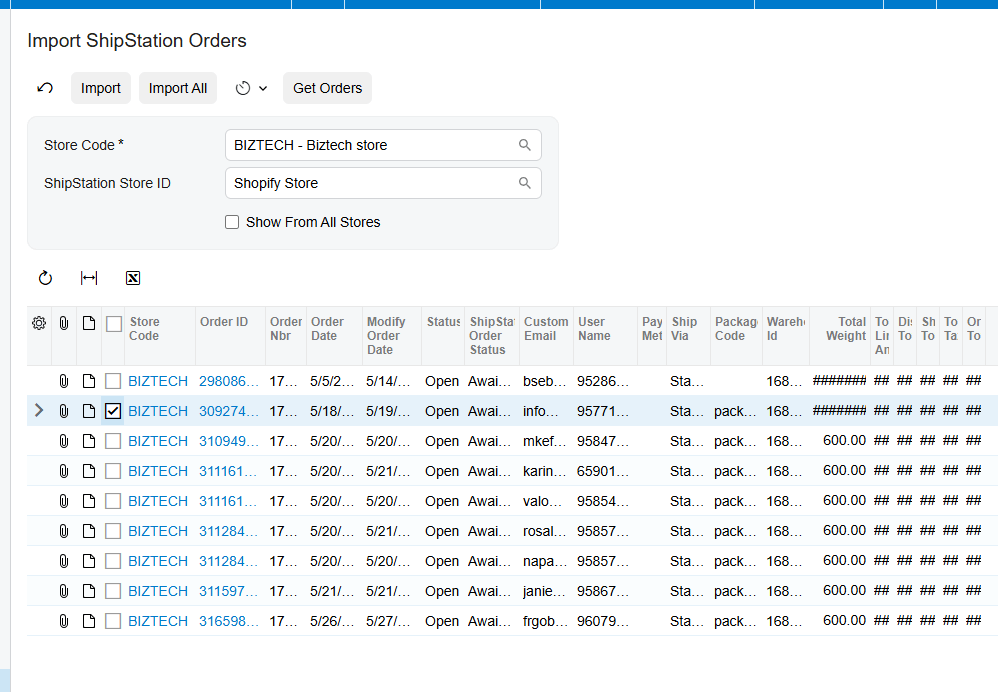
Bringing orders in from ShipStation
If you're pulling data in from ShipStation, you start by retrieving your connected stores and choosing which one to import from. Then you map ShipStation's order statuses to Acumatica's, so only the orders you want, like the ones already shipped, come across. You decide how those orders are classified in Acumatica, whether their shipments come in along with them, and how customers and items should be handled. The Integration Option on Shipstation Store screen should be selected as Shipstation to Acumatica to be able to see any records on Import ShipStation Orders screen.
Setting up the shipping side
If you're sending orders out to ShipStation instead, you set up the shipping side. You pull in your carriers and their services directly from ShipStation, choose the package types you use, and line up your ShipStation warehouses. And in both directions, you map your shipping methods, your ship-vias, between the two systems, so every order goes out by the right method.
Shipments and tracking, handled automatically
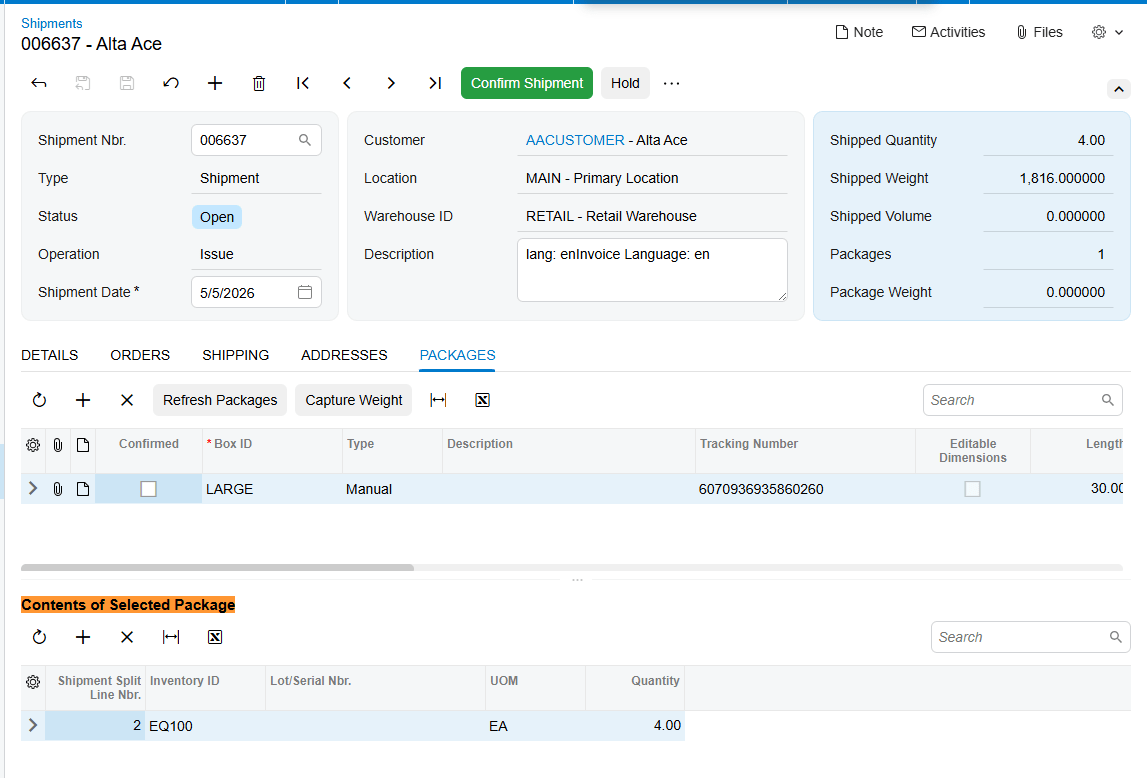
Then comes the part that saves the most time. When an order is shipped, the connector brings the shipment back into Acumatica and attaches the details, including the shipment number and the tracking number, to the right order, then moves it forward to the invoicing stage. If you'd rather drive it from Acumatica, you can create the sales order and shipment there, confirm it, and the connector creates the matching order and shipment in ShipStation, tracking number and all.
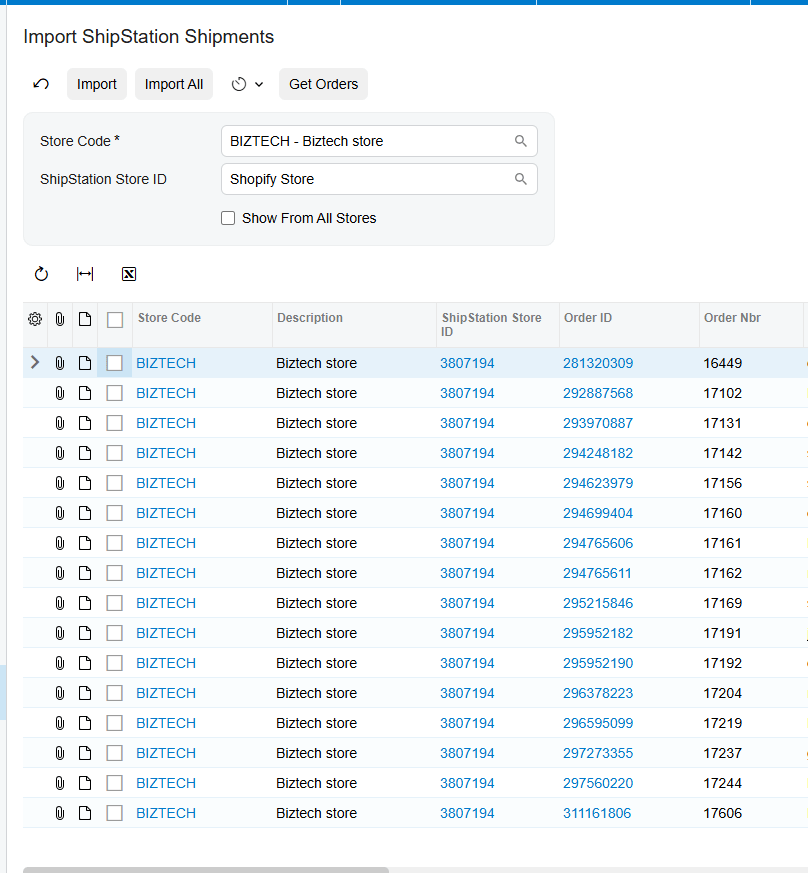
Processing the record in Import ShipStation Shipment screen, will add the package data on Shipmnent document.
Keeping ShipStation's automation
And because ShipStation integrator is still doing the shipping, you keep everything it's good at. Batch label printing, carrier rate shopping, and its automation rules all keep working, while Acumatica stays perfectly in step. You get the best of both worlds: powerful, automated shipping, and an ERP that always reflects what actually went out the door.
The bottom line
Once it's connected, ShipStation and Acumatica work as one integration. Orders flow out for fulfillment, tracking flows back to your books, and your team stops copying numbers between two screens. The shipping stays fast, and the records stay accurate.
If you'd like help connecting your own shipping operation, the team at Biz-Tech Services does exactly this. Visit biz-techservices.com to book a walkthrough and see your ShipStation shipments flow straight into Acumatica.
How to Connect ShipHero to Acumatica
How to Connect ShipHero to Acumatica
Link your warehouse management system to your ERP so orders, shipments, receipts, and inventory stay in sync automatically.
When your warehouse and your books don't agree
If you fulfill orders out of a warehouse, you're probably running ShipHero for the picking, packing, and shipping, and Acumatica for your inventory and your books. The trouble is keeping the two in step. Shipments happen in ShipHero, but the stock counts and the accounting live in Acumatica, and reconciling them by hand is slow and easy to get wrong.
The Biz-Tech ShipHero integrator ties your warehouse and your ERP together, so orders, shipments, purchase orders, receipts, and inventory movements flow between them automatically. Let's walk through how you connect them.
What ShipHero brings to the table
ShipHero integration is a warehouse management and fulfillment system, often shortened to W-M-S. It runs the physical side of your operation. The integration links it to Acumatica so the two share data in real time instead of working in isolation.
Step one: enter your ShipHero credentials
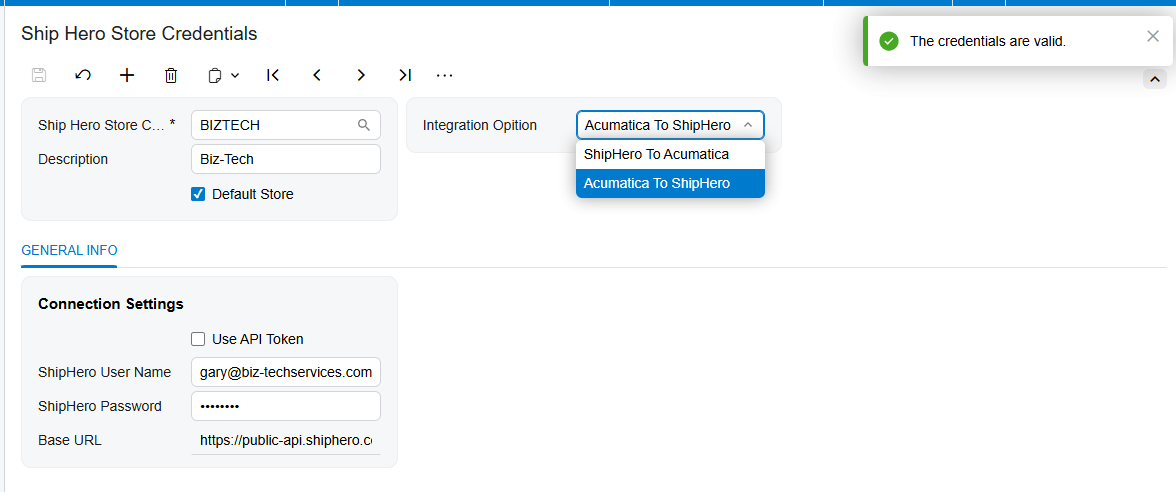
Setup starts with credentials. Once the connector is installed, a ShipHero workspace appears inside Acumatica. On the ShipHero Store screen you enter your ShipHero username, password, and web address, then press Test Credentials. When the connection succeeds, your warehouse is linked and you can decide how the two systems should work together.
Choosing your direction
The connector runs in two directions, and you pick the one that matches your business. In the first mode, ShipHero to Acumatica, the warehouse is where orders are fulfilled, and the connector brings the shipped orders, labels, and tracking numbers back into Acumatica. In the second mode, Acumatica to ShipHero, you create the orders in Acumatica and send them out to ShipHero to be shipped, then pull the shipments back. You choose the workflow that fits how you actually operate. The configuration field is added on the header.
Lining up the building blocks
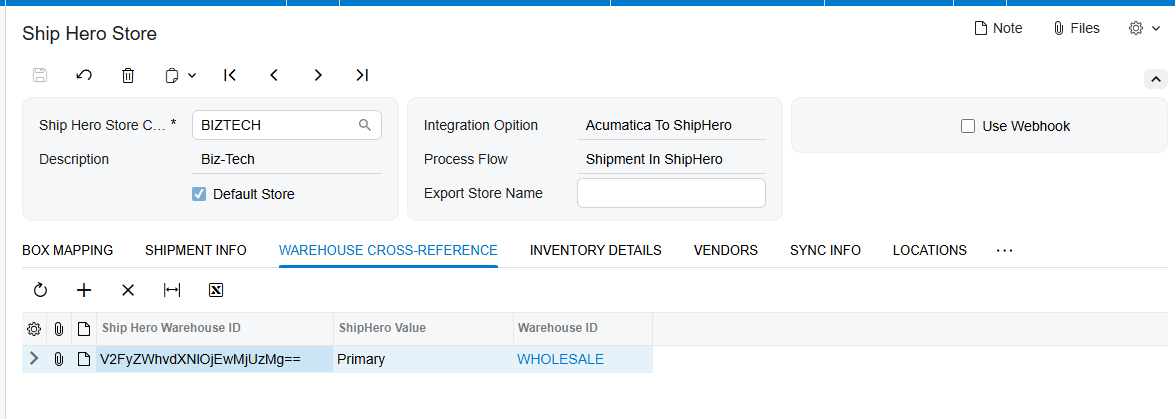
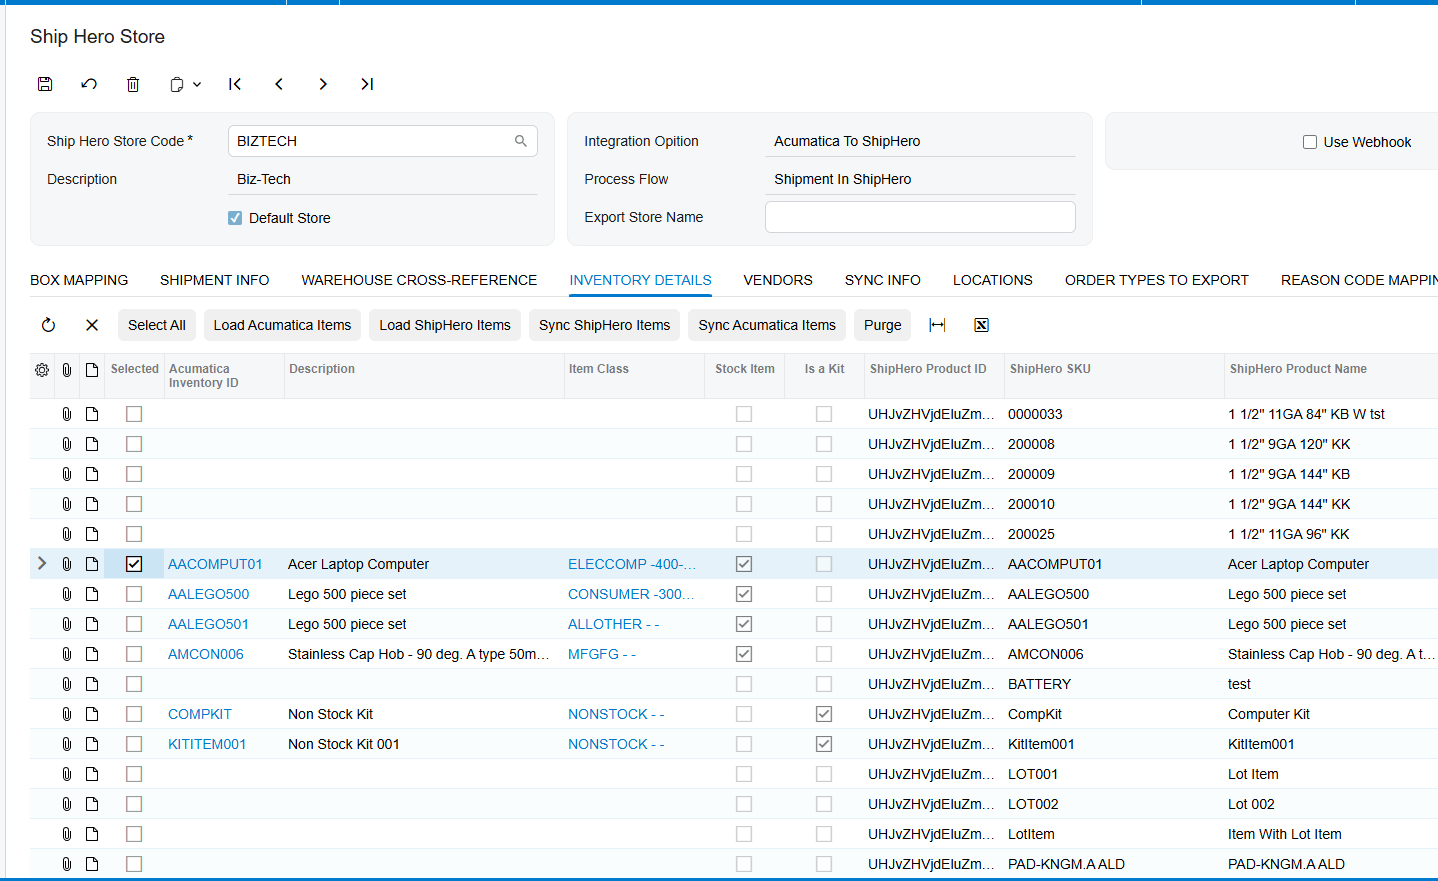
Next you connect the things the two systems share. You map your ShipHero warehouses to your Acumatica warehouses, and your shipping methods to your Acumatica ship-vias, so everything lands in the right place. You sync your items between the systems, matched up by their SKU, and when an item is tied to a vendor, that vendor information comes across with it. And if you manage stock by bin, you can map your sellable and non-sellable locations so quantities are tracked exactly where they sit. You also decide which quantity the connector reports to the warehouse, whether that's on hand, available, or available for shipment, and whether it sends your standard price or your M-S-R-P.
Orders and shipments
With that foundation in place, the day-to-day flow takes care of itself. Orders move between the systems based on the direction you chose, and shipments come back automatically. When a shipment is imported from ShipHero, the connector brings it into Acumatica and confirms it, matched to the right sales order, with the tracking number already attached.
Purchase orders and receipts
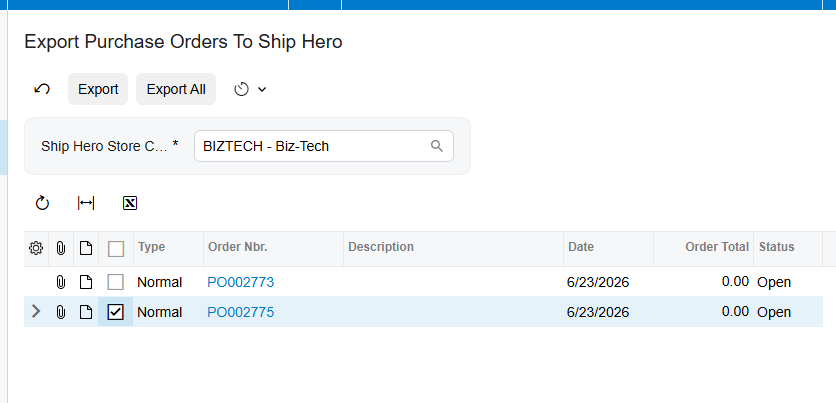
Your inbound side is covered too. You can export your Acumatica purchase orders to ShipHero, and as the warehouse receives the goods, the connector imports those receipts back, updating the received quantities on your purchase orders and releasing them if you choose. So your incoming stock is recorded the moment it lands on the dock. Have a Purchase Order document with Export to ShipHero checkbox added and PO Receipt Entered, to have that record on the processing screen..
Inventory movements in real time
Inventory movements stay in sync as well. When stock is transferred between locations inside the warehouse, the connector imports those bin transfers and updates the quantities in Acumatica. And if you turn on webhooks, all of this happens the instant it happens in ShipHero. New shipments, purchase order receipts, transfers, and returns flow into Acumatica in real time, with no waiting and no manual pull.
A system that reconciles itself
The result is a connection that keeps itself honest. Shipments are matched to their orders, receipts update your purchase orders, and every inventory movement is reflected in Acumatica, so your stock counts and your books always agree with what physically happened in the warehouse.
The bottom line
Once it's connected, ShipHero and Acumatica work as one. Orders, shipments, purchase orders, receipts, and inventory all stay aligned, and your team stops reconciling spreadsheets and gets back to moving product.
If you'd like help connecting your own warehouse, the team at Biz-Tech Services does exactly this. Visit biz-techservices.com to book a walkthrough and see your ShipHero fulfillment flow straight into Acumatica.
How to Connect Magento to Acumatica
How to Connect Magento to Acumatica
Link your Magento store to your ERP so orders, products, customers, inventory, and fulfillment stay in sync — automatically.
When your store and your ERP don't talk
If you sell on Magento and run your business on Acumatica, you're keeping two systems in step by hand. Orders arrive on your store, and someone re-enters them into Acumatica. Stock counts drift apart. A product stays listed online after you've sold out. It's slow work, and every manual step is a chance for a costly mistake.
The Biz-Tech Magento Connector closes that gap. It links your Magento store and Acumatica so orders, products, customers, inventory, and fulfillment flow between them automatically. Let's walk through how you connect the two.
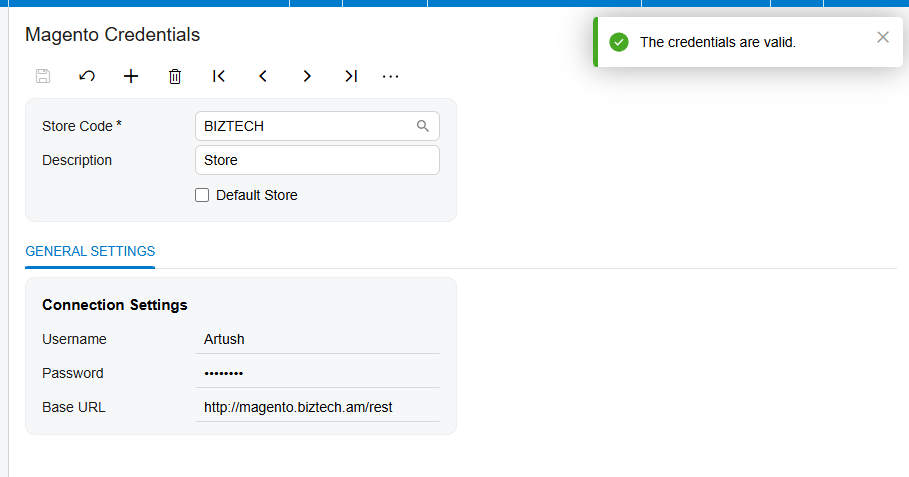
Step one: enter your Magento credentials
The connection runs through Magento's API, so setup starts with credentials. Once the connector is installed, a Magento workspace appears inside Acumatica. On the Magento Credentials screen you enter your store's username, password, and web address, and then you press Test Credentials. When the connection succeeds, your store is linked and you're ready to configure how it behaves.
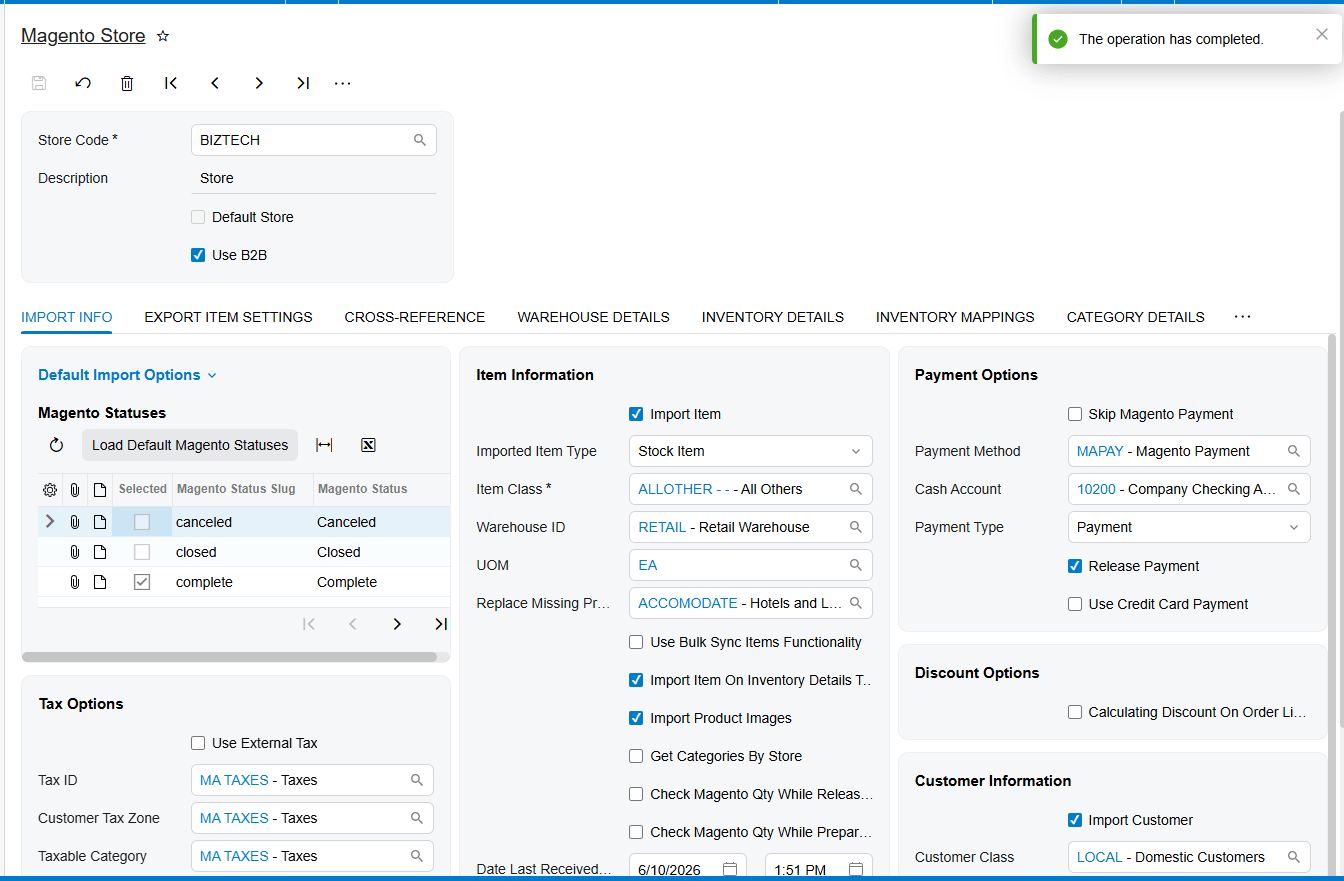
Setting up the Magento Store
The Magento Store screen is the control center for the whole integration. This is where you decide how orders come in, including which Acumatica document they become and the default order type. You also set the defaults for new records, like the customer class for new customers, the item settings for new products, your tax handling, and how payments are treated. Configure this once, and everything downstream follows your rules.
Bringing orders in
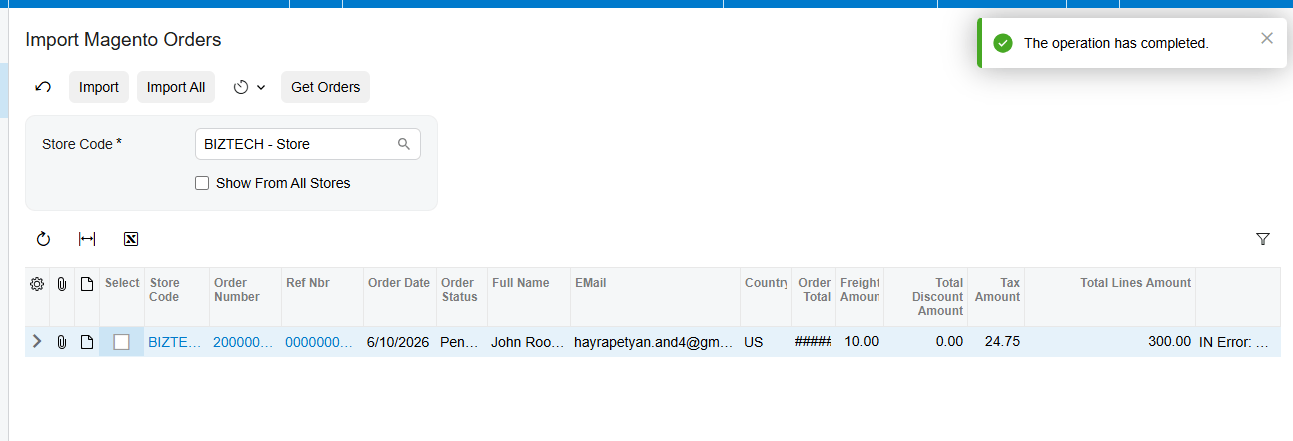
With that in place, importing orders is simple. On the Import Magento Orders screen you press Get Orders, and the connector retrieves your Magento orders for the period you choose, based on their status, like processing, pending, or partially shipped. From there you import them one at a time or all at once, and you can put it on a schedule so new orders come in on their own.
Keeping customers connected
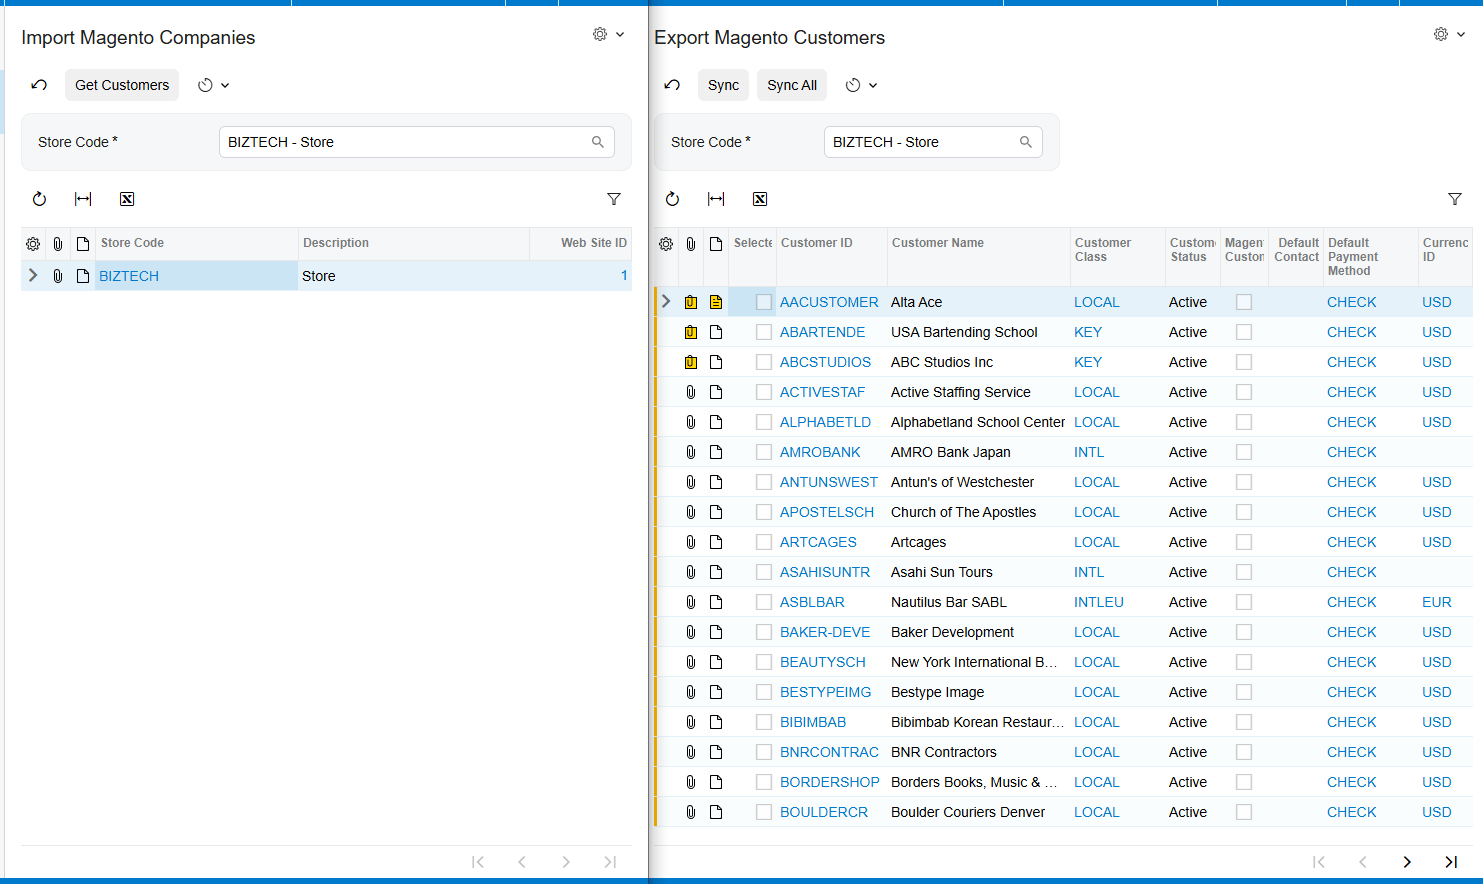
Customers stay in sync too. When an order arrives, the connector can create or match the customer in Acumatica, applying a default class to anyone new. And it works the other way as well: you can export customers from Acumatica to Magento, and it lines up your Magento customer groups with your Acumatica price classes, so each buyer sees the right pricing.
Syncing products, categories, prices, and images
Your catalog stays aligned in both directions. You can push Acumatica items out to Magento or pull Magento items in, matched up by their SKU, and publish or unpublish them to control what's for sale. Product categories sync across as well, so your store stays organized. And the details that matter for selling come along too your prices, including customer-specific and volume pricing, and your product images all export to Magento right alongside the items.
Inventory that stays accurate
Once your products are connected, keeping quantities aligned is automatic. From the inventory screen, the connector sends your Acumatica stock levels to Magento, using the combined total across the warehouses you choose and the measure you prefer, like on hand or available. That's what keeps you from selling something you no longer have.
Closing the loop with fulfillment
Fulfillment flows back automatically. When you confirm a shipment in Acumatica and prepare the invoice, the connector creates the matching fulfillment in Magento, and it can notify your customer that the order is on its way. The order is marked shipped on both sides, with no one logging into Magento to do it by hand.
Handling refunds
Refunds are handled end to end. You import refunded orders from Magento, and the connector responds based on how far the order has gone, whether that's creating a customer refund payment, reducing the refunded quantity on a partial refund, or issuing a credit memo once the order has been invoiced. Either way, your books stay in step with what actually happened on the store.
The bottom line
Once it's connected, your Magento store and your Acumatica system work as one. Orders flow in, the catalog and customers stay aligned, inventory stays accurate, and fulfillment and refunds take care of themselves. Your team stops re-keying data and gets back to growing the business.
If you'd like help connecting your own store, the team at Biz-Tech Services does exactly this. Visit biz-techservices.com to book a walkthrough and see your Magento orders flow straight into Acumatica.
How to Connect Amazon Seller Central to Acumatica
How to Connect Amazon Seller Central to Acumatica
Link Amazon to your ERP so orders, inventory, fulfillment, and refunds sync automatically — across both FBM and FBA.
Why Amazon is hard on your back office
Selling on Amazon is great for reach, but it's tough on your back office. Orders pour in, and someone has to move every one of them into Acumatica. Some you ship yourself, and some Amazon ships for you out of its own warehouses, and those two paths work completely differently. Do all of that by hand and it's slow, easy to get wrong, and almost impossible to keep your stock numbers straight.
The Amazon Connector of Biz-Tech Services, Inc. takes that work off your plate. It links Amazon Seller Central to Acumatica so orders, inventory, fulfillment, and refunds flow between them automatically, for both fulfillment models. Let's walk through how you connect them.
How the connection works
One thing worth knowing up front: the connector talks to Amazon through a secure intermediate server that Biz-Tech Services, Inc. runs. Acumatica connects to that server, and the server handles the conversation with Amazon integration. You don't have to manage any of that plumbing yourself. You just set up the connection once.
Step one: authorize Biz-Tech in Seller Central
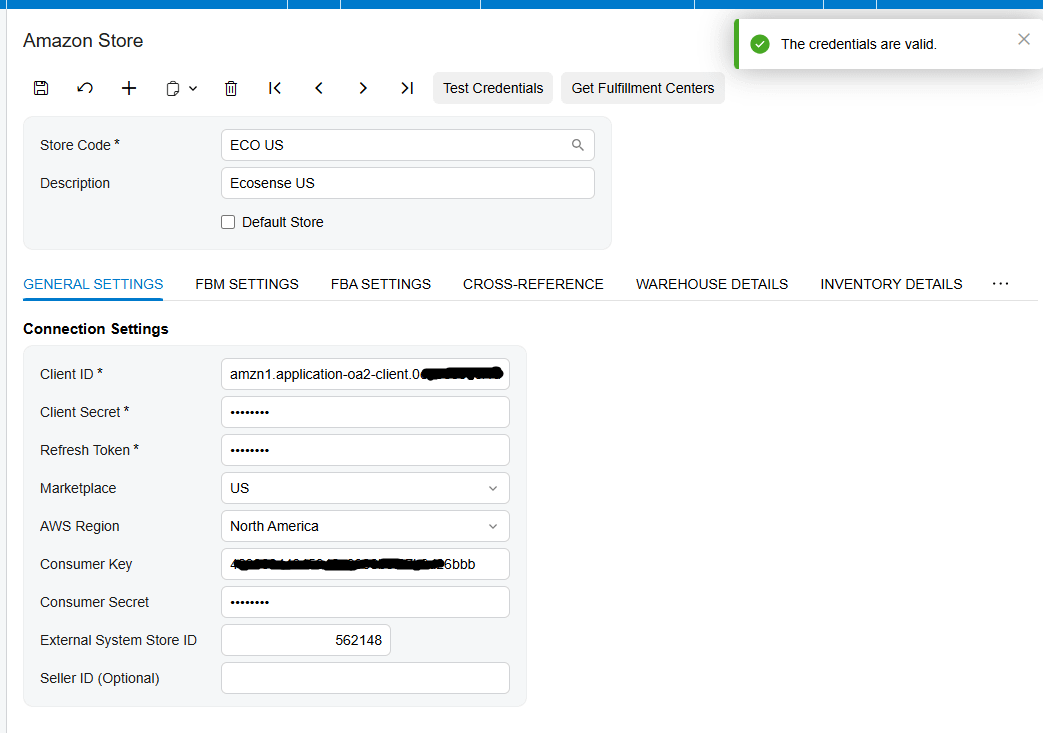
Setup begins in Amazon Seller Central, where you give Biz-Tech permission to connect. In your Seller Central settings you authorize a new developer, enter Biz-Tech's developer name and ID number, and accept the agreement. Amazon then generates your credentials: a Seller ID, a Marketplace ID, and an authorization token.
You take those credentials into the Amazon Store screen in Acumatica, along with your marketplace and region, and test the connection. Once it succeeds, your store is linked, and you can set your defaults, like the order type and the warehouse new orders should use.

Two ways to sell: FBM and FBA
Amazon selling comes in two flavors, and the connector handles both. FBM, or Fulfillment by Merchant, means you store and ship the orders yourself. FBA, or Fulfillment by Amazon, means Amazon holds your inventory in its centers and ships on your behalf. Each one has its own setup, so let's take them in turn. For FBM process confirmations, you ca nuse the Export FBM PO Acknowledgement process.

Bringing in your own shipped orders
For merchant-fulfilled orders, the connector pulls your Amazon orders in and creates them as sales orders or invoices in Acumatica. It can create the customer on the fly if they don't exist yet, bring in the tax and payment details, and assign a default warehouse. The key to clean orders is SKU mapping. Through the Inventory Details tab, each Amazon SKU is matched to an Acumatica inventory item, and you can pull products in by their SKU or their ASIN, so every order line lands on the right product.

Confirming and fulfilling
From there, fulfillment follows a clear path. You send Amazon a purchase order acknowledgement to confirm you've received the order, then you create the shipment, add the tracking number, and confirm it. When you prepare the invoice, the connector reports that fulfillment back to Amazon automatically, so the order is marked shipped on Amazon's side without you ever logging in.
Letting Amazon do the shipping
Fulfillment by Amazon integration works differently, because the goods move into Amazon's centers. Here the connector imports your FBA orders as invoices, and it imports the shipments you send to Amazon as transfer orders, mapping each Amazon fulfillment center to the Acumatica warehouse the stock ships from. As deliveries are confirmed, they come in as receipts at the destination warehouse, so your inventory reflects where everything actually is. It even checks received quantities against shipped quantities and flags any mismatch, so discrepancies get caught instead of quietly throwing your counts off.
Keeping inventory honest
In both models, your stock levels stay aligned. From the inventory screen, the connector sends your Acumatica quantities up to Amazon, using the combined total across the warehouses you choose, and whichever measure you prefer, like on hand or available. That's what keeps you from overselling something you no longer have.


Handling refunds
Refunds are handled end to end. You import refunded orders from Amazon, and the connector does the right thing based on how far the order has progressed, whether that's creating a customer refund payment, removing a shipment that wasn't confirmed yet, or issuing a credit memo if the order was already invoiced. Each refund uses an adjustment reason, so your records stay clean and easy to audit.
One clear picture
And to keep an eye on all of it, there's a single view that shows your merchant-fulfilled and Amazon-fulfilled orders side by side, plus a warehouse quantities screen for tracking what's where. So even across two fulfillment models, you always have one clear picture of your Amazon business.
The bottom line
Once it's connected, Amazon Seller Central and Acumatica work as one. Orders flow in, fulfillment flows back, inventory stays honest across both models, and refunds take care of themselves. Your team stops re-keying Amazon orders and gets back to selling.
If you'd like help connecting your own Seller Central account, the team at Biz-Tech Services does exactly this. Visit biz-techservices.com to book a walkthrough and see your Amazon orders flow straight into Acumatica.
How to Connect Amazon Seller Central to Acumatica
Link Amazon to your ERP so orders, inventory, fulfillment, and refunds sync automatically — across both FBM and FBA.
Why Amazon is hard on your back office
Selling on Amazon is great for reach, but it's tough on your back office. Orders pour in, and someone has to move every one of them into Acumatica. Some you ship yourself, and some Amazon ships for you out of its own warehouses, and those two paths work completely differently. Do all of that by hand and it's slow, easy to get wrong, and almost impossible to keep your stock numbers straight.
The Amazon Connector of Biz-Tech Services, Inc. takes that work off your plate. It links Amazon Seller Central to Acumatica so orders, inventory, fulfillment, and refunds flow between them automatically, for both fulfillment models. Let's walk through how you connect them.
How the connection works
One thing worth knowing up front: the connector talks to Amazon through a secure intermediate server that Biz-Tech Services, Inc. runs. Acumatica connects to that server, and the server handles the conversation with Amazon integration. You don't have to manage any of that plumbing yourself. You just set up the connection once.

Step one: authorize Biz-Tech in Seller Central
Setup begins in Amazon Seller Central, where you give Biz-Tech permission to connect. In your Seller Central settings you authorize a new developer, enter Biz-Tech's developer name and ID number, and accept the agreement. Amazon then generates your credentials: a Seller ID, a Marketplace ID, and an authorization token.
You take those credentials into the Amazon Store screen in Acumatica, along with your marketplace and region, and test the connection. Once it succeeds, your store is linked, and you can set your defaults, like the order type and the warehouse new orders should use.

Two ways to sell: FBM and FBA
Amazon selling comes in two flavors, and the connector handles both. FBM, or Fulfillment by Merchant, means you store and ship the orders yourself. FBA, or Fulfillment by Amazon, means Amazon holds your inventory in its centers and ships on your behalf. Each one has its own setup, so let's take them in turn. For FBM process confirmations, you ca nuse the Export FBM PO Acknowledgement process.

Bringing in your own shipped orders
For merchant-fulfilled orders, the connector pulls your Amazon orders in and creates them as sales orders or invoices in Acumatica. It can create the customer on the fly if they don't exist yet, bring in the tax and payment details, and assign a default warehouse. The key to clean orders is SKU mapping. Through the Inventory Details tab, each Amazon SKU is matched to an Acumatica inventory item, and you can pull products in by their SKU or their ASIN, so every order line lands on the right product.

Confirming and fulfilling
From there, fulfillment follows a clear path. You send Amazon a purchase order acknowledgement to confirm you've received the order, then you create the shipment, add the tracking number, and confirm it. When you prepare the invoice, the connector reports that fulfillment back to Amazon automatically, so the order is marked shipped on Amazon's side without you ever logging in.
Letting Amazon do the shipping
Fulfillment by Amazon integration works differently, because the goods move into Amazon's centers. Here the connector imports your FBA orders as invoices, and it imports the shipments you send to Amazon as transfer orders, mapping each Amazon fulfillment center to the Acumatica warehouse the stock ships from. As deliveries are confirmed, they come in as receipts at the destination warehouse, so your inventory reflects where everything actually is. It even checks received quantities against shipped quantities and flags any mismatch, so discrepancies get caught instead of quietly throwing your counts off.
Keeping inventory honest
In both models, your stock levels stay aligned. From the inventory screen, the connector sends your Acumatica quantities up to Amazon, using the combined total across the warehouses you choose, and whichever measure you prefer, like on hand or available. That's what keeps you from overselling something you no longer have.


Handling refunds
Refunds are handled end to end. You import refunded orders from Amazon, and the connector does the right thing based on how far the order has progressed, whether that's creating a customer refund payment, removing a shipment that wasn't confirmed yet, or issuing a credit memo if the order was already invoiced. Each refund uses an adjustment reason, so your records stay clean and easy to audit.
One clear picture
And to keep an eye on all of it, there's a single view that shows your merchant-fulfilled and Amazon-fulfilled orders side by side, plus a warehouse quantities screen for tracking what's where. So even across two fulfillment models, you always have one clear picture of your Amazon business.
The bottom line
Once it's connected, Amazon Seller Central and Acumatica work as one. Orders flow in, fulfillment flows back, inventory stays honest across both models, and refunds take care of themselves. Your team stops re-keying Amazon orders and gets back to selling.
If you'd like help connecting your own Seller Central account, the team at Biz-Tech Services does exactly this. Visit biz-techservices.com to book a walkthrough and see your Amazon orders flow straight into Acumatica.

Acumatica Cloud ERP: The Practical ERP Platform for Growing Businesses

Acumatica Cloud ERP: The Practical ERP Platform for Growing Businesses
Modern businesses do not need more disconnected software. They need one reliable operating system for finance, operations, inventory, sales, purchasing, projects, reporting, automation, and growth. That is exactly why more companies are searching for Acumatica, Acumatica ERP, Acumatica Cloud ERP, and cloud ERP software for growing businesses.
Acumatica is not just another ERP system. It is a modern cloud ERP platform designed for companies that have outgrown spreadsheets, entry-level accounting tools, manual workflows, disconnected eCommerce systems, isolated warehouse processes, and fragmented reporting. For growing organizations, Acumatica provides a practical way to bring finance, operations, inventory, customer management, reporting, field service, distribution, manufacturing, construction, retail, and project accounting into one connected business management system.
The real value of Acumatica ERP is not only in its modules. The real value is in the way the platform helps companies operate with more visibility, more control, more flexibility, and less unnecessary complexity. A company that runs on disconnected tools usually spends too much time correcting data, reconciling reports, manually updating systems, and chasing operational truth. Acumatica helps replace that fragmented model with a single cloud ERP environment where people, processes, and data work together.
This is why Acumatica has become one of the most important ERP options for small and midmarket businesses, distribution companies, manufacturing businesses, construction firms, retail operations, eCommerce brands, project-based companies, field service organizations, and professional services teams. Companies searching for best ERP for growing business, cloud ERP for midmarket, Acumatica implementation partner, Acumatica ERP integration, Acumatica consulting, Acumatica customization, and ERP software for small and medium businesses are usually looking for the same thing: a system that can scale without becoming too heavy, too expensive, or too difficult to adapt.
Acumatica is built around that need.
It offers cloud ERP functionality, flexible deployment options, integrated applications, open APIs, low-code and no-code customization, reporting, dashboards, mobile access, workflow automation, industry editions, and a pricing philosophy that is especially attractive for growing companies. The result is an ERP platform that feels practical rather than rigid, modern rather than outdated, and scalable rather than restrictive.
For businesses that want a stronger ERP foundation, Acumatica is one of the most reasonable choices in the market.
Why Businesses Outgrow Basic Accounting and Disconnected Tools
Many companies begin with simple tools. They use basic accounting software, spreadsheets, shared folders, manual reports, separate inventory systems, standalone CRM tools, eCommerce plugins, payment portals, warehouse spreadsheets, and email-based approvals. At the beginning, this can work. The team is small. The order volume is manageable. Finance can still reconcile manually. Operations can still remember exceptions. Managers can still ask someone for the latest number.
But growth changes everything.
As sales increase, the business becomes harder to control. Inventory gets more complex. Purchasing becomes more sensitive. Customer expectations rise. Warehouse activity increases. Projects become more difficult to track. Reporting becomes slower. Errors become more expensive. Manual work becomes more dangerous. And the business begins to ask the same questions again and again:
- Which numbers are correct?
- Which inventory quantity is real?
- Which orders are delayed?
- Which customers are profitable?
- Which invoices are open?
- Which warehouse has stock?
- Which project is over budget?
- Which process is slowing us down?
- Which report can leadership trust?
This is the point where the business needs more than accounting software. It needs ERP software. More specifically, it needs a modern cloud ERP system that connects business functions into one operating environment.
That is where Acumatica Cloud ERP becomes important.
Acumatica helps companies move beyond isolated systems and create one connected environment for financial management, order management, inventory management, purchasing, warehouse operations, CRM, project accounting, reporting, dashboards, field service, manufacturing, distribution, construction, retail, commerce, and automation.
Instead of having one system for sales, another for accounting, another for inventory, another for eCommerce, and another for reporting, Acumatica gives businesses a more unified structure. This does not mean every company must use every Acumatica module immediately. It means the platform can grow with the company and support more processes over time.
That is a major advantage for companies that want ERP to become a long-term business foundation.
What Is Acumatica ERP?
Acumatica ERP is a cloud-based enterprise resource planning platform designed to help businesses manage core operations from one integrated system. It brings together financial management, inventory, sales orders, purchasing, CRM, reporting, dashboards, project accounting, field service, distribution, manufacturing, construction, retail, commerce connectors, warehouse management, payments, payroll, and other business capabilities.
For a growing company, this matters because every department depends on shared data.
Finance needs accurate transactions. Sales needs customer and order visibility. Operations needs inventory and workflow control. Warehouse teams need real-time stock information. Management needs dashboards and KPIs. Project teams need job costing and budget visibility. Manufacturing teams need production and material control. Construction teams need project accounting and field coordination. eCommerce teams need clean integration between storefronts and ERP.
Acumatica connects these areas so that the business can operate from one source of truth.
That is the basic promise of Acumatica Cloud ERP: one modern ERP platform for growing businesses that need flexibility, scalability, visibility, and control.
Why Acumatica Is Different from Traditional ERP
Traditional ERP systems often have a reputation for being heavy, expensive, difficult to customize, slow to implement, and hard for users to adopt. In large enterprise environments, that level of structure may be acceptable. But for many small and midmarket businesses, traditional ERP can feel excessive.
Acumatica takes a different approach.
The platform is designed to be more flexible, more open, and more practical for growing companies. It supports modern cloud ERP needs while also giving businesses room to customize workflows, build dashboards, integrate systems, and scale usage as the company grows.
The key difference is not only technology. It is philosophy.
Acumatica is built around practical business usability. It is designed for companies that need ERP power without unnecessary enterprise weight. It gives organizations the ability to manage complex operations, but it does not force them into the same kind of rigid ERP model that many legacy platforms are known for.
This is why search terms like Acumatica ERP, Acumatica Cloud ERP, cloud ERP for small business, cloud ERP for midmarket, ERP software for growing companies, and modern ERP system are so relevant. Companies are looking for a better ERP experience. Acumatica is one of the platforms that directly answers that demand.
Acumatica Pricing: Why Unlimited Users Matter
One of the most important reasons companies choose Acumatica is its pricing philosophy.
Many ERP systems use user-based pricing. That means the more people need access, the more expensive the system becomes. For a growing business, this creates the wrong incentive. The business wants more people working inside ERP, but the pricing model pushes leadership to limit access.
That can damage adoption.
When ERP access is restricted, people create workarounds. They use spreadsheets. They ask licensed users for reports. They rely on exported data. They track exceptions outside the system. They wait for someone else to update records. Over time, the ERP becomes less central than it should be.
Acumatica’s unlimited user pricing philosophy is a major advantage because it supports broad adoption. Instead of asking, “Who can we keep out of the ERP to control license cost?” a company can ask, “Who should be using Acumatica to improve visibility and efficiency?”
That is a much better question.
For growing companies, broad ERP access is extremely important. Finance, operations, warehouse teams, sales managers, project managers, executives, customer service teams, purchasing teams, field service teams, and production supervisors all need access to accurate data. When more people can work inside the system, the data becomes stronger. When the data becomes stronger, reporting becomes more trustworthy. When reporting becomes more trustworthy, leadership makes better decisions.
This is why Acumatica unlimited users, Acumatica pricing, cloud ERP pricing, ERP cost comparison, ERP without user-based pricing, and unlimited user ERP are such important SEO keywords. They are not just search terms. They reflect one of the biggest practical advantages of Acumatica.
Acumatica’s pricing model makes it easier for companies to scale ERP usage across the organization without turning every new user into a cost problem.
Acumatica Cloud ERP Platform: Open, Flexible, and Built for Integration
A modern ERP system cannot be closed. No serious business runs on ERP alone. Companies need ERP to connect with eCommerce platforms, payment gateways, marketplaces, warehouse systems, shipping carriers, tax tools, CRM platforms, BI tools, customer portals, vendor portals, field service apps, and custom business applications.
This is one of Acumatica’s major strengths.
The Acumatica Cloud ERP platform supports open architecture, APIs, webhooks, developer tools, low-code and no-code customization, configurable workflows, dashboards, reports, and role-based personalization. This makes Acumatica a strong foundation for businesses that need ERP integration, eCommerce automation, payment integration, marketplace synchronization, warehouse automation, and custom workflow development.
Companies searching for Acumatica API, Acumatica integration, Acumatica webhooks, Acumatica customization, Acumatica developer, Acumatica automation, Acumatica eCommerce integration, and Acumatica ERP integration partner are usually trying to solve a very specific problem: they need ERP to work with the rest of their technology stack.
Acumatica is well suited for that.
An eCommerce company may need Shopify, WooCommerce, Amazon, BigCommerce, Magento, or other commerce systems connected to ERP. A distributor may need EDI, warehouse management, shipping integration, and customer portals. A manufacturer may need production data, purchasing workflows, inventory visibility, and shop floor processes connected. A service company may need field service automation. A construction company may need project accounting, document management, payroll, and job costing workflows.
Acumatica can serve as the central operating platform that connects these processes.
This is also where an experienced Acumatica implementation and integration partner becomes valuable. A company like BizTech can help businesses design and implement Acumatica integrations, build custom workflows, connect external systems, create dashboards, automate data flows, and make the ERP fit real operational needs.
Acumatica is powerful as software. It becomes even more valuable when implemented and integrated correctly.
Acumatica Financial Management
Financial management is one of the core reasons businesses implement ERP. As companies grow, finance teams need more than basic bookkeeping. They need accurate reporting, multi-entity visibility, accounts payable, accounts receivable, cash management, general ledger, financial dashboards, intercompany accounting, project financials, budgeting, and real-time decision support.
Acumatica Financial Management gives businesses a stronger financial foundation.
Instead of relying on disconnected accounting tools and manual spreadsheets, companies can use Acumatica to manage finance inside the same environment as operations, inventory, purchasing, sales, projects, and reporting. This creates better alignment between transactions and business activity.
For example, sales orders can connect to receivables. Inventory movements can affect financial reporting. Purchasing activity can connect to payables. Project costs can connect to financial performance. Payment workflows can be integrated into accounting. Management can view financial dashboards without waiting for manual reporting cycles.
This is why keywords like Acumatica financial management, Acumatica accounting software, cloud ERP accounting, ERP financial management, Acumatica accounts payable, Acumatica accounts receivable, Acumatica general ledger, and Acumatica multi-entity accounting matter for SEO. Many companies start searching for Acumatica when their accounting system can no longer support operational growth.
Acumatica helps finance become more connected to the rest of the business.
Acumatica Inventory Management
Inventory accuracy is one of the most important operational challenges for growing companies. If inventory data is wrong, everything else suffers. Sales teams promise products that are unavailable. Purchasing teams buy too much or too little. Warehouse teams waste time correcting errors. Customers experience delays. Finance struggles to trust cost and margin reporting.
Acumatica Inventory Management helps companies manage stock, warehouses, replenishment, item records, order fulfillment, purchasing, availability, and inventory visibility from one ERP environment.
For distributors, manufacturers, retailers, and eCommerce businesses, inventory is not just a number. It is a promise to the customer. A company must know what is available, where it is located, what is reserved, what is on order, what is committed, and what can be shipped.
This is where Acumatica becomes extremely valuable.
Acumatica can help businesses improve inventory control, reduce manual updates, support multi-warehouse visibility, improve purchasing decisions, support order fulfillment, and connect inventory data to sales, finance, and operations.
Relevant SEO keywords include Acumatica inventory management, cloud inventory management, ERP inventory software, Acumatica warehouse management, Acumatica WMS, multi-warehouse inventory ERP, inventory visibility ERP, Acumatica order management, and inventory control software for growing business.
For companies with complex stock movement, Acumatica provides the operational structure needed to reduce inventory confusion and improve decision-making.
Acumatica Distribution Management
Distribution companies need ERP that can handle purchasing, inventory, sales orders, replenishment, warehouse operations, pricing, customer service, margin analysis, shipping, returns, and multi-location workflows.
Acumatica Distribution Management is designed for this kind of operational complexity.
A distributor must know which products are available, which orders are ready, which items need replenishment, which customers are profitable, which warehouses are performing well, and which purchasing decisions affect cash flow. Without integrated ERP, these answers often live across spreadsheets, emails, warehouse systems, accounting tools, and manual reports.
Acumatica brings these workflows together.
For distributors searching Acumatica distribution ERP, distribution ERP software, wholesale distribution ERP, cloud ERP for distributors, inventory and order management ERP, Acumatica warehouse management, Acumatica purchasing, and ERP for wholesale business, Acumatica is a strong option because it combines operational control with flexible cloud architecture.
Distribution businesses also benefit heavily from Acumatica’s unlimited user model. Warehouse staff, buyers, sales teams, finance, management, and customer service can all use the system without forcing the company to ration access.
That supports better adoption and better data.
Acumatica Manufacturing Management
Manufacturing companies need ERP that supports production planning, purchasing, inventory, BOMs, routing, scheduling, costing, material control, quality processes, shop floor visibility, sales orders, and financial reporting.
Acumatica Manufacturing Management helps manufacturers connect production with the rest of the business.
Manufacturing cannot operate in isolation. Production depends on purchasing. Purchasing depends on demand. Demand depends on sales. Inventory affects production schedules. Production affects costing. Costing affects profitability. Finance needs accurate operational data. Management needs visibility into capacity, margins, constraints, and exceptions.
Acumatica gives manufacturers a platform to bring these processes together.
For companies searching Acumatica manufacturing ERP, cloud manufacturing ERP, ERP for manufacturers, manufacturing management software, Acumatica production management, Acumatica BOM, Acumatica shop floor, manufacturing ERP for midmarket, and best ERP for manufacturing company, Acumatica is a strong choice because it offers manufacturing capability inside a broader cloud ERP platform.
This is important because many manufacturers are no longer purely manufacturing businesses. They may also sell through eCommerce, manage distribution, provide services, support field operations, run multiple warehouses, or need integrations with external platforms. Acumatica’s flexible architecture makes it easier to support that kind of hybrid business model.
Acumatica Construction Management
Construction companies have specific ERP needs. They need job costing, project accounting, commitments, change orders, billing, payroll, field visibility, document workflows, subcontractor management, equipment tracking, and project financial reporting.
Acumatica Construction Management supports these needs by connecting financials, projects, field operations, reporting, and workflows.
For construction firms, the challenge is not only accounting. The challenge is controlling the entire project lifecycle. A construction business needs to know which jobs are profitable, which projects are over budget, which change orders are pending, which commitments are open, which invoices are ready, and which field activities affect project financials.
Acumatica helps construction companies bring these workflows into one ERP environment.
Important SEO keywords include Acumatica construction ERP, construction ERP software, cloud ERP for construction, job costing software, construction project accounting, Acumatica project accounting, ERP for contractors, construction financial management, and field service ERP.
Construction firms often suffer when office and field workflows are disconnected. Acumatica helps reduce that gap by giving project teams, finance, and management a more connected view of the business.
Acumatica Retail and eCommerce
Retail and eCommerce businesses move fast. They need accurate inventory, clean order processing, reliable product data, customer visibility, payment integration, warehouse coordination, and synchronized commerce workflows.
Acumatica Retail Management and Acumatica commerce capabilities help companies connect online and offline commerce with ERP operations.
Modern commerce businesses may sell through Shopify, WooCommerce, Amazon, BigCommerce, Magento, marketplaces, retail locations, B2B portals, and direct sales channels. Without integration, each channel becomes a separate source of work. Orders must be imported. Inventory must be updated. Payments must be reconciled. Product data must be maintained. Customer records must be matched. Shipping and fulfillment must be tracked.
Acumatica can serve as the central ERP system behind these channels.
SEO keywords include Acumatica eCommerce integration, Acumatica commerce connectors, Acumatica Shopify integration, Acumatica WooCommerce integration, Acumatica Amazon integration, Acumatica retail ERP, ERP for eCommerce, cloud ERP for online stores, eCommerce data sync, and Acumatica order sync.
With the right Acumatica implementation partner, businesses can automate order import, inventory sync, fulfillment updates, payment reconciliation, customer records, and reporting dashboards.
This is where BizTech can add major value by helping companies connect Acumatica with commerce platforms, marketplaces, and payment systems.
Acumatica Project Accounting
Project-based businesses need accurate visibility into budgets, costs, billing, resources, profitability, and project performance. This is true for construction companies, professional services firms, engineering businesses, agencies, implementation teams, field service organizations, and contractors.
Acumatica Project Accounting helps companies manage project financials inside the ERP.
A project can appear successful from a revenue perspective while losing money in labor, materials, delays, change orders, or unbilled work. Without integrated project accounting, these issues often appear too late.
Acumatica helps connect project activity to financial reporting, giving companies better visibility into project profitability.
Important SEO keywords include Acumatica project accounting, project accounting ERP, ERP for project-based business, professional services ERP, construction project accounting, job costing ERP, project profitability reporting, and Acumatica dashboards for projects.
For project-driven organizations, Acumatica can become the system that connects operational work to financial truth.
Acumatica CRM and Customer Management
Customer information is often scattered across sales tools, spreadsheets, emails, support systems, and accounting platforms. That creates problems. Sales cannot see payment status. Finance cannot see customer activity. Service teams cannot see order history. Management cannot see the full customer picture.
Acumatica CRM helps bring customer information closer to ERP operations.
This is important because customer management is not separate from finance and operations. Customer relationships depend on quotes, orders, invoices, payments, service history, support issues, shipments, and project activity.
Acumatica gives businesses a way to manage customer data in connection with the rest of the ERP.
SEO keywords include Acumatica CRM, ERP CRM integration, customer management ERP, Acumatica sales management, Acumatica customer records, ERP for sales and operations, and cloud ERP CRM.
For growing companies, this connection between customer management and operations is extremely valuable.
Acumatica Reporting, Dashboards, and Business Intelligence
ERP is not only about recording transactions. It is about making better decisions.
A growing business needs dashboards and reports that answer practical questions:
- What is revenue by channel?
- Which products are profitable?
- Which customers are overdue?
- Which orders are delayed?
- Which warehouses have stock issues?
- Which projects are over budget?
- Which invoices are unpaid?
- Which departments need attention?
- Which business units are growing?
- Which workflows are creating bottlenecks?
Acumatica Reporting, Dashboards, and BI help businesses turn ERP data into decisions.
Instead of waiting for manual reports, companies can create dashboards for executives, finance, sales, operations, warehouse teams, project managers, and service teams. This helps leadership see the business more clearly and helps teams act faster.
Relevant SEO keywords include Acumatica dashboards, Acumatica reporting, Acumatica BI, ERP dashboards, cloud ERP reporting, business intelligence ERP, Acumatica financial reports, Acumatica KPI dashboards, and real-time ERP reporting.
For many companies, dashboards are one of the most visible benefits of ERP. They turn Acumatica from a transaction system into a management system.
Acumatica Automation and Workflow Management
Manual workflows are expensive. They slow down the business, create errors, and make processes dependent on individual employees. As companies grow, manual work becomes a serious bottleneck.
Acumatica automation helps businesses create more consistent processes.
Workflows can support approvals, alerts, notifications, data updates, order processes, purchasing flows, service activity, project tracking, inventory movement, financial controls, and reporting exceptions.
This is especially important in companies where work crosses departments. For example, a sales order may affect inventory, warehouse picking, invoicing, payment, shipping, and reporting. If those steps are disconnected, the process becomes fragile. If those steps are connected through ERP workflows, the business becomes more reliable.
SEO keywords include Acumatica workflow automation, ERP automation, business process automation, Acumatica approval workflows, Acumatica alerts, Acumatica notifications, cloud ERP automation, and automated ERP workflows.
Automation is one of the biggest ways Acumatica helps companies reduce manual work and scale without adding unnecessary administrative burden.
Acumatica Integration with eCommerce, Payments, and Marketplaces
A modern business needs integrations. Acumatica is especially strong when used as the central ERP platform behind connected operations.
Common Acumatica integrations include:
- Shopify Acumatica integration;
- WooCommerce Acumatica integration;
- Amazon Acumatica integration;
- BigCommerce Acumatica integration;
- Magento Acumatica integration;
- PayPal Acumatica integration;
- payment gateway integrations;
- warehouse management integrations;
- shipping carrier integrations;
- CRM integrations;
- EDI integrations;
- BI and reporting integrations;
- custom API integrations.
These integrations matter because businesses need data to move accurately across systems. Orders should flow into ERP. Inventory should sync with storefronts. Payments should update accounting. Fulfillment data should return to customers. Marketplace activity should be visible. Warehouse systems should stay aligned with ERP. Reporting should include all channels.
This is where Acumatica integration services become valuable.
BizTech can help businesses design and implement Acumatica integrations that connect ERP with the tools they already use. This can include eCommerce automation, payment workflows, marketplace connectors, API-based data sync, dashboards, and custom business logic.
SEO keywords include Acumatica integration, Acumatica connector, Acumatica API integration, Acumatica implementation partner, Acumatica eCommerce connector, Acumatica payment integration, Acumatica marketplace integration, and BizTech Acumatica integration.
For many companies, the integration layer is where Acumatica becomes a true operating system.
Why Businesses Choose Acumatica
Companies choose Acumatica for many reasons, but the most common advantages are practical:
- flexible cloud ERP platform;
- unlimited user pricing philosophy;
- strong financial management;
- inventory and warehouse visibility;
- distribution management;
- manufacturing management;
- construction management;
- project accounting;
- CRM;
- reporting and dashboards;
- open APIs and webhooks;
- low-code and no-code customization;
- mobile access;
- integration readiness;
- customer-driven innovation;
- strong fit for growing businesses.
Acumatica is especially attractive for businesses that want ERP power without excessive complexity. It is not a lightweight accounting tool, but it is also not an unnecessarily heavy enterprise ERP system. It sits in the practical middle: strong enough to manage serious operations, flexible enough to adapt, and modern enough to support cloud-based business growth.
This is why companies searching for why choose Acumatica, Acumatica benefits, Acumatica advantages, Acumatica ERP review, best cloud ERP, ERP for growing company, ERP software for midmarket, and Acumatica implementation often find Acumatica to be one of the strongest options.
Why Acumatica Is a Strong Choice for Growing Businesses
Growing companies need ERP that can scale in a practical way.
They need a system that supports today’s needs but does not block tomorrow’s growth. They need to start with the right modules and add functionality over time. They need reporting that improves as the business becomes more complex. They need integrations that can expand as more systems are added. They need workflows that can evolve as departments mature.
Acumatica supports this kind of growth.
The platform can start with finance and inventory, then expand into distribution, manufacturing, construction, project accounting, CRM, warehouse management, field service, commerce connectors, reporting, payments, and automation.
That makes Acumatica a strong long-term ERP choice.
SEO keywords include ERP for growing business, scalable ERP software, cloud ERP for midmarket, Acumatica scalability, Acumatica cloud platform, future-ready ERP, and ERP digital transformation.
Growth is not just about adding more transactions. It is about adding complexity. Acumatica helps companies manage that complexity without losing control.
The Role of BizTech in Acumatica Implementation
Choosing Acumatica is important. Implementing it correctly is just as important.
A strong Acumatica project requires process understanding, configuration, data migration, customization, integration, dashboards, workflow design, user training, and ongoing support.
That is where BizTech can help.
BizTech works with businesses that need practical Acumatica implementation and integration support. The goal is not only to install software. The goal is to make Acumatica work for the way the company actually operates.
A BizTech-led Acumatica project can include:
- business process analysis;
- ERP requirements discovery;
- Acumatica implementation planning;
- system configuration;
- Acumatica customization;
- data migration;
- dashboard design;
- reporting setup;
- workflow automation;
- eCommerce integrations;
- payment integrations;
- marketplace integrations;
- API development;
- user training;
- post-go-live support;
- ongoing optimization.
For companies searching Acumatica implementation partner, Acumatica consultant, Acumatica integration partner, Acumatica customization services, Acumatica support, Acumatica ERP implementation, and BizTech Acumatica, this is the practical value: experienced implementation turns ERP software into business results.
Acumatica gives the platform. BizTech helps make it work in the real business environment.
Acumatica vs Legacy ERP
Many companies come to Acumatica because they are frustrated with legacy ERP systems.
Legacy ERP can be difficult to customize, expensive to maintain, hard to integrate, slow to report from, and unfriendly for users. It may require outdated infrastructure, specialized technical knowledge, manual workarounds, and limited access.
Acumatica offers a more modern alternative.
It gives businesses cloud ERP functionality, browser-based access, mobile support, flexible deployment, open integrations, dashboards, automation, and a more practical growth model.
SEO keywords include legacy ERP replacement, modern ERP system, cloud ERP migration, replace legacy ERP, Acumatica vs legacy ERP, ERP modernization, and digital transformation ERP.
For companies that feel trapped by older systems, Acumatica provides a path toward a more flexible and connected business platform.
Acumatica vs Basic Accounting Software
Some companies compare Acumatica not to another ERP, but to basic accounting software.
This usually happens when the business has grown beyond accounting-only needs. The company needs inventory, order management, purchasing, project accounting, CRM, manufacturing, warehouse management, field service, reporting, and integrations.
Basic accounting software can record financial activity. It usually cannot manage the full operational complexity of a growing company.
That is where Acumatica becomes necessary.
Acumatica gives businesses a complete ERP platform rather than a limited accounting tool. This helps companies manage operations and finance together.
SEO keywords include Acumatica vs QuickBooks, QuickBooks alternative, ERP vs accounting software, cloud ERP accounting, Acumatica accounting, business management software, and ERP for companies outgrowing QuickBooks.
For companies that are ready to move from accounting software to ERP, Acumatica is a strong next step.
Final Conclusion: Why Acumatica Is One of the Best ERP Choices for Growing Businesses
Acumatica is one of the most practical ERP platforms for growing companies because it combines modern cloud ERP functionality with flexible pricing, broad user access, open integrations, strong customization, dashboards, reporting, automation, and industry-specific capabilities.
It is powerful enough to support serious business operations, but flexible enough to adapt to the way companies actually work.
That is why businesses choose Acumatica Cloud ERP for financial management, distribution, manufacturing, construction, retail, project accounting, CRM, inventory, warehouse management, field service, eCommerce, payments, reporting, and automation.
The strongest reason to choose Acumatica is not one feature. It is the complete operating model.
Acumatica helps businesses:
- reduce disconnected systems;
- improve visibility;
- automate manual workflows;
- scale ERP access across teams;
- integrate eCommerce and payment systems;
- improve inventory control;
- strengthen financial reporting;
- connect operations and finance;
- support industry-specific workflows;
- build dashboards and analytics;
- adapt as the business changes.
For companies searching for Acumatica, Acumatica ERP, Acumatica Cloud ERP, cloud ERP software, ERP for growing business, Acumatica implementation, Acumatica integration, Acumatica consultant, Acumatica pricing, Acumatica unlimited users, Acumatica dashboards, Acumatica manufacturing, Acumatica distribution, Acumatica construction, and Acumatica eCommerce, the answer is clear:
Acumatica is a modern ERP platform built for businesses that want flexibility, visibility, and practical scalability.
And with BizTech as an Acumatica implementation and integration partner, companies can turn Acumatica from software into a connected business operating system.
That is the real value of Acumatica.
Not just ERP.
A better way to run and grow the business.
FAQ: Acumatica Cloud ERP
What is Acumatica?
Acumatica is a modern cloud ERP platform that helps businesses manage finance, inventory, purchasing, sales, manufacturing, distribution, construction, retail, project accounting, CRM, reporting, dashboards, and automation from one integrated system.
Is Acumatica good for growing businesses?
Yes. Acumatica is especially strong for growing businesses because it offers flexible cloud ERP functionality, unlimited user pricing philosophy, open APIs, dashboards, workflow automation, and industry-specific capabilities.
What industries use Acumatica?
Acumatica is used by companies in distribution, manufacturing, construction, retail, eCommerce, professional services, field service, agriculture, business services, software, technology, and other industries.
What are the main benefits of Acumatica ERP?
The main benefits of Acumatica ERP include cloud access, flexible pricing, unlimited users, integrated applications, financial management, inventory control, dashboards, reporting, workflow automation, APIs, customization, and scalability.
Does Acumatica support integrations?
Yes. Acumatica supports integrations through APIs, webhooks, developer tools, commerce connectors, and customization options. Businesses can integrate Acumatica with eCommerce platforms, payment systems, marketplaces, CRM tools, warehouse systems, shipping carriers, and custom applications.
Is Acumatica good for eCommerce?
Yes. Acumatica is a strong ERP option for eCommerce businesses because it can connect with platforms such as Shopify, WooCommerce, Amazon, BigCommerce, Magento, and payment systems. With the right implementation partner, Acumatica can support order sync, inventory sync, fulfillment updates, customer data, payment reconciliation, and reporting.
What is Acumatica implementation?
Acumatica implementation is the process of configuring and deploying Acumatica ERP for a business. It can include process analysis, data migration, module setup, customization, integration, dashboards, reporting, training, and post-go-live support.
Why work with an Acumatica implementation partner?
An Acumatica implementation partner helps ensure the system is configured around real business needs. A partner like BizTech can help with implementation, customization, integration, automation, reporting, dashboards, and long-term optimization.
Is Acumatica better than basic accounting software?
For growing businesses, yes. Basic accounting software can handle bookkeeping, but Acumatica provides broader ERP functionality, including inventory, purchasing, sales orders, CRM, project accounting, manufacturing, distribution, construction, reporting, and integrations.
Why choose Acumatica?
Companies choose Acumatica because it is flexible, modern, scalable, cloud-based, integration-friendly, customizable, and designed for growing businesses that need more than basic accounting software.
How to Connect Shopify to Acumatica
How to Connect Shopify to Acumatica
Link your Shopify store to your ERP so orders, products, inventory, customers, and fulfillment stay in sync — automatically.
Two systems that don't talk to each other
If you sell on Shopify and run your business on Acumatica, you're really running two systems that don't naturally talk to each other. Orders land in Shopify, and someone has to move them into Acumatica. Stock counts drift apart. A product keeps selling online after you've run out. Every manual handoff is slow, and every one is a chance for a mistake.
The Biz-Tech Shopify Connector ties the two together, so orders, products, inventory, customers, and fulfillment flow between them automatically. Let's walk through how you connect them.
Step one: enter your Shopify credentials
The connection starts with credentials. Once the connector is installed, a Shopify workspace appears inside Acumatica. You open the Shopify Store screen, add a new store, and enter the API credentials from your Shopify account. Then you press Test Credentials, and when the connection succeeds, the two systems are linked. From here you set a few ground rules, like whether this is your default store, whether you're running business-to-business, and whether orders should also export back to Shopify.
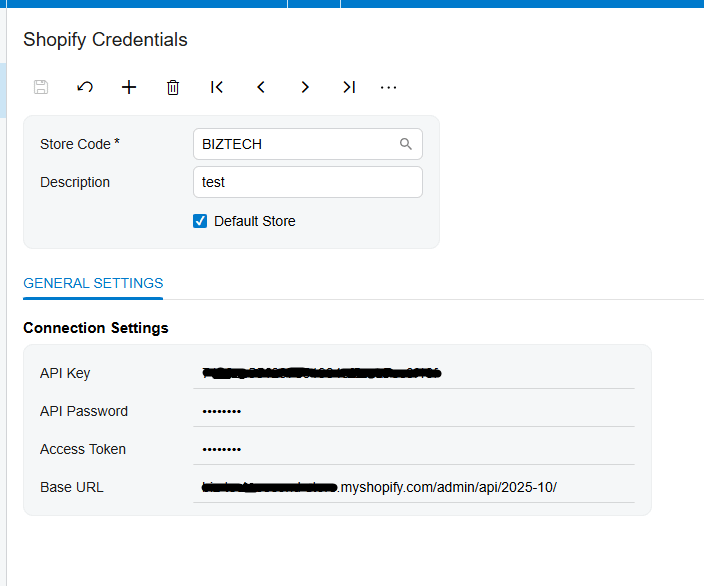
Setting up how orders come in
Next you decide how orders are handled. You choose whether each Shopify order becomes a sales order or an invoice in Acumatica, you pick the order financial statuses, and you select which order statuses to pull in, like fulfilled, unfulfilled, or partially fulfilled. You also set a start date so it only imports from the point you choose. Configure the “Begin Order Date” field for the 1st time order retrieval, and the “Last Imported Order Date” field will be updated to keep a date of the rrecently updated order to start the next order retrieval from that point. After that, bringing orders in is simple. On the Import Shopify Orders screen you press Get Orders, then import them one at a time or all at once, and you can put that on a schedule so it runs on its own.

Matching up your locations
Shopify and Acumatica each track stock by location, so you line them up. The connector loads your Shopify locations and lets you map each one to the matching Acumatica warehouse. You also choose which quantity it should report, whether that's on hand, available, or available for shipment, and when several warehouses feed a location, it adds them together so your storefront shows an accurate number.
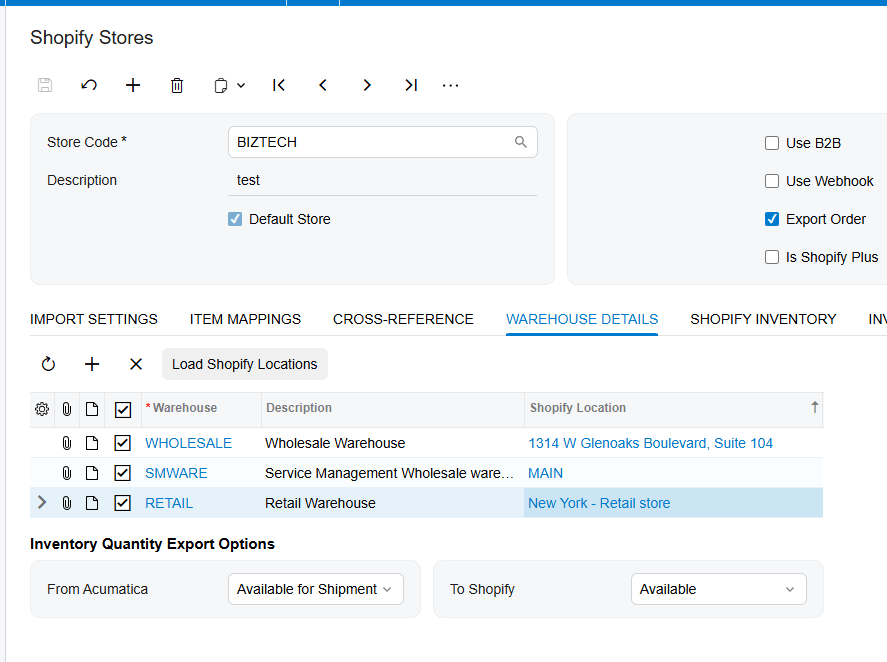
Keeping products and variants in sync
Your catalog stays aligned too. You can push your Acumatica items out to Shopify, or pull Shopify items in, matched up by their SKU. And if you sell variations, say a t-shirt in several sizes and colors, the connector handles that through template and matrix items. One template product carries its individual variants, and each variant has its own SKU, price, and stock.
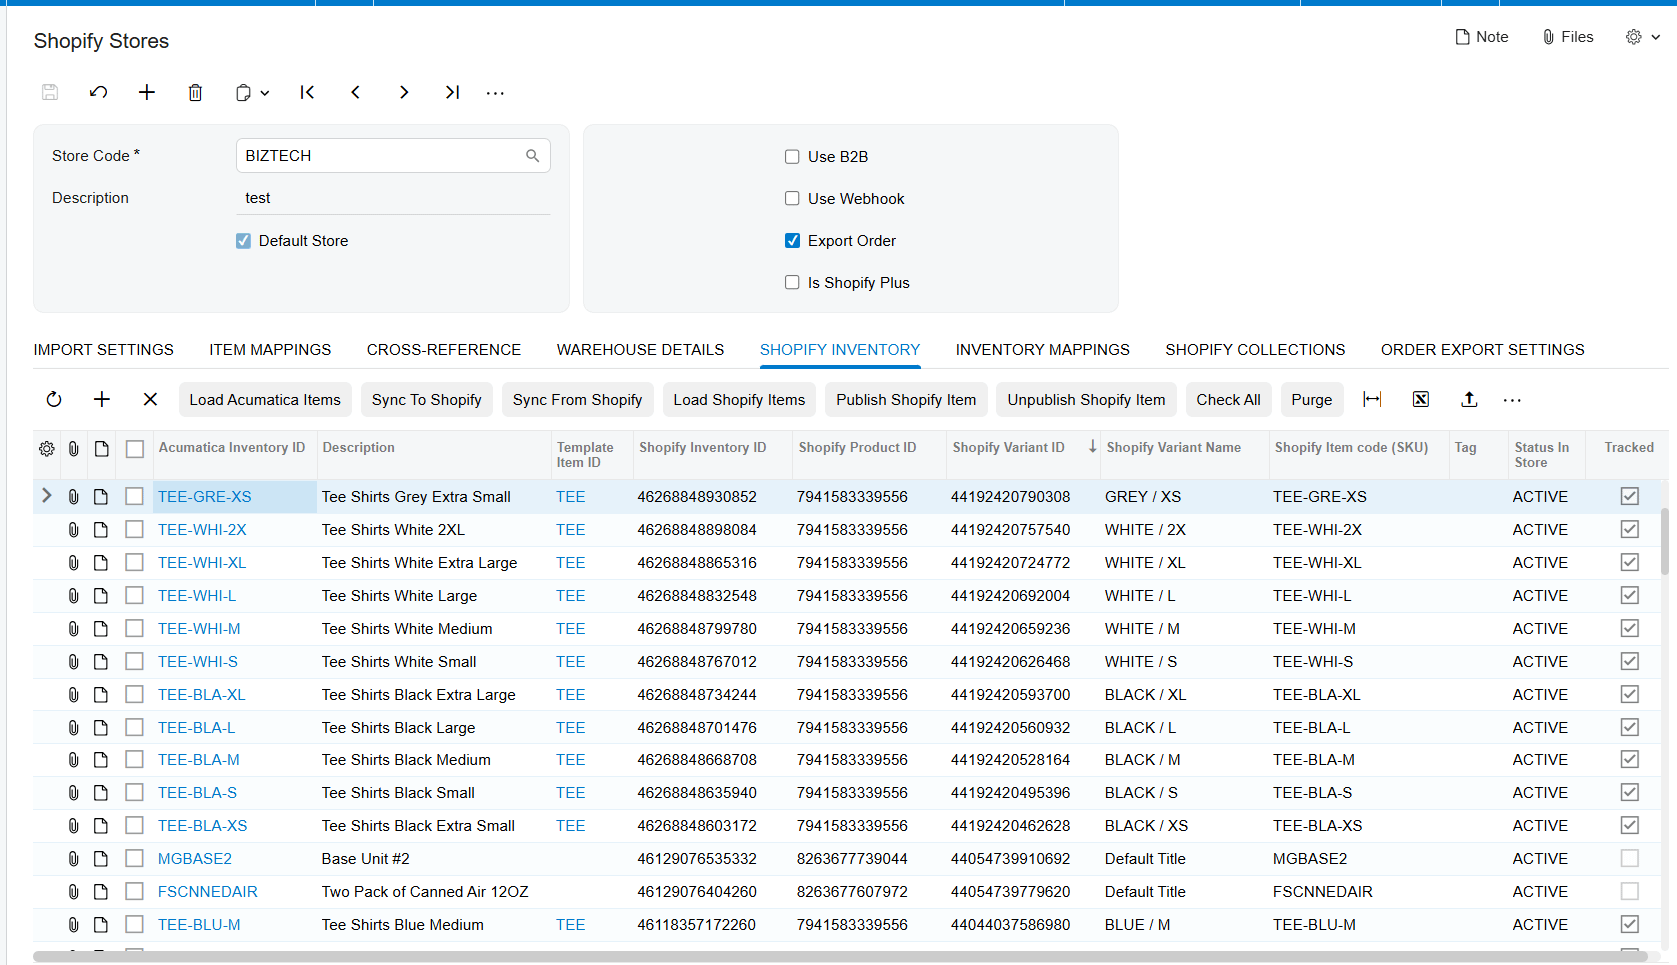
Connecting customers and B2B companies
Customers come across as well. When an order arrives, the connector can create or match the customer record in Acumatica, and it can sync customer details back to Shopify so both sides stay current. If you sell business-to-business on Shopify Plus, it goes further. Turning on the B2B option lets you sync whole company profiles, with their multiple contacts, their locations, and their custom price lists, and you can import or export those companies in bulk.
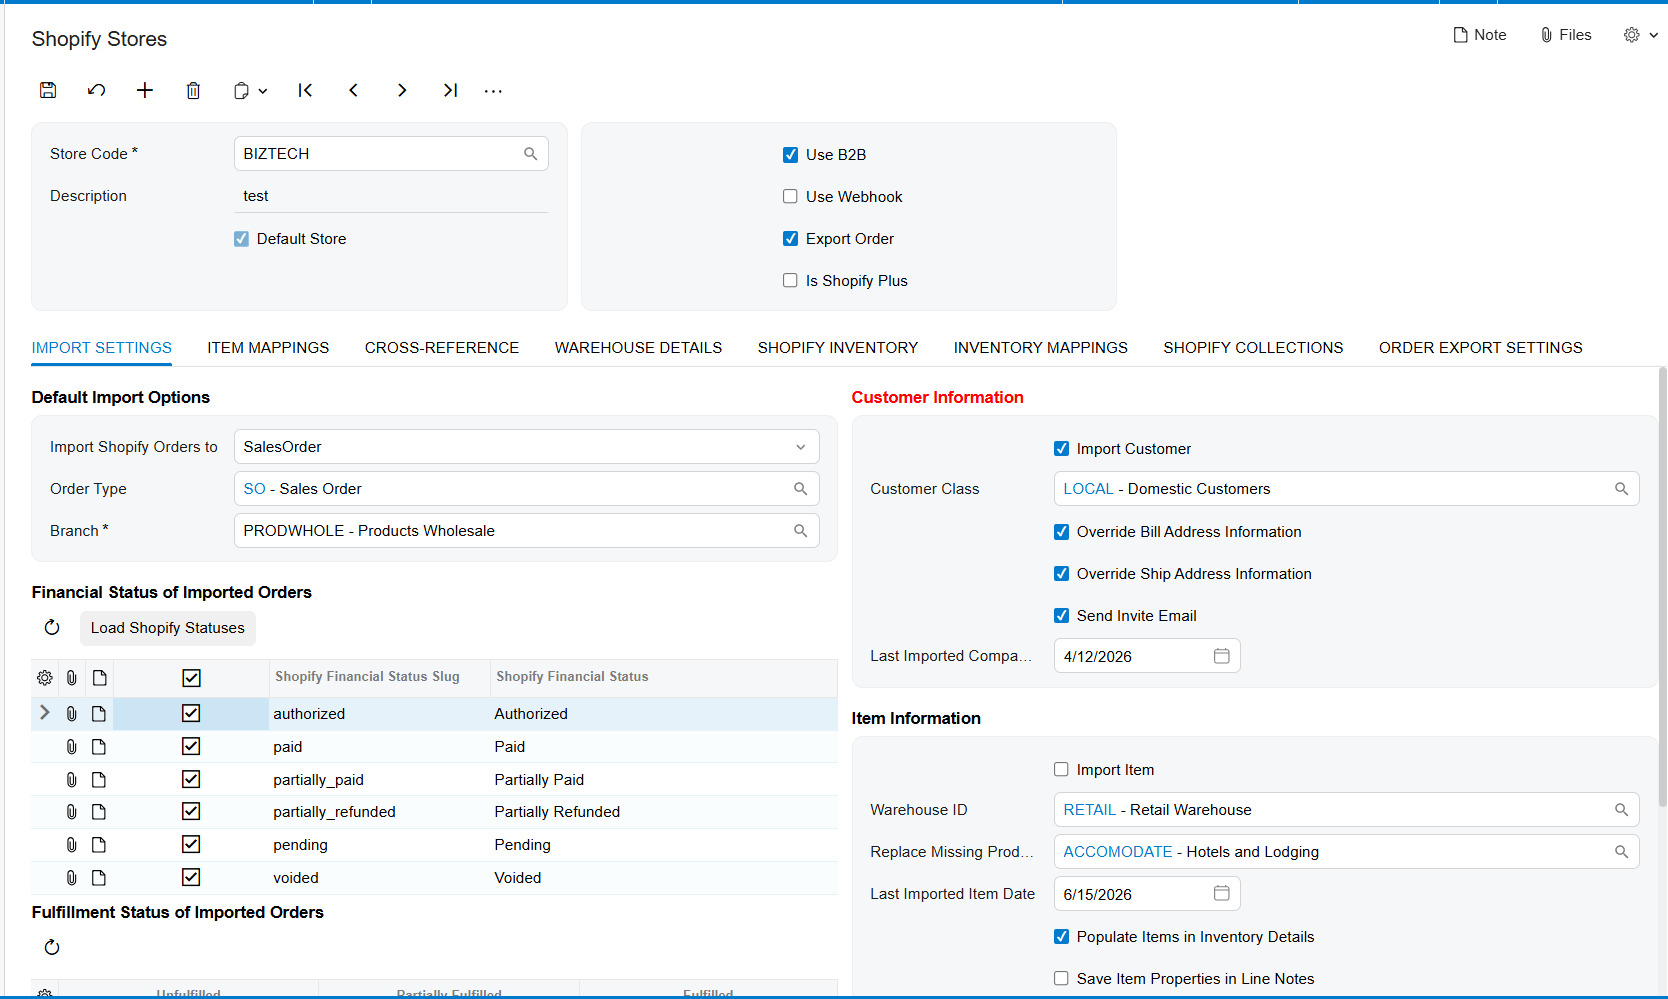
Turning on webhooks for real-time updates
For everything to feel instant, you can turn on webhooks. With webhooks enabled, a new order, a fulfillment, or a refund in Shopify triggers the matching process in Acumatica automatically. So an order placed on your store can appear in Acumatica on its own, without anyone pressing a button.
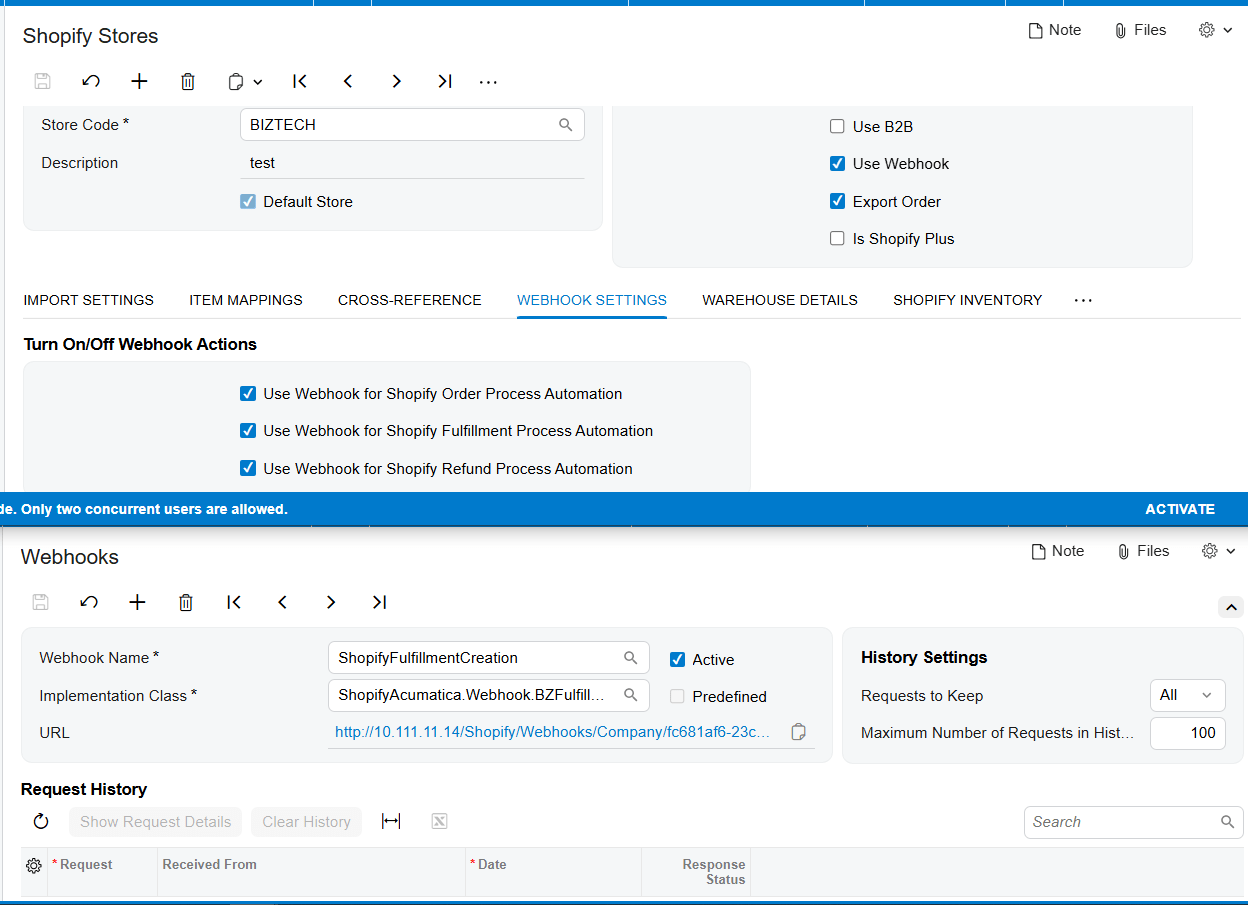
Inventory that stays honest
Once your products are connected, keeping quantities aligned is automatic. From the inventory export screen, the connector sends your Acumatica stock levels to Shopify, using the combined total across the warehouses you selected, and you can schedule that to run regularly. That's what keeps you from overselling something you no longer have.

Closing the loop with fulfillment
Fulfillment is where the connection really pays off. When you Prepare Invoice in Acumatica, the connector reports that fulfillment back to Shopify, and sends the tracking number across. Your customer is updated automatically, and the order shows as fulfilled on both sides.
Handling refunds cleanly
Refunds are handled with the same care. You can import refunded orders from Shopify, and the connector works out the right response based on where the order stands. It might create a customer refund payment, remove a shipment that hasn't been confirmed yet, or issue a credit memo if the order has already been invoiced. Either way, your books stay in step with what actually happened on the store.
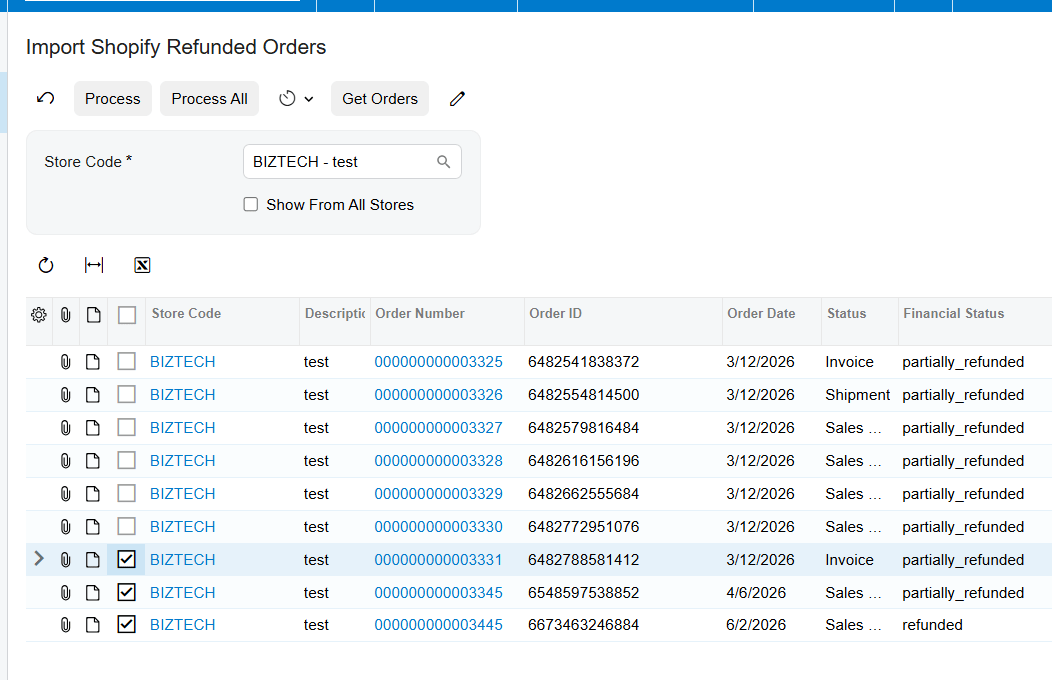
The bottom line
Once it's connected, your Shopify store and your Acumatica system work as one. Orders flow in, inventory stays honest, customers and catalog stay in step, and fulfillment and refunds take care of themselves. Your team stops copying data and gets back to growing the business.
If you'd like help connecting your own store, the team at Biz-Tech Services does exactly this. Visit biz-techservices.com to book a walkthrough and see your Shopify orders flow straight into Acumatica.
How to Connect WooCommerce to Acumatica
How to Connect WooCommerce to Acumatica
Link your online store to your ERP so orders, products, inventory, and payments stay in sync — automatically.
The double-entry problem
If you sell on a WooCommerce store and run your business on Acumatica, you've probably felt the gap between them. Orders come in on your website, and then someone has to re-key them into your ERP. Stock levels drift apart. A product sells online that you no longer carry. It's a lot of manual work, and every handoff is a chance for something to go wrong.
The Biz-Tech WooCommerce Connector closes that gap. It links your WooCommerce store and your Acumatica system so that orders, products, inventory, customers, and payments flow between them without anyone copying data by hand. Let's walk through how you connect the two.
Step one: create your API keys in WooCommerce
The connection runs on WooCommerce's REST API, which uses a key to control access. So the first thing you do is generate that key on your website. In WooCommerce, you go to Settings, then Advanced, then REST API, and add a new key. You give it a description, choose the user it belongs to, and set the permission level to Read and Write so data can move in both directions. WooCommerce then gives you two values, a Consumer Key and a Consumer Secret. Keep those handy, because Acumatica needs them next.

Step two: enter your credentials in Acumatica
Once the connector package is installed, a WooCommerce workspace appears right inside your Acumatica menu. You start on the WooCommerce Store Preferences screen and enter the credentials you just generated, your Consumer Key, your Consumer Secret, your store's web address, and your WordPress login. Then you press Test Credentials. When you see the message that your credentials are valid, the two systems are talking, and you're ready to configure how they work together.
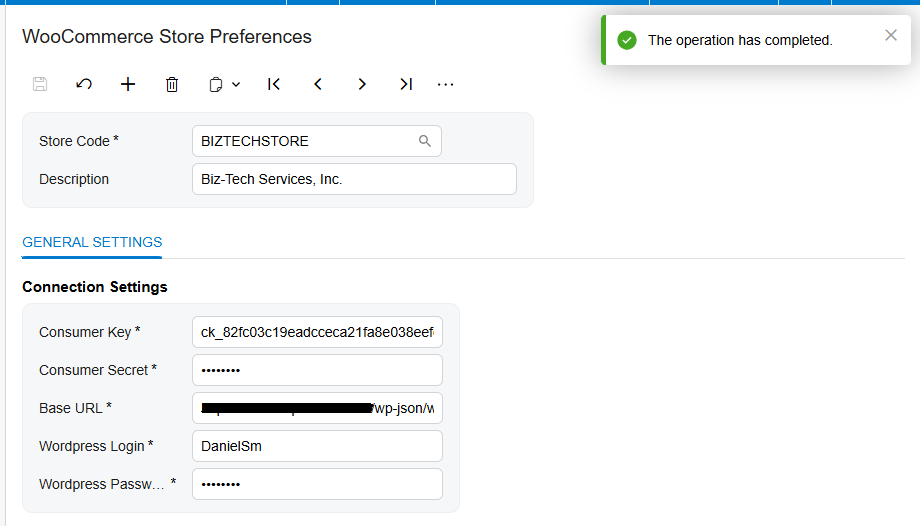
Step three: set up the WooCommerce Store
The WooCommerce Store screen is the control center of the whole integration. This is where you decide how orders behave when they arrive. You choose that incoming orders become sales orders in Acumatica or invoiced directly, you set a default order type and a default warehouse, and you tell the system which order statuses to pull in, like processing or completed. You can also set a start date so it only imports orders from a point you choose, and you decide whether you're running in standard retail mode or business-to-business mode.
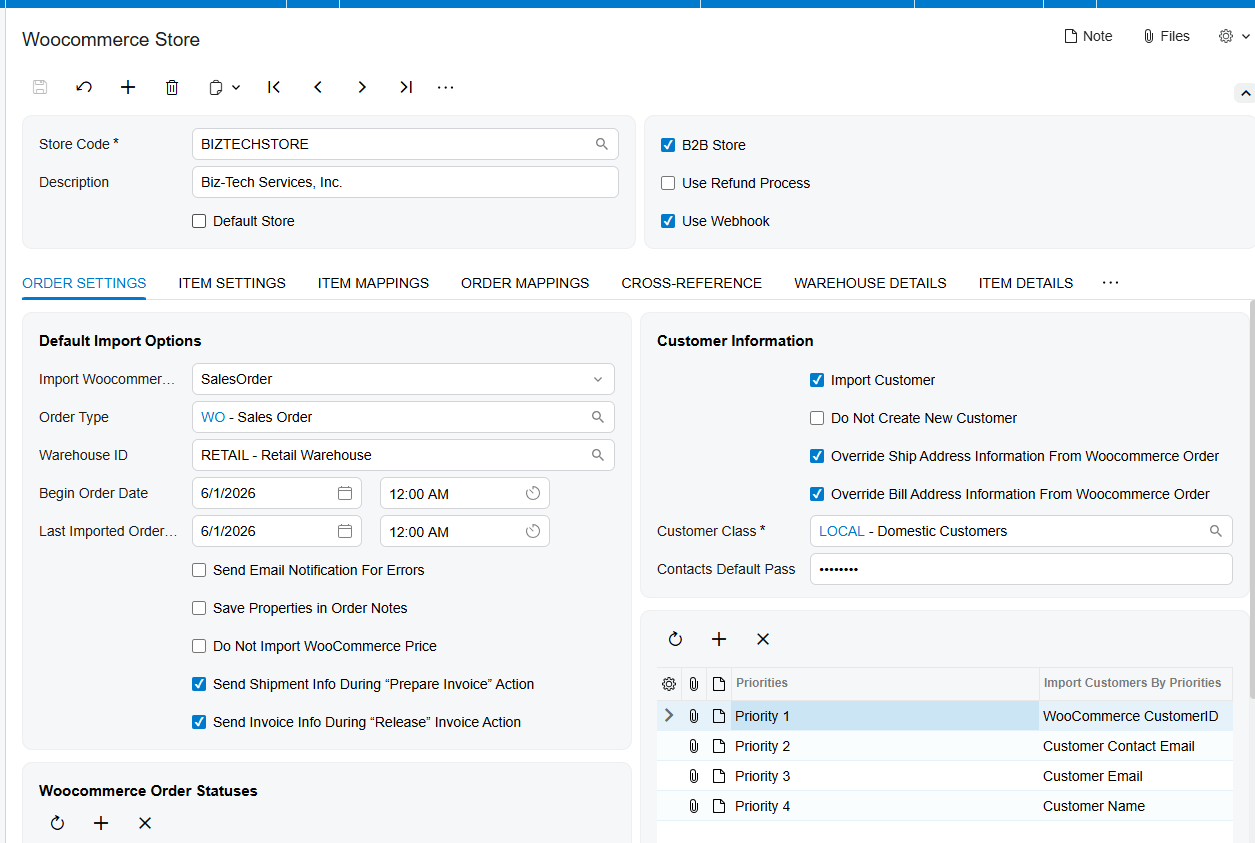
Bringing orders in
With that in place, bringing orders into Acumatica is simple. On the Import WooCommerce Orders screen, you press Get Orders, and the connector retrieves every order for your selected period. From there you can import them one at a time or import them all at once. And you don’t have to do it manually forever. You can set a schedule so the system retrieves and imports new orders on its own, around the clock.
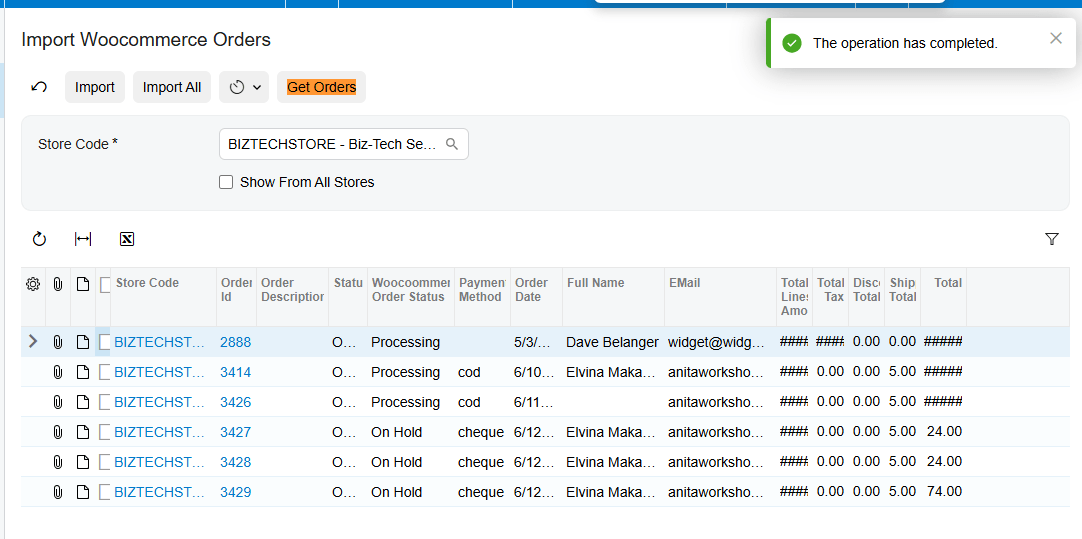
Keeping products and inventory in sync
The connector also keeps your catalog aligned. From the export screens, you can push your Acumatica items out to WooCommerce, update their prices and images, and publish or unpublish them based on whether they're in stock.
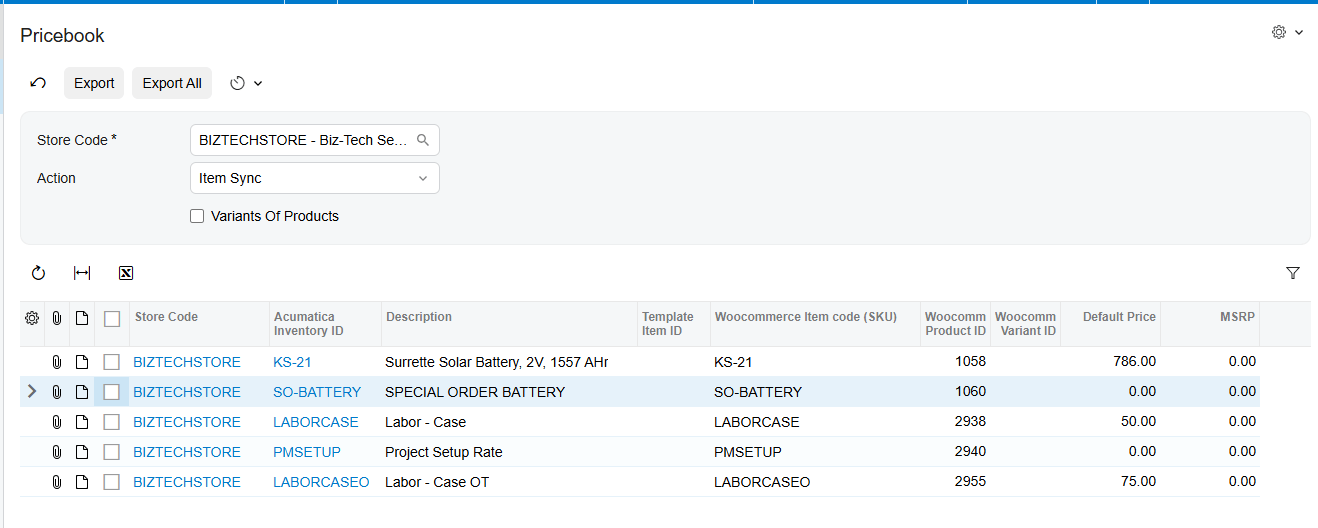
Just as important, keeps your inventory configred. You choose whether Product Name, SKU, Weight, Image, Dimensions and etc. are sent to WooCommerce. You can also configure the 1st time creadion or later edits.
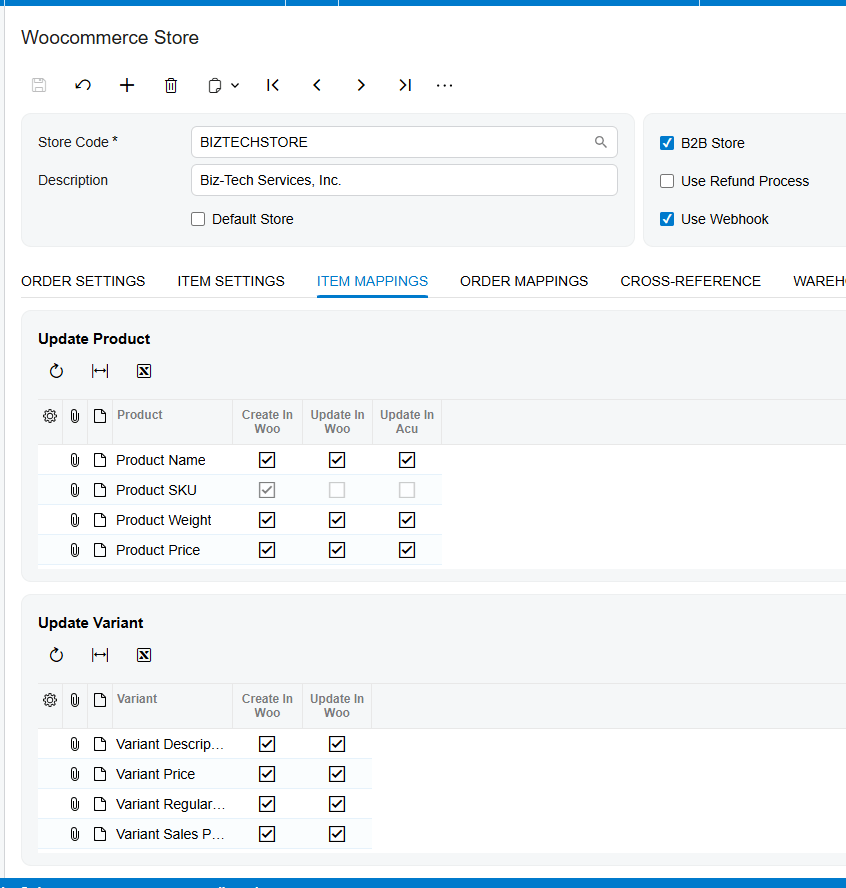
The Item Settings tab is where you decide how products are handled as they move between the two systems. You choose whether the connector should create brand-new items in Acumatica automatically, or only match incoming products to items you already have by lining them up on their SKU. And you set the defaults every new item inherits — things like its item type, its unit of measure, and which price gets sent back to your store.
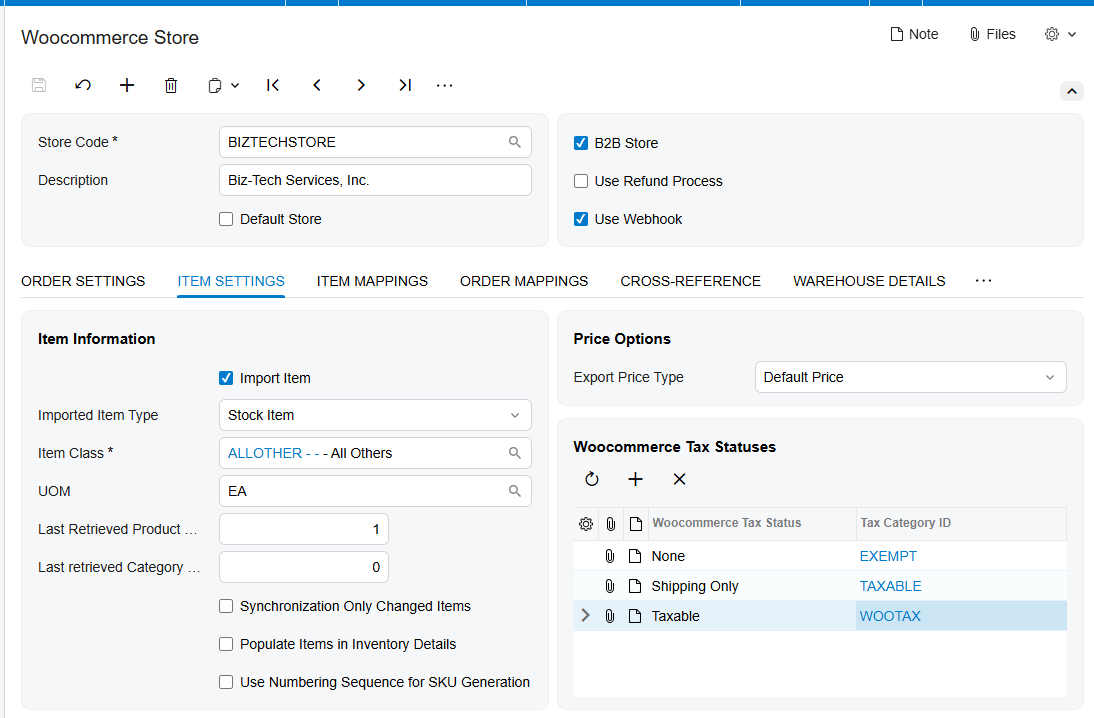
Matching up customers
Customers stay connected too. When an order comes in, the connector can create or match the customer record in Acumatica automatically, using the email and name to avoid duplicates. And if you run a business-to-business store, it can sync your contacts the other way and create matching user accounts on your WooCommerce site, so your buyers can log in and order directly.
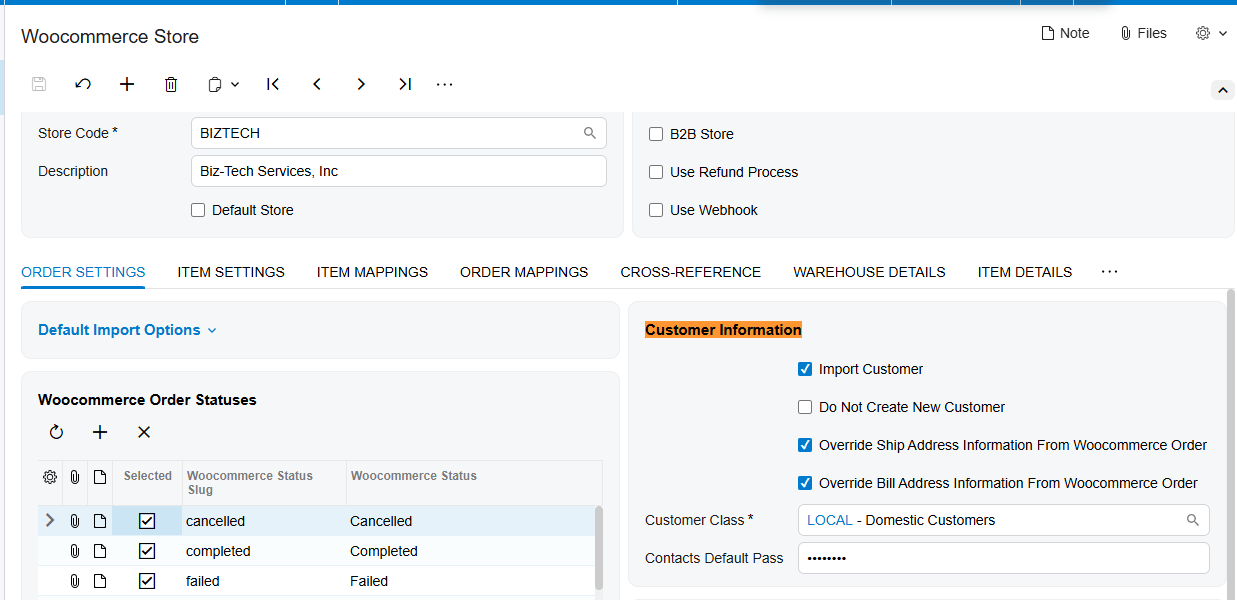
Handling payments, taxes, and shipping
Payments are handled with real flexibility. When a customer pays on your website, WooCommerce authorizes the card and reserves the funds. Acumatica then records that authorization and lets you capture the money later, when the order is actually ready to ship. You decide the payment method and type during import, and the connector works with gateways like Ebizcharge and Fortis.
Taxes and shipping come across as well. You can map your tax setup, including external services like Avalara if you use them, so taxes calculate correctly in Acumatica. And you match each WooCommerce shipping method to the right ship-via in Acumatica, so the delivery method on the order is always accurate.
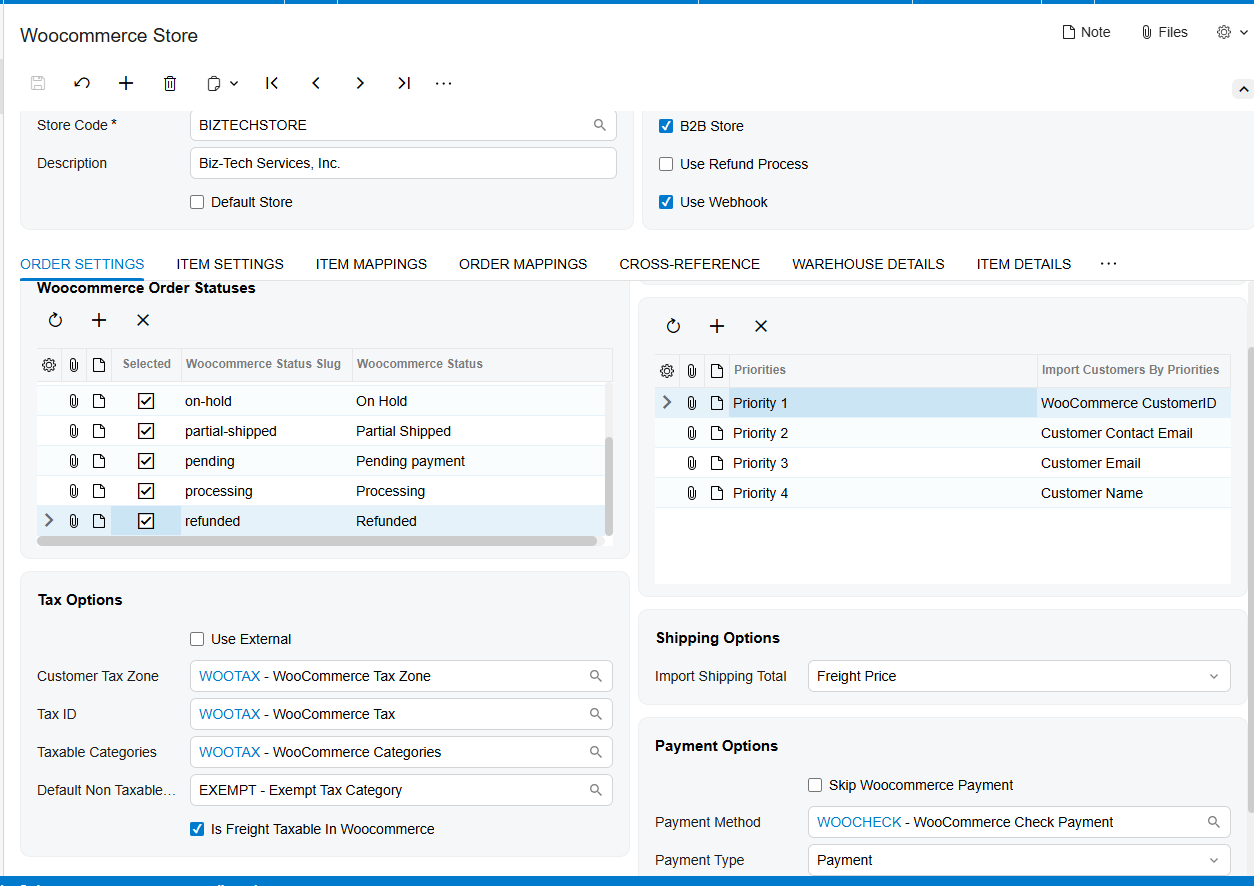
Completing the order: fulfillment
The last piece is fulfillment, and this is where the connection really pays off. You create the shipment in Acumatica, confirm it with the box and tracking number, prepare the invoice, and release it. As you move through those steps, the connector pushes the tracking number and the completion back to WooCommerce, so the order is marked complete on both sides and your customer gets updated automatically. No second system to touch.
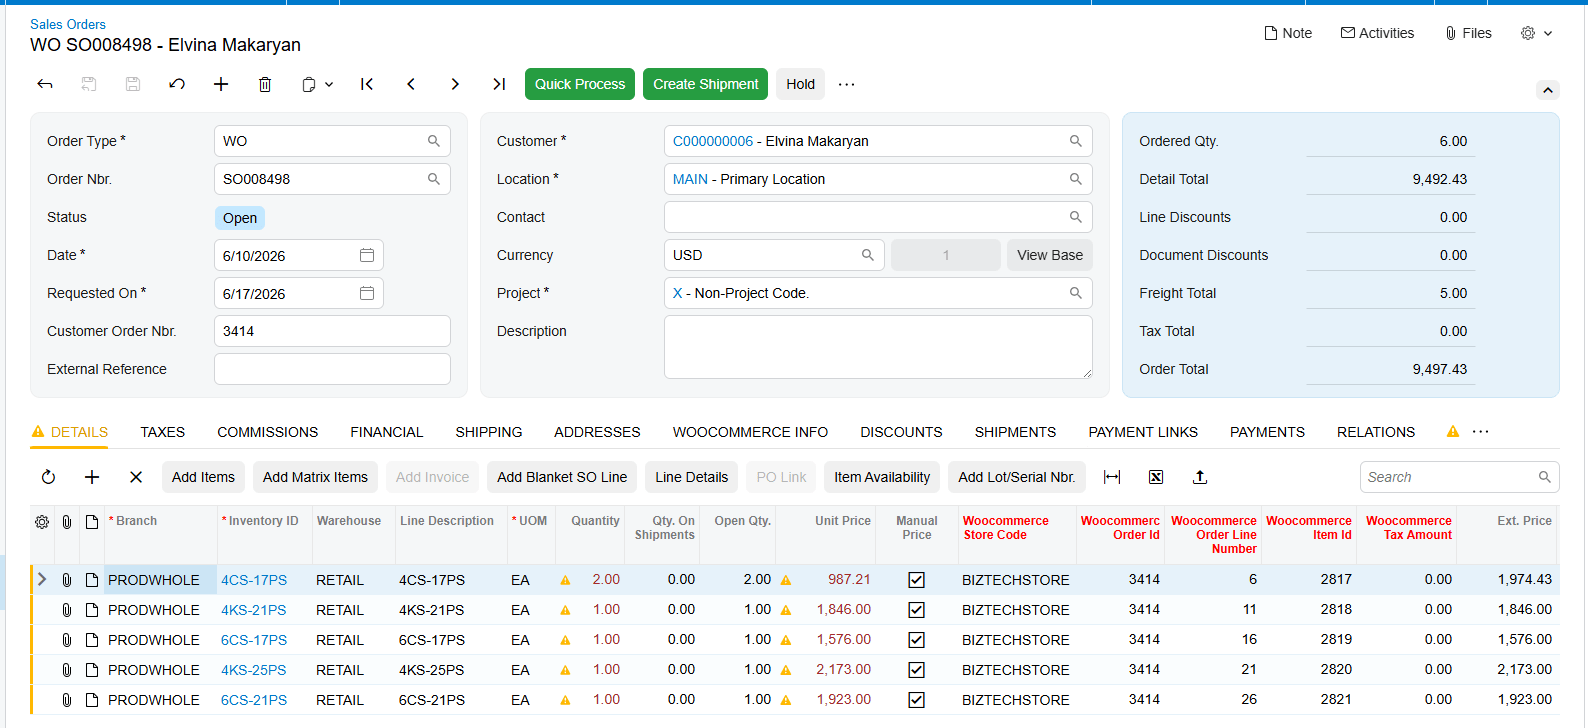
Tracking number of Shipment document is moved to WooCommerce and the Order status is updated. Do not forget to have
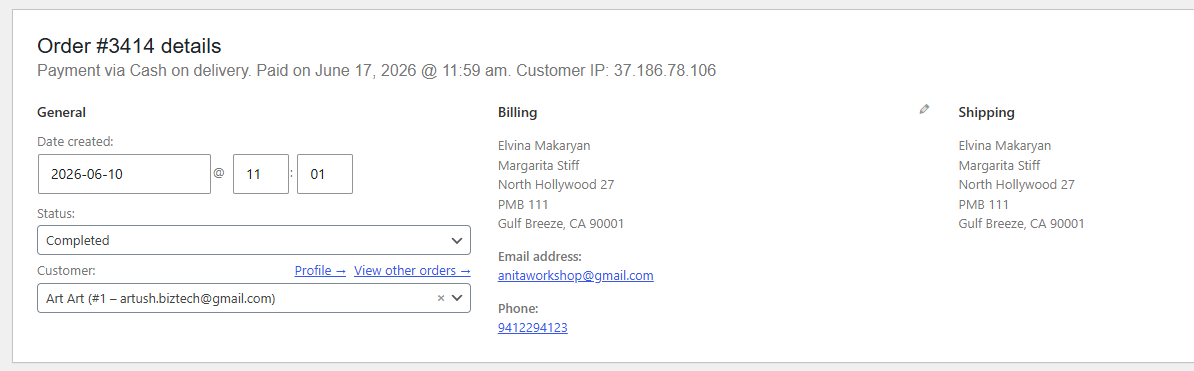
The bottom line
Once it's connected, your WooCommerce store and your Acumatica system work as one. Orders flow in, inventory stays accurate, payments line up, and fulfillment closes the loop on its own. Your team stops re-typing and starts focusing on growth.
If you'd like help connecting your own store, the team at Biz-Tech Services does this every day. Visit biz-techservices.com to book a walkthrough and see your WooCommerce orders flow straight into Acumatica.