How to Set Up CommerceHub in Acumatica
Connect the CommerceHub retail network to your ERP with a secure, automated file exchange — generated in NotebookLM from the product PDF.
Scaling your business often means partnering with major retailers like Costco, Home Depot, or Lowe’s. These partnerships are a massive win for your growth, but they bring a heavy administrative burden. Managing hundreds of orders, tracking shipments, and keeping inventory accurate across different platforms can quickly become a manual nightmare. You need your e-commerce operations to talk directly to your back-office system. We designed the Biz-Tech Services CommerceHub Connector for Acumatica to bridge that gap.
In this article, we are going to walk you through the initial setup and connection process. This is the foundation of your integration, ensuring that data flows smoothly and securely between your partners and your Acumatica Enterprise Resource Planning, or ERP, system.
Understanding the SFTP connection
The first thing to understand about CommerceHub is how it handles data. Most modern connectors use an API, or Application Programming Interface, for direct communication. However, CommerceHub integrator is unique because it primarily uses SFTP, which stands for Secure File Transfer Protocol.
Think of SFTP as a secure digital post office. Instead of sending messages back and forth instantly, the systems write information into text files. These files are then uploaded to or downloaded from a secure server. To make this work, we use a tool called FileZilla to manage these transfers. In your Acumatica workspace, our connector acts as the engine that reads these files and turns them into actionable data.
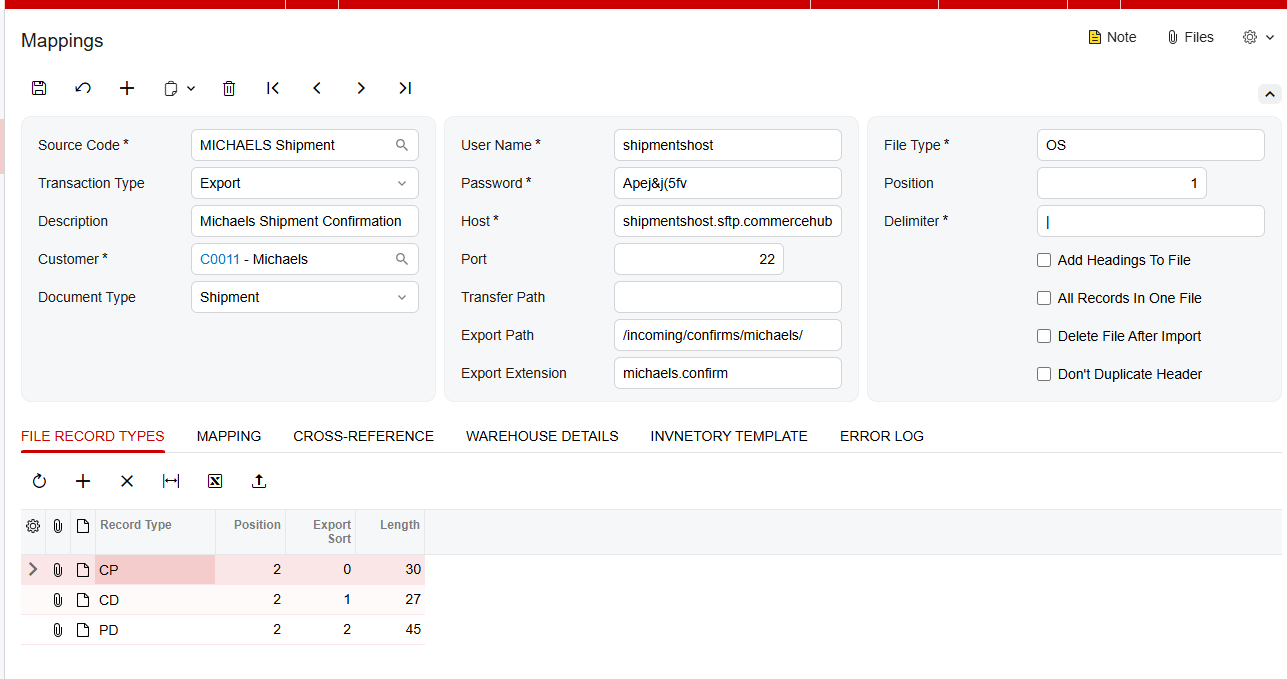
To start the setup, you go to the Mappings screen. This is where you configure the connector’s behavior and define how it should talk to the outside world. You enter your CommerceHub SFTP credentials, including the host address, the port (which is typically twenty-two for secure transfers), your username, and your password. Once those are set, you define the specific paths where the connector should look for files to import, and where it should place files for export.
The power of store codes
Once your connection is established, we need to talk about store codes. Store codes are the heart of the CommerceHub integration, because they let you manage distinct configurations for each of your retail partners.
Your business doesn’t treat a Costco order exactly the same way it treats a Michaels order, and with store codes you don’t have to. Each store can be set up with its own unique parameters. You can define a specific transaction type, a description, and even assign a default customer in Acumatica for that retailer. This level of customization means that when an order comes in, it already fits the specific requirements of that partner.
Mapping your items
For the integration to work, Acumatica needs to know that the item named in a CommerceHub file is the same item sitting in your warehouse. We handle this through the cross-reference tab.
On this screen, you map your Acumatica inventory IDs to the specific item IDs used in the CommerceHub files. This makes sure that when you import an order, the system identifies the products correctly. Without this mapping, the automation would stop in its tracks. We also provide an inventory template screen, where the items you select are marked for synchronization, so you can export accurate quantities back to your retailers.
Managing your data files
Now that the foundation is laid, the connector manages several types of files to keep your business moving.
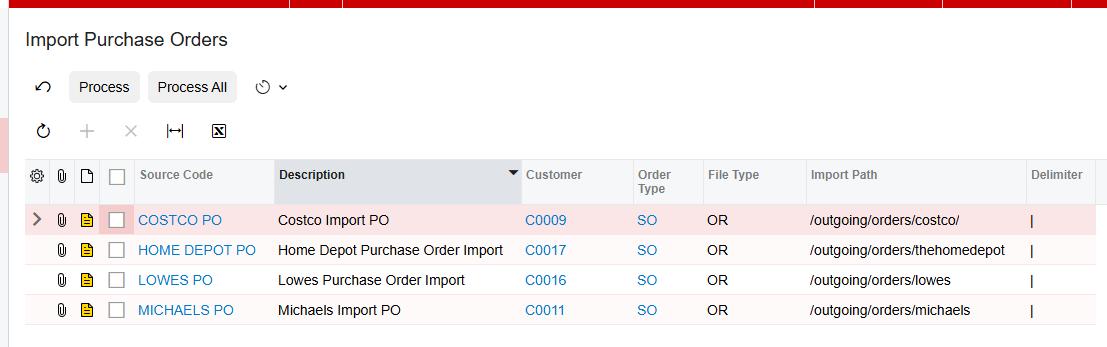
First are the purchase order files. The Import Purchase Orders screen pulls orders from CommerceHub into Acumatica. While these orders come in under a default customer, the connector is smart enough to override the address information with the actual shipping address from the order.
Next are the acknowledgement files. Once an order is created in Acumatica, it sits in an open status, waiting to be acknowledged. You use the export screen to send a purchase order acknowledgement back to the retailer, letting them know you’ve received and accepted the order.

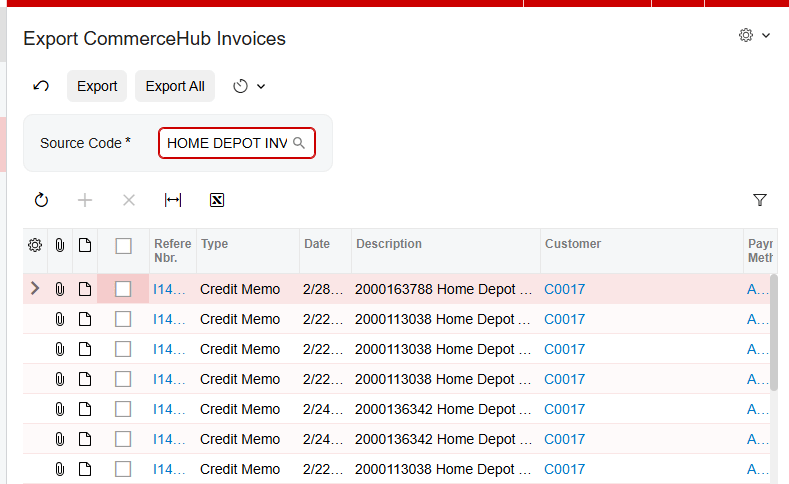
As you fulfill those orders, the system handles shipment and invoice files. The Export Shipment screen finds every order with a confirmed shipment status and prepares that data for CommerceHub. And the Export Invoices screen sends your billing information once an order has been invoiced or released in your system. The integrator contains a similar Export CommerceHub Shipment processing screen for Shimpents.
Finally, there is the inventory file. You can choose to export your on-hand, available, or available-for-shipment quantities. This keeps your retail partners updated on exactly what you have in stock, which prevents overselling.
Handling errors and failed files
Even with a great system, data issues happen. Maybe a file was formatted incorrectly, or an item ID was missing. We’ve built in two specific places to help you manage this.
The first is the CommerceHub Errors screen. This is a central log where you can see every error message received from CommerceHub across all processes. It gives you the date, the order number, and a detailed message, so you can resolve the issue quickly.
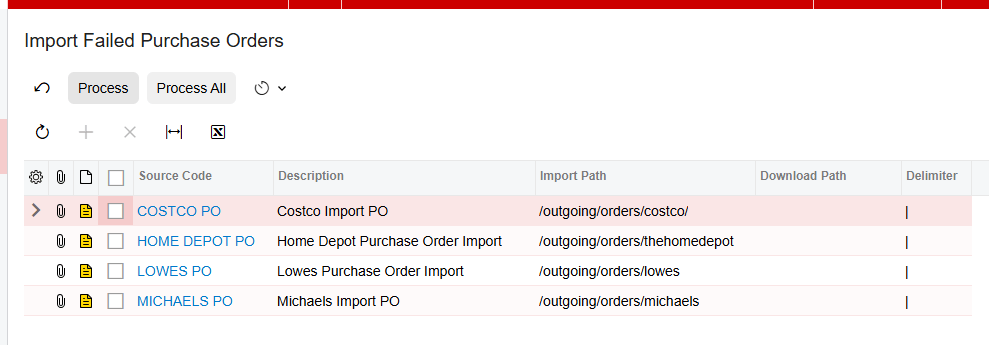
The second is the Import Failed Purchase Orders screen. If an order fails to import during the normal process, it doesn’t just disappear. It moves here, where you can review the failed attempts, fix the underlying issue, like a mapping error, and then process them again, so no order is ever lost.
The bottom line
Setting up your CommerceHub integration correctly means moving away from manual data entry and toward a secure, automated file exchange that treats every retail partner with the specific attention they require. By mastering your SFTP connection and your store code configurations, you turn a complex retail requirement into a smooth part of your daily workflow.
If you’d like to see how the CommerceHub Connector can transform your e-commerce operations, visit biz-techservices.com today to request a full demo.