
How to Create Sales Orders with Kit Items in Acumatica
Creating a sales order with kit items in Acumatica means adding one kit line, answering a short options prompt, and letting Acumatica explode that line into a placeholder item plus every component the customer will actually receive. This article walks that task as a user performs it in the Biz-Tech Services Kit Processing product for Acumatica ERP: adding the kit line, working the Options popup and the Component Details window, exploding the kit, and reading the result.
The point of the product is that kit components are visible and editable on the Acumatica sales order line itself. Users do not open a separate maintenance screen or print a pick list to see what is inside a kit. That convenience comes with rules, and most support questions trace back to a handful of settings configured long before the order was opened. Those settings appear below only where they change order entry.
Before You Start: What Must Be Configured
A kit line behaves according to its kit specification. If any of the following is missing, order entry will not go the way users expect.
1. The item is flagged as a kit. A kit specification can only be created for an item marked as a kit on the General tab of the Stock Items (IN202500) or Non-Stock Items (IN202000) form.
2. The Kit Assembly feature is enabled. The Kit Specifications form appears only if it is turned on for the tenant on the Enable/Disable Features (CS100000) form in Acumatica.
3. The specification is Active and has a current revision. A current revision must be enabled for the kit to explode on the Acumatica Sales Orders screen. If the kit already has one and you check another, Acumatica warns that saving will uncheck the previous revision.
4. Explode Kit is selected. Selecting it activates the three fields that drive order entry: Kit Placeholder Item, Explode Option, and Price Calculation.
5. The placeholder item exists and its unit of measure matches. The Kit Placeholder Item is a non-stock item that replaces the kit item after explosion, and its Unit of Measure, or UOM, must match the UOM of the kit item.
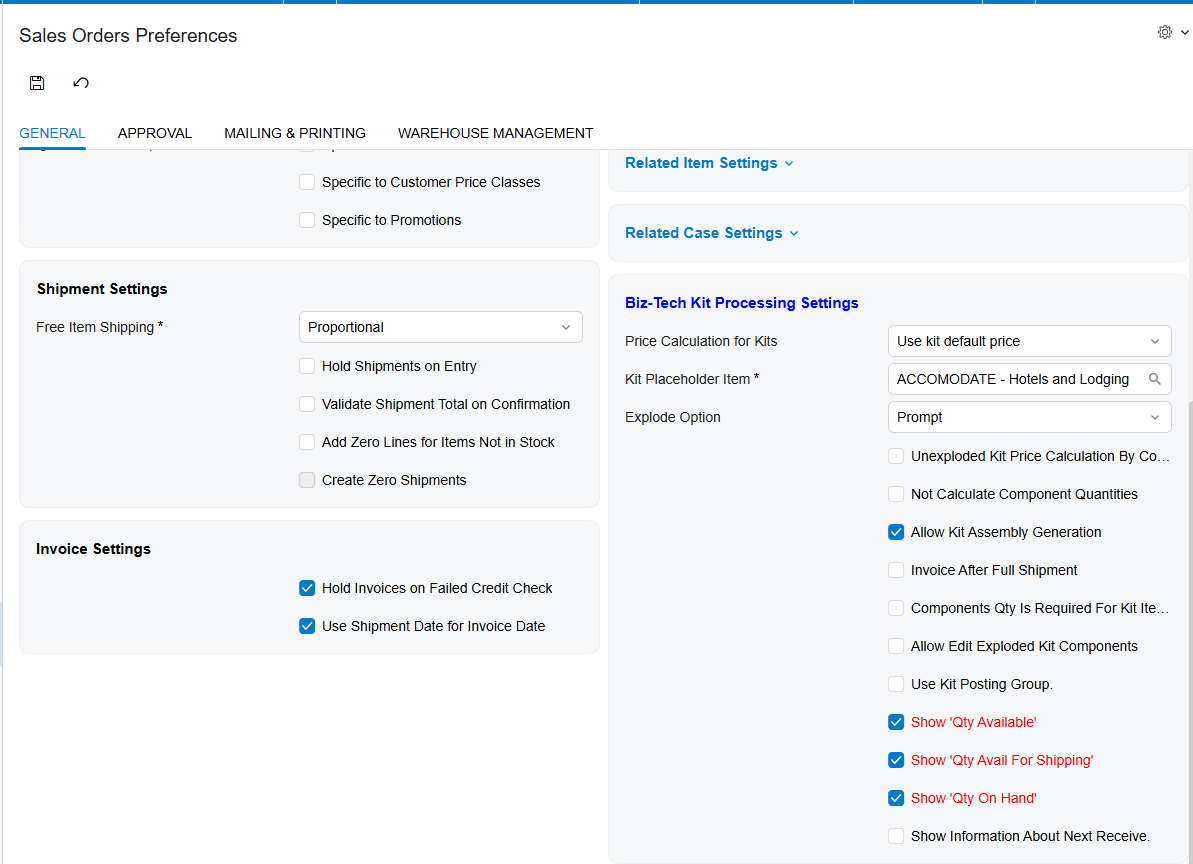
6. Preferences are set. In the Biz-Tech Services Kit Processing Settings section of Sales Orders Preferences, Price Calculation for Kits, Kit Placeholder Item, and Explode Option apply to all kits. Where the same settings are configured for a specific kit on the Kit Specifications screen, Acumatica gives priority to the per-kit setting.
That last point matters. When two users see different behavior from the same Acumatica kit, the usual cause is that the kit carries its own Explode Option or placeholder item and is ignoring the tenant-wide preference.
Creating a Sales Order with a Kit Item, Step by Step
Each sub-step below matches something the user clicks on the Acumatica Sales Orders screen.
Step 1: Add the Kit Item to the Order Line
Create the sales order as usual and add the kit inventory ID on a document detail line. The line is still a single kit line, not a set of components, and nothing is committed yet. That is exactly why this is the moment to make changes.
Step 2: Answer the Options Popup
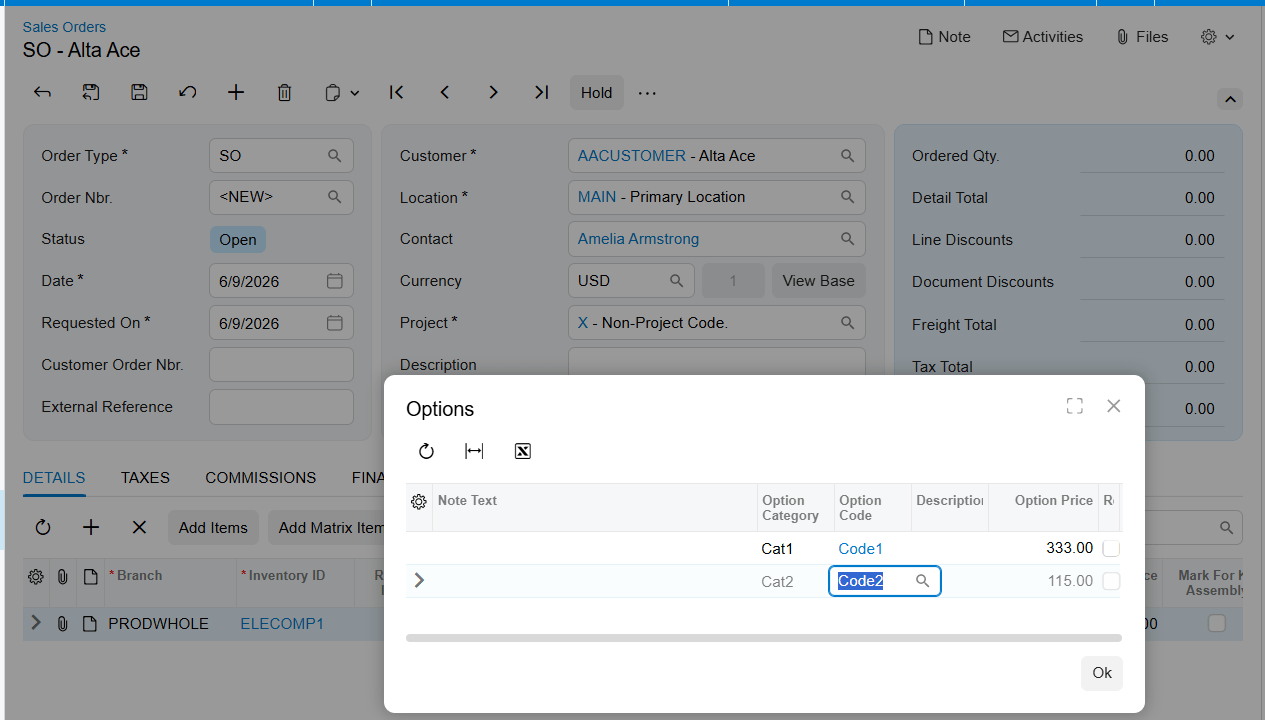
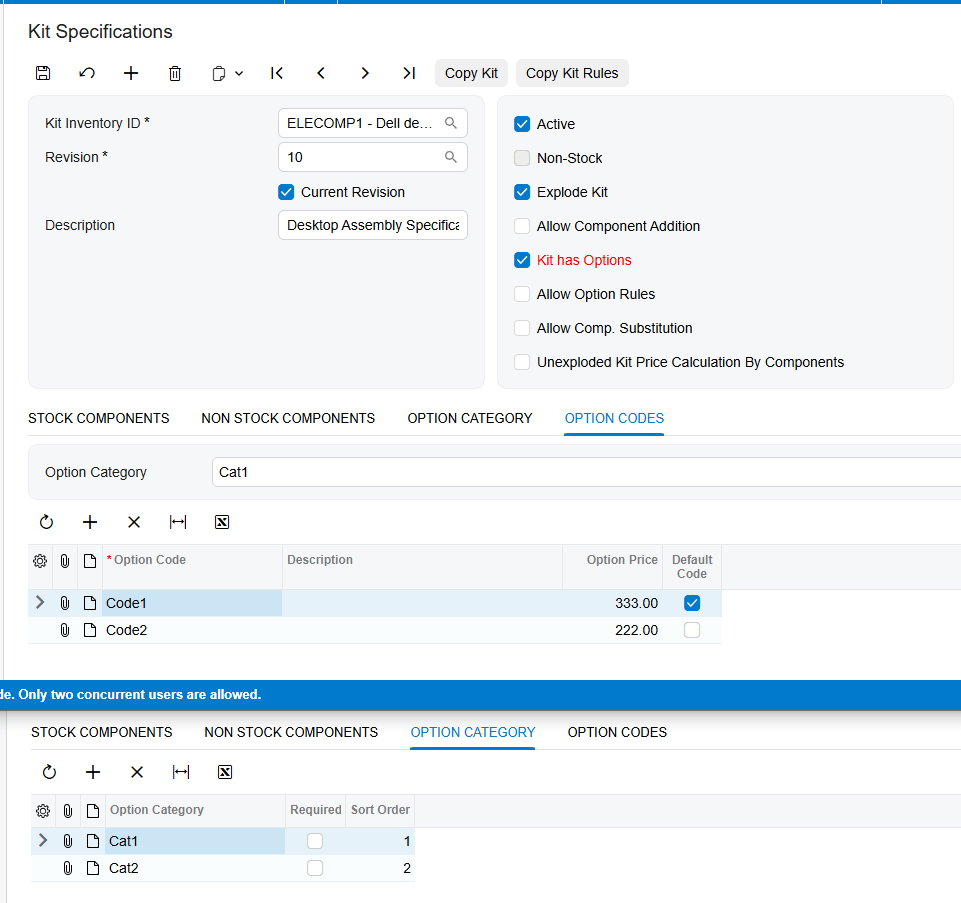
If the specification has Kit has options selected, an Options popup opens automatically as soon as the kit item is entered. It lists each Option Category defined for the kit; the user selects an Option Code for each and presses OK. Where a category is marked Required, an option code must be chosen before the user can proceed with the kit order.
The order in which categories appear in the Acumatica drop-down is not random. The Sort Order setting on the kit specification sorts option categories ascending or descending, and that is what users see. If the sequence confuses order-entry staff, that is the setting to change.
Some option codes arrive without being chosen. A code flagged as Default Code is included automatically, which covers the cases where no human answers the popup: the API, import scenarios, processing screens, and sales quotes.
Step 3: Open the Component Details Window
With the kit line selected, open the Component Details popup. This window holds all information related to the kit. From here, and only before explosion, a user can add or delete components, exchange a component for a substitute item, and change the options selected in Step 2.
To revise options already answered, click Change Options. All previous Option Category and Option Code configurations stay intact unless manually changed, so reopening the window to adjust one category will not silently reset the others.
What the window shows about stock is configurable. The Component Availability section of Sales Orders Preferences decides whether Component Details displays Qty. Available, Qty. Avail. for Shipping, and Qty. on Hand, and whether it shows next-receive information drawn from receipts, transfers, and open purchase orders. For a user deciding whether to promise a date, that is the difference between guessing and knowing.
Step 4: Substitute a Component or Add One
Substitution is available when Allow Component Substitution is enabled and substitute items are defined. Double-click the component in Component Details, then use the search icon beside it to pick the substitute. This is how a kit ships with an equivalent part without redefining the kit in Acumatica.
Adding a component that was never part of the kit requires Allow Component Addition, which activates the Add Row option in Component Details. If it is off, new components cannot be added, but existing ones can still be deleted.
Step 5: Explode the Kit
There are two ways to trigger kit explosion on an Acumatica sales order: click Load Components in Component Details, or assign a quantity to the new kit line. Both produce the same result, and users tend to discover the second by accident, which is why a kit sometimes appears to explode on its own.
Whether explosion happens without being asked depends on the Explode Option. Prompt asks the user whether to explode the kit. Automatically explodes it with no user intervention. Do Not Explode prevents explosion entirely.
Step 6: Read the Order After Explosion
After explosion the kit item is replaced by the Kit Placeholder Item, and the components become their own Acumatica order lines with prices, quantities, and costs. The placeholder is a non-stock item that behaves like the kit item but contains no actual items. It keeps the financials clean: with the components on the order in their own right, carrying the kit item too would double-count costs.
One field on the placeholder row deserves attention. Total Cost of Components is the component unit cost at the time the sales order was created, which does not change afterward, multiplied by quantity. It carries forward to the invoice.
Document Triggers: What Each Action Creates
Four actions on the kit line create or change documents in Acumatica. Knowing which produces what is the fastest way to trace where a number came from.
Kit Explosion Creates the Placeholder and Component Lines
Explosion creates no separate document. It rewrites the sales order, swapping the kit line for a placeholder line and inserting one line per component. If Use Kit Posting Group is selected, Acumatica also puts the kit item Account and Subaccount values on the placeholder row, and if Apply to the Components is selected too, on the component rows as well. That is a trigger with accounting consequences, so confirm it before switching it on mid-year.
Mark for PO and Create PO Produce a Purchase Order
A purchase order can be raised for one component directly from the sales order, before the kit is exploded. Add the kit, open Component Details, select Mark for PO for the component, and click Create PO. Acumatica creates the purchase order and shows its number under the PO number column in the popup.
Three rules govern grouping and maintenance. The purchase order is created according to the Default Vendor ID of the component. If several components share a vendor, one purchase order covers them all. And if the purchase order is later deleted, or its lines removed, the number disappears from Component Details, so the sales order does not point at a missing document.
Mark for Kit Assembly and Generate Kit Assembly Produce an Assembly
A kit assembly document can be generated from the order without exploding the kit, provided Allow Kit Assembly Generation is selected on Sales Order Preferences. Enter the kit, select Mark for Kit Assembly on the Details tab, then click Generate Kit Assembly from the Actions list and Save. The same action sits behind the Mark/Unmark for Kit Assembly button in Component Details.
The generated number lands in the Kit Assembly field on the Details tab, and that link opens the Kit Assembly form, whose Orders tab shows the originating sales order number. Assemblies generated this way use the current revision on the Kit Specifications screen. Components can still be added or removed in Component Details beforehand.
Opportunities and Sales Quotes Produce the Order Upstream
Kit lines can begin before the Acumatica sales order exists. On the Details tab of Opportunities, add the kit item and press Create Quote. The kit will not explode on Opportunities itself. On the resulting Sales Quotes screen it explodes the same two ways as on an order. After Save, the exploded kit appears on the Opportunities Details tab too, and later changes are reflected on both screens.
Mapping Rules That Decide What Appears on the Order
What lands on the order is not simply the component list from the specification. Four mechanisms decide the final content and total.
Option Categories and Option Codes
When Kit has options is enabled, two tabs appear on the Kit Specifications screen: Option Category and Option Codes. Each option code belongs to a category, carries its own Option Price, and has stock or non-stock items attached, which may include other kit items. Those items are what Acumatica adds to the order when a user picks that code. This is how one inventory ID serves a family of configurations.
Option Rules That Exclude Combinations
Enabling Allow Option Rules adds an Option Rule tab. A rule pairs a Source Option Category and Source Option Code with a Target Option Category and Target Option Code, and the effect on the Sales Orders screen is exclusion: selecting the source combination removes the target code from the target category.
The documented example: with Size as source category and 8×10 as source code, and Color as target category and Black as target code, choosing 8×10 for Size removes Black from Color. Change Size to 8×12, which is not configured under Option Rules, and Black becomes available again. If staff report that a color has vanished in Acumatica, an option rule is almost always why.
Component Substitution
Substitution changes which item appears on the line without changing the kit specification. Enabling Allow Component Substitution adds a Substitution tab and a matching column on the Stock Components tab. Selecting that check box for a component publishes it to the Substitution tab, where the Sub Item section holds the items that may replace it. It applies to specified components and option code components alike.
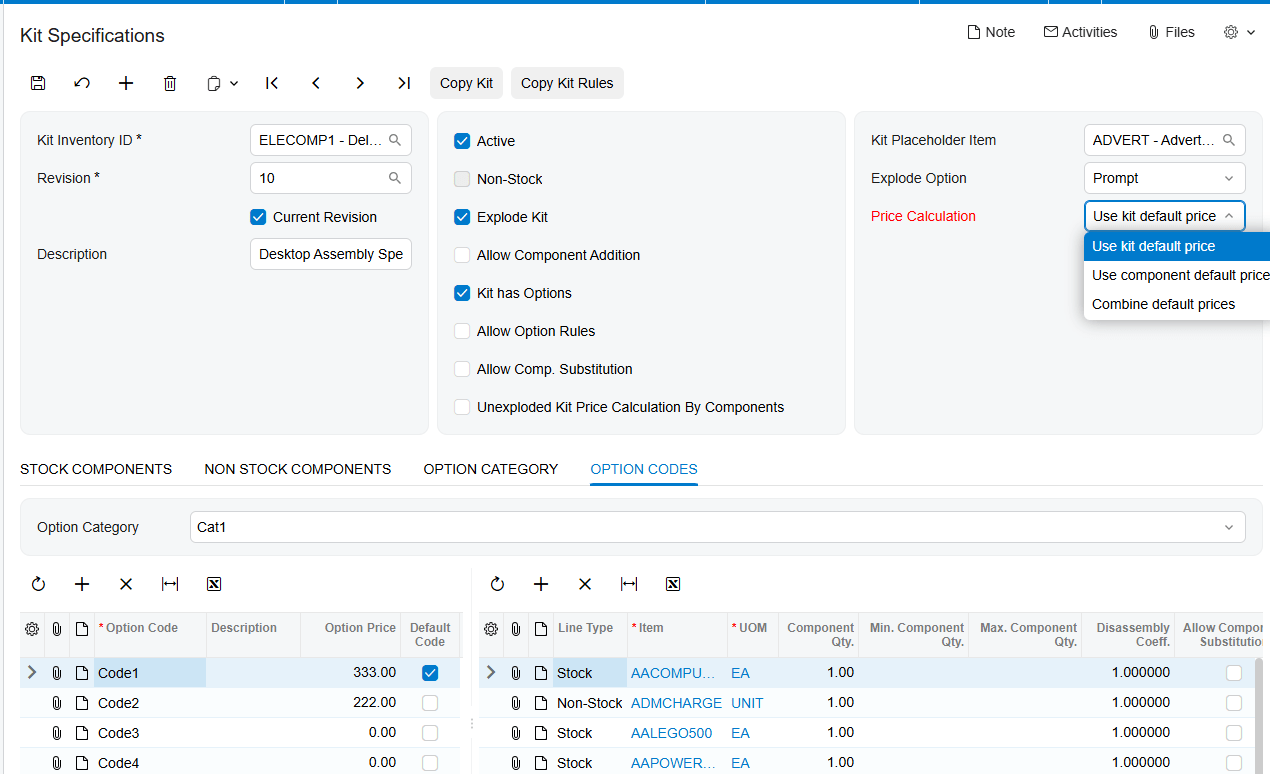
The Three Price Calculation Methods
Price Calculation determines how the kit contributes to the order total, and the three methods give materially different numbers.
1. Use Kit Default Price. The kit default price is used, plus any manually added price for the options associated with the kit.
2. Use Component Default Price. The calculation is based on each component default price, and the kit item price is set to zero.
3. Use Combined Default Price. Both the kit default price and the default prices of each component are combined.
A separate setting skips explosion entirely for pricing. Unexploded Kit Price Calculation by Components prevents the kit from exploding and prices only the components for the order total, with a warning that it runs only for kit items whose Explode Kit check box is not enabled. One more preference changes quantities: with Not Calculate Component Quantities enabled on Sales Order Preferences screen, quantity calculation in Acumatica sales orders is based on the quantity specified for the kit itself.
Validation and Common Exceptions
These are the blocks and errors users actually hit on an Acumatica kit order, and what each is telling you.
The Placeholder Unit of Measure Does Not Match the Kit
The UOM of the Kit Placeholder Item must match the UOM of the kit item. If they do not, a warning error message appears. This is a configuration fault that only surfaces during order entry, which is why it feels like an order problem. Fix the placeholder or kit item, then re-enter the line.
The Kit Refuses to Explode
Several independent settings suppress kit explosion, each working regardless of the others. Work through them in this order.
1. The kit specification is not Active, or has no current revision enabled.
2. The Explode Kit check box is not selected on the kit specification.
3. The Explode Option is set to Do Not Explode.
4. Block Kit Items Explosion is selected on the Customers or Vendors screen for this customer.
5. Block Kit Items Explosion is selected in the Biz-Tech Kit Processing Settings on the Order Types screen for this order type.
6. Unexploded Kit Price Calculation by Components is selected, which by design prevents explosion and prices the components instead.
The last three catch people out: the kit specification looks perfectly correct while the block comes from the customer record, the order type, or a pricing preference.
Editing Is Restricted After Explosion
Once the kit has exploded, Component Details stops being an editing surface. Users can no longer delete or add components there, and only Quantity and Warehouse remain editable. Components can still be deleted or added with the [X] and [+] buttons on the Document Details tab.
Editing component quantities on an exploded kit is itself gated. Allow Edit Exploded Kit Component lets users edit individual component quantities and delete kit components on the Sales Orders screen; if it is off, expect quantities to be read-only. The same setting exists in Purchase Orders Preferences for Acumatica purchase orders.
Component Quantities Block the Shipment
Shipping is governed by Components Qty. Is Required for Kit Item Ship in Sales Orders Preferences. Selecting it reveals a drop-down with three options, and the one chosen decides whether a shipment can be created at all.
1. Ship Available Qty. sets the kit or placeholder line to back order allowed, so a shipment can be created for the minimum component quantity without all components being available based on the kit quantity.
2. Ship Ordered Qty. requires all components to be available based on the quantity specified for the kit. Nothing ships until every component is allocated and available.
3. The third option sets the line to back order allowed without requiring component quantities to be available for shipping.
If Acumatica will not create a shipment for an order that looks fully stocked, check which of the three is in force before investigating allocations. Separately, Invoice After Full Shipment allows partial shipment and holds the placeholder to be invoiced after all components have shipped.
A Component Has Zero Quantity
If any kit component has a quantity of zero and the kit item is not set to back order allowed, an error message appears when the check box is selected. A zero-quantity component and a line that cannot be back-ordered are unshippable, and Acumatica stops you at selection rather than at the shipment.
Non-Stock Kit Rules
Non-stock kits carry two constraints, both about the Explode Option. If a non-stock kit has a stock option item, its explode option should be Automatically so the stock option is allocated during shipment. If a non-stock kit is a component or option inside another kit, the Explode Option for both parent and child kit must be Automatically. Nested Acumatica kits that appear to lose stock components almost always violate one of these rules.
Kit Assembly Is Unavailable
For non-stock kit items the Mark for assembly button is disabled by design: there is nothing physical to assemble. Generating an assembly from the order also requires Allow Kit Assembly Generation, and the Kit Assembly form requires the Kit Assembly feature to be enabled in Acumatica.
A Purchase Order Will Not Be Created
Create PO needs a required quantity with a value on the component before Acumatica will create a purchase order. It also depends on the component having a Default Vendor ID, because that is what the order is created against.
Where to Check Your Work
Before releasing a kit order into the Acumatica fulfillment cycle, confirm these fields on the finished document. Most kit disputes come down to one of them being wrong when the order was saved.
1. Kit Placeholder Item. The placeholder line, not the original kit item, should be on the order after explosion.
2. Unit of Measure on the placeholder line. It must match the UOM of the kit item.
3. Component lines. Every expected component present, with its own price, quantity, and cost.
4. Total Cost of Components on the placeholder row. Unit cost at order creation multiplied by quantity, carried to the invoice.
5. Option Category and Option Code selections. Reopen Change Options and confirm they match what the customer asked for.
6. Order total against the price calculation method: Use Kit Default Price, Use Component Default Price, or Use Combined Default Price.
7. Account and Subaccount on the placeholder row, and on the component rows if Apply to the Components is in use.
8. PO number column in Component Details. Any component marked for purchase should show a live number.
9. Back order allowed on the kit or placeholder line, consistent with the shipping option selected.
10. Quantities on component lines, particularly where Not Calculate Component Quantities is enabled.
Creating Sales Orders with Kit Items: Frequently Asked Questions
Why will my kit not explode on the sales order?
Check the specification first: Active, current revision enabled, Explode Kit selected, Explode Option not Do Not Explode. If that is all correct, the block is outside the specification. Block Kit Items Explosion on the Customers or Vendors screen, the same check box on the Order Types screen, and Unexploded Kit Price Calculation by Components each prevent Acumatica kit explosion on their own.
How do I explode a kit without entering a quantity?
Open Component Details for the kit line and click Load Components, which explodes the kit directly. Assigning a quantity does the same thing and is the more common route in Acumatica, but it is easy to trigger before you meant to.
Can I change the options after I have answered the Options popup?
Yes, as long as the kit has not been exploded. Click Change Options in Component Details and adjust the option codes. Every previous Option Category and Option Code configuration stays intact unless you change it.
Why can I not add or delete components anymore?
Two rules produce that symptom. Before explosion, adding components requires Allow Component Addition, although existing ones can still be deleted without it. After explosion, Component Details allows no adding or deleting, and only Quantity and Warehouse can be edited there. Use the [X] and [+] buttons on the Document Details tab instead.
Why does an option code keep appearing even though nobody selected it?
That code is almost certainly flagged as a Default Code on the kit specification. Default codes are included automatically so kits still configure correctly when no user answers the Options popup: the API, import scenarios, processing screens, and sales quotes.
Why does my second invoice for a kit show a price of zero?
That is expected for a partial shipment when Use Kit Default Price is the price calculation option. The invoice for the first shipment carries the total kit price, and the price for the remaining items is zero. Acumatica charges the kit price once, not once per shipment.
Why is Mark for Kit Assembly greyed out on my order?
For non-stock kit items the button is disabled by design. If the kit is a stock item and it is still unavailable, confirm that Allow Kit Assembly Generation is selected in the Biz-Tech Kit Processing Settings and that the Kit Assembly feature is enabled on the Enable/Disable Features (CS100000) form.
Do kit lines work the same way on quotes and purchase orders?
Largely, yes. On the Sales Quotes screen a kit explodes by quantity or by Load Components exactly as on an order, and changes flow back to the linked opportunity, although the kit will not explode on Opportunities itself. Acumatica purchase orders use the same Component Details window and the same two explosion triggers, with their settings in Purchase Orders Preferences.
Work With the Biz-Tech Services Kit Processing Product
Creating a sales order with kit items rests on a few decisions: whether the kit explodes, which options and substitutions apply, how the price is calculated, and what must be available before the order can ship. Once your business settles those in the kit specification and in Sales Orders Preferences, order entry is a matter of adding a line, answering the Options popup, and confirming the placeholder and component rows. The Biz-Tech Services Kit Processing product keeps that loop on the Acumatica Sales Orders screen, where the order-entry user already is.
To learn more about the Biz-Tech Services Kit Processing product for Acumatica ERP, or to discuss how kit orders should be configured for your business, visit https://biz-techservices.com to learn more and get in touch with the Biz-Tech Services team.
Check also related articles
How to Set Up Kit Processing in Acumatica
Kit Processing Configuration Checklist for Acumatica
How Kit Processing Works in Acumatica from Order Entry to Fulfillment
Watch YouTube training video.

