
How to Sync Orders Between ShipHero and Acumatica
ShipHero and Acumatica synchronize orders through processing screens that retrieve or export eligible records, then create the configured document in the destination system. This guide shows how to import ShipHero orders as sales orders or invoices, export open ERP sales orders and purchase orders, bring purchase receipts back, and verify the resulting records.
The Biz-Tech Services ShipHero Acumatica Connector supports two store-level integration directions, and that choice determines which tabs and workflows are available. The steps below concentrate on document triggers, mapping rules, validation, and exceptions. Broader movement of items, vendors, locations, shipments, transfers, and returns is covered in the sibling article, How ShipHero Data Flows Between WMS and Acumatica ERP.
Before You Start: What Must Be Configured
Before processing orders, publish the ShipHero customization package through the Customization Projects screen (SM204505), create the ShipHero Store record, enter the ShipHero username, password, and Base URL, and use Test Credentials. The Biz-Tech Services Acumatica ShipHero Connector depends on a valid store connection and an Integration Option that matches the intended direction.
1. Choose ShipHero to Acumatica when orders originate in ShipHero and must be imported.
2. Choose Acumatica to ShipHero when orders originate in the ERP system, are exported for fulfillment, and later return as shipments.
3. For inbound orders, set Import Ship Hero Orders To to Sales Order or Invoice and select the Order Type used in Acumatica.
4. Set Last Imported Order Date to control the date from which the first order should be imported.
5. Select the relevant store in Stores to get. If its Customer field is blank, customer handling follows the Customer Information setup.
6. Enable and complete Ship Via Cross Reference and Warehouse Cross Reference when those mappings are required.
7. Decide whether freight and tax should be imported, and complete the related tax fields before processing live orders.
8. For outbound sales orders, activate every eligible order type in the Order Types To Export grid.
How to Sync Orders Between ShipHero and Acumatica, Step by Step
The Biz-Tech Services ShipHero Acumatica Integration uses separate processing actions for inbound and outbound documents. Follow the path that matches the ShipHero Store Integration Option.
Step 1: Retrieve an order from ShipHero
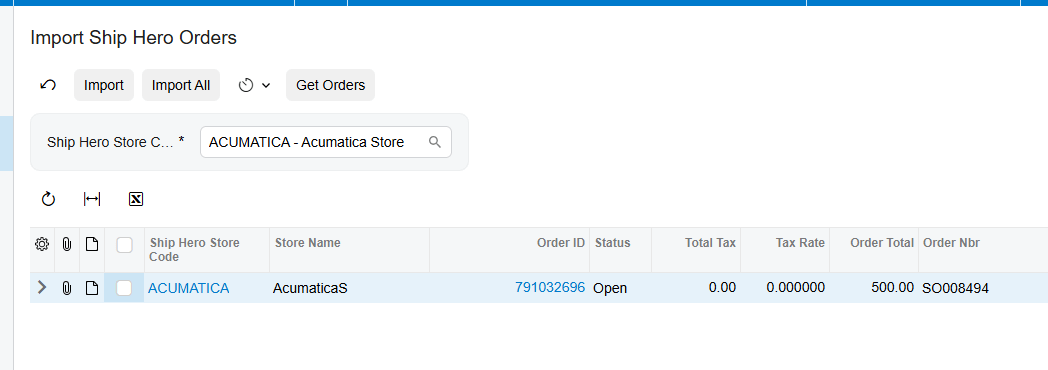
Open Import Ship Hero Orders, select the Ship Hero Store Code, and choose Get Orders. This action retrieves available orders from ShipHero and adds them to the Ship Hero Order screen. Retrieval does not yet create the Acumatica destination document.
Step 2: Import the retrieved order into Acumatica
Select the retrieved record and choose Import. The integration creates the destination document according to the ShipHero Store setup: either a Sales Order or an Invoice, using the configured Order Type. Customer, address, freight, tax, Ship Via, warehouse, and item behavior are governed by the mappings and options described below.
Step 3: Export an Acumatica sales order to ShipHero
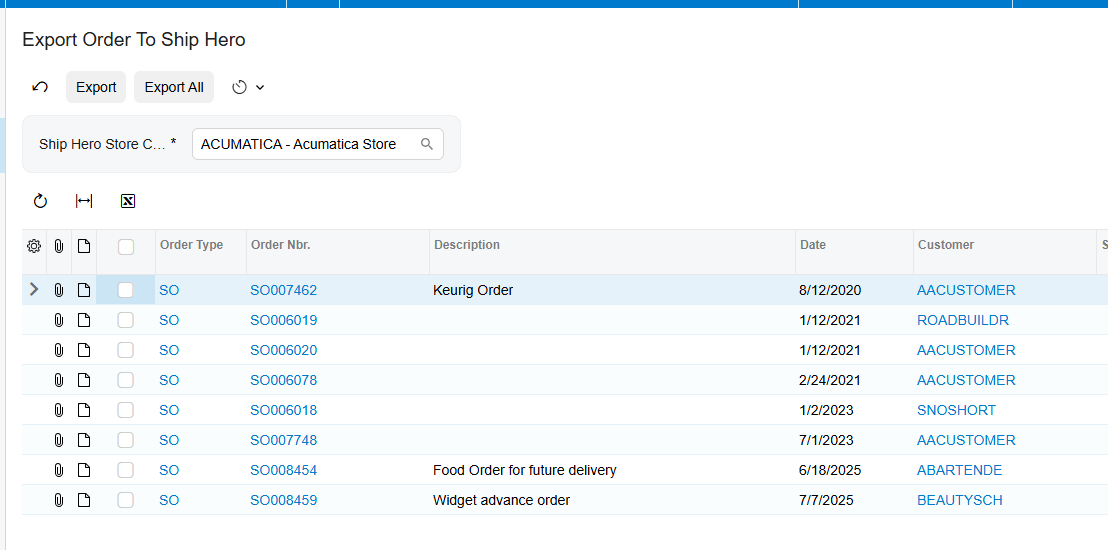
Open Export Ship Hero Order and select an eligible order. Only ERP orders with Open status appear, and the order type must be active for the selected store. Choose Export to create the order in ShipHero.
Step 4: Export an open purchase order to ShipHero
Open Export Purchase Orders to Ship Hero. The screen displays purchase orders with Open status. Select the purchase orders to send and use Export to Ship Hero. The documentation states that this screen requires no special setup beyond the connected environment.
Step 5: Retrieve and import the related purchase receipt
After an exported purchase order has a receipt in ShipHero, open Import Receipts from Ship Hero and choose Get Receipts. The screen displays receipts that need import. Choose Import to create the receipt for the purchase order in Acumatica. It is released automatically only when the store option Release PO Receipt During Import Process is selected; otherwise it remains unreleased.
Document Triggers: What Each Action Creates
1. Get Orders retrieves available ShipHero orders and places them on the Ship Hero Order screen; it does not create an Acumatica sales document by itself.
2. Import on Import Ship Hero Orders creates the configured Sales Order or Invoice in the ERP system.
3. Export on Export Ship Hero Order creates an order in ShipHero from an eligible open source order.
4. Export to Ship Hero on the purchase-order processing screen creates a ShipHero purchase order from an open Acumatica purchase order.
5. Get Receipts retrieves ShipHero receipts and displays those awaiting import.
6. Import on Import Receipts from Ship Hero creates an Acumatica receipt for the related purchase order and may release it according to store setup.
7. Shipment processing is separate. Get Shipments retrieves ShipHero shipments, while Import brings the shipment into Acumatica and confirms it. The source also documents shipment webhooks that can retrieve and automatically import shipment data, match it to the corresponding sales order, and process it under the selected webhook branch.
Mapping Rules That Decide What Appears on the Order
The order result is controlled by the ShipHero Store rather than by a single processing-screen action. Review these rules before diagnosing a document that imported with unexpected values.
1. Document type: Import Ship Hero Orders To selects Sales Order or Invoice; Order Type supplies the destination document type.
2. Customer: with Import Customer selected, ShipHero customer information creates a new customer using the selected Customer Class. Without it, the order uses the default Customer.
3. Addresses: Override Ship Address Information and Override Bill Address Information control whether order address data replaces the default address information.
4. Freight: Import Freight determines whether the ShipHero order freight is included.
5. Tax: Import Tax enables ShipHero order tax import. Customer Tax Zone, Tax ID, and Taxable Category provide the documented tax setup values.
6. Ship Via: when Use Cross Ref for Ship Via is selected, the Ship Via Cross Reference tab maps ShipHero and Acumatica values.
7. Warehouse: Warehouse Cross Reference assigns the mapped warehouse to the imported sales order and is also used during item synchronization.
8. Missing items: with Import Item selected, a missing item can be created using the configured imported item type, item class, unit of measure, and warehouse ID. Without it, the integration uses Replace Missing Products and the configured Warehouse ID rather than creating a new item.
9. Packaging: when Automatic Packaging is not selected, Default Box ID becomes available. The documentation instructs users to select the default box and then select Automatic Packaging to use that package with the order.
Validation and Common Exceptions
Validate eligibility and setup before treating an empty grid as a connection failure.
1. An outbound sales order does not appear unless its status is Open and its order type is active in Order Types To Export for the selected store.
2. An outbound purchase order does not appear unless its status is Open.
3. An inbound order can use the wrong warehouse when Warehouse Cross Reference is incomplete or does not match the incoming value.
4. A missing product becomes a newly created item only when Import Item is selected; otherwise the documented replacement-item behavior applies.
5. A receipt remains unreleased when Release PO Receipt During Import Process is not selected.
6. A webhook will not work if Webhook Name and Webhook Type do not match, if Branch for Webhooks is blank, or if the same URL has already been registered.
7. The document does not provide an error-message catalog for failed order import, export, invoice creation, or purchase-order processing. Use the eligibility rules, store options, cross-references, and displayed source records as the documented diagnostic path.
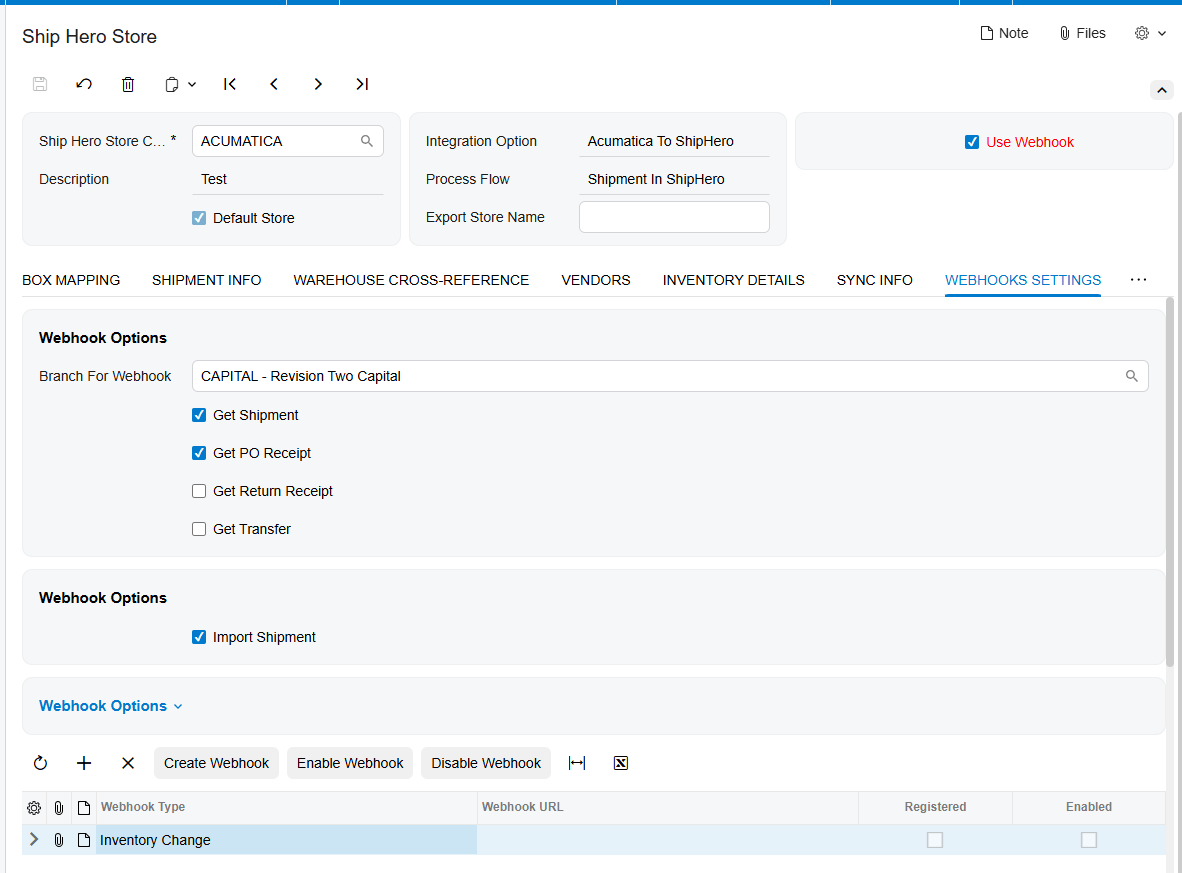
For webhook-based shipment validation, first enable Use Webhook in the ShipHero Store header so the Webhook Settings tab becomes available. On the Webhooks screen, select a Webhook Name that exactly matches Webhook Type in the store. Generate the URL, place it in Webhook Settings, and choose Create Webhook to register it for POST requests. The same URL can be created for only one webhook and set only once. Select Branch for Webhooks because incoming shipments, purchase order receipts, transfers, and returns are processed under that branch. The webhook grid then shows Webhook Type, Webhook URL, Registered, and Enabled. Registered indicates that ShipHero accepted the registration; Enabled indicates that the event is active. Create Webhook registers the URL, Enable Webhook starts real-time synchronization, and Disable Webhook stops incoming events while preserving the configuration. These fields help distinguish a registration problem from a disabled event or a document-mapping issue.
Where to Check Your Work
The Biz-Tech Services Acumatica ShipHero Integration keeps source and processing details visible across its dedicated screens. Check the following places after each action:
1. Ship Hero Order header: Order ID, Store Code, Acumatica order status, ShipHero order number, and ShipHero order status.
2. Ship Hero Order financial area: the financial portion of the imported source order.
3. Ship Hero Order Details tab: ordered products.
4. Ship Hero Order Addresses tab: customer address information.
5. Ship Hero Order Shipments tab: shipment records and the linked shipment ID.
6. Ship Hero Store: Last Import Date and Last Imported Order Date.
7. Export Ship Hero Order: confirm the Acumatica order is Open and visible for the selected store.
8. Ship Hero Purchase Order inquiry: synchronized purchase-order data and the Update Order action for changes made in ShipHero.
9. Import Receipts from Ship Hero: receipts retrieved by Get Receipts and awaiting Import.
10. Ship Hero Shipment: package, label, and shipment information, plus the Processed checkbox after processing.
How to Sync Orders Between ShipHero and Acumatica: Frequently Asked Questions
Can a ShipHero order create an Acumatica invoice instead of a sales order?
Yes. The Biz-Tech Services ShipHero Acumatica Integrator provides Sales Order and Invoice choices in Import Ship Hero Orders To. Order Type supplies the Acumatica document type.
Why is my open Acumatica sales order missing from the export screen?
The order must be Open, and its order type must be active in the selected store’s Order Types To Export grid.
Why did Get Orders not create a sales order in Acumatica?
Get Orders only adds the record to Ship Hero Order. Run Import to create the configured Acumatica Sales Order or Invoice.
Why did the imported order use a replacement product?
Without Import Item, a missing item uses Replace Missing Products and the configured Warehouse ID. Configure Import Item when new item creation is intended.
Why was the purchase receipt not released?
Check Release PO Receipt During Import Process. When it is unselected, receipts import as unreleased. For a partial receipt, the source states that the last imported receipt is released.
Can order and shipment updates run through webhooks?
Shipment webhooks can import shipment data and match it to the corresponding sales order. The source does not document a general order-created webhook configuration, so not every order action should be assumed to be webhook-driven.
How can I verify a purchase order changed in ShipHero?
In Ship Hero Purchase Order, Update Order brings ShipHero changes to the synchronized purchase order back to Acumatica.
Work With the Biz-Tech Services ShipHero
Use the correct direction, eligible statuses, active order types, and complete mapping rules. Treat retrieval and creation as separate steps, then verify the ShipHero records.
If your team needs help configuring, testing, or troubleshooting the Biz-Tech Services Acumatica ShipHero Integrator, visit https://biz-techservices.com to work with Biz-Tech Services.
Check the video for more details – https://www.youtube.com/watch?v=nmPg3d1oAPI

