
How Kit Processing Works in Acumatica from Order Entry to Fulfillment
Kit Processing in Acumatica is easiest to understand as a data flow rather than as a screen. A single kit record starts life on the Kit Specifications form, picks up defaults from your preferences screens, becomes a line on a sales order, splits into a placeholder and a set of components, and finally resolves into a shipment, an invoice, and a set of inventory transactions. Every problem a user ever reports with kits traces back to one of those handoffs. Understanding where each record is created, which field controls the next step, and where the result becomes visible is what makes the module predictable.
The Biz-Tech Services Kit Processing product lets users explode kit components directly on the Sales Orders screen, with no need to open a separate maintenance form or print a pick list just to see what a kit contains. Cost calculation for kit items is controlled from the native Sales Order Preferences screen, which gives companies flexibility without forcing maintenance adjustments to inventory items. This article follows a kit through the entire Acumatica data flow, from the specification that defines it to the released invoice that closes it out, and points out the fields worth watching at each stage.
Stage One: The Kit Specification Is the Source of Every Record
Everything downstream inherits from the Kit Specifications form, so this is where the data flow begins. The form is available only when the Kit Assembly feature is enabled on the Enable/Disable Features (CS100000) form, and you can create a kit specification only for an inventory item that has already been marked as a kit on the General tab of the Stock Items (IN202500) or Non-Stock Items (IN202000) form. That marking is the true origin point of the record. Without it, no specification can exist.
The header fields define the identity of the kit. Kit Inventory ID is the inventory identifier of the kit as assigned on the stock or non-stock item form, and Non-Stock is a read-only checkbox indicating that the kit is a non-stock kit. Revision ID uniquely identifies each revision of the specification, and Description holds a brief summary. Two checkboxes govern whether the record participates in the flow at all: Active marks the specification as usable, and Current Revision indicates which revision the system will actually use when the kit explodes on a sales order. If a kit item already has a current revision and you attempt to change it, the system warns you that saving will uncheck the previous one. Only one revision is current at a time, and that is the revision the rest of the flow will read.
Explode Kit is the field that determines whether the kit will break into its components on the Sales Orders screen. Selecting it activates three further fields that shape the entire downstream flow: Kit Placeholder Item, Explode Option, and Price Calculation. Kit has options adds Option Category and Option Codes tabs, where you define the choices a user will be asked to make during order entry. Marking an option category as Required forces the user to select a code in the Options popup before the kit order can proceed, while Sort Order controls whether categories appear in ascending or descending order in the Sales Orders dropdown. Default Code automatically includes an option code in the order without user input, which matters a great deal for any path where no human is present to choose: API calls, import scenarios, processing screens, and opportunities or sales quotes.
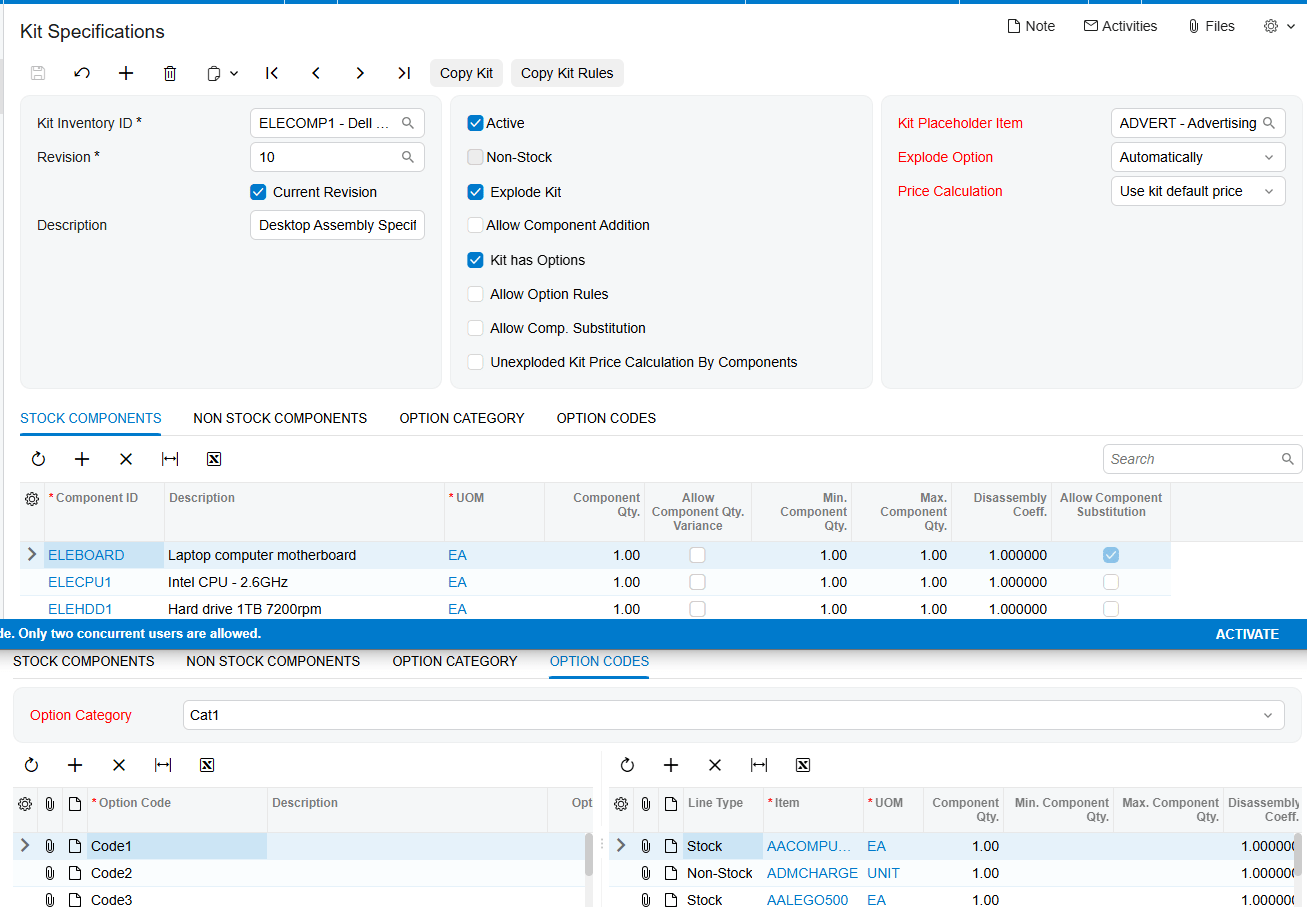
Three further checkboxes extend what users can change later in the flow. Allow Option Rules adds an Option Rule tab, where a source option category and code exclude a target option category and code on the Sales Orders screen. If Size 8×10 is configured to exclude the color Black, a user who selects 8×10 will not be offered Black; selecting a size that is not covered by a rule, such as 8×12, makes Black available again. Allow Component Substitution adds a Substitution tab and a matching column on the Stock Components tab, letting you nominate replacement items for specific components. Allow Component Addition activates the Add Row option in the Component Details dialog on the Sales Orders screen, permitting new components to be added before the kit explodes.
Two structural rules belong here because they cause real problems when missed. First, the Unit of Measure of the Kit Placeholder Item must match the Unit of Measure of the kit item, or the system raises a warning. Second, for nested kits, where a kit item is used as a component or option inside another kit, the main kit is the Parent Kit and the included kit is the Child Kit. If a non-stock kit is used as a component or option, the Explode Option for both the parent and the child must be set to Automatically. The same requirement applies when a non-stock kit contains a stock option item, because only automatic explosion ensures the stock option is allocated during shipment.
Stage Two: Acumatica Preferences Supply the Defaults That Flow Downstream
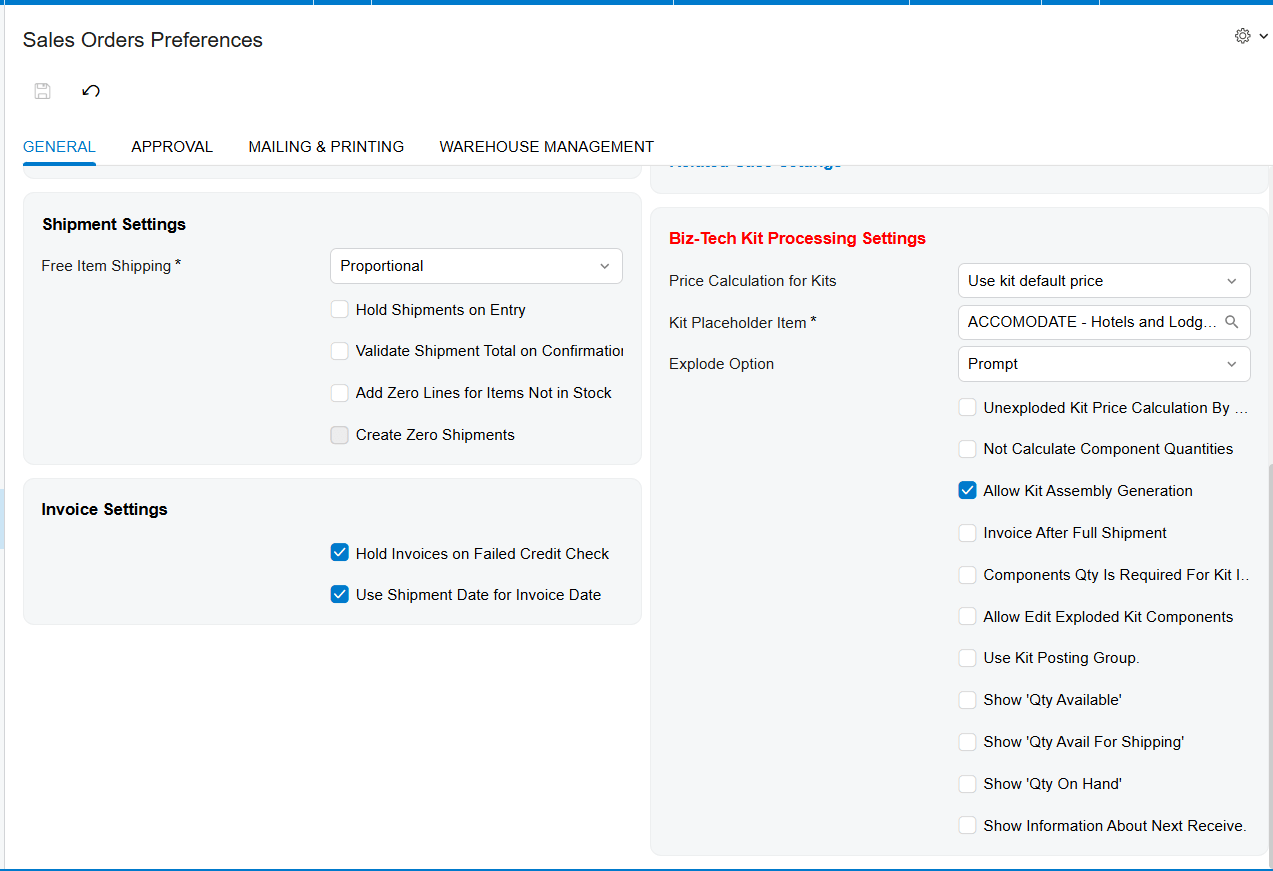
The second stage of the Acumatica Kit Processing data flow is the Biz-Tech Services Kit Processing Settings section on the Sales Orders Preferences screen, with an equivalent section on the Purchase Orders Preferences screen. Price Calculation for Kits, Kit Placeholder Item, and Explode Option are general settings that apply to every kit. The precedence rule is simple and worth teaching to every user: if those same settings are configured manually for a specific kit on the Kit Specifications screen, the system prioritizes the kit-level setting over the general one. When a kit behaves differently from what preferences suggest, the specification is almost always the reason. If the specific item has already configyration done in Kit Specifications screen, then the setup of individual item would be used
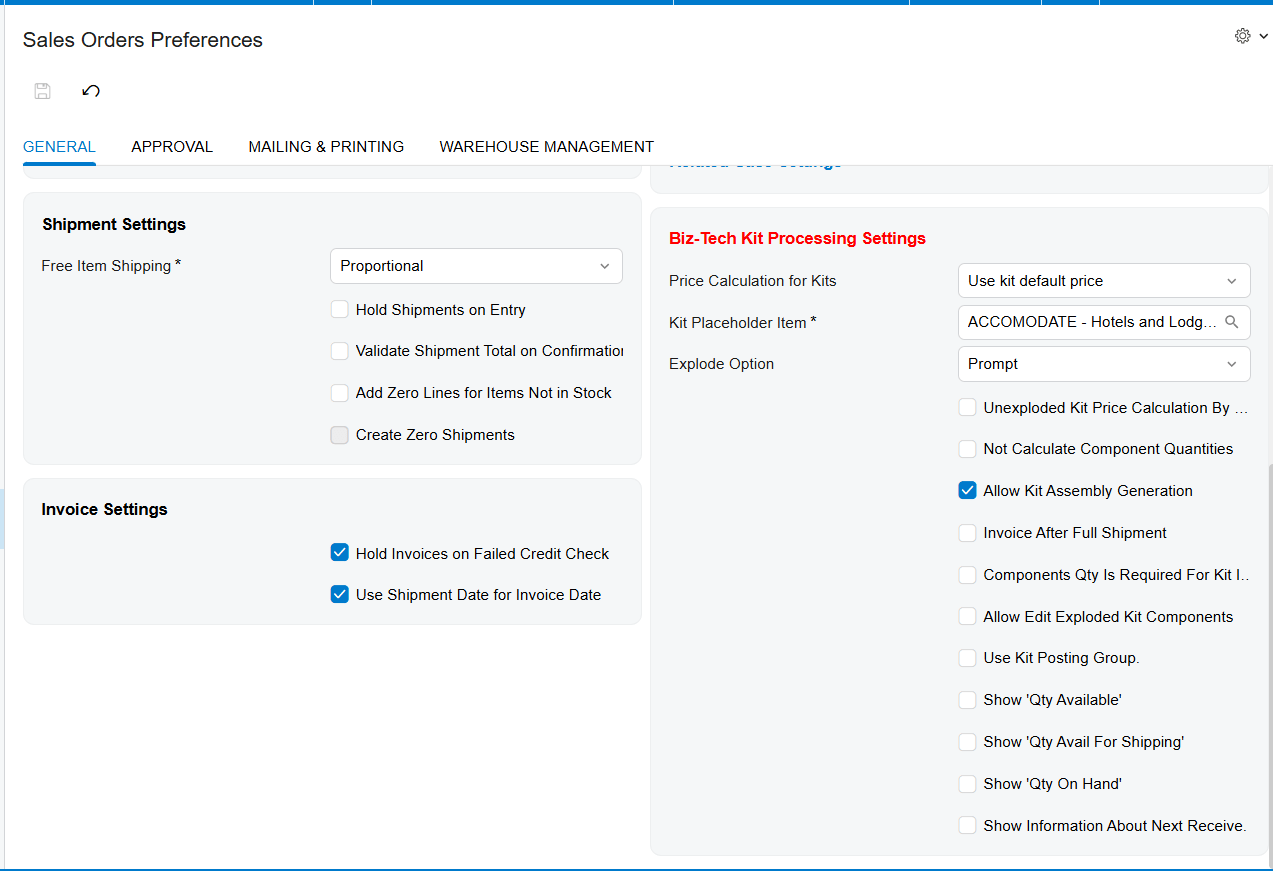
Several preference fields change how quantities and documents behave later in the flow. Not Calculate Component Quantities bases quantity calculation in sales orders on the quantity specified for the kit itself. Invoice After Full Shipment allows partial shipment and holds the placeholder item back until every component has shipped. Use Kit Posting Group places the kit item’s account and subaccount values on the placeholder row after explosion, and Apply to the Components extends those same values to the component rows. Allow Kit Assembly Generation enables the assembly branch described later. Unexploded Kit Price Calculation by Components prevents the kit from exploding and calculates only the price of the components toward the order total, which is why selecting it triggers a warning that the Explode Kit checkbox should be unchecked.
Components Qty. Is Required for Kit Item Ship deserves particular attention, because it decides whether a shipment can be created at all. Selecting it reveals a dropdown with three shipping behaviors. Ship Available Qty. sets the kit or placeholder line to back order allowed and lets a shipment be created for the minimum component quantity, without requiring every component to be available. Ship Ordered Qty. requires all components to be available and allocated based on the kit quantity, so nothing ships until everything is ready. The third option allows back order without requiring component quantity to be available for shipping. Finally, Allow Edit Exploded Kit Component gives users control over component quantities after explosion and permits deletion of kit components on the Sales Orders screen, and it has the same effect on the Purchase Orders screen when set in purchase order preferences.
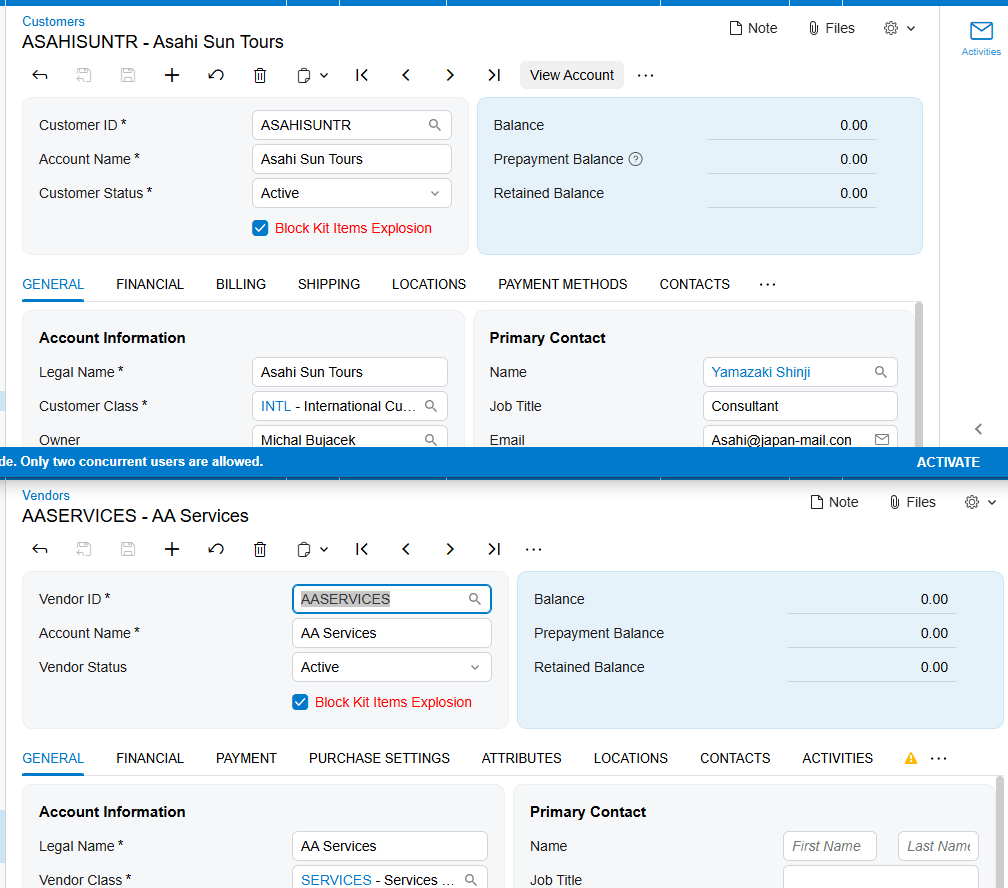
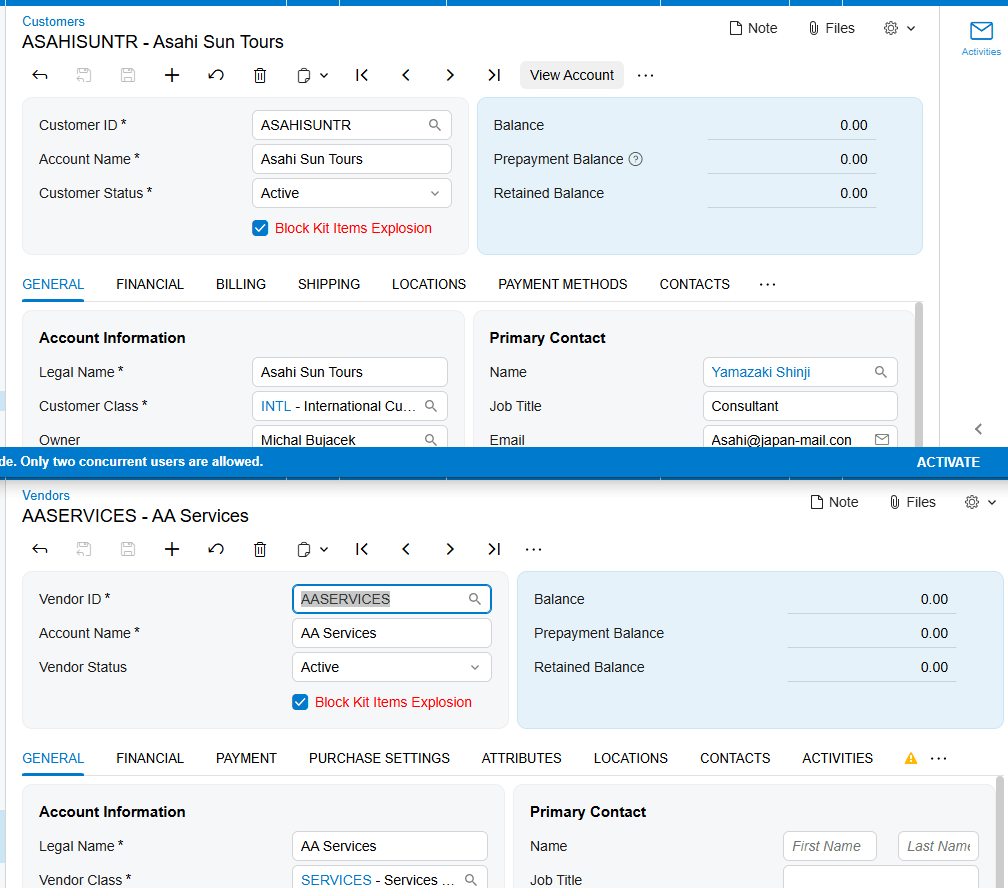
Two settings outside these screens can also stop the flow. Selecting Block Kit Items Explosion on the Customers or Vendors screen prevents kits from exploding for that business account, and the same checkbox in the Biz-Tech Kit Processing Settings on the Order Types screen prevents explosion for that order type. Both override the explode option on the kit itself, so they are the first place to look when a kit refuses to explode for one customer or one order type but works everywhere else.
Stage Three: Sales Order Entry and the Component Details Window
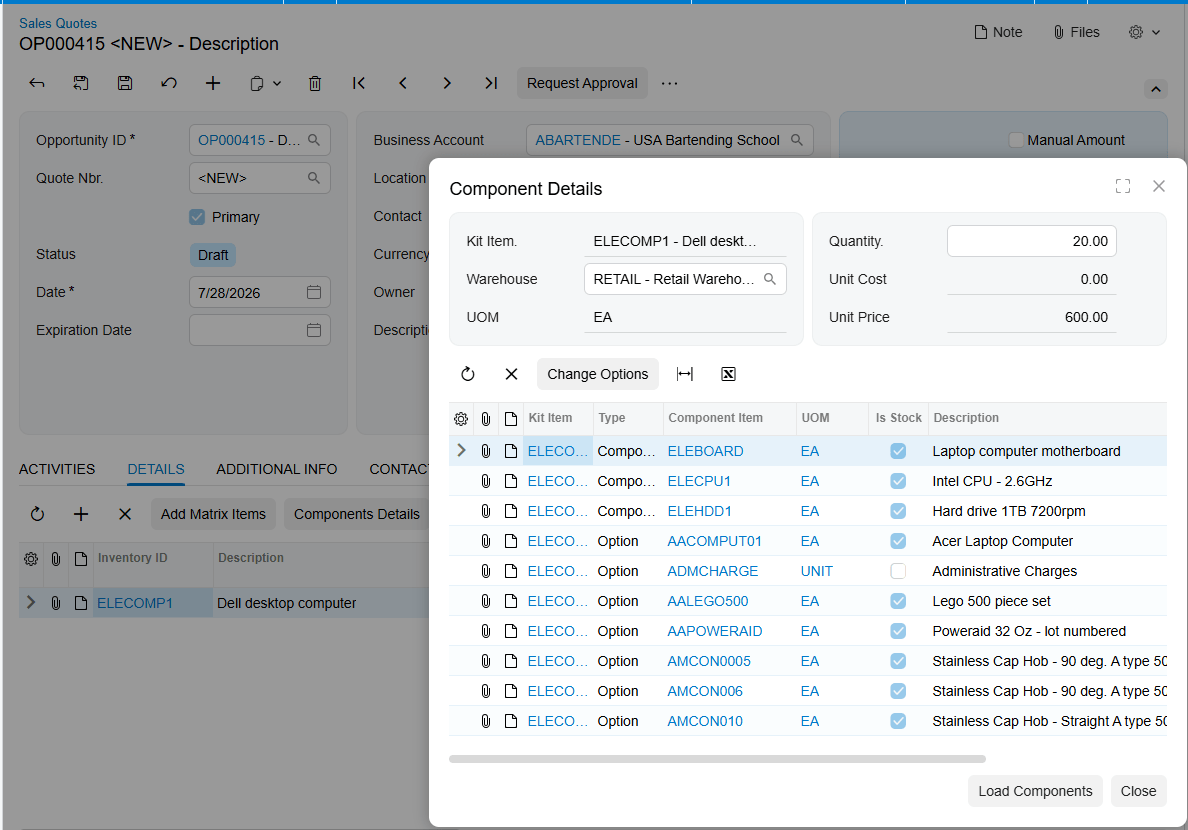
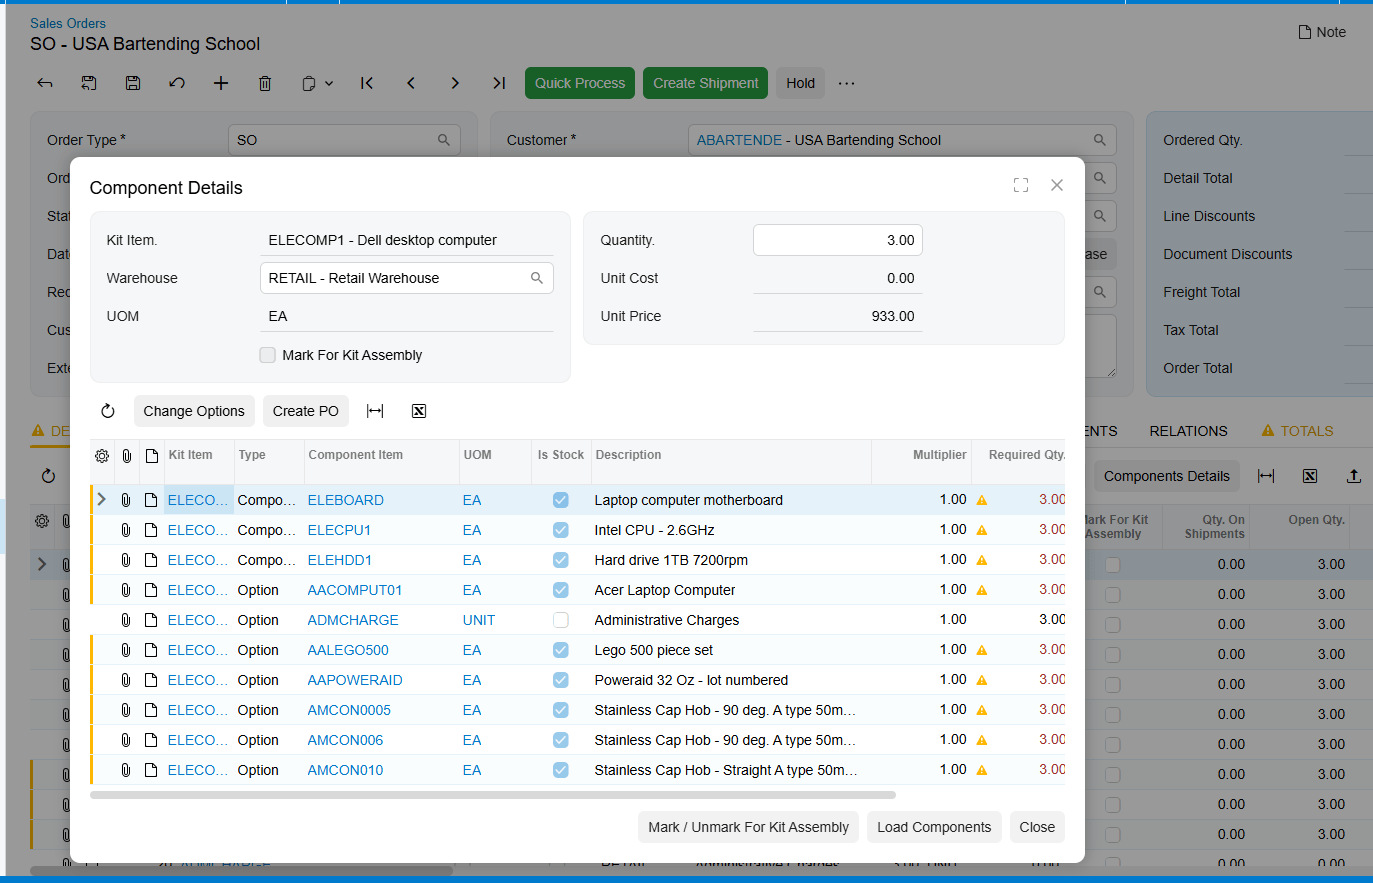
Once a kit item is added to a sales order, the flow moves into the Component Details popup, which is the working surface for everything that happens before explosion. If the kit has options, an Options popup opens automatically when the kit item is entered, prompting the user to select an option code for each option category before pressing OK. Those selections can still be revised without exploding the kit by using the Change Options button in Component Details; all previous option category and option code configurations remain intact unless they are manually changed.
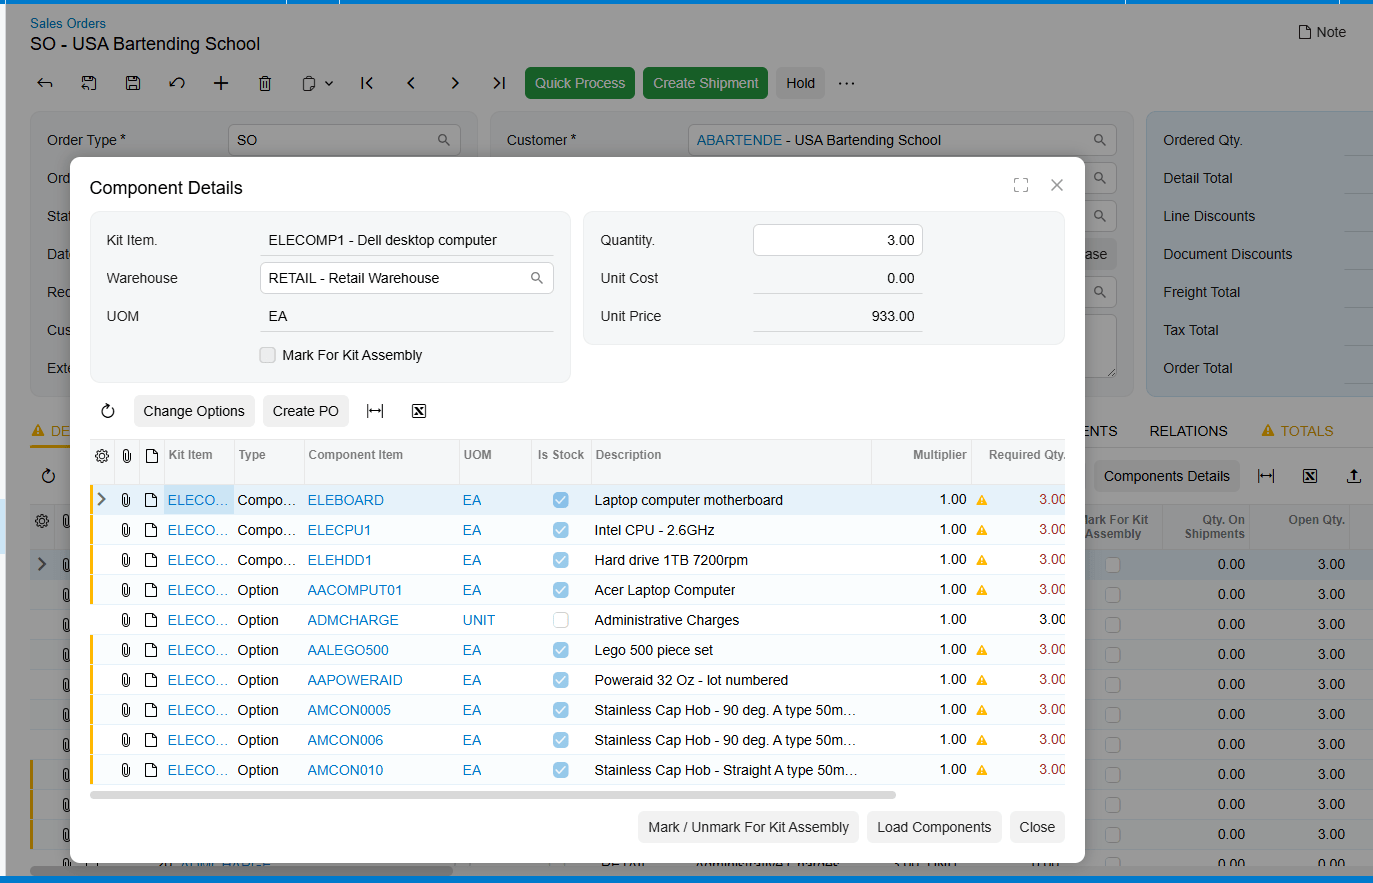
Before explosion, Component Details is where the order line is shaped. Users can add or delete components, and they can exchange a component for an approved substitute by double-clicking the item and choosing the replacement from the search icon that appears beside it. This window is also the point where purchasing can be triggered. Selecting the Mark for PO checkbox for a component and clicking Create PO generates a purchase order, and the resulting purchase order number is displayed under the PO Number field in Component Details. The required quantity must have a value for the purchase order to be created. Purchase orders are created according to the Default Vendor ID of each component, and when several components share the same vendor, a single purchase order covers them all. If that purchase order or its lines are later deleted, the number is removed from Component Details automatically, which keeps the reference trustworthy.
Stage Four: Acumatica Kit Explosion and the Placeholder Item
Explosion is the pivotal transformation in the Biz-Tech Services Acumatica Kit Processing flow, because it is the moment one order line becomes many. A kit explodes in one of two ways: by clicking Load Components in the Component Details dialog, or simply by assigning a quantity to the newly added kit on the sales order. Which of these is even possible depends on the Explode Option chosen earlier. Prompt asks the user whether to explode, Automatically explodes without user intervention, and Do Not Explode prevents explosion entirely.
When the kit explodes, the kit placeholder item and its components appear on the sales order lines with their respective prices, quantities, and costs. The placeholder is a non-stock item that replaces the kit item on the Sales Orders screen after explosion. Its purpose is financial accuracy: a kit item consists of multiple components, and when those components are added to the order as real lines, leaving the original kit item in place would double-count item cost. The placeholder behaves like the kit item in the order but contains no actual items. One field on that placeholder row is worth monitoring closely. Total Cost of Components is calculated as the component’s unit cost at the time the sales order was created, which does not change afterward, multiplied by the quantity. It is displayed on the kit placeholder row and carried forward to the invoice, making it the natural checkpoint for verifying kit margin.
Price Calculation determines what the customer is charged, and it offers three methods. Use Kit Default Price applies the kit’s own default price, plus any manually added price for its options. Use Component Default Price bases the price on each component’s default price and sets the kit item price to zero. Use Combined Default Price adds the kit’s default price to the default prices of the components. The choice matters beyond the order total, because it changes how partial shipments are invoiced, as described in the fulfillment stage below.
Editing rules tighten once explosion has occurred, and this catches users out more than any other behavior in the module. After the kit has exploded, components can no longer be added or deleted from the Component Details popup; only Quantity and Warehouse remain editable there. To add or remove components at that point, users must work with the [X] and [+] buttons on the Document Details tab of the sales order. Before explosion, the picture is different again: if Allow Component Addition is off, new components cannot be added, although existing components can still be deleted.
Stage Five: The Acumatica Kit Assembly Branch
Kit Assembly is an optional branch in the Acumatica data flow rather than a mandatory step, and it is available only when the Kit Assembly feature is enabled on the Enable/Disable Features (CS100000) form. A kit assembly document contains the required stock components with their quantities and costs, calculated according to the kit specification revision you specify. Assemblies can be created directly on the Kit Assembly screen by entering the kit item in the Inventory ID field, selecting the revision, choosing a warehouse, and entering a quantity. Components can be added or removed before the assembly is released.
The more interesting path runs from the sales order, because it lets you assemble without exploding the kit. The user enters the kit on the sales order, optionally adjusts components in the Component Details popup, selects the Mark for Kit Assembly checkbox on the Details tab, and then clicks Generate Kit Assembly from the Actions list followed by Save. The same action is available through the Mark/Unmark for Kit Assembly button in the Component Details dialog. The generated assembly places a link number in the Kit Assembly field on the Details tab of the sales order, and clicking that link opens the Kit Assembly form. The relationship is visible from both ends: the Orders tab of the Kit Assembly screen shows the linked sales order number the assembly came from. Two constraints apply. Kit assemblies generated from sales orders always use the current revision specified on the Kit Specifications screen, and for non-stock kit items the Mark for Assembly button is disabled.
Stage Six: Kit Order Fulfillment in Acumatica
With explosion complete, the order moves into the standard Acumatica fulfillment cycle, and the kit records follow the components rather than the kit. The sequence is four steps. First, click Create Shipment on the toolbar and confirm the Specify Shipment Parameters window with OK. Second, on the Shipments screen to which you are redirected, click Confirm Shipment. Third, on the Invoices screen, click Prepare Invoice. Fourth, release the invoice with the Release button. At that point the inventory and financial impact of the kit is fully posted.
Partial shipments introduce one behavior that finance teams should know before it appears on a customer document. When Use Kit Default Price is the selected price calculation method and the order ships partially, the invoice for the first shipment carries the total kit price, and the invoice price for the remaining items is zero. This is intentional, since the kit is priced once rather than per component, but it looks surprising on a second invoice if nobody was expecting it. Where this is undesirable, Invoice After Full Shipment holds the placeholder back until all components have shipped, so the kit is invoiced only once everything is out the door.
The Purchase Order Side of Kit Processing
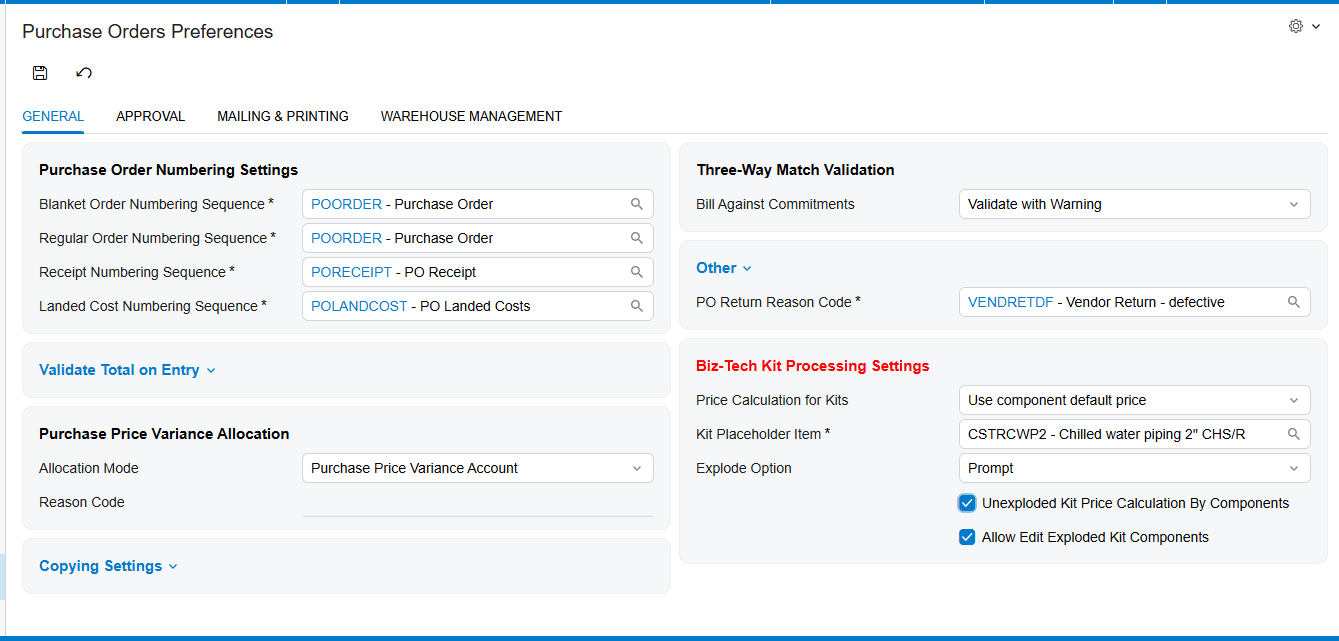
Kit Processing in Acumatica is not limited to the sell side. The Purchase Orders Preferences screen carries the same Biz-Tech Kit Processing Settings section, with the same precedence rule that kit-level configuration overrides the general settings, and the same Unexploded Kit Price Calculation by Components and Allow Edit Exploded Kit Component behaviors. Adding a kit item to a purchase order gives access to the same Component Details popup, where components can be added, deleted, or exchanged for substitutes and options can be changed before explosion. The kit is exploded either by clicking Load Components or by assigning a quantity to the kit line, exactly as on the sales order.
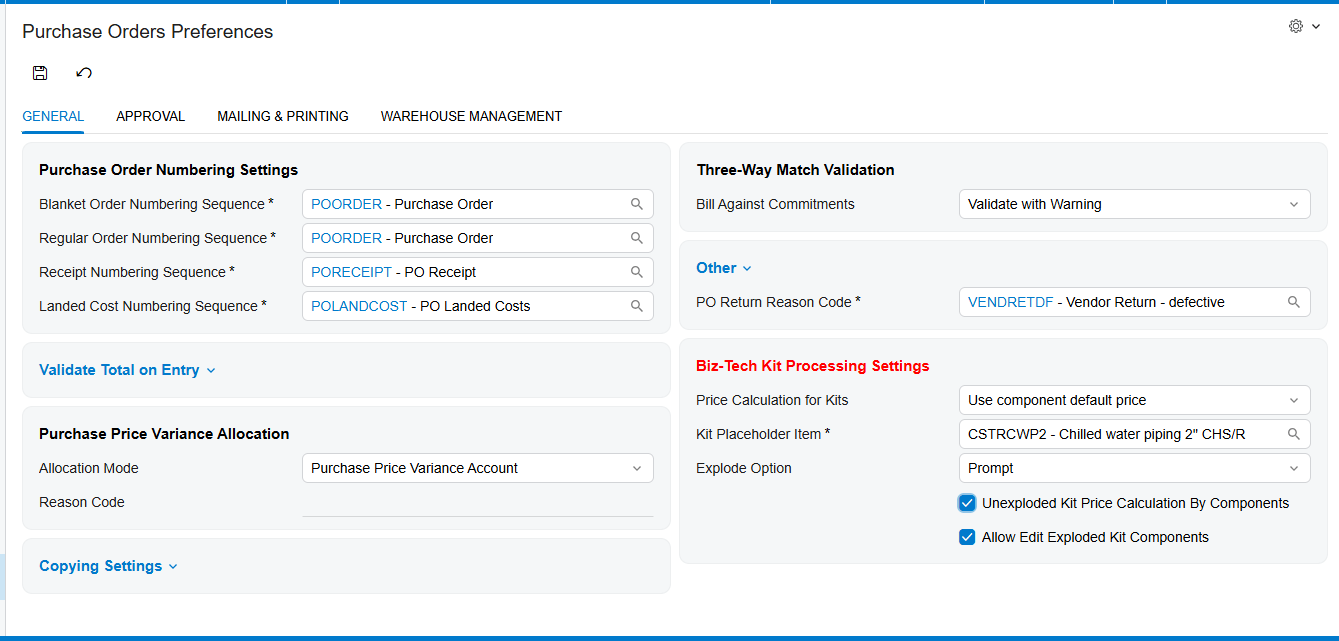
The inbound flow then completes in three moves. A purchase order containing the kit items is created and exploded. When the components are received, a purchase receipt for the ordered items is created. On release of that purchase receipt, the system automatically generates an inventory receipt reflecting the items in inventory. That automatic inventory receipt is the point at which purchased kit components become available stock, so it is the record to check when component availability does not look right after a delivery.
Where the Flow Starts Earlier: Opportunities and Sales Quotes
For businesses that quote before they sell, the kit data flow begins one step earlier. A kit item is added on the Details tab of the Opportunities screen and a quote is generated with the Create Quote button. The kit will not explode on the Opportunities screen itself.
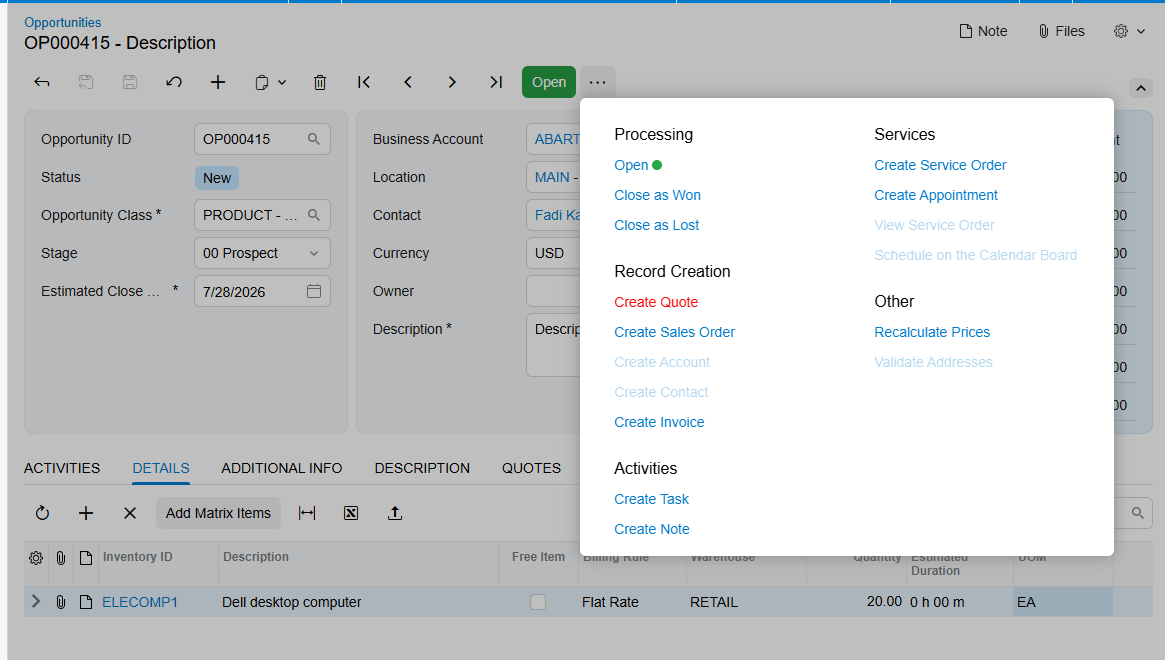
Explosion happens on the Sales Quotes screen, either by giving the kit a quantity or by clicking Load Components on the Details tab. After saving, the exploded kit is reflected back in the Details tab of the Opportunities screen, and from then on any change made to the exploded kit updates in both screens. This is also the path where Default Code earns its place, since no user is prompted to pick options during automated or quote-driven creation.
Kit Pricing Summary: Where Pricing Is Reviewed and Applied
Kit Pricing Summary is the analysis point of the Acumatica Kit Processing flow, and it uses the same explosion logic as the order screens. For a kit to appear here, its specification must have the Active checkbox selected and the Revision field filled in. Selecting the kit in the Kit Inventory ID field loads the kit together with its components, stock components first and non-stock components after. Each component line displays Quantity, Unit Price, Min Markup %, Markup %, Extended Price, and Surcharge, and the calculated totals of Extended Price and Surcharge appear on the last line.
Two formulas govern the numbers. Surcharge is calculated as quantity multiplied by unit price multiplied by minimum markup, divided by one hundred. Total with Surcharge is the sum of the extended price and surcharge amounts across the component lines. Clicking Apply Price takes the total surcharge from the last line and applies it to the kit item’s default price, which is how component-level markup becomes a kit-level price. The screen works for nested kits as well: after the parent kit is exploded, the components of both kits load together and the totals line sums their extended prices and surcharges. The whole summary can be exported to Excel, which makes it a practical review artifact for a pricing meeting.
Where to Monitor Kit Processing Results in Acumatica
If you are training users or troubleshooting a kit order in Acumatica, these are the fields and screens that tell you what the system actually did:
- Current Revision on Kit Specifications, which determines the revision every downstream document reads.
- Explode Option and Explode Kit, which decide whether the order line ever becomes components.
- Block Kit Items Explosion on the Customers, Vendors, and Order Types screens, which silently overrides the kit’s own explode setting.
- Total Cost of Components on the kit placeholder row, which carries the frozen unit cost forward to the invoice.
- PO Number in the Component Details popup, which confirms whether a component was purchased and stays accurate if the purchase order is deleted.
- Kit Assembly on the sales order Details tab, which links to the generated assembly, and the Orders tab of the Kit Assembly screen, which links back.
- The Component Availability section of Component Details, which can display Qty. Available, Qty. Avail. for Shipping, and Qty. on Hand.
- Next receive information in the same window, including next receive type and reference number, with Inc. In Receipt, Inc. In Transfer, Inc. PO, Inc. PO Receipt, and Inc. PO Transfer controlling which documents are considered when calculating the next receive date and quantity.
- The totals line on Kit Pricing Summary, where extended price and surcharge are reviewed before Apply Price changes the kit’s default price.
One note on availability display: if any kit component has a quantity of zero and the kit item is not set to back order allowed, an error message appears when the availability checkbox is selected. That message is a genuine signal about allocation, not a display fault.
Loading Kits in Bulk with Acumatica Import Scenarios
Kit items do not have to be built by hand. Acumatica import scenarios support structured, automated entry of kit data from external sources, and the product ships with a set of scenarios that map to the stages described above. BZ-Import Is a Kit Check Box in Non-Stock and BZ-Import Is a Kit Check Box in Stock enable the Is a Kit checkbox on the respective item forms, which is the prerequisite for everything else. BZ-Import Kit Header configures the header section of the Kit Specifications screen. BZ-Import Kit Stock Components and BZ-Import Kit Non-Stock Components add components to the kit. BZ-Import Kit Option Category adds option categories, option codes, and the stock and non-stock components associated with each code, and BZ-Import Kit Substitution adds substitute items for the relevant components. Before running any of them, confirm that data mapping between the external source and the corresponding Acumatica fields is correct, and remember that Default Code matters here because an import has no user to answer an options prompt.
Kit Processing in Acumatica: Frequently Asked Questions
What is the kit placeholder item and why does Acumatica use one?
The kit placeholder item is a non-stock item that replaces the kit item on the Sales Orders screen after explosion. Because the components are added to the order as their own lines, keeping the original kit item would double-count item cost. The placeholder behaves like the kit item in the order but contains no actual items. Its unit of measure must match the unit of measure of the kit item, or the system raises a warning.
Why will my kit not explode on the sales order?
Check four things in order. The kit specification must have Explode Kit selected and a current revision marked. The Explode Option must not be set to Do Not Explode. The Block Kit Items Explosion checkbox may be selected on the Customers or Vendors screen, or in the Biz-Tech Kit Processing Settings on the Order Types screen, either of which prevents explosion. Finally, Unexploded Kit Price Calculation by Components deliberately prevents explosion and prices the kit by its components instead.
Can components be changed after a kit has exploded?
Only partially. Once the kit has exploded, components can no longer be added or deleted from the Component Details popup, where just Quantity and Warehouse remain editable. To add or remove components after explosion, use the [X] and [+] buttons on the Document Details tab of the sales order. Editing component quantities and deleting components on the order screen also requires Allow Edit Exploded Kit Component to be enabled in preferences.
How does Acumatica price a kit that ships partially?
When Use Kit Default Price is the selected price calculation method, the invoice for the first shipment carries the total kit price and the invoice price for the remaining items is zero, because the kit is priced once rather than per component. If you would rather invoice only when the order is complete, enable Invoice After Full Shipment, which permits partial shipment but holds the placeholder item back until every component has shipped.
Can a kit contain another kit?
Yes. Kit items can be configured as nested components or options inside both stock and non-stock kit specifications, with the outer kit acting as the Parent Kit and the included kit as the Child Kit. If a non-stock kit is used as a component or option, the Explode Option for both the parent and the child must be set to Automatically. The Copy Kit function and the Kit Pricing Summary screen both support nested kits.
How do I create a purchase order for a single kit component?
Add the kit to the sales order and, without exploding it, open the Component Details popup. Select the Mark for PO checkbox for the component you need and click Create PO. The required quantity must have a value. The purchase order is created against the component’s Default Vendor ID, several components sharing a vendor are combined into one purchase order, and the resulting number appears in the PO Number field of the popup.
Work With the Biz-Tech Services Kit Processing Product
Kit Processing in Acumatica rewards teams who understand the flow rather than memorizing screens. The specification defines the kit, preferences supply the defaults, order entry shapes the line, explosion turns one line into a placeholder plus components, and fulfillment converts those components into shipments, invoices, and inventory transactions. Once users know which field governs each handoff and where to look when a result is unexpected, kit orders stop being a special case and become routine.
If your business sells or purchases configured products and wants kit components visible and controllable right on the order, we are glad to help you scope, configure, and roll out Kit Processing. Visit https://biz-techservices.com to learn more about our Acumatica expertise or to schedule a personalized demonstration of the Biz-Tech Services Kit Processing product.
How Kit Processing Works in Acumatica from Order Entry to Fulfillment
Kit Processing in Acumatica is easiest to understand as a data flow rather than as a screen. A single kit record starts life on the Kit Specifications form, picks up defaults from your preferences screens, becomes a line on a sales order, splits into a placeholder and a set of components, and finally resolves into a shipment, an invoice, and a set of inventory transactions. Every problem a user ever reports with kits traces back to one of those handoffs. Understanding where each record is created, which field controls the next step, and where the result becomes visible is what makes the module predictable.
The Biz-Tech Services Kit Processing product lets users explode kit components directly on the Sales Orders screen, with no need to open a separate maintenance form or print a pick list just to see what a kit contains. Cost calculation for kit items is controlled from the native Sales Order Preferences screen, which gives companies flexibility without forcing maintenance adjustments to inventory items. This article follows a kit through the entire Acumatica data flow, from the specification that defines it to the released invoice that closes it out, and points out the fields worth watching at each stage.
Stage One: The Kit Specification Is the Source of Every Record
Everything downstream inherits from the Kit Specifications form, so this is where the data flow begins. The form is available only when the Kit Assembly feature is enabled on the Enable/Disable Features (CS100000) form, and you can create a kit specification only for an inventory item that has already been marked as a kit on the General tab of the Stock Items (IN202500) or Non-Stock Items (IN202000) form. That marking is the true origin point of the record. Without it, no specification can exist.
The header fields define the identity of the kit. Kit Inventory ID is the inventory identifier of the kit as assigned on the stock or non-stock item form, and Non-Stock is a read-only checkbox indicating that the kit is a non-stock kit. Revision ID uniquely identifies each revision of the specification, and Description holds a brief summary. Two checkboxes govern whether the record participates in the flow at all: Active marks the specification as usable, and Current Revision indicates which revision the system will actually use when the kit explodes on a sales order. If a kit item already has a current revision and you attempt to change it, the system warns you that saving will uncheck the previous one. Only one revision is current at a time, and that is the revision the rest of the flow will read.
Explode Kit is the field that determines whether the kit will break into its components on the Sales Orders screen. Selecting it activates three further fields that shape the entire downstream flow: Kit Placeholder Item, Explode Option, and Price Calculation. Kit has options adds Option Category and Option Codes tabs, where you define the choices a user will be asked to make during order entry. Marking an option category as Required forces the user to select a code in the Options popup before the kit order can proceed, while Sort Order controls whether categories appear in ascending or descending order in the Sales Orders dropdown. Default Code automatically includes an option code in the order without user input, which matters a great deal for any path where no human is present to choose: API calls, import scenarios, processing screens, and opportunities or sales quotes.
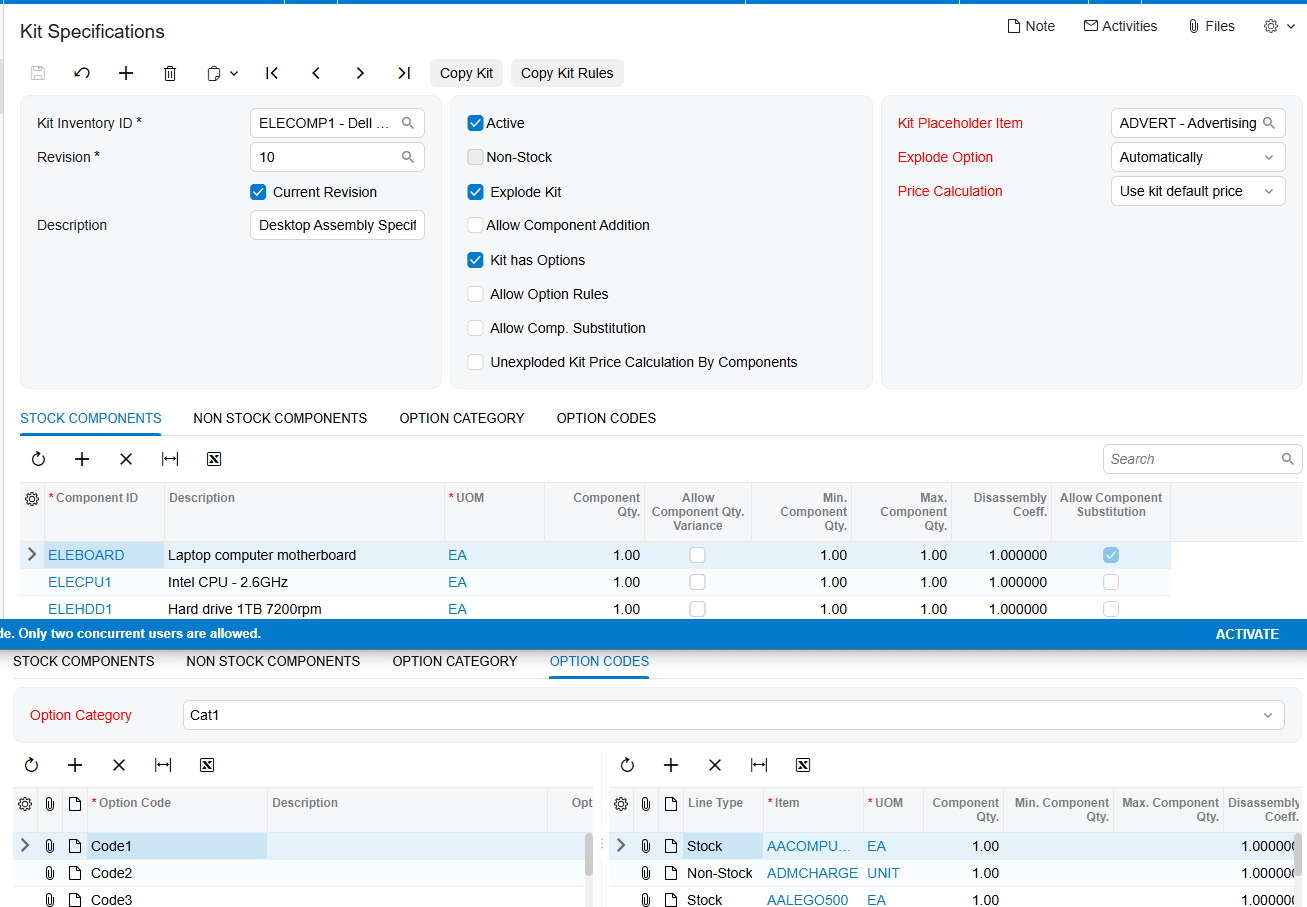
Three further checkboxes extend what users can change later in the flow. Allow Option Rules adds an Option Rule tab, where a source option category and code exclude a target option category and code on the Sales Orders screen. If Size 8×10 is configured to exclude the color Black, a user who selects 8×10 will not be offered Black; selecting a size that is not covered by a rule, such as 8×12, makes Black available again. Allow Component Substitution adds a Substitution tab and a matching column on the Stock Components tab, letting you nominate replacement items for specific components. Allow Component Addition activates the Add Row option in the Component Details dialog on the Sales Orders screen, permitting new components to be added before the kit explodes.
Two structural rules belong here because they cause real problems when missed. First, the Unit of Measure of the Kit Placeholder Item must match the Unit of Measure of the kit item, or the system raises a warning. Second, for nested kits, where a kit item is used as a component or option inside another kit, the main kit is the Parent Kit and the included kit is the Child Kit. If a non-stock kit is used as a component or option, the Explode Option for both the parent and the child must be set to Automatically. The same requirement applies when a non-stock kit contains a stock option item, because only automatic explosion ensures the stock option is allocated during shipment.
Stage Two: Acumatica Preferences Supply the Defaults That Flow Downstream
The second stage of the Acumatica Kit Processing data flow is the Biz-Tech Services Kit Processing Settings section on the Sales Orders Preferences screen, with an equivalent section on the Purchase Orders Preferences screen. Price Calculation for Kits, Kit Placeholder Item, and Explode Option are general settings that apply to every kit. The precedence rule is simple and worth teaching to every user: if those same settings are configured manually for a specific kit on the Kit Specifications screen, the system prioritizes the kit-level setting over the general one. When a kit behaves differently from what preferences suggest, the specification is almost always the reason. If the specific item has already configyration done in Kit Specifications screen, then the setup of individual item would be used
Several preference fields change how quantities and documents behave later in the flow. Not Calculate Component Quantities bases quantity calculation in sales orders on the quantity specified for the kit itself. Invoice After Full Shipment allows partial shipment and holds the placeholder item back until every component has shipped. Use Kit Posting Group places the kit item’s account and subaccount values on the placeholder row after explosion, and Apply to the Components extends those same values to the component rows. Allow Kit Assembly Generation enables the assembly branch described later. Unexploded Kit Price Calculation by Components prevents the kit from exploding and calculates only the price of the components toward the order total, which is why selecting it triggers a warning that the Explode Kit checkbox should be unchecked.
Components Qty. Is Required for Kit Item Ship deserves particular attention, because it decides whether a shipment can be created at all. Selecting it reveals a dropdown with three shipping behaviors. Ship Available Qty. sets the kit or placeholder line to back order allowed and lets a shipment be created for the minimum component quantity, without requiring every component to be available. Ship Ordered Qty. requires all components to be available and allocated based on the kit quantity, so nothing ships until everything is ready. The third option allows back order without requiring component quantity to be available for shipping. Finally, Allow Edit Exploded Kit Component gives users control over component quantities after explosion and permits deletion of kit components on the Sales Orders screen, and it has the same effect on the Purchase Orders screen when set in purchase order preferences.
Two settings outside these screens can also stop the flow. Selecting Block Kit Items Explosion on the Customers or Vendors screen prevents kits from exploding for that business account, and the same checkbox in the Biz-Tech Kit Processing Settings on the Order Types screen prevents explosion for that order type. Both override the explode option on the kit itself, so they are the first place to look when a kit refuses to explode for one customer or one order type but works everywhere else.
Stage Three: Sales Order Entry and the Component Details Window
Once a kit item is added to a sales order, the flow moves into the Component Details popup, which is the working surface for everything that happens before explosion. If the kit has options, an Options popup opens automatically when the kit item is entered, prompting the user to select an option code for each option category before pressing OK. Those selections can still be revised without exploding the kit by using the Change Options button in Component Details; all previous option category and option code configurations remain intact unless they are manually changed.
Before explosion, Component Details is where the order line is shaped. Users can add or delete components, and they can exchange a component for an approved substitute by double-clicking the item and choosing the replacement from the search icon that appears beside it. This window is also the point where purchasing can be triggered. Selecting the Mark for PO checkbox for a component and clicking Create PO generates a purchase order, and the resulting purchase order number is displayed under the PO Number field in Component Details. The required quantity must have a value for the purchase order to be created. Purchase orders are created according to the Default Vendor ID of each component, and when several components share the same vendor, a single purchase order covers them all. If that purchase order or its lines are later deleted, the number is removed from Component Details automatically, which keeps the reference trustworthy.
Stage Four: Acumatica Kit Explosion and the Placeholder Item
Explosion is the pivotal transformation in the Biz-Tech Services Acumatica Kit Processing flow, because it is the moment one order line becomes many. A kit explodes in one of two ways: by clicking Load Components in the Component Details dialog, or simply by assigning a quantity to the newly added kit on the sales order. Which of these is even possible depends on the Explode Option chosen earlier. Prompt asks the user whether to explode, Automatically explodes without user intervention, and Do Not Explode prevents explosion entirely.
When the kit explodes, the kit placeholder item and its components appear on the sales order lines with their respective prices, quantities, and costs. The placeholder is a non-stock item that replaces the kit item on the Sales Orders screen after explosion. Its purpose is financial accuracy: a kit item consists of multiple components, and when those components are added to the order as real lines, leaving the original kit item in place would double-count item cost. The placeholder behaves like the kit item in the order but contains no actual items. One field on that placeholder row is worth monitoring closely. Total Cost of Components is calculated as the component’s unit cost at the time the sales order was created, which does not change afterward, multiplied by the quantity. It is displayed on the kit placeholder row and carried forward to the invoice, making it the natural checkpoint for verifying kit margin.
Price Calculation determines what the customer is charged, and it offers three methods. Use Kit Default Price applies the kit’s own default price, plus any manually added price for its options. Use Component Default Price bases the price on each component’s default price and sets the kit item price to zero. Use Combined Default Price adds the kit’s default price to the default prices of the components. The choice matters beyond the order total, because it changes how partial shipments are invoiced, as described in the fulfillment stage below.
Editing rules tighten once explosion has occurred, and this catches users out more than any other behavior in the module. After the kit has exploded, components can no longer be added or deleted from the Component Details popup; only Quantity and Warehouse remain editable there. To add or remove components at that point, users must work with the [X] and [+] buttons on the Document Details tab of the sales order. Before explosion, the picture is different again: if Allow Component Addition is off, new components cannot be added, although existing components can still be deleted.
Stage Five: The Acumatica Kit Assembly Branch
Kit Assembly is an optional branch in the Acumatica data flow rather than a mandatory step, and it is available only when the Kit Assembly feature is enabled on the Enable/Disable Features (CS100000) form. A kit assembly document contains the required stock components with their quantities and costs, calculated according to the kit specification revision you specify. Assemblies can be created directly on the Kit Assembly screen by entering the kit item in the Inventory ID field, selecting the revision, choosing a warehouse, and entering a quantity. Components can be added or removed before the assembly is released.
The more interesting path runs from the sales order, because it lets you assemble without exploding the kit. The user enters the kit on the sales order, optionally adjusts components in the Component Details popup, selects the Mark for Kit Assembly checkbox on the Details tab, and then clicks Generate Kit Assembly from the Actions list followed by Save. The same action is available through the Mark/Unmark for Kit Assembly button in the Component Details dialog. The generated assembly places a link number in the Kit Assembly field on the Details tab of the sales order, and clicking that link opens the Kit Assembly form. The relationship is visible from both ends: the Orders tab of the Kit Assembly screen shows the linked sales order number the assembly came from. Two constraints apply. Kit assemblies generated from sales orders always use the current revision specified on the Kit Specifications screen, and for non-stock kit items the Mark for Assembly button is disabled.
Stage Six: Kit Order Fulfillment in Acumatica
With explosion complete, the order moves into the standard Acumatica fulfillment cycle, and the kit records follow the components rather than the kit. The sequence is four steps. First, click Create Shipment on the toolbar and confirm the Specify Shipment Parameters window with OK. Second, on the Shipments screen to which you are redirected, click Confirm Shipment. Third, on the Invoices screen, click Prepare Invoice. Fourth, release the invoice with the Release button. At that point the inventory and financial impact of the kit is fully posted.
Partial shipments introduce one behavior that finance teams should know before it appears on a customer document. When Use Kit Default Price is the selected price calculation method and the order ships partially, the invoice for the first shipment carries the total kit price, and the invoice price for the remaining items is zero. This is intentional, since the kit is priced once rather than per component, but it looks surprising on a second invoice if nobody was expecting it. Where this is undesirable, Invoice After Full Shipment holds the placeholder back until all components have shipped, so the kit is invoiced only once everything is out the door.
The Purchase Order Side of Kit Processing
Kit Processing in Acumatica is not limited to the sell side. The Purchase Orders Preferences screen carries the same Biz-Tech Kit Processing Settings section, with the same precedence rule that kit-level configuration overrides the general settings, and the same Unexploded Kit Price Calculation by Components and Allow Edit Exploded Kit Component behaviors. Adding a kit item to a purchase order gives access to the same Component Details popup, where components can be added, deleted, or exchanged for substitutes and options can be changed before explosion. The kit is exploded either by clicking Load Components or by assigning a quantity to the kit line, exactly as on the sales order.
The inbound flow then completes in three moves. A purchase order containing the kit items is created and exploded. When the components are received, a purchase receipt for the ordered items is created. On release of that purchase receipt, the system automatically generates an inventory receipt reflecting the items in inventory. That automatic inventory receipt is the point at which purchased kit components become available stock, so it is the record to check when component availability does not look right after a delivery.
Where the Flow Starts Earlier: Opportunities and Sales Quotes
For businesses that quote before they sell, the kit data flow begins one step earlier. A kit item is added on the Details tab of the Opportunities screen and a quote is generated with the Create Quote button. The kit will not explode on the Opportunities screen itself.
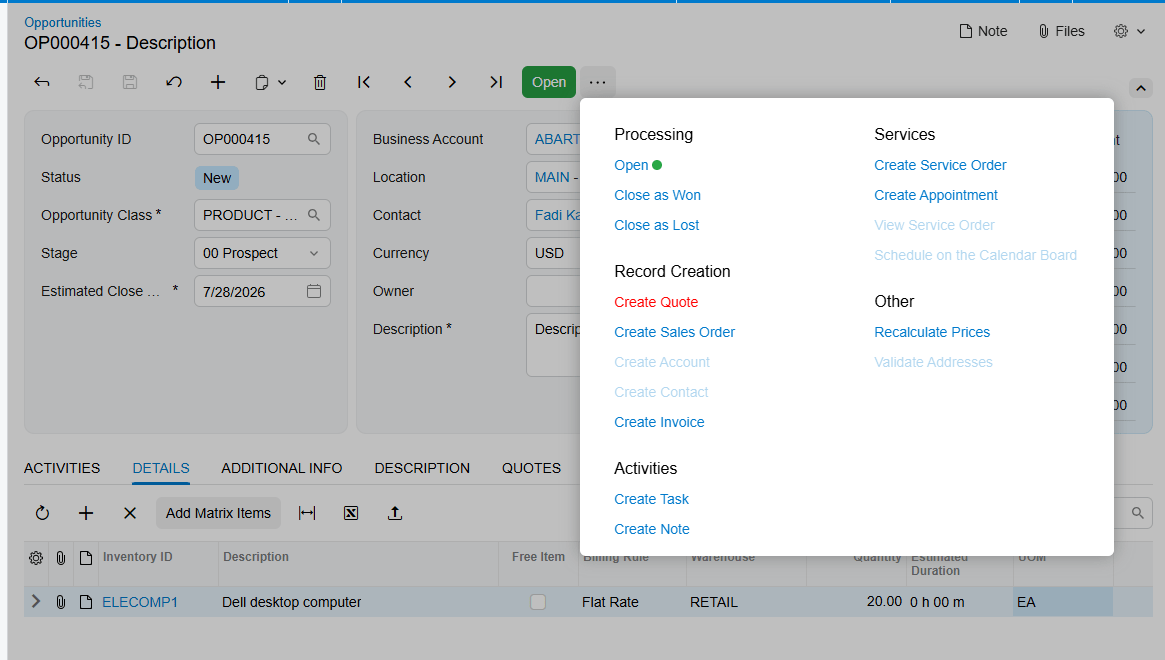
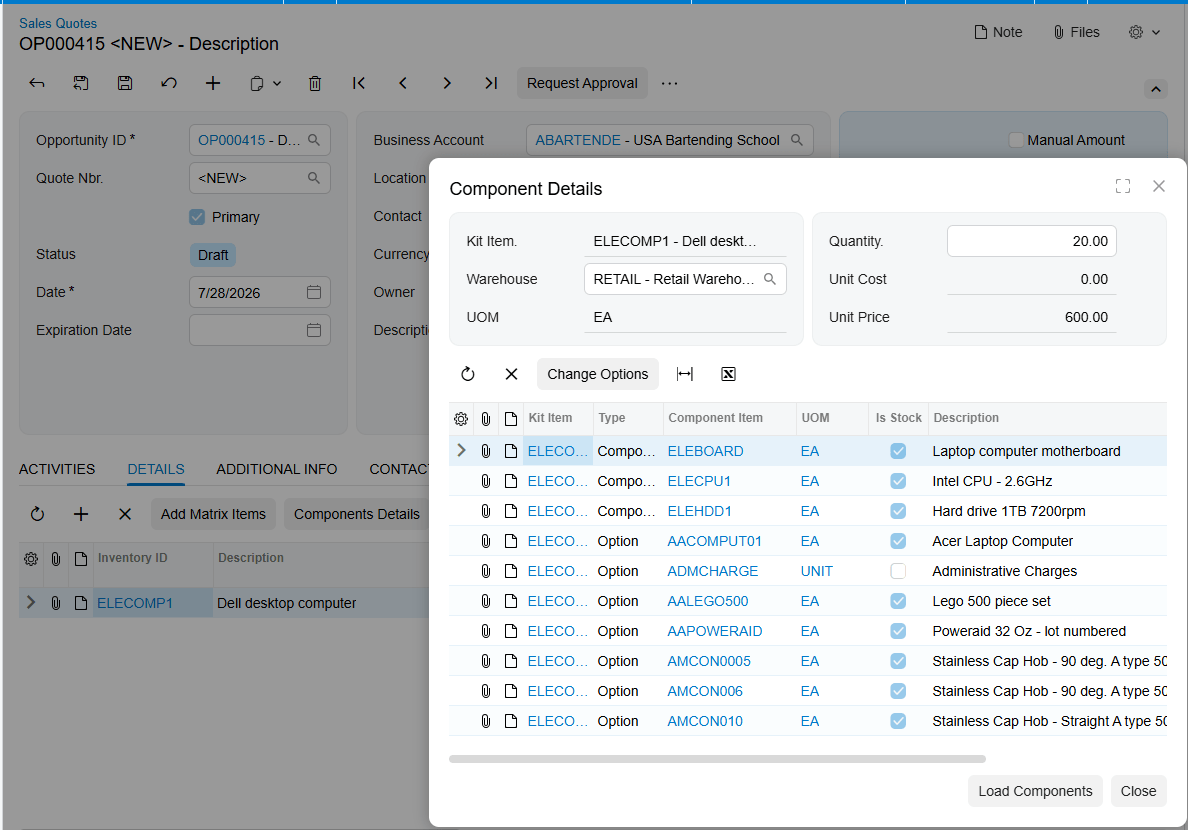
Explosion happens on the Sales Quotes screen, either by giving the kit a quantity or by clicking Load Components on the Details tab. After saving, the exploded kit is reflected back in the Details tab of the Opportunities screen, and from then on any change made to the exploded kit updates in both screens. This is also the path where Default Code earns its place, since no user is prompted to pick options during automated or quote-driven creation.
Kit Pricing Summary: Where Pricing Is Reviewed and Applied
Kit Pricing Summary is the analysis point of the Acumatica Kit Processing flow, and it uses the same explosion logic as the order screens. For a kit to appear here, its specification must have the Active checkbox selected and the Revision field filled in. Selecting the kit in the Kit Inventory ID field loads the kit together with its components, stock components first and non-stock components after. Each component line displays Quantity, Unit Price, Min Markup %, Markup %, Extended Price, and Surcharge, and the calculated totals of Extended Price and Surcharge appear on the last line.
Two formulas govern the numbers. Surcharge is calculated as quantity multiplied by unit price multiplied by minimum markup, divided by one hundred. Total with Surcharge is the sum of the extended price and surcharge amounts across the component lines. Clicking Apply Price takes the total surcharge from the last line and applies it to the kit item’s default price, which is how component-level markup becomes a kit-level price. The screen works for nested kits as well: after the parent kit is exploded, the components of both kits load together and the totals line sums their extended prices and surcharges. The whole summary can be exported to Excel, which makes it a practical review artifact for a pricing meeting.
Where to Monitor Kit Processing Results in Acumatica
If you are training users or troubleshooting a kit order in Acumatica, these are the fields and screens that tell you what the system actually did:
- Current Revision on Kit Specifications, which determines the revision every downstream document reads.
- Explode Option and Explode Kit, which decide whether the order line ever becomes components.
- Block Kit Items Explosion on the Customers, Vendors, and Order Types screens, which silently overrides the kit’s own explode setting.
- Total Cost of Components on the kit placeholder row, which carries the frozen unit cost forward to the invoice.
- PO Number in the Component Details popup, which confirms whether a component was purchased and stays accurate if the purchase order is deleted.
- Kit Assembly on the sales order Details tab, which links to the generated assembly, and the Orders tab of the Kit Assembly screen, which links back.
- The Component Availability section of Component Details, which can display Qty. Available, Qty. Avail. for Shipping, and Qty. on Hand.
- Next receive information in the same window, including next receive type and reference number, with Inc. In Receipt, Inc. In Transfer, Inc. PO, Inc. PO Receipt, and Inc. PO Transfer controlling which documents are considered when calculating the next receive date and quantity.
- The totals line on Kit Pricing Summary, where extended price and surcharge are reviewed before Apply Price changes the kit’s default price.
One note on availability display: if any kit component has a quantity of zero and the kit item is not set to back order allowed, an error message appears when the availability checkbox is selected. That message is a genuine signal about allocation, not a display fault.
Loading Kits in Bulk with Acumatica Import Scenarios
Kit items do not have to be built by hand. Acumatica import scenarios support structured, automated entry of kit data from external sources, and the product ships with a set of scenarios that map to the stages described above. BZ-Import Is a Kit Check Box in Non-Stock and BZ-Import Is a Kit Check Box in Stock enable the Is a Kit checkbox on the respective item forms, which is the prerequisite for everything else. BZ-Import Kit Header configures the header section of the Kit Specifications screen. BZ-Import Kit Stock Components and BZ-Import Kit Non-Stock Components add components to the kit. BZ-Import Kit Option Category adds option categories, option codes, and the stock and non-stock components associated with each code, and BZ-Import Kit Substitution adds substitute items for the relevant components. Before running any of them, confirm that data mapping between the external source and the corresponding Acumatica fields is correct, and remember that Default Code matters here because an import has no user to answer an options prompt.
Kit Processing in Acumatica: Frequently Asked Questions
What is the kit placeholder item and why does Acumatica use one?
The kit placeholder item is a non-stock item that replaces the kit item on the Sales Orders screen after explosion. Because the components are added to the order as their own lines, keeping the original kit item would double-count item cost. The placeholder behaves like the kit item in the order but contains no actual items. Its unit of measure must match the unit of measure of the kit item, or the system raises a warning.
Why will my kit not explode on the sales order?
Check four things in order. The kit specification must have Explode Kit selected and a current revision marked. The Explode Option must not be set to Do Not Explode. The Block Kit Items Explosion checkbox may be selected on the Customers or Vendors screen, or in the Biz-Tech Kit Processing Settings on the Order Types screen, either of which prevents explosion. Finally, Unexploded Kit Price Calculation by Components deliberately prevents explosion and prices the kit by its components instead.
Can components be changed after a kit has exploded?
Only partially. Once the kit has exploded, components can no longer be added or deleted from the Component Details popup, where just Quantity and Warehouse remain editable. To add or remove components after explosion, use the [X] and [+] buttons on the Document Details tab of the sales order. Editing component quantities and deleting components on the order screen also requires Allow Edit Exploded Kit Component to be enabled in preferences.
How does Acumatica price a kit that ships partially?
When Use Kit Default Price is the selected price calculation method, the invoice for the first shipment carries the total kit price and the invoice price for the remaining items is zero, because the kit is priced once rather than per component. If you would rather invoice only when the order is complete, enable Invoice After Full Shipment, which permits partial shipment but holds the placeholder item back until every component has shipped.
Can a kit contain another kit?
Yes. Kit items can be configured as nested components or options inside both stock and non-stock kit specifications, with the outer kit acting as the Parent Kit and the included kit as the Child Kit. If a non-stock kit is used as a component or option, the Explode Option for both the parent and the child must be set to Automatically. The Copy Kit function and the Kit Pricing Summary screen both support nested kits.
How do I create a purchase order for a single kit component?
Add the kit to the sales order and, without exploding it, open the Component Details popup. Select the Mark for PO checkbox for the component you need and click Create PO. The required quantity must have a value. The purchase order is created against the component’s Default Vendor ID, several components sharing a vendor are combined into one purchase order, and the resulting number appears in the PO Number field of the popup.
Work With the Biz-Tech Services Kit Processing Product
Kit Processing in Acumatica rewards teams who understand the flow rather than memorizing screens. The specification defines the kit, preferences supply the defaults, order entry shapes the line, explosion turns one line into a placeholder plus components, and fulfillment converts those components into shipments, invoices, and inventory transactions. Once users know which field governs each handoff and where to look when a result is unexpected, kit orders stop being a special case and become routine.
If your business sells or purchases configured products and wants kit components visible and controllable right on the order, we are glad to help you scope, configure, and roll out Kit Processing. Visit https://biz-techservices.com to learn more about our Acumatica expertise or to schedule a personalized demonstration of the Biz-Tech Services Kit Processing product.

