
How Shopify Data Flows into Acumatica ERP
Shopify data flows into Acumatica ERP as a controlled two-way exchange: the connector retrieves Shopify orders and imports them into Acumatica as Sales Orders, SO Invoices or AR Invoices, then sends results back out – fulfillment events, tracking numbers, inventory quantities, prices, products and customer data. Every leg of that flow is driven by settings you configure once on the Shopify Stores screen, so understanding the path a record takes is the difference between a Biz-Tech Services Shopify Acumatica integration that quietly works and one that silently drops orders.
This article walks that route end to end for the Biz-Tech Services Shopify Connector, following the direction records actually travel: credentials, inbound orders, the customer and payment and tax decisions attached to them, outbound fulfillment and order export, item and inventory sync, and errors. It names the real screens, tabs, buttons, checkboxes and fields your team will click, because those are what you check when you want to know what the integration did.
What the Shopify Connector for Acumatica Does
The Biz-Tech Services Shopify Connector is an integration between Shopify, an eCommerce platform, and Acumatica, an enterprise resource planning (ERP) system. It is delivered as an Acumatica customization project, published through the Customization Projects screen (SM204505), and requires a license of type PCSR, PERP or SAAS. Once published, it adds configuration, processing and inquiry screens that handle order sync, inventory management, product information sync, customer data sync, and the posting of sales data into Acumatica.
The connector talks to Shopify through its Application Programming Interface, or API, using connection information stored on the Shopify Stores screen. The Biz-Tech Services Shopify Acumatica integration also requires default options and required values for the order import process, which is why the store record carries so many settings. Based on those settings it connects to the corresponding system, retrieves orders, and imports the selected orders into Acumatica. When a user confirms the shipments created from those imported orders, fulfillment events are generated in Shopify for each corresponding order.
The Shopify Data Flow at a Glance
Before drilling into any single screen, it helps to see the whole path a record travels between the two systems:
- Setup – the connector package is published on the Customization Projects screen (SM204505), then a store is created from the Shopify Stores screen using Add New Store, which opens the Shopify Credentials screen. Test Credentials confirms the connection through the API.
- Configuration – on the Shopify Stores screen you set Import Settings, Tax Options, Customer Information, Item Information, Payment Options, Cross-Reference Options, Export Item Mappings, Warehouse Details and Order Export Settings. These decide what the connector is allowed to create.
- Retrieval – the Import Shopify Orders screen pulls orders with Get Orders. Only orders in Fulfilled, Unfulfilled or Partially Fulfilled status appear, filtered by Begin Order Date and afterwards by Last Imported Order Date.
- Staging – each retrieved order is written to the Shopify Orders screen, which holds its initial state – Order ID, Status, Payment Method, Ship Via, Document Details and Addresses – before it becomes an Acumatica document.
- Import – Import or Import All turns the staged order into the document type chosen in Import Shopify Orders to: a Sales Order, an SO Invoice or an AR Invoice, with the customer, items, payment and tax treatment your settings allow.
- Outbound fulfillment – when the shipment created from the imported order is confirmed, and after Prepare Invoice, the connector generates the Shopify fulfillment event and sends the tracking number back, updating the order status.
- Master data sync – separate processing screens push items, images, quantities, sales prices, template and matrix items, customers, contacts and locations, manually or on a scheduler.
- Exceptions – refunded orders come in through Import Shopify Refunded Orders, and export errors are logged with messages shown in the export log or notification center.
Setting Up the Connection: Shopify Credentials and Shopify Stores
Nothing flows until the store record exists, and these settings matter more than any other step: almost every downstream behavior – whether a customer is created, whether an item is created, whether a payment is attached – is a checkbox here rather than a decision made at import time.
How do you install the Shopify Connector in Acumatica?
The Biz-Tech Services Shopify Acumatica connector ships as a deployment package you import on the Customization Projects screen (SM204505), the same screen used to add, validate, publish, unpublish, export or delete any Acumatica customization project. On import, the platform uploads the package, creates the corresponding customization project and saves it in the database; publishing that project is what makes the Biz-Tech Services Shopify Acumatica integrator screens appear.
Where do Shopify credentials live?
Open the Shopify Stores screen and click Add New Store. You are redirected to the Shopify Credentials screen, where you complete the setup that integrates Acumatica with Shopify. Two actions govern the connection afterwards: Test Credentials, which tests the connection to the Shopify store through the API using the information on the Connection Settings tab, and Edit Credentials, which allows changes to the stored credentials. If Test Credentials fails, nothing downstream will work, so check it first whenever data stops moving.
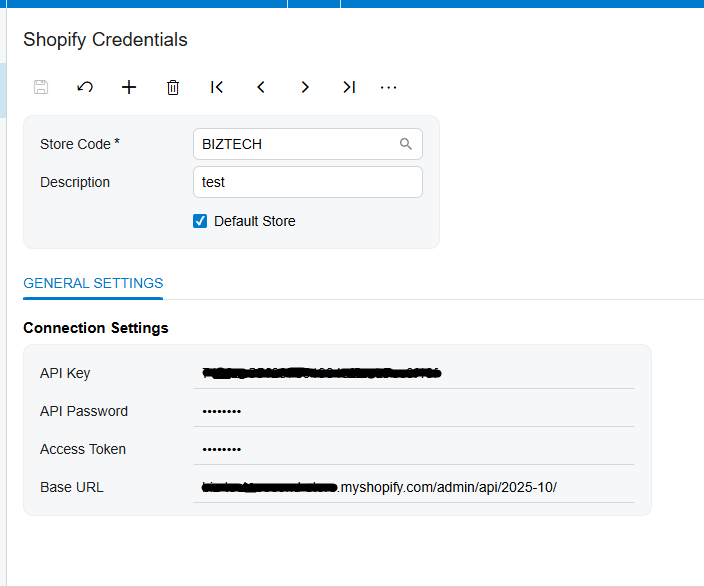
The store-level fields that steer the whole flow
The header of the Shopify Stores screen carries the switches that determine which directions are even active:
- Store Code – a Lookup field indicating the corresponding Shopify store. It is required on the processing screens, so it ties every run to a specific storefront.
- Default Store – when selected, the default store automatically appears when you open the processing and Store screens and the Store Code field. Useful when you run one storefront and do not want users choosing the wrong one.
- Use B2B – allows customers to sync business-to-business, or B2B, data to Shopify. When unselected, the connector exports an ordinary customer instead.
- Use Webhook – enables the webhook logic to function, which is what lets Shopify events trigger Acumatica processing without a manual click.
- Export Order – activates the logic for exporting orders from Acumatica to Shopify, and makes the Order Export Settings tab appear.
Inbound: How Shopify Orders Become Acumatica Documents
The inbound leg is the heart of the Biz-Tech Services Shopify Acumatica integration. A shopper checks out, the connector retrieves the order, and Acumatica creates a document from it. What that document is, which orders qualify, and how much of the payload survives the trip are all governed by the Import Settings tab.
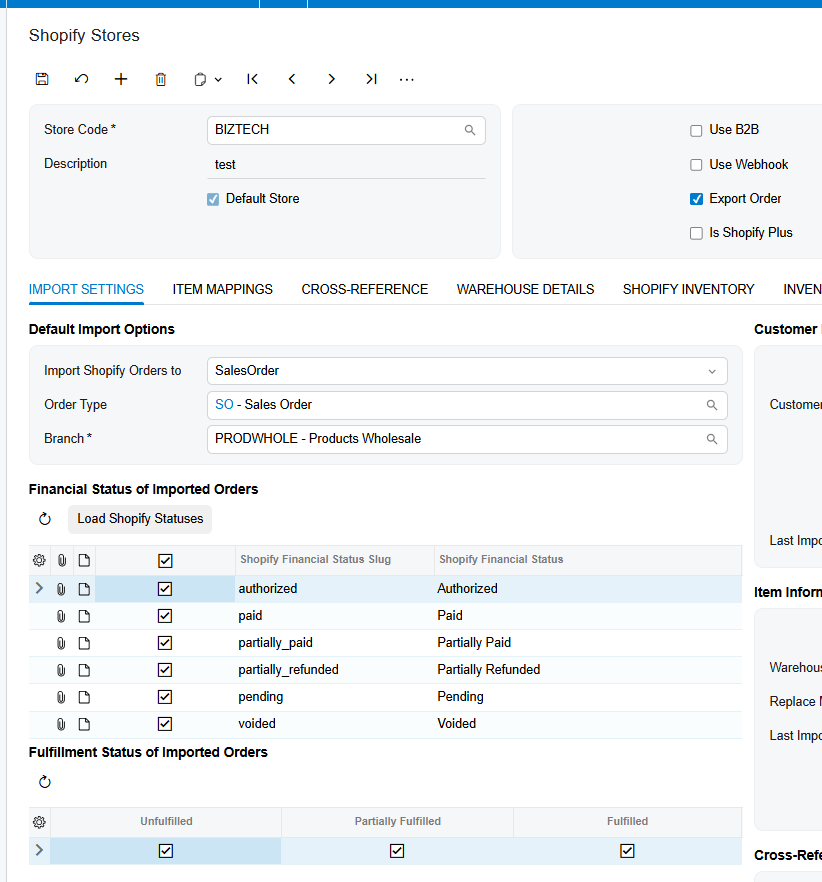
What document does a Shopify order become in Acumatica?
The Import Shopify Orders to field specifies the document type: Shopify orders can be imported as Sales Orders, Sales Order Invoices (SO Invoice), or Accounts Receivable Invoices (AR Invoice). Order Type represents the default type of orders created by the Biz-Tech Services Shopify Acumatica integration, and Branch determines where the order lands, using the branch values already set up on the store. Choose deliberately: a business that picks, packs and ships needs Sales Orders so shipments and fulfillment events can follow, while a business that only needs revenue recorded may be better served by an invoice.
Which Shopify orders are eligible for import?
Two filters decide what the Biz-Tech Services Shopify Acumatica connector will even look at. Fulfillment Status of Orders reflects the status of the corresponding order that will be imported. Under Order Status you will find the financial statuses; the corresponding checkbox must be selected for an order to be retrieved and imported. If a financial status is left unchecked, orders in that status simply will not appear – the most common reason an order seems to be missing.
Dates form the second filter. Begin Order Date is the date from which the first order should be imported. Last Imported Order Date shows when the last order was imported; for other invoice import processes it counts the date related to the last invoice date, and Last Refunded Order Date and Last Imported Company Date are the equivalents for refunds and companies. Retrieval begins from Begin Order Date only while Last Imported Order Date is not later than it; after that, orders are fetched from that watermark. These fields tell you where the connector believes it left off.
Import behavior options on the store record
Further checkboxes shape how much information travels with each order and how much API traffic the connector generates:
- Send Email Notifications for Errors – opens a field for an email address, and the connector notifies you of Order IDs that hit errors during retrieval. Turn this on if nobody watches the processing screen all day.
- Save Order Properties in Document Notes – retrieves order properties into document notes while fetching, preserving detail that has no dedicated Acumatica field.
- Skip Fulfillment – when selected, no API request is sent during Prepare Invoice and the order status is not updated. This deliberately breaks the outbound fulfillment leg, so leave it clear if you expect Shopify to reflect shipments.
- Refresh Order When Import Orders – when selected, the connector requests fresh data during import; when unselected it imports without updating anything. Selecting it costs extra API calls but guarantees the current version of the order.
Retrieving and importing Shopify orders
The Import Shopify Orders screen is where the inbound flow executes. Get Orders retrieves orders from Shopify, and a timer indicates elapsed time until the process completes. The page only shows orders with the statuses Fulfilled, Unfulfilled or Partially Fulfilled in the shop. Import then handles selected orders and Import All imports every order in the grid; if an error occurs, the message is displayed on screen with information about the system error. The screen also supports a schedule for getting and importing orders, so the cycle can run unattended.
What the Shopify Orders screen shows you
Each retrieved order carries a hyperlink; clicking the order number navigates to the corresponding Shopify Orders screen, which presents the initial situation of the order as it arrived – the best place to compare what came in against what Acumatica created. It has three tabs: Document Details, with information about the items; Addresses, with the customer address; and the Order ID field, which displays the Shopify order ID and order number.
The rest of the screen carries the linking fields. Status displays the order status in Acumatica, while Payment Method and Ship Via display the methods used. Sales Order Number shows the sales order created if the order was imported, and Invoice Number the invoice number if it was invoiced – so an empty Sales Order Number signals that the order was staged but never converted. Refresh Order updates the status, which matters because it reflects the initial state on import and does not change on its own if the order is later fulfilled in Shopify. Import Order fetches an order by its ID, after which it appears on the Import Shopify Orders screen ready to be imported – the manual path for a single urgent order. This screen is also where you read the raw payment method and Ship Via values when creating Cross-Reference mappings.
Automating the inbound flow with webhooks
Webhooks let Shopify events drive Acumatica instead of waiting for a scheduled run. When Use Webhook for Shopify Order Process Automation, Use Webhook for Shopify Fulfillment Process Automation and Use Webhook for Shopify Refund Process Automation are selected, the connector generates new Order, Fulfillment and Refund processes in the Shopify system. With order process automation on, any order created online is automatically imported into Acumatica on the Sales Orders screen, and the Webhook Order checkbox is then selected on the Shopify Orders screen – a quick way to tell an automated import from a manual one.
To create the mapping, go to the Webhooks screen, fill in the Webhook name and Implementation class, and click Save. A Webhook Uniform Resource Locator, or URL, is generated; that URL must be added to the URL field of the newly created webhook in the Shopify system. Until it is registered there, the Acumatica half has nothing to listen to.
Customers, Payments and Taxes on Imported Shopify Orders
An order is never just lines and totals. Each imported order drags a customer, a payment and a tax treatment behind it, and you control each on the Shopify Stores screen.
How does the connector decide which Acumatica customer to use?
When Import Customer is selected, the Biz-Tech Services Shopify Acumatica integration imports the customer information from Shopify into a new customer record in Acumatica. If it is not selected, orders are imported with the default customer instead – every order lands on one house account. Two checkboxes control addresses: Override Ship Address Information from Shopify Order imports the address the order will ship to, and Override Bill Address Information from Shopify Order the address of the party who will pay the bill. If the corresponding numbering sequence is absent, an error message is displayed, so customer numbering must exist first.
Cross-Reference: translating Shopify values into Acumatica values
The two platforms rarely use the same words for the same thing, and the Cross-Reference tab reconciles them. Cross-Reference Options on the Import Settings tab select the entities to be matched during the transition, and only the checked entities appear in the drop-down on the Cross-Reference tab. Selecting them makes the Ship Via field appear, letting you map the Shopify value to the Acumatica Ship Via value.
Customer assignment works the same way. If Use Tags to Import Customer is selected and the type Code is chosen, you set up the Shopify tags and Acumatica customer (AcctCD) values in the Shopify Value and Acumatica Value fields on the Cross-Reference tab. During import, orders carrying a mapped tag get that customer. If Use def. class if tag is not found is unselected, a new customer is created taking the customer class from the Cross-Reference tab. The same logic works for items.
How are Shopify payments imported?
Payment Options decide whether money travels with the order:
- Skip Shopify Payment – the order is imported from Shopify without payment.
- Import Captured CC Tran. as Payment – must be selected for an order that has a payment in Shopify to be imported with that payment. Otherwise the order arrives with none, whatever was collected at checkout.
- Payment Method – the method set on the payment during the order import process.
- Payment Type – Payment and Prepayment are the types a user can select during import.
- Release Payment During Order Import – the payment is imported already released, removing a manual step but also the chance to review it first.
Tax Options
Tax Options set how imported orders are taxed in Acumatica. Customer Tax Zone is the combined tax of effective taxes for a zone, defined according to the locations of the vendors or customers, and Tax ID is the customer tax identifier. Taxable Category creates or edits the tax categories applied to products, and Default Non-Taxable Category sets up an exempt category for non-taxable items and displays them on sales order lines. Because Shopify calculates tax at checkout, these fields keep the Acumatica side of the same order consistent with your tax configuration.
Point of Sale, discount and freight handling
Point of Sale, or POS, orders are placed at the point of sale, often in retail or hospitality. Use POS System enables their importation, POS Customer sets a default customer for them, and Default POS Item sets the default item for that process. Separately, Include Item Discount in Price includes the item discount amount in the order price rather than carrying it separately.
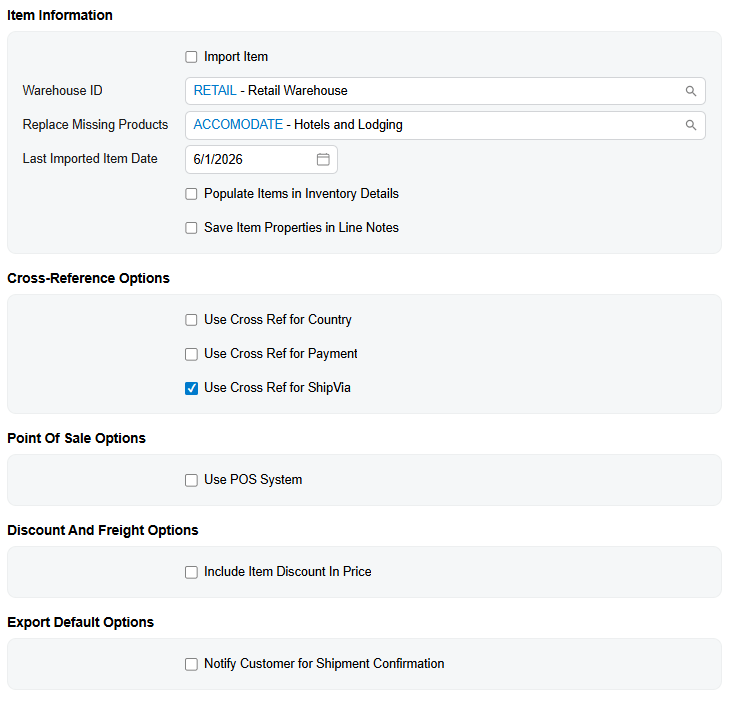
What happens to items that do not exist in Acumatica?
When Import Item is selected, the system may create a new item if it does not already exist in Acumatica during the sync and order import process, and options for imported item type, item class, unit of measure (UOM) and Warehouse ID appear to define the defaults. When Import Item is not selected, new item importation sets the default value of Replace Missing Products as the item name and takes the warehouse from Warehouse ID – so orders still import, but against a placeholder item.
Three functions become available with Import Item on. Use Numbering Sequence for SKU Generation generates a Stock Keeping Unit (SKU) number according to the numbering sequence setup when the system does not find one. Populate Items in Inventory Details adds the item into Inventory Details while importing. Save Item Properties in Line Notes syncs the order with line and header notes in Acumatica.
Outbound: Fulfillment, Refunds and Sales Order Export to Shopify
Once an order lives in Acumatica, the flow reverses. Shipments, invoices, refunds and even orders that started life in Acumatica all have a path back to the storefront.
When does Acumatica send fulfillment back to Shopify?
When a user confirms the shipments created from imported orders, fulfillment events are generated in Shopify for each corresponding order, and after the Prepare Invoice action the tracking number is sent and the Sales Order status is updated accordingly. Skip Fulfillment overrides this: with it selected, no API request goes out during Prepare Invoice and the order status is not updated. One detail on the way in: after the order import process, the Ship Via value appears in the Delivery Settings field on the Shipping tab of the Sales Orders screen.
How are Shopify refunds handled in Acumatica?
The Import Shopify Refunded Orders screen imports refunded orders into Acumatica. Press Get Orders to load them – a timer indicates elapsed time – and they are then displayed on the Shopify Refund screen. What happens next depends on how far the original order had progressed, which is why the same refund can produce very different documents:
- Case 1 – the order is a Sales Order with no fulfillments yet. If it consists of a single item, pressing Process generates a Payment with the Customer Refund type, attaches it to the Payments tab, sets the refunded amount and closes the order. The status changes to Canceled and all lines are deleted.
- Case 2 – a shipment was created but not confirmed. Process finds the shipment, deletes it, then proceeds as in Case 1.
- Case 3 – the shipment has been confirmed. Process creates a Credit Memo and attaches a reference number with the Customer Refund type to the Applications.
- Case 4 – the invoice is prepared but not released. The system creates a Credit Memo and attaches a reference number with the Customer Refund type to the Applications.
- Case 5 – the invoice is released. The system reverses the invoice.
How do you export Acumatica Sales Orders to Shopify?
Sales Orders created in Acumatica can be exported to Shopify through a designated export process. If a line item does not exist in Shopify, the system automatically creates a new product there using the Acumatica details; if the customer does not exist, a new customer record is created from the order information. Fields such as order number, date, customer details, item descriptions, quantities and prices are mapped and transferred according to predefined field mappings, and the new products and customers carry key identifying details to match their Acumatica counterparts.
There are two ways to export: the Actions menu on the Sales Order, and the Export Sales Orders processing screen, which shows only Sales Orders with Open or On Hold status, allows export individually or in bulk, and supports scheduler setup. Once exported, an order disappears from the screen and reappears if any updates are made. Exported Sales Orders are not imported back into Acumatica, so this is a one-way publish rather than a round trip. Two further actions manage exported orders: Shopify Cancel Order updates the order status to Cancelled after prompting for a cancellation reason, and Delete Shopify Order removes the order from Shopify entirely.
Order Export Settings: what travels with an exported order
The Order Export Settings tab appears when Export Order is selected. It defines how data is handled on the way out and sets fallback behavior when customer or product records are missing in Shopify:
1. Customer Settings – Export Customer exports customer information from the order; when unchecked, a field appears to specify a default customer used for all exports. Update Shipping Address and Update Billing Address create or update the corresponding address if the customer already exists.
2. Product Settings – Create Product creates new product records in Shopify when an item from the Sales Order does not already exist. When unchecked, the default product under Replace Missing Products is used instead.
3. Default Export Options – Export Once Created means that after creating and saving the order in Acumatica it appears in Shopify automatically. Order Fulfillment Status defines the initial fulfillment status of the exported order, for example Unfulfilled.
4. Export Transactions – specifies the payment status, such as Paid or Authorized. On Shopify Plus, with this selected, creating a payment from the Sales Order Payments tab or the Payments and Applications screen and saving it updates the payment status.
5. Export Tax Details, Export Discount and Export Freight – include the order tax information, discount details and freight data respectively.
6. Status Settings and Type Settings – define which Sales Order statuses (for example On Hold, Open) and Order Types (for example SO – Sales Order) are eligible, which also controls what appears on the Export Sales Orders screen.
After the order is placed, the customer receives notifications related to it, for example order cancellation or export notifications – so these settings have a customer-facing effect, not just an internal one.
Item and Inventory Sync Between Acumatica and Shopify
Product and inventory data is the third major flow, running mostly from Acumatica out to Shopify. It is also the flow most often blocked by an unchecked box, because a switchboard on the store record decides which fields the processing screens may touch.
Export Item Mappings: the master switchboard
The Export Item Mappings tab synchronizes product-related fields with Shopify and syncs the values of the item fields that are selected; fields that do not need updating can have their checkboxes cleared. This setting most often explains a sync that ran successfully but changed nothing: for all processing screens, if the required fields are not selected for creating or updating, the corresponding data – price, description, weight – will not be updated. Two related behaviors: the image checkbox applies to stock items and store export processes but does not influence the image processing screen, and if Track Quantity is clear in both systems an error message should appear during syncing, while if it is clear in Shopify only, the sync updates the quantity and selects that checkbox automatically.
The Shopify Inventory tab
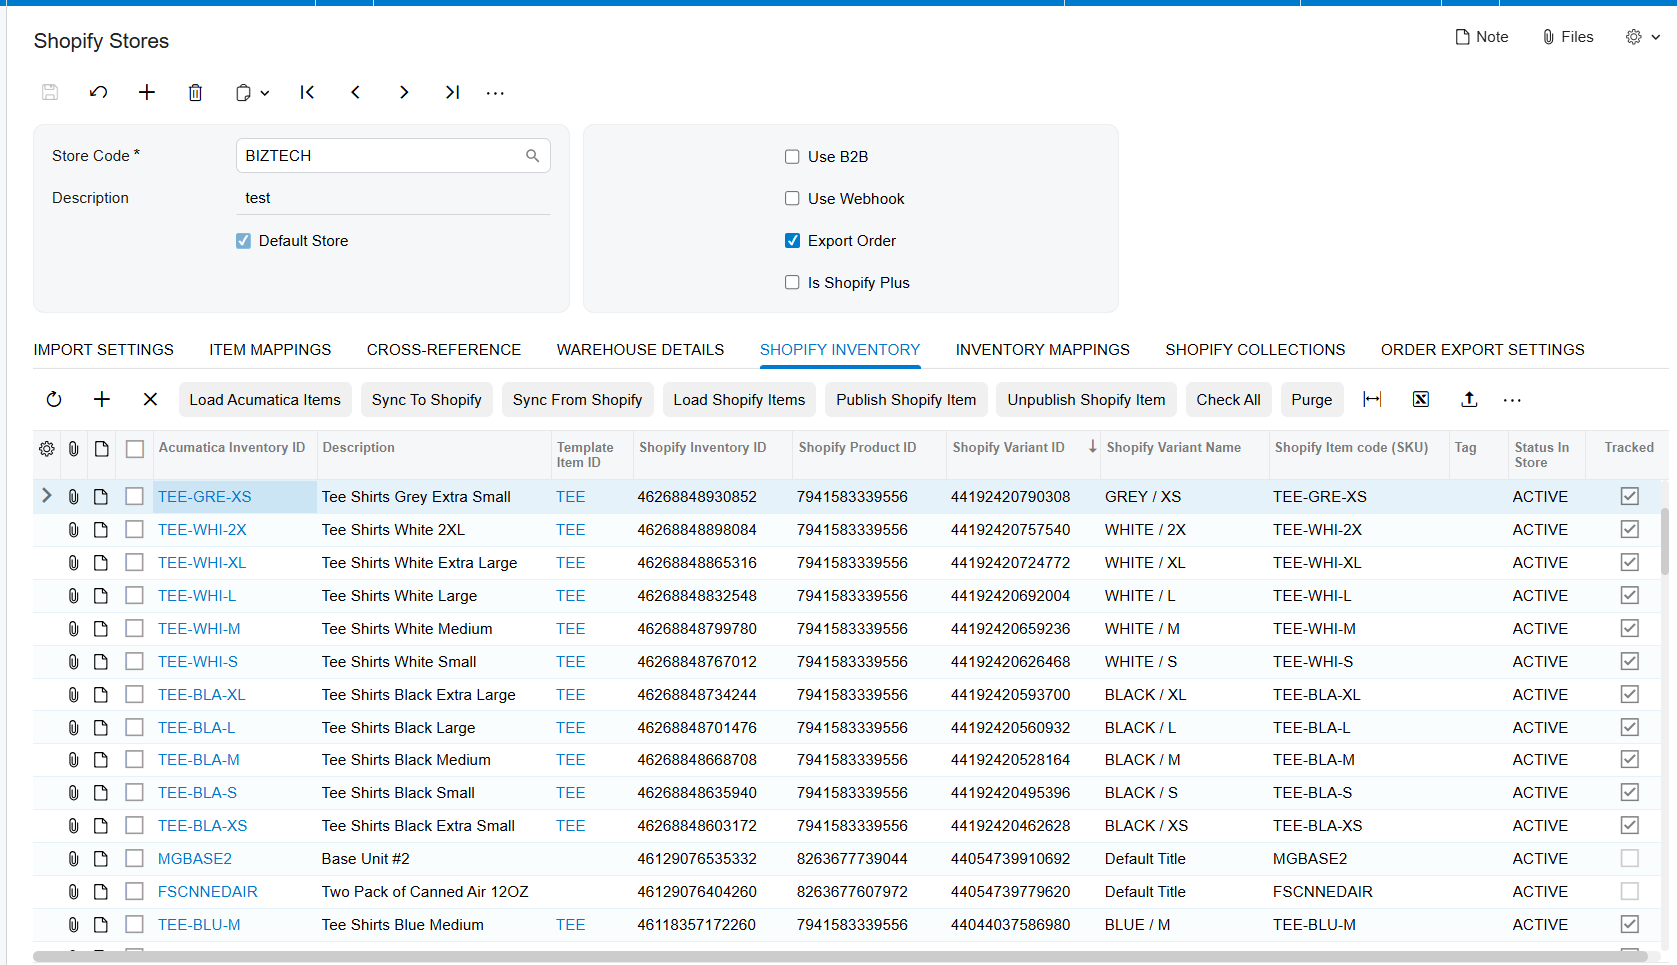
On the Shopify Inventory tab you can load all Acumatica and Shopify items and then sync, publish or unpublish them. Load Acumatica Items retrieves all stock and non-stock items into the table, and Load Shopify Items does the same for the storefront catalog. Sync to Shopify exports Acumatica items outward; Sync from Shopify imports items in, taking the SKU and creating an Acumatica Inventory ID from it. Purge clears the table, and Get Item by ID retrieves a single item. The list can be exported and imported as an Excel document, and item sync, publish and unpublish can also be run from the Stock Items screen.
One asymmetry matters when planning your catalog: the Biz-Tech Services Shopify Acumatica connector does not support the mapping function during the Acumatica item export process, though on the import side you can map Shopify and Acumatica items to each other. When exporting an inventory item outward, the Biz-Tech Services Shopify Acumatica integration sets the item Inventory CD as the SKU, the identifier that keeps the catalogs aligned afterwards.
Inventory Mapping and Shopify metafields
The Inventory Mapping tab organizes the mapping between Acumatica attributes, item currency settings, user-defined fields and Shopify fields, and exports or updates metafields at the product or variant level. Get Metafields retrieves all existing metafields so you can organize the field mapping. Checkboxes specify whether each mapping is used for import or export. Acumatica Property should be set to the Acumatica item category and Shopify Property to the corresponding item category, and the relevant checkbox must be selected before importing or exporting mapped values.
Warehouse Details and quantity export
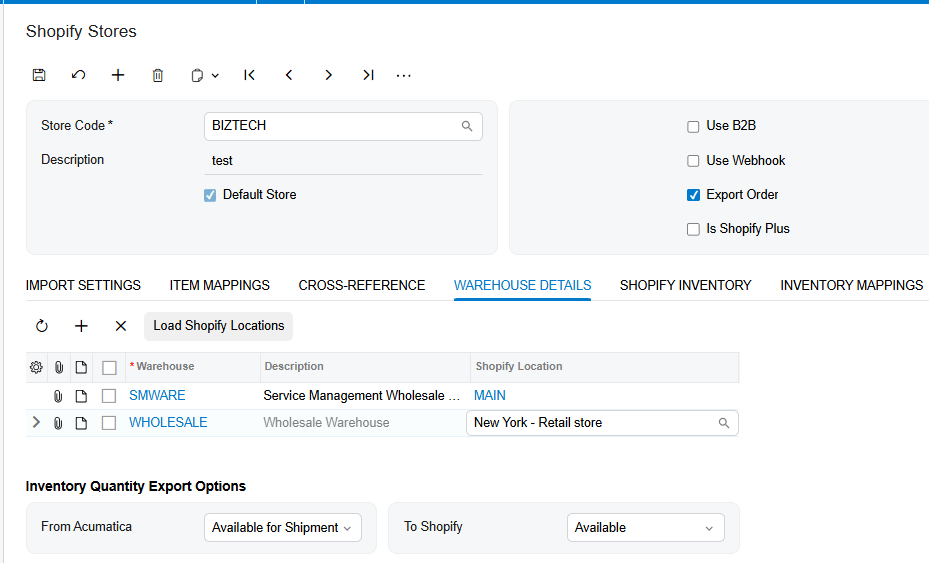
Warehouse Details is where Acumatica warehouses meet Shopify locations. Load Shopify Locations retrieves them all and lets you map them to warehouses; after the export from Export Shopify Inventory Quantities, the Biz-Tech Services Shopify Acumatica connector updates the quantity in the corresponding location. If several warehouses are selected, the exported quantity is the sum across them, and the drop-down value – On Hand, Available, or Available for Shipment – decides which figure syncs. This is a business decision: On Hand can oversell against allocated stock, while Available for Shipment is the most conservative.
On the Export Shopify Inventory Quantities screen itself, choose the required items beforehand on the Shopify Inventory tab of the Shopify Stores screen by checking the checkboxes and pressing Save. The screen displays the sum of item quantities according to the chosen warehouses and supports a schedule to avoid manual processing. It is possible to update the quantity even if Track Quantity is not selected for that item.
Exporting item data, images and prices
Dedicated processing screens carry specific slices of item data to Shopify:
- Export Shopify Inventory Items – synchronizes item price, description and weight. Load items into the store first, then select items and press Sync, or Sync All for everything displayed. This only works if the matching checkboxes are selected on Export Item Mappings.
- Export Shopify Product Images – enabled when the Product Image checkbox is selected on Export Item Mappings. Fill in Store Code, select the items, and press Sync or Sync All. If the checkbox is clear the image is not synced, and punctuation marks in the data will duplicate the image.
- Export Shopify Inventory Quantities – syncs quantities per mapped location, with scheduler support.
- Export Shopify Item Sales Prices – exports sales price lists as Shopify B2B catalogs, covered below.
Two behaviors apply across these screens. If the system does not find some items in the store during synchronization, it creates them automatically. And the Is Shopify Item checkbox is checked only for items that came from Shopify and were generated by the connector – a reliable way to distinguish connector-created items from ones your team keyed in.
How do Acumatica sales prices reach Shopify?
The Biz-Tech Services Shopify Acumatica integrator exports sales price lists from Acumatica to your store by leveraging Shopify B2B functionality, supporting customer price classes and individual customers including volume pricing and quantity rules, and synchronizing them as catalogs. Products, customers and customer locations must already be synced, and the customer or location must have a Customer Price Class assigned. What gets exported comes from the Sales Prices (AR202000) screen: prices are tied to a Customer Price Class or a Customer through the Price Code, and volume rules use Break Quantities. Define a Break Quantity greater than 1 to enforce minimum purchase quantities – if only 0 or 1 is defined, no quantity rule is exported.
A catalog is created for each unique combination of Customer Price Class and Currency, named CustomerPriceClassID-CurrencyCode, for example Wholesale-USD, with fixed pricing applied to all products within it. To run the export: assign a Price Class to the customer, confirm the customer and locations are synced, navigate to Export Shopify Sales Prices (BZ501005), select the records configured in Sales Prices (AR202000), and click Process or Process All. The system then creates or updates catalogs, adds prices including quantity breaks, and assigns customers or locations to the correct catalog. If the Price Type is Customer Price Class, the screen uses existing Shopify companies and adds them to the matching catalog.
Template items and matrix items
A Template Item is a base product used to create multiple variations, called Matrix Items. It defines general attributes but is not a sellable product itself – for example a T-Shirt template with Size and Color. Matrix Items are child products generated from a template; each is a unique combination of attributes, stocked, priced and sold separately, such as Red Small with SKU TS-RED-S. The Export Shopify Template Items process syncs template and matrix items separately or together, and after syncing the template item the Shopify Template ID is displayed on the Shopify Product tab.
To sync matrix items, click Sync Matrix Items, go to the Matrix Items tab, select the desired items, and click Include Item in Sync; they then appear on the Shopify Details tab, confirming they are in the store and ready to sync. Sync All Matrix Items syncs every matrix item along with the template product. On the Shopify Product tab, the Shopify Product Data field becomes available once the template item has been synced, and selecting its checkbox displays extra fields such as Custom URL, Meta Description and Page Title. The same logic applies to stock items: with the sync checkboxes selected the connector syncs items as template items with their matrix items, and with them clear it exports ordinary, individual products.
Shopify Collections
The Shopify Collections tab retrieves all collections and displays them in Acumatica when you press Get Collections. Purge All Collections clears them when you want to reload from scratch.
Customer and Company Sync Between Acumatica and Shopify
Customer data flows in both directions, and for B2B storefronts Acumatica is the authoritative side. For bidirectional synchronization with Shopify Plus B2B you must enable Use B2B in the store settings, which ensures Shopify correctly handles company profiles, multiple contacts per company, custom price lists, and customer and contact locations. Each B2B customer may have multiple users, added under the company. To push data outward, create a customer in Shopify with or without a contact, then press Sync Customer from the three-dot menu; Acumatica then updates Shopify with customer and contact data. Acumatica is the source of truth for customer details, so pressing Sync Customer assures the store gets the latest. You can also create and sync a password for a contact account through the Shopify Contact Password field.
The identifiers that link the systems live in specific places: the B2B customer ID appears on the Shopify Customers tab for customers linked to a B2B company; contact IDs are on the Contacts tab of the Customers screen and on the Contacts screen; and Location ID is stored on the Info tab of the Shopify Locations screen, ensuring the correct location is assigned and synced.
Four screens carry the customer flow. Import Shopify Companies imports company data into Acumatica; a company disappears from the screen once imported, indicating success, and filtering is based on the updated date field so only recently updated customers are retrieved. Export Shopify Companies exports customer, contact and location data in batches for bulk updates, and after a successful sync the customer disappears, reappearing only if changes occur. Export Shopify Customers processes customers on the scheduler, automatically or manually. The Shopify Companies screen allows manual import using Get Company by ID and Create Customer, which imports the company as an Acumatica customer along with its contacts and locations.
How the Shopify Connector Reports Errors
Errors surface in three places. On the Import Shopify Orders screen, an error during import is displayed on screen with information about the system error. For Sales Order export, errors such as invalid data or missing required fields are logged, with messages displayed in the export log or notification center. For unattended runs, Send Email Notifications for Errors emails the Order IDs that hit errors during retrieval. Two configuration problems have their own messages: an absent numbering sequence when a customer is being created, and Track Quantity not selected in both systems during item syncing.
Where to Monitor Shopify Results in Acumatica
Once the flow is running, most questions come down to whether a record made it and where it stopped. These are the exact fields, screens and buttons to check, roughly in the order a record travels:
- Shopify Stores screen, Test Credentials – confirms the connection to the store through the API. If this fails, nothing downstream will run.
- Shopify Stores screen, Last Imported Order Date – shows when the last order was imported and where the next retrieval starts; compare it against Begin Order Date. Last Refunded Order Date and Last Imported Company Date are the equivalents for refunds and companies.
- Import Shopify Orders screen – lists retrieved Shopify orders in Fulfilled, Unfulfilled or Partially Fulfilled status waiting to be imported, and displays the error message on screen when an import fails.
- Shopify Orders screen, Status – the order status as it was on import; use Refresh Order to update it against the current Shopify state.
- Shopify Orders screen, Sales Order Number and Invoice Number – the sales order created if the order was imported, and the invoice number if it was invoiced. Empty values mean the order was staged but never converted.
- Shopify Orders screen, Webhook Order checkbox – selected automatically after a webhook-driven import, distinguishing automated imports from manual ones.
- Sales Orders screen, Shipping tab, Delivery Settings – carries the Ship Via value that arrived with the order after import.
- Sales Orders screen, Shopify Order ID and store name – displayed after a Sales Order is exported, confirming the order now exists in Shopify.
- Sales Orders screen, Order is Synced and Exported checkboxes – selected automatically after export. If the order is updated afterward, Order is Synced clears and the order reappears on the Export Sales Orders screen; Mark/Unmark as Synced sets it manually.
- Export Sales Orders processing screen – lists only Sales Orders in Open or On Hold status still awaiting export. An order that disappears was exported successfully; one that reappears has been edited since.
- Stock Items screen, Is Shopify Item checkbox and Shopify Product tab – Is Shopify Item is checked only for connector-generated items, and the tab shows the Shopify Template ID plus Export to Shopify, selected automatically when the product exists there.
- The export log or notification center – where errors from the Sales Order export process are recorded.
Shopify Acumatica Integration: Frequently Asked Questions
Why is a Shopify order not appearing in Acumatica?
Work down the filters in order. The Import Shopify Orders screen only lists orders with the statuses Fulfilled, Unfulfilled or Partially Fulfilled, so an order in another state never shows up. Next check the Order Status section on the Import Settings tab: the corresponding checkbox must be selected for an order to be retrieved. Finally check the dates – retrieval starts from Begin Order Date only while Last Imported Order Date is not later than it, and afterwards orders are fetched from that watermark, so an older order is skipped.
Why was a customer not created in Acumatica from a Shopify order?
The most likely cause is the Import Customer checkbox on the Shopify Stores screen. If it is not selected, orders are imported with the default customer instead of creating a new record. If it is selected and creation still fails, check numbering: an absent numbering sequence produces an error message. If you use tags, confirm the Use Tags to Import Customer setup on the Cross-Reference tab, because when Use def. class if tag is not found is clear, a new customer is created taking the customer class from that tab.
Why did an item price, description or weight not update in Shopify?
This is almost always the Export Item Mappings tab. For all processing screens, if the required fields are not selected for creating or updating, the corresponding data such as price, description or weight will not be updated. Select the appropriate checkboxes there before using the processing screens, then re-run Sync or Sync All on the Export Shopify Inventory Items screen.
Why is Acumatica not sending fulfillment back to Shopify?
Check the Skip Fulfillment checkbox on the Shopify Stores screen. When it is selected, no API request is sent during the Prepare Invoice action and the order status is not updated. With it clear, confirming the shipments created from imported orders generates Shopify fulfillment events, and the tracking number is sent after Prepare Invoice with the Sales Order status updated accordingly.
Can Shopify orders be imported as invoices instead of Sales Orders?
Yes. The Import Shopify Orders to field specifies the document type, and Shopify orders can be imported into Acumatica as Sales Orders, Sales Order Invoices (SO Invoice), or Accounts Receivable Invoices (AR Invoice). Order Type sets the default type created by the Biz-Tech Services Shopify Acumatica integrator, and Branch uses the branch values already set up on the store.
Does the Shopify Connector import payments with the order?
Only if you tell it to. Import Captured CC Tran. as Payment must be selected for an order that has a payment at checkout to be imported with that payment; otherwise it arrives without one, and Skip Shopify Payment does the opposite. Payment Method and Payment Type – Payment or Prepayment – set what is created, and Release Payment During Order Import causes the payment to arrive already released.
How do I run the Shopify integration automatically instead of clicking buttons?
There are two mechanisms. Several processing screens support scheduler setup, including Import Shopify Orders, Export Shopify Inventory Quantities, Export Sales Orders and Export Shopify Customers. Separately, webhooks work in real time: with Use Webhook enabled and Use Webhook for Shopify Order Process Automation selected, any order created in Shopify is automatically imported into Acumatica on the Sales Orders screen, with equivalent options for fulfillment and refunds.
What happens in Acumatica when a Shopify order is refunded?
It depends on how far the order had progressed. If it is a Sales Order with no fulfillments, processing the refund creates a Payment with the Customer Refund type, sets the refunded amount, closes the order, changes the status to Canceled and deletes all lines. If a shipment was created but not confirmed, it is deleted first and the same path follows. If the shipment was confirmed, or the invoice was prepared but not released, the system creates a Credit Memo with a Customer Refund reference in the Applications. If the invoice was already released, the system reverses it.
Work With the Biz-Tech Services Shopify Connector
The Shopify data flow into Acumatica ERP is a chain, and every link is a setting you control. Credentials and store configuration decide whether the Biz-Tech Services Shopify Acumatica connector can connect at all. Import Settings decide which orders qualify and what document they become. Customer Information, Payment Options, Tax Options and Item Information decide how much of the original order survives the trip. Export Item Mappings and the processing screens decide what your storefront sees of your catalog, inventory and prices, and Order Export Settings decides what happens to orders that start life in Acumatica. When you know which screen owns which decision, troubleshooting stops being guesswork.
If your business runs a Shopify storefront on top of Acumatica ERP and you want that data flow configured, monitored and running without manual intervention, the Biz-Tech Services team can help you set it up correctly the first time. Visit https://biz-techservices.com to learn more about our Acumatica expertise or to schedule a personalized demonstration of the Shopify Connector.

