
How to Send Acumatica Orders to ShipStation
Sending ERP orders to ShipStation starts with an ERP sales order, a connected store configured for outbound processing, and either the Create Orders in ShipStation process or an action on the Sales Orders screen. This guide explains the documented setup, order-creation actions, mapping controls, validation points, and exceptions so you can move sales orders into ShipStation and confirm the result.
The Biz-Tech Services ShipStation Acumatica Connector supports two documented outbound workflows: creating an order in ShipStation before bringing its shipment back to Acumatica, or creating both the ShipStation order and shipment when an Acumatica shipment is confirmed. The focus here is the order-creation task; the broader two-way record movement is covered in the sibling article, How ShipStation Data Flows Between Shipping and Acumatica ERP.
Before You Start: What Must Be Configured
Before an order can be sent, the Biz-Tech Services Acumatica ShipStation Connector needs a published customization package, working ShipStation credentials, the correct data direction, and store-specific outbound choices. Keep these prerequisites tight so a failed export can be traced to a setting instead of to an undefined process.
1. Install and publish the connector customization package through Customization Projects (SM204505).
2. On the ShipStation Store screen, enter the Consumer Key, Consumer Secret, and Base URL in Connection Settings, then use Test Credentials to verify API connectivity.
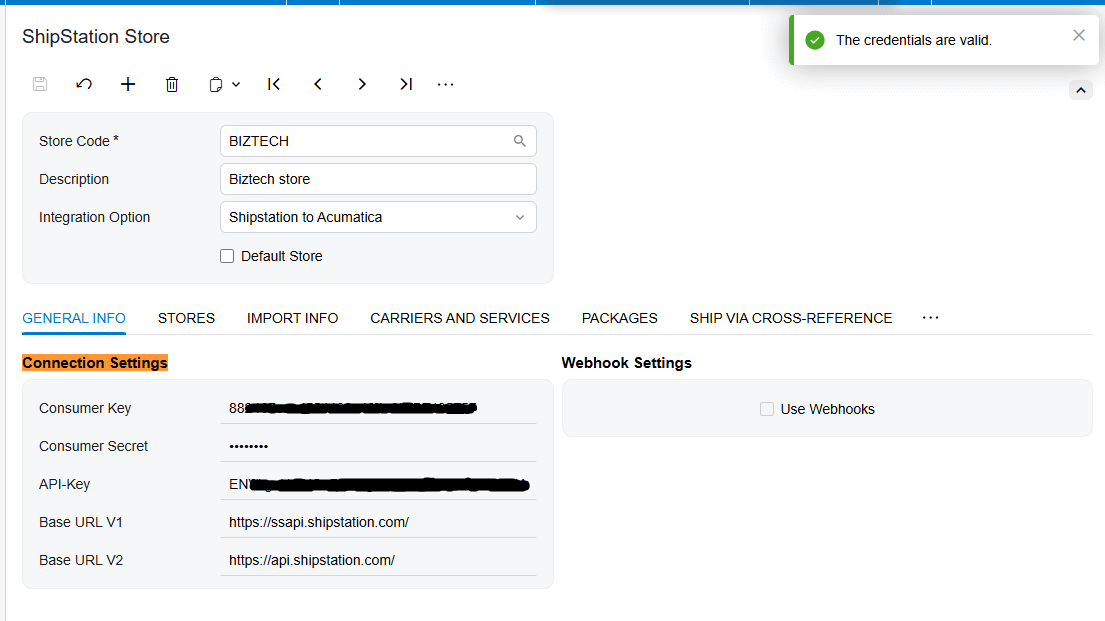
3. Use Get Stores on the General Info tab, identify the applicable connected store, and select the store used by the integration.
4. Set Integration Option to Acumatica to ShipStation. The Create Orders in ShipStation screen is not documented for the reverse direction.
5. Choose the Process Flow that matches the intended workflow: Shipment in ShipStation or Shipment in Acumatica.
6. Load the available carrier codes, packages, and platform warehouses on their respective tabs. Select the package that should be used for the order.
The documentation says the General Info tab remains consistent between integration directions, while the other tabs change with the selected direction. It does not provide screen IDs for ShipStation Store, Create Orders in ShipStation, Sales Orders, or Shipments, so this article does not assign any.
Send Acumatica Orders to ShipStation, Step by Step
The Biz-Tech Services ShipStation Acumatica Integration provides a batch path and a single-order path for the Shipment in ShipStation flow, plus a shipment-confirmation path when both records should be created together.
Step 1: Confirm the outbound direction and process flow
Open the applicable connector configuration and confirm that Integration Option is Acumatica to ShipStation. For the dedicated Create Orders in ShipStation screen, Process Flow must be Shipment in ShipStation. This combination determines whether eligible ERP orders appear for export and whether the later shipment is expected to originate in ShipStation.
Step 2: Load and select outbound reference values
Open the Carriers and Services, Packages, and ShipStation Warehouses tabs. Use the relevant retrieval button on each tab; for example, Get Carriers retrieves carrier codes and Get Packages retrieves available packages from the platform. Select the package that applies to the order. The manual says the warehouse tab follows the same logic, but it does not describe a line-by-line mapping rule for these outbound values.
Step 3: Create orders in a batch
Open Create Orders in ShipStation. The screen displays ERP orders that can be exported and created on the platform. Choose the configured Store Code and corresponding ShipStation Store ID, select the orders to process, and run the export. The documentation states that the selected store identifiers determine where the ERP orders are created.
Step 4: Create one ShipStation order from Sales Orders
For a single record, open the ERP sales order. In the Actions menu, open the connector option and click Create ShipStation Order. This is the documented alternative to the batch processing screen.
Step 5: Confirm that ShipStation returned its order identifier
After a successful export, review the ShipStation Order ID field on the Sales Orders screen. The workflow documentation states that exporting the order generates the order on the platform and places that identifier on the ERP sales order.
Step 6: Complete the selected shipment workflow
If Process Flow is Shipment in ShipStation, create the shipment there and bring it back through Import Shipment from ShipStation or the Get ShipStation Shipments action on Sales Orders. The imported shipment number and tracking number are added to the corresponding ERP order, and its status is updated to Prepare Invoice.
If Process Flow is Shipment in Acumatica, first create the sales order and shipment in Acumatica. On the Shipping tab of the Shipments screen, manually complete the ShipStation Information option, then confirm the shipment. The confirmation creates both the destination order and its shipment. The returned Store Code, ShipStation Store ID, ShipStation Order ID, and ShipStation Order Number appear in ShipStation Information, while tracking information appears on the Packages tab.
Document Triggers: What Each Action Creates
1. Create Orders in ShipStation: exports displayed ERP orders to the configured connected store and creates destination orders.
2. Create ShipStation Order on Sales Orders: creates the destination order for the current ERP sales order.
3. Import ShipStation Shipment: retrieves shipment information for ERP orders already exported to ShipStation; it adds shipment and tracking details to the corresponding order and moves the ERP order to Prepare Invoice.
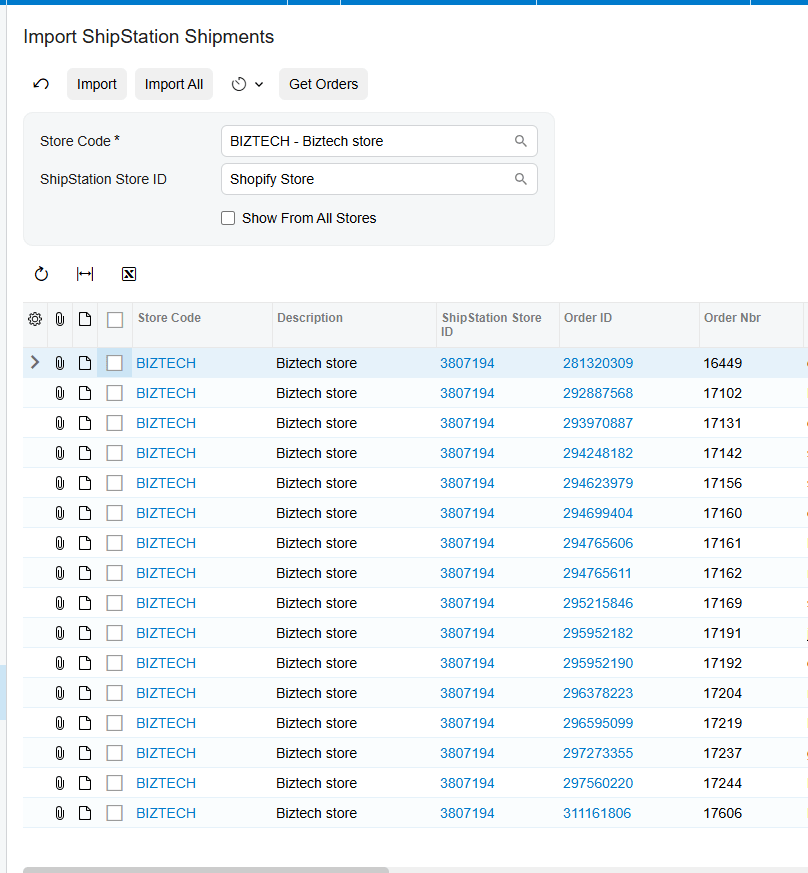
4. Get ShipStation Shipments on Sales Orders: performs the documented shipment-import process for the current order.
5. Confirm Shipment with Process Flow set to Shipment in Acumatica: creates both the order and shipment on the platform after the required ShipStation Information is completed on the ERP shipment.
The source documents triggers for sales orders and shipments only. It does not describe an action that exports an Acumatica purchase order, creates a purchase order on the platform, creates an Acumatica invoice during order export, or sends an invoice to ShipStation. Prepare Invoice is an ERP order status reached after shipment information returns; the manual does not claim that the import creates the invoice.
Mapping Rules That Decide What Appears on the Order
Store and outbound setup values are the documented controls that determine where the order goes and which shipping references are available. Store Code and ShipStation Store ID associate an export with the intended connected store. The Carriers and Services, Packages, and ShipStation Warehouses tabs retrieve available values from ShipStation, and the package selection identifies the package used for the order.
The integration direction and Process Flow are also mapping decisions in practice because they decide which screens and actions are valid. Acumatica to ShipStation with Shipment in ShipStation exposes the order-export and shipment-return sequence. Acumatica to ShipStation with Shipment in Acumatica uses the ERP shipment confirmation as the creation event.
For the confirm-shipment path, the user manually fills the ShipStation Information option on the Shipping tab before confirmation. Afterward, Store Code, ShipStation Store ID, ShipStation Order ID, and ShipStation Order Number are populated there, and tracking information is populated on Packages. The source does not specify field-by-field transformations for customer, address, line, price, discount, tax, carrier, service, package, or warehouse data on outbound orders. Those mappings should therefore be validated in the configured environment rather than inferred from the inbound options documented elsewhere.
Validation and Common Exceptions
1. Credential validation: use Test Credentials after entering the Consumer Key, Consumer Secret, and Base URL. If the test does not connect, review those values before testing order export.
2. Direction mismatch: Create Orders in ShipStation requires Integration Option to be Acumatica to ShipStation. A store set to ShipStation to Acumatica is intended for the import screens.
3. Process-flow mismatch: the dedicated order-export and shipment-import screens require Shipment in ShipStation. Use the shipment-confirmation workflow for Shipment in Acumatica.
4. Missing reference data: retrieve carriers, packages, and warehouses from the platform and confirm the required package is selected before processing.
5. No returned order ID: if ShipStation Order ID is blank after processing, the documented success marker is absent. Recheck credentials, store selection, direction, and process flow before retrying.
6. No shipment or tracking data: in the Shipment in ShipStation flow, a shipment must first exist on the platform and then be imported. The source does not say that order export alone produces tracking information.
7. Incomplete confirm-shipment setup: in the Shipment in Acumatica flow, ShipStation Information on the Shipping tab must be filled before Confirm Shipment.
The manual mentions an error when an inbound import screen is used with an incorrectly configured store, but it does not quote the exact message. It provides no named outbound error messages, validation codes, retry behavior, duplicate-order rules, or exception log. Troubleshooting should rely on the documented settings and returned identifiers without inventing message text.
Where to Check Your Work
The Biz-Tech Services Acumatica ShipStation Integration leaves several concrete checkpoints across configuration, sales order, shipment, and inquiry screens.
1. Customization Projects (SM204505): confirm that the integration package is present and published.
2. ShipStation Store – Connection Settings: review Consumer Key, Consumer Secret, Base URL, and the result of Test Credentials.
3. ShipStation Store – General Info: confirm the intended store was retrieved and selected.
4. ShipStation Store – Integration Option: verify Acumatica to ShipStation.
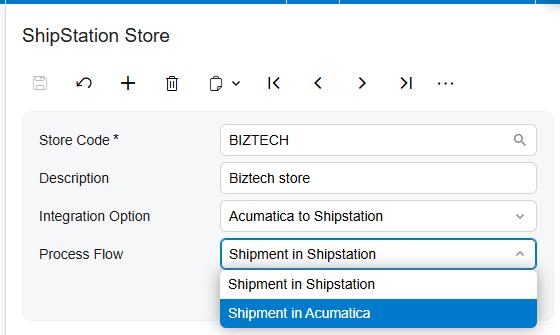
5. ShipStation Store – Process Flow: verify Shipment in ShipStation or Shipment in Acumatica matches the workflow being used.
6. Carriers and Services, Packages, and ShipStation Warehouses: confirm the reference lists were retrieved and the package was selected.
7. Create Orders in ShipStation: confirm the intended ERP orders appear under the correct Store Code and ShipStation Store ID.
8. Sales Orders: check ShipStation Order ID after export and use the ShipStation actions for single-order processing.
9. Import Shipment from ShipStation: confirm that the already-exported order is available after a shipment is created on the platform.
10. Shipments – Shipping tab: review Store Code, ShipStation Store ID, ShipStation Order ID, and ShipStation Order Number in ShipStation Information.
11. Shipments – Packages tab: verify that tracking information was populated.
12. ShipStation Orders and ShipStation Shipments: use these Generic Inquiries to review initial order and shipment information recorded in Acumatica.
Send Acumatica Orders to ShipStation: Frequently Asked Questions
Which Acumatica document can I send to ShipStation?
The source specifically documents ERP sales orders. It does not document exporting purchase orders or invoices to ShipStation, so those document types should not be assumed to be supported by this workflow.
Can I send one order without running a batch?
Yes. From the Sales Orders screen, use the Actions menu, open the connector option, and click Create ShipStation Order. The Create Orders in ShipStation screen is the documented batch-oriented alternative.
Why does my order not appear on Create Orders in ShipStation?
Verify that the store uses Acumatica to ShipStation and that Process Flow is Shipment in ShipStation. Also confirm credentials, the selected store, and the Store Code and ShipStation Store ID. The manual does not provide additional eligibility rules or an exact error message for a missing order.
How do I know that the ShipStation order was created?
Check the ShipStation Order ID field on the Acumatica Sales Orders screen. The documented workflow says this value is displayed when the order is exported and generated in ShipStation.
Why is tracking information missing after I export the order?
Order export and shipment import are separate steps in the Shipment in ShipStation flow. Create the shipment on the platform, then use Import Shipment from ShipStation or Get ShipStation Shipments. The shipment number and tracking number are added only after that import.
Can Acumatica create the ShipStation shipment at the same time as the order?
Yes, through the documented Shipment in Acumatica workflow. Create the Acumatica sales order and shipment, complete ShipStation Information on the Shipping tab, and confirm the shipment. The Biz-Tech Services Acumatica ShipStation Integrator then creates both records in ShipStation during confirmation.
Does importing a ShipStation shipment create an invoice?
The documentation says the ERP order status changes to Prepare Invoice after the shipment is imported. It does not state that the import action creates an invoice.
Where can I review the resulting records?
Review the Sales Orders and Shipments screens for returned identifiers and tracking information. The order and shipment Generic Inquiries display initial information about the integrated order and shipment records.
Work With the Biz-Tech Services ShipStation Connector
A reliable outbound workflow depends on the correct store direction, Process Flow, retrieved shipping references, and clear confirmation checks. The documentation supports both batch and single-order creation, followed either by shipment import or by creation of the destination order and shipment during ERP shipment confirmation.
If your team needs help configuring, validating, or troubleshooting this workflow, the Biz-Tech Services ShipStation Acumatica Integrator can help align the documented settings with your Acumatica process. Visit https://biz-techservices.com to learn more and contact Biz-Tech Services.
Check the video for more details – https://www.youtube.com/watch?v=ZS94T90M20o

