
How to Sync Shopify Inventory with Acumatica
Accurate inventory depends on more than sending a quantity from one system to another. The Biz-Tech Services Acumatica Shopify connector links Acumatica inventory records, warehouses, and quantity settings to Shopify products and locations. A reliable setup begins with product identity and location mapping, then uses Acumatica as the source for the quantity exported to Shopify.
The documented workflow supports manual processing and scheduled quantity synchronization. It can combine quantities from selected Acumatica warehouses and publish the result according to one of three quantity measures: On Hand, Available, or Available for Shipment. The important work happens before automation starts: confirm credentials, decide which warehouses and items belong to the store, and choose the quantity definition that matches what customers should be able to buy.
How Shopify Inventory Sync with Acumatica Works
The Biz-Tech Services Shopify Acumatica connector maintains the relationship between the Shopify store and Acumatica through the Shopify Stores configuration. From there, the Warehouse Details area retrieves Shopify locations and maps them to Acumatica warehouses. When inventory quantities are exported, the connector updates the corresponding Shopify location.
For stores supplied by more than one warehouse, the connector can export the sum of quantities across the selected warehouses. The selected quantity basis controls which Acumatica figure is sent. This distinction matters because On Hand, Available, and Available for Shipment can represent different operational positions. Select the measure that reflects the inventory promise your business intends to make online.
Product identity is equally important. On export, the connector uses the Acumatica Inventory CD as the Shopify SKU. The manual states that item mapping is not supported during the Acumatica-to-Shopify item export process. Mapping is available when importing Shopify items into Acumatica. Therefore, teams should verify Inventory IDs and Shopify SKUs before relying on quantity updates.
Settings and Fields to Review Before Syncing
Store connection
Open the Shopify Store configuration and identify the correct Store Code. If one store should appear automatically on processing and store screens, select Default Store. Use Test Credentials to verify the API connection with the values on the Connection Settings tab. Edit Credentials is available when connection details need to change.
The Biz-Tech Services Shopify Acumatica integration package must also be installed and published in Acumatica through the customization project process. The source manual identifies the Customization Projects form as SM204505 and lists PCSR, PERP, and SAAS as supported license designations. Confirm the applicable licensing and deployment details for your environment before configuration.
Warehouse and Shopify location mapping
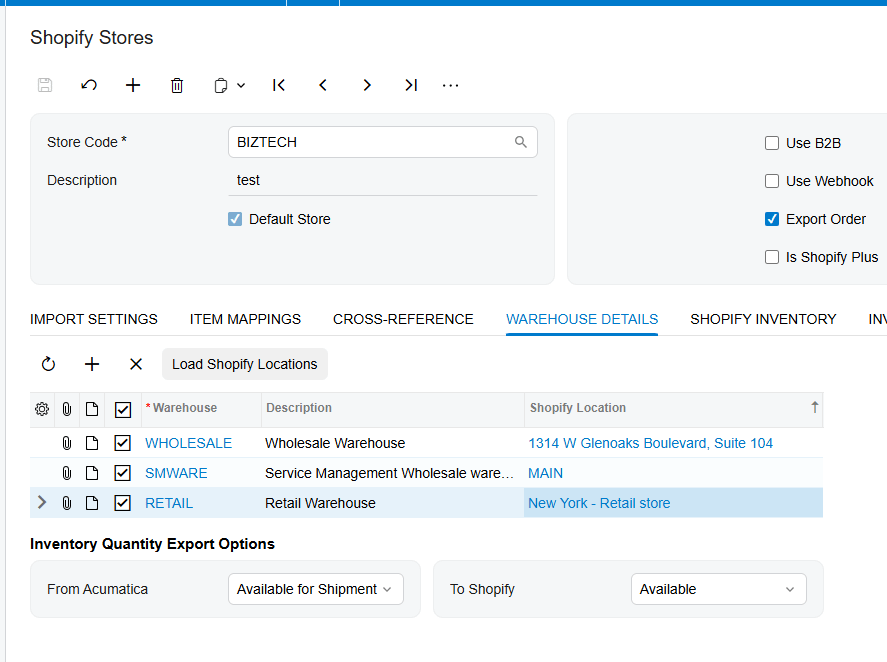
In Warehouse Details, use Load Shopify Locations to retrieve locations from Shopify. Map each relevant Shopify location to the Acumatica warehouse that supplies it. If several warehouses are selected, the exported item quantity is the sum across those warehouses. Review this scope carefully so a warehouse intended for another channel, market, or purpose is not included by mistake.
Quantity basis and tracking
Choose On Hand, Available, or Available for Shipment from the quantity selection. The manual does not define the formulas behind these values, so confirm their meaning in your Acumatica configuration and business rules. The exported value should match the quantity the storefront is allowed to offer, not simply the easiest number to retrieve.
Review Track Quantity as well. The documentation says that if Track Quantity is cleared in both Shopify and Acumatica, synchronization produces an error. If it is cleared in Shopify but selected in Acumatica, the sync updates the quantity and automatically selects tracking in Shopify. The same manual later notes that quantity can be updated even when Track Quantity is not selected for an item. Because those statements may depend on context or connector version, test the behavior in a nonproduction item before rollout.
Item selection and product fields
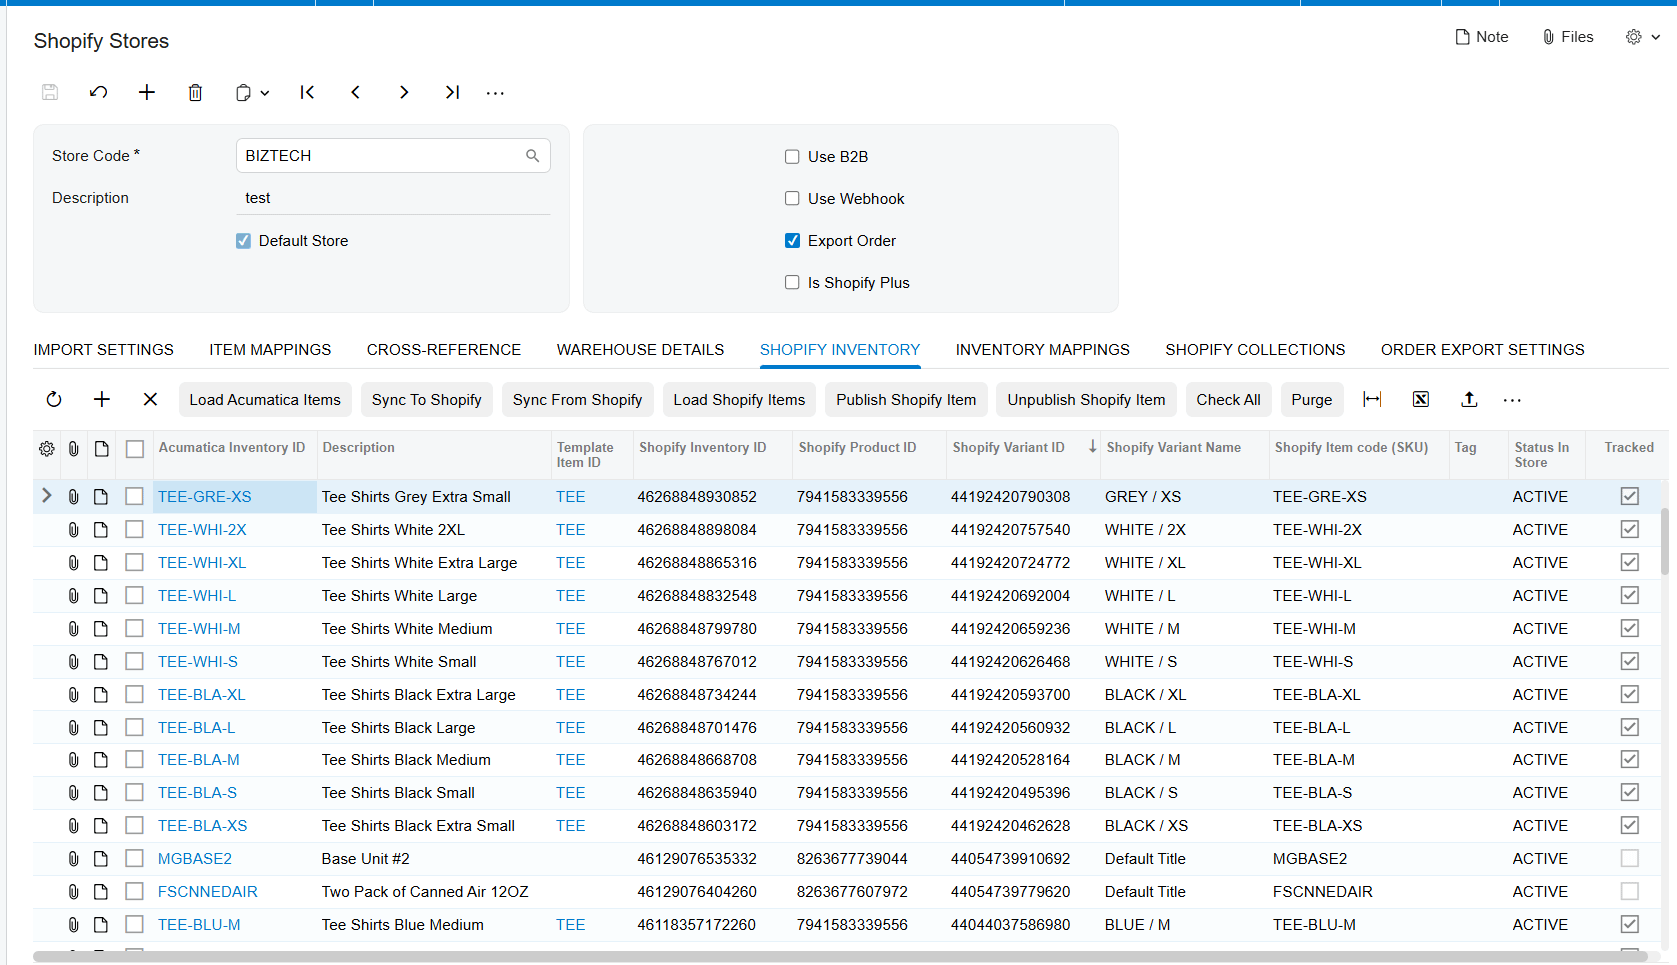
The Shopify Inventory tab can load Acumatica stock and non-stock items with Load Acumatica Items, or retrieve Shopify products with Load Shopify Items. It supports Sync to Shopify, Sync from Shopify, publish, unpublish, Get Item by ID, and Purge. The list can also be imported or exported as an Excel document.
Export Item Mappings controls which product-related values are updated. Clear fields that should not be exported, and select every field required for the processing operation. The manual specifically warns that unselected fields such as price, description, or weight are not updated. Inventory Mapping separately connects Acumatica attributes, item currency settings, and user-defined fields to Shopify fields, including product- or variant-level metafields. Use Get Metafields to retrieve existing Shopify metafields, and select the import or export checkbox for each active mapping.
Practical Shopify and Acumatica Inventory Workflow
1. Validate the connector deployment and license. Confirm the customization package is installed, validated, and published for the intended Acumatica tenant.
2. Test the Shopify connection. Select the Store Code, review connection settings, and run Test Credentials before loading products or locations.
3. Load and map Shopify locations. In Warehouse Details, retrieve Shopify locations and map only the Acumatica warehouses that should contribute inventory to each location.
4. Choose the exported quantity. Select On Hand, Available, or Available for Shipment according to the storefront promise and the organization’s inventory rules.
5. Verify item identity. Compare Acumatica Inventory CDs with Shopify SKUs. Resolve duplicates, blanks, or unintended identifiers before export because Acumatica item export uses Inventory CD as SKU.
6. Load the product records. Use Shopify Inventory to load Acumatica items or Shopify items. If products must first be created or updated in Shopify, use Sync to Shopify or the Export Shopify Inventory Items screen. Select Sync for specific records or Sync All for all displayed records.
7. Enable the required export fields. Check Export Item Mappings and any Inventory Mapping rows needed for product or variant data. A processing screen cannot update a field that has not been selected for creation or update.
8. Select inventory items for quantity export. In Shopify Inventory on the Shopify Store screen, select the required items and save the selection.
9. Run a controlled quantity sync. Open Export Shopify Inventory Quantities and process a small set first. Confirm that Shopify receives the expected quantity at the expected location.
10. Schedule recurring synchronization. After the controlled test passes, use the scheduling option on Export Shopify Inventory Quantities to reduce manual processing. Choose the interval according to sales velocity and operational needs; the source does not prescribe a frequency.
How to Monitor and Validate Inventory Synchronization
Start validation with a small, representative sample: one simple stock item, one item held in multiple selected warehouses, and, if applicable, one variant or matrix item. Record the Acumatica quantity under the selected basis, run the export, and compare the resulting Shopify location quantity. For a multiwarehouse item, independently add the contributing quantities and confirm that Shopify receives the same total.
Use the processing screen as the operational checkpoint. Confirm that the intended Store Code and records are selected before running Sync, Sync All, Process, or a schedule. If a product does not appear as expected, return to Shopify Inventory and verify that it was loaded and selected. If product details fail to update, inspect Export Item Mappings and the import or export checkbox on Inventory Mapping.
After deployment, periodically test credentials, review location-to-warehouse mappings, and compare a sample of Acumatica and Shopify quantities. Revalidate after adding a warehouse, Shopify location, product, variant, or metafield. The source manual does not document a dedicated inventory exception report, retry policy, alert, or synchronization history, so confirm the available monitoring and logging features in the installed connector version.
Common Pitfalls in Shopify Acumatica Inventory Sync
1. Mismatched SKU and Inventory ID. Acumatica-to-Shopify item export uses Inventory CD as the SKU, and export-time item mapping is not supported. A mismatch can prevent the intended product relationship.
2. Incorrect warehouse scope. Selecting extra warehouses inflates the summed quantity; omitting a supplying warehouse understates it.
3. Wrong quantity definition. On Hand may not equal the amount that should be offered for sale. Validate Available or Available for Shipment against business rules before choosing.
4. Inactive field mappings. Required values do not update when their Export Item Mappings or Inventory Mapping checkboxes are not selected.
5. Assuming products already exist. Export Shopify Inventory Items may create products automatically when the connector cannot find them in the Shopify store. Test this behavior to avoid unintended catalog records.
6. Using Sync All too early. A broad export can amplify configuration errors. Begin with selected records and expand only after validating location, SKU, and quantity results.
7. Treating documentation ambiguities as guarantees. The manual contains two statements about Track Quantity that may apply in different contexts. Confirm the installed version’s behavior before production scheduling.
Frequently Asked Questions
Can Acumatica update inventory at multiple Shopify locations
Yes. Warehouse Details retrieves Shopify locations and maps them to Acumatica warehouses. The quantity export updates the corresponding location. When multiple warehouses are selected, the connector exports their summed quantity.
Which Acumatica quantity is sent to Shopify
The connector can use On Hand, Available, or Available for Shipment. The source does not define those calculations, so review your Acumatica rules and select the value that represents sellable inventory for the store.
Can Shopify products be mapped to different Acumatica item codes
Mapping is supported during import from Shopify to Acumatica. During export from Acumatica, the connector uses the item’s Inventory CD as the Shopify SKU and does not support mapping in that export process.
Can inventory synchronization run automatically
Yes. Export Shopify Inventory Quantities supports scheduling as well as manual processing. The documentation does not specify a recommended interval, so set and test a cadence that fits order volume and operational requirements.
What should be checked when a quantity does not update
Check credentials, Store Code, item selection, SKU alignment, location-to-warehouse mapping, quantity basis, Track Quantity behavior, and the required mapping checkboxes. Then rerun a single-item export and compare the Acumatica source quantity with the Shopify location quantity.
Plan a Reliable Shopify Acumatica Integration
A dependable Shopify inventory sync starts with controlled scope and verifiable identifiers. Establish the store connection, map locations to the right warehouses, choose the correct quantity basis, and validate a small item set before scheduling broader updates.
If you need help configuring, testing, or extending a Shopify and Acumatica integration, contact Biz-Tech Services to discuss your inventory workflow and connector requirements.

