
To sync CommerceHub inventory quantities from Acumatica, configure the connector for the correct store, add the warehouses that should contribute inventory, choose the quantity basis, and save the applicable Inventory IDs in the Inventory Template. Those items then appear on the Export CommerceHub Inventory screen, where they can be processed through the connector’s SFTP file workflow.
The connector documentation identifies three quantity choices: On Hand Quantity, Available Quantity, and Available for Shipment Quantity. That selection matters because it determines which Acumatica quantity the connector exports. A reliable CommerceHub inventory sync therefore begins with configuration, not with the export button.
How the CommerceHub Acumatica inventory integration works
The CommerceHub connector exchanges data through SFTP and text files rather than direct API requests. The documented flow sends information from Acumatica into the file-transfer layer and onward to CommerceHub. Information returning to Acumatica follows the reverse path.
Store codes separate connector configurations for different import and export processes. A store can have its own parameters, including Transaction Type, Description, Default Customer, and Document Type. The inventory process also depends on the warehouses, quantity basis, and Inventory IDs selected in the Mappings area. For inventory synchronization, use the store configuration associated with the intended CommerceHub operation.
This design creates several checkpoints. Acumatica determines which records and quantities are eligible. The Export CommerceHub Inventory screen presents the selected items. A text file carries the data through SFTP. CommerceHub must then receive and use that file. When a quantity looks wrong, check each checkpoint in sequence instead of assuming the issue is inside Acumatica.
CommerceHub inventory sync workflow
1. Confirm the connector and store configuration. After the connector is published, the CommerceHub workspace and its screens become available in Acumatica. Open the Mappings screen and select the store code that belongs to the inventory export process. Store codes can carry distinct settings, so verify that you are working in the intended configuration before changing warehouses or items.
2. Add the warehouses to Warehouse Details. Warehouse Details controls which Acumatica warehouses are included in the inventory export. Add every warehouse that should contribute a quantity and leave out warehouses that should not be represented in the CommerceHub feed. If an expected location is missing here, its inventory will not be part of the configured export scope.
3. Choose the quantity basis. Use the Quantity field in Warehouse Details to select On Hand Quantity, Available Quantity, or Available for Shipment Quantity. Choose the measure that matches the inventory value the CommerceHub operation is expected to receive. The connector documentation lists these options but does not define a universal best choice, so the correct setting depends on the business rule for that store and process.
4. Select Inventory IDs in Inventory Template. Open the Inventory Template tab, select the Inventory IDs that should be synchronized, and save the changes. Saving is essential: the documented behavior is that selected and saved Inventory IDs appear on the Export CommerceHub Inventory screen.
5. Review the export population. Open Export CommerceHub Inventory for the applicable store code. Confirm that the expected items are present before processing. If an item is absent, return first to Inventory Template and confirm that its Inventory ID was selected and saved. Then check that the correct store configuration is in use.
6. Process the inventory export. Use the export screen to process the selected inventory records. The connector writes the inventory information into the file-based SFTP flow for delivery to CommerceHub. Because this is not a direct API transaction, a successful selection in Acumatica is only one part of the end-to-end sync.
7. Validate the result. Compare the quantity expected from Acumatica with the inventory output and the quantity received in CommerceHub. Validate the same Inventory ID, store code, warehouses, and quantity basis at each point. This isolates configuration errors from file-transfer or downstream processing problems.
Fields and settings that control the export
Store Code
The store code identifies the connector configuration used for a process. Since each store can have unique parameters, selecting the wrong store code can lead you to review or process a different configuration than intended.
Warehouse Details
This area defines the warehouses to export. Treat the warehouse list as the boundary of the inventory calculation used by the connector. When troubleshooting a missing or unexpected quantity, confirm the warehouse list before investigating the transfer file.
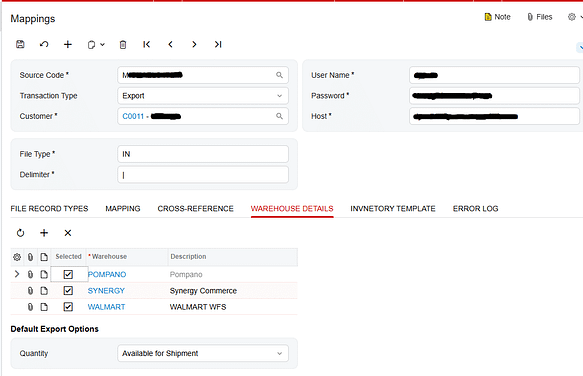
Quantity
The Quantity field offers three documented values:
1. On Hand Quantity, which selects the on-hand measure.
2. Available Quantity, which selects the available measure.
3. Available for Shipment Quantity, which selects the amount available for shipment.
Do not treat these labels as interchangeable. Record the selected option for the store configuration and compare the export against that same Acumatica measure.
Inventory Template
Inventory Template identifies which Inventory IDs participate in synchronization. An Inventory ID must be selected and saved before the associated item appears on Export CommerceHub Inventory. This makes the template the first place to check when an item is missing from the processing screen.
Monitoring and validating the inventory sync
Monitor the process at the points the connector documentation exposes. Begin with Mappings, where the store, Warehouse Details, Quantity selection, Inventory Template, and Error Log are available. Then inspect Export CommerceHub Inventory, the SFTP transfer, and the received value in CommerceHub.
For each validation sample, capture the following values:
1. The store code used for the export.
2. The Acumatica Inventory ID selected in Inventory Template.
3. The warehouses included in Warehouse Details.
4. The selected quantity option and the corresponding Acumatica quantity.
5. The item’s presence on Export CommerceHub Inventory.
6. The outbound file result and the quantity received in CommerceHub.
The Mappings screen includes an Error Log tab for messages encountered during connector import and export activity, and Purge Logs can remove all messages from that tab. Review available messages before purging them. The source specifically describes order-related errors in this area and does not define dedicated inventory error fields, so do not rely on the Error Log alone for inventory validation. Check the outbound file and CommerceHub result as well.
Common pitfalls
The item was not saved in Inventory Template
Selecting an Inventory ID without saving it will not establish the documented link to Export CommerceHub Inventory. Reopen the template and confirm that the item remains selected.
The wrong store code is selected
Store codes can have different connector parameters. Confirm the store before reviewing the item population or running the export.
A warehouse is missing or should not be included
Warehouse Details determines which warehouses belong in the export. An incomplete list can omit inventory, while an unintended warehouse can change the quantity being sent.
The quantity basis does not match the expected value
A comparison against On Hand will fail if the connector is configured to export Available or Available for Shipment. Always reconcile against the configured Quantity option.
The Acumatica step succeeded but the file flow did not
The connector uses text files and SFTP. An item can appear correctly in Acumatica while CommerceHub remains unchanged if the file is not transferred or processed. Validate the handoff after running the export.
Logs were purged before the issue was reviewed
Purge Logs removes all messages in the Error Log tab. Review and retain the information needed for troubleshooting before using it.
Frequently asked questions
Which Acumatica quantities can the connector export
The documented options are On Hand Quantity, Available Quantity, and Available for Shipment Quantity. The Quantity field in Warehouse Details controls the selection.
Why is an item missing from Export CommerceHub Inventory
Confirm that the Inventory ID is selected and saved in Inventory Template. Also verify that you opened the export screen for the intended store code.

Does the CommerceHub connector send inventory through an API
No. The connector documentation describes an SFTP process that exchanges text files. The inventory export therefore requires validation of both the Acumatica processing step and the file-transfer path.
Where are warehouses configured for the inventory export
Add them in Warehouse Details on the Mappings screen. This list identifies the warehouses that need to be exported.
Where can connector errors be reviewed
The Mappings screen includes an Error Log and a Purge Logs action. Because the documentation describes the log mainly in relation to order processing, also review the inventory export result, outbound file, and CommerceHub value when troubleshooting inventory.
How should a CommerceHub inventory quantity be validated
Use a specific item and compare the same Inventory ID, store code, warehouse scope, and configured quantity basis across Acumatica, the export output, and CommerceHub. This sequence shows whether the mismatch begins in setup, export processing, file transfer, or receipt.
Get help with CommerceHub and Acumatica integration
If you need help configuring, validating, or troubleshooting a CommerceHub inventory sync in Acumatica, contact Biz-Tech Services to discuss the connector workflow and your inventory requirements.

