
How Salesforce CRM Data Flows into Acumatica ERP
Salesforce orders flow into Acumatica as sales orders through a connected store record, and updated order data flows back out to the CRM on demand. Salesforce is a Customer Relationship Management platform, or CRM, and Acumatica is an Enterprise Resource Planning system, or ERP. The Biz-Tech Services Salesforce Acumatica Connector is the bridge between them, moving orders, customers, contacts, items, price books and discounts across the gap so that sales, finance and inventory all work from the same numbers.
This article follows that path end to end: how the connection is established, how a Salesforce order becomes an Acumatica sales order, how customers and items are resolved along the way, how pricing and discounts are kept aligned, and how changes made in the ERP are pushed back out. Configuration is covered here only where a specific setting decides what happens at a handoff, because the settings are what make the flow behave one way rather than another.
What the Salesforce Connector for Acumatica Does
The Biz-Tech Services Salesforce Acumatica Connector is an integration product from Biz-Tech Services, Inc. that connects a Salesforce CRM org to an Acumatica ERP instance. It defines data synchronization, automates the workflows that move records between the two platforms, and keeps data flowing in both directions. On the ERP side it adds a Salesforce Store screen that holds the credentials and the rules for the integration, processing screens for importing orders and exporting customers, price books and discounts, and inquiry screens where the results of each transfer can be reviewed. The product must be installed on an Acumatica system carrying a PCSR PERP or SAAS license.
The Salesforce Data Flow at a Glance
Every record that crosses between the two systems follows the same broad path. These are the stages, in the order they occur:
1. The Salesforce Store screen holds the store code, its description, and the API credentials on the General Info tab that link the two systems.
2. The Test Credentials button under Actions in the screen header confirms the connection is valid before any data moves.
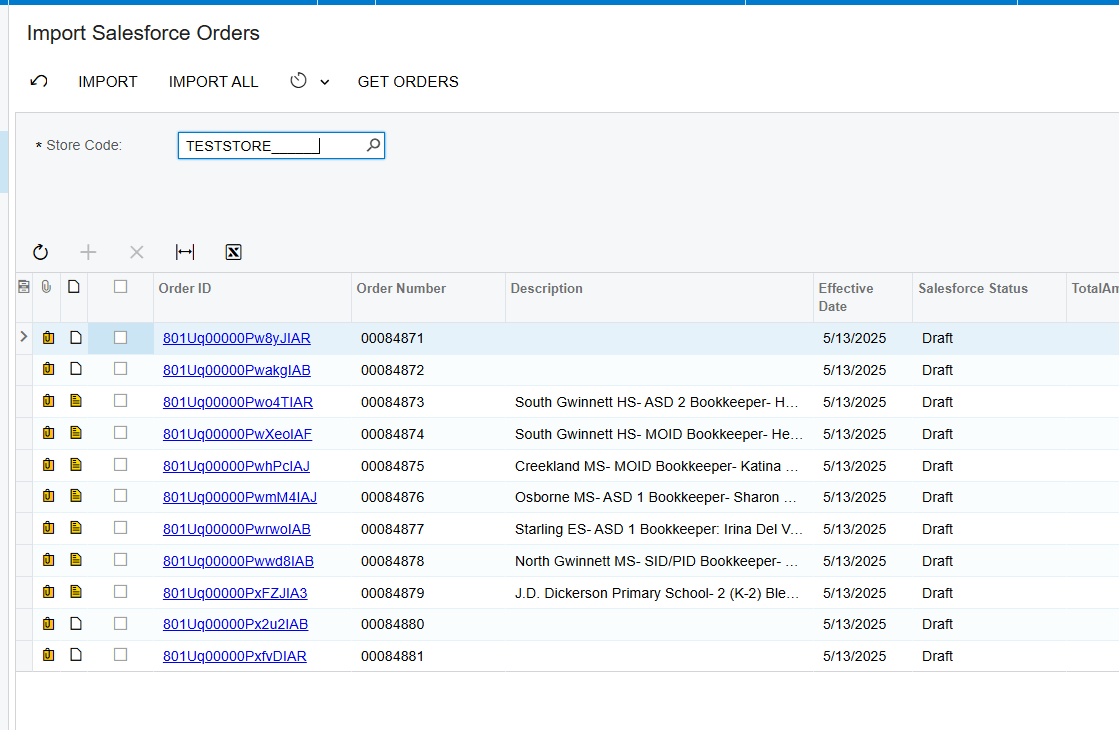
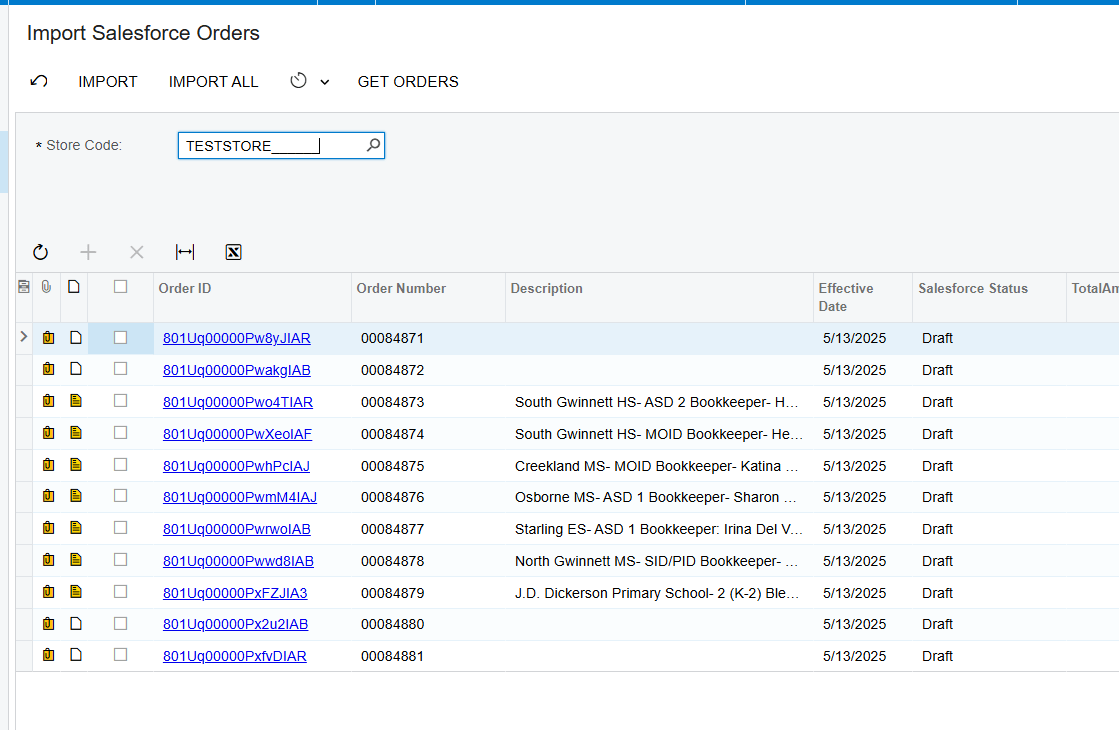
3. The Get Orders button on the Import Salesforce Orders screen retrieves orders dated after the value set in the Order Settings tab of the store.
4. Import or Import All turns the selected orders, or all displayed orders, into Acumatica sales orders of the configured Order Type.
5. During that import the connector resolves the customer and the items on the order, creating them in Acumatica or matching them to existing records, and applies the tax, payment and discount rules.
6. The resulting document can be opened from the Salesforce Orders Inquiry screen, which shows the original CRM detail alongside the SO number and SO status.
7. Customers, price books and discounts flow outbound through the Export Salesforce Customers screen and its counterparts for price books and discounts.
8. Order changes made in Acumatica flow back through the Sync Orders To Salesforce screen, updating the matching CRM order at both line and document level.
Stage One: Connecting Salesforce to Acumatica
Everything downstream depends on the Salesforce Store screen. The store code carries all the configuration and setup for the integration between the two systems, and the description field holds notes about what that store code represents. Underneath the code and description sit the tabs that govern the flow.
The General Info tab is where the API credentials that link the CRM with the ERP are entered. Once they are in place, the Test Credentials button in the header under Actions reports whether the credentials are correct. The Order Settings tab then defines how imported records behave: the order import process, order calculation, order type, import destination, order discount settings, payment methods and more. Because these settings are read at import time rather than at setup time, they are the switches that decide what each incoming Salesforce record turns into.

Inbound: How Salesforce Orders Become Acumatica Sales Orders
The Import Salesforce Orders screen is the transfer point for order data moving from the CRM platform into the ERP system. Pressing Get Orders retrieves the Salesforce orders related to the date set in the Order Settings tab of the store. The Import button brings in only the orders selected in the grid, while Import All brings in every order currently displayed.
Which Default Import Options Shape the Result
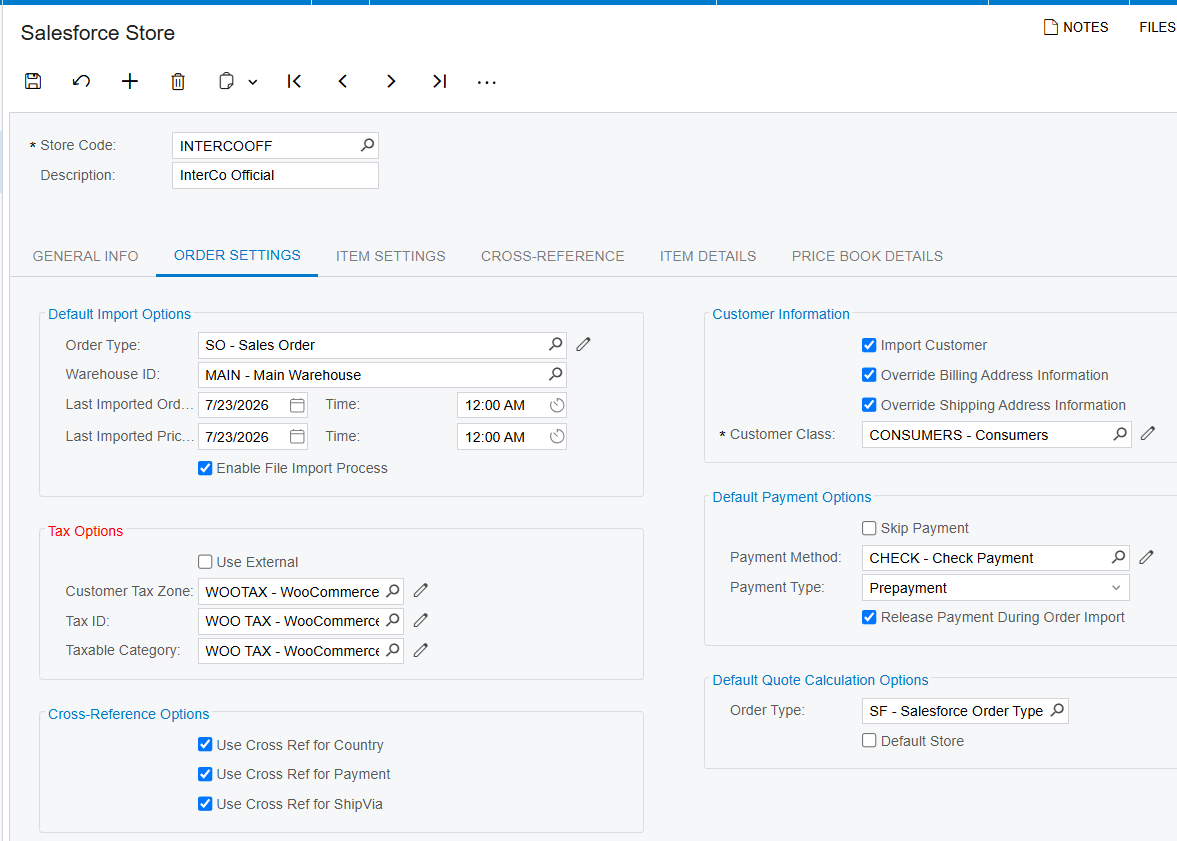
Several fields in Default Import Options determine the shape of the resulting document. Order Type indicates the document type the order should be imported into and placed as in Acumatica. Warehouse ID sets the default warehouse for the order. Last Imported Order Date displays the date of the last imported order, and that date is used the next time orders are fetched to decide which orders count as new, so it is the field that keeps repeat pulls from re-importing history. Last Imported Price Book Date works the same way for price books.
Enable File Import Process controls whether attachments travel with the order. When the checkbox is selected, the file is retrieved from the Salesforce order and copied into the workspace on the Sales Orders screen at import time. When it is cleared, the file is not retrieved with the order at all.
How Tax Is Calculated on an Imported Order
Tax options allow for alternative tax calculations based on how the tax option is set up. Selecting Use External enables the calculation of alternative taxes such as Avalara tax. Setting up the Customer Tax Zone, Tax ID and Tax Category instead allows for the import of similar taxes, such as those coming from Salesforce. The choice determines whether the tax figure on the imported order is calculated locally or carried over.
How Customers and Items Are Resolved During Import
An incoming Salesforce order is only useful if it lands on the right customer and the right inventory items. The connector resolves both during the import process.
Customer Creation and Address Handling
When the Import Customer checkbox is selected, a new customer is created in Acumatica during the order import process, using the email, the contact information and the selected customer class. When the checkbox is cleared, the system uses the default customer for every imported order instead, which keeps the customer list from growing with every CRM transaction.
The Override Billing Address Information and Override Shipping Address Information checkboxes decide which address ends up on the sales order. When they are selected, the import process overrides the customer addresses and sets the Salesforce order address on the sales order.
Item Matching and Product Creation
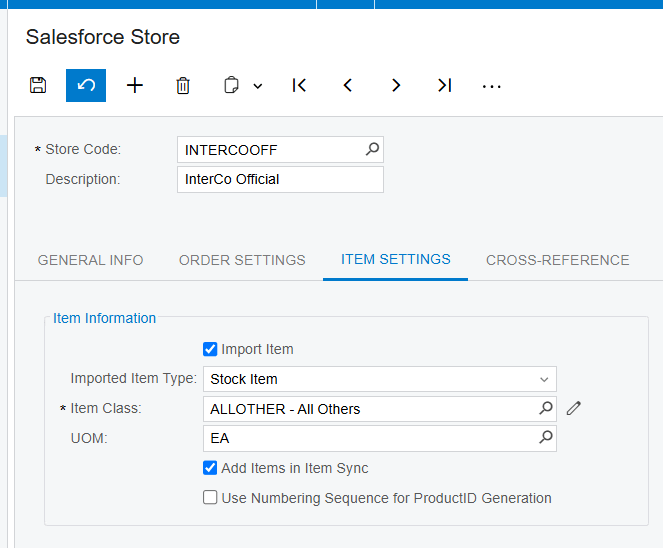
Item Settings governs how products are resolved. When the Import Item checkbox is selected, new items are created in Acumatica based on the configured settings as items are imported from Salesforce. When it is not selected, the program prohibits the import and creation of items unless the corresponding items already exist there. In that case the system searches for the Inventory CD using the Salesforce Product SKU: if it is found, that item is retrieved; if it is not, the error message “The item {0} does not exist in the system” is displayed and the record stops there. Add Items in Inventory Sync enables item synchronization, and Use Numbering Sequence for Product ID Generation makes the system automatically generate a unique product ID for each new product from a predefined numbering sequence.
How Payments Ride Along With the Order
Default Payment Options controls the payment side of the import. Skip Salesforce Payment imports the order without a payment when selected. Payment Method sets the payment method applied during the order import process, and Payment Type determines the payment type of the imported order. Release Payment during Order Import releases the payment as part of that same import. Selecting the Use Cross Ref for Payment checkbox on the Order Settings tab enables payments through cross-reference, and when cross-reference is used for payment the payment must not be skipped. Cross-reference options more generally let your business link and map Acumatica and Salesforce values such as Payment, Country or Ship Via, with each option enabled by its checkbox and mapped on the Cross-Reference tab.
How Pricing and Discounts Stay Aligned
Prices reach the ERP through price books. Selecting the Last Imported Price Book Date on the Order Settings tab lets you load Salesforce price books into the Price Book Details tab based on that date. Each ID listed in that tab is a hyperlink to the Salesforce Price Books inquiry screen, where the list price can be changed and item lines added or deleted.
The Salesforce Price Books screen is also where synced products are added to a price book and the list price is defined manually. Selecting a preferred price book ID and clicking Get All Products in the Actions menu retrieves and displays every item in that price book. Two ordering rules matter here: items must be included in the standard price book before they are added to another price book, and if an item already exists in a price book it must be brought into Acumatica by importing an order, during which the item is automatically added to the corresponding price book.
Discounts follow their own path. When the Salesforce Synced checkbox is cleared on the Acumatica Discounts screen, the setup discount code appears on the Export Salesforce Discounts screen, where it can be created or updated and then used during order creation. Both line and document discount types are supported.
Outbound: Sending Acumatica Data Back to Salesforce
The flow does not end when an order lands in the ERP. Four screens move data in the other direction.
Exporting Customers and Contacts
The Export Salesforce Customers screen creates and updates Acumatica customers in Salesforce. Load Acumatica Customers loads and displays all of them, and the Export or Export All button creates or updates the selected customers or all of them in the CRM. If a customer has a primary contact, that primary contact is also created as a Contact during the customer creation process. Note that the export creates the primary contact only once and does not update it afterward, so later contact corrections do not travel.
Exporting Price Books
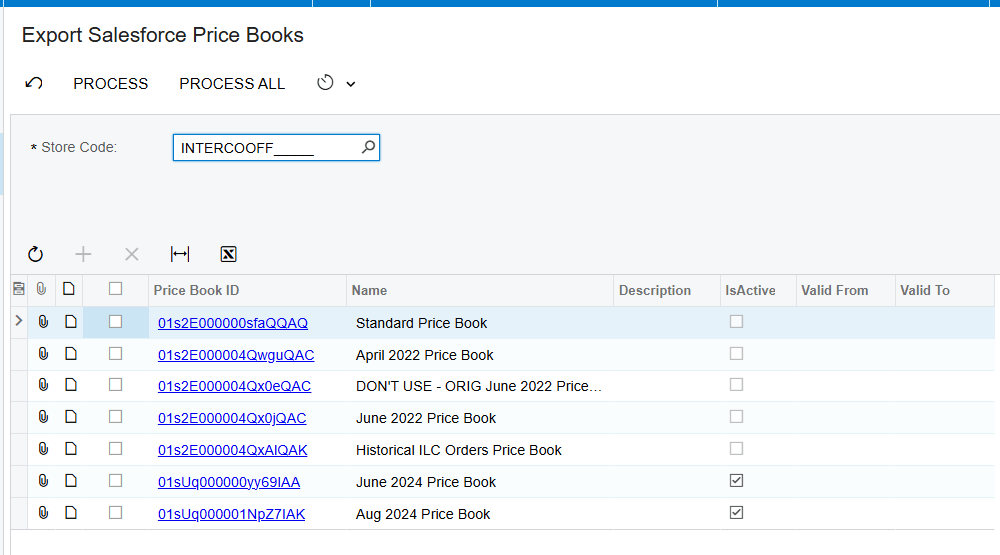
The Export Salesforce Price Books screen displays all the price books that have been loaded and are shown in the Price Book Details tab of the store screen. Process or Process All adds or updates products in the selected price books or in all of them. Only items that have been updated or changed are exported; unmodified items are not sent, which keeps each run small.
Syncing Order Changes Back to the CRM
The Sync Orders To Salesforce screen is where an order that came in from the CRM, was updated in Acumatica, and now needs to be pushed back gets processed. Updates are supported at both the order line level and the order document level. At the line level it updates the line description, discount code and discounted amount, and lines can be added and deleted. At the document level it updates the shipping and billing addresses, plus country, order date, order description, order total, freight amount, discount amount and tax amount. After changing that data, selecting the order and syncing it updates the CRM record to match. The screen also retrieves internal notes from Salesforce and displays them in the sales order Notes workspace, where they are read-only.
One filter governs what appears here: only modified orders with a status of On Hold or Open are displayed on this screen. An order that has moved past those statuses will not be listed, which is the first thing to check when an expected order is missing.
Where to Monitor Salesforce Results in Acumatica
Every stage of the flow leaves a visible trace. These are the exact places to look when you need to confirm that a record moved:
1. Import Salesforce Orders screen: the grid of orders retrieved by Get Orders, before and after Import or Import All is pressed.
2. Salesforce Orders Inquiry screen: reached by clicking the Order ID hyperlink on the import screen, showing the initial order details.
3. SO number and SO status on that inquiry screen: proof that the CRM order became an Acumatica sales order, and where that order now stands.
4. The workspace on the Sales Orders screen: holds the file copied from the Salesforce order when Enable File Import Process is selected.
5. The Notes workspace on the sales order: holds the internal notes retrieved from the CRM, which are uneditable.
6. Salesforce Info tab on the Customers screen: a generated ID plus a selected Salesforce customer checkbox means the record is a synced customer.
7. The Contacts screen: the same ID and checkbox logic applies to the primary contact.
8. The Export Salesforce Customers processing page: displays the Account ID and the last sync date for records already synced.
9. Item Details tab of the store screen: the synced item Salesforce ID, product code, product name, price and weight, populated by Load Acumatica Items, Sync to Salesforce and Sync all from Salesforce.
10. Price Book Details tab of the store screen: the price books loaded from the CRM, each ID linking through to the Salesforce Price Books inquiry screen.
11. Last Imported Order Date and Last Imported Price Book Date on the Order Settings tab: the watermark that decides what the next fetch pulls.
12. Salesforce Synced checkbox on the Discounts screen: cleared means the code is still waiting on the Export Salesforce Discounts screen.
Salesforce Acumatica Integration: Frequently Asked Questions
How do Salesforce orders get into Acumatica?
Press Get Orders on the Import Salesforce Orders screen. The connector retrieves the orders related to the date set in the Order Settings tab of the store and lists them in the grid. Then use Import to bring in only the orders you selected, or Import All to bring in every order displayed.
Does the connector create customers in Acumatica automatically?
Only if you tell it to. With the Import Customer checkbox selected, a new customer is created during the order import process with email, contact information and the selected customer class. With the checkbox cleared, every imported Salesforce order is placed on the default customer instead.
Can changes made in Acumatica be sent back to Salesforce?
Yes, through the Sync Orders To Salesforce screen. It updates the order at both line and document level, covering line description, discount code and discounted amount, added and deleted lines, shipping and billing addresses, country, order date, order description, order total, freight amount, discount amount and tax amount.
Why do I get “The item does not exist in the system” when importing a Salesforce order?
That message appears when the Import Item checkbox is not selected and the product on the order has no match in Acumatica. The system searches for the Inventory CD using the Salesforce Product SKU, and when nothing is found it cannot create the item on its own. Either create the item in Acumatica first, or select Import Item so new items are created from the configured settings during import.
Why is my modified order missing from the Sync Orders To Salesforce screen?
That screen only displays modified orders with a status of On Hold or Open. If the sales order has moved to another status, it will not appear in the list regardless of the changes made to it. Check the SO status on the Salesforce Orders Inquiry screen first.
Why does my imported order have no payment on it?
Check Skip Salesforce Payment in Default Payment Options, because when that checkbox is selected the order is imported without payment. Also check whether Use Cross Ref for Payment is selected on the Order Settings tab: when payments run through cross-reference, the payment must not be skipped, so the two settings have to agree.
Why can I not add a product to a Salesforce price book?
Items must be included in the standard price book before they can be added to another price book. If the item already exists in a price book, it has to be brought into Acumatica by importing an order first, and during that import the item is automatically added to the corresponding price book.
How do I confirm a customer is already synced?
Open the Customers screen and look at the Salesforce Info tab. When the Salesforce customer checkbox is selected and an ID has been generated there, the record is synced. The export processing page also shows the Account ID and the last sync date for customers that have already been sent across.
Work With the Biz-Tech Services Salesforce Connector
The data flow into Acumatica is a single continuous path: credentials on the Salesforce Store screen, orders pulled by Get Orders, customers and items resolved during import, tax and payment applied from the store settings, results visible on the Salesforce Orders Inquiry screen and on the sales order itself, and updates pushed back out through the Sync Orders To Salesforce and export screens. Knowing which screen owns which stage is what makes the integration straightforward to run day to day.
If your business runs Salesforce alongside Acumatica and wants that flow set up, tuned and monitored properly, the Biz-Tech Services Salesforce Acumatica Connector is built for exactly that. Visit https://biz-techservices.com to learn more about our Acumatica expertise or to schedule a personalized demonstration.

