
How to Import WooCommerce Orders into Acumatica
To import WooCommerce orders into Acumatica, you retrieve them from your store with the Get Orders action and then import the ones you want as Acumatica ERP (enterprise resource planning) sales orders. By the end of this guide you will know which settings decide what gets pulled in, which screen a retrieved order lands on, what documents the import creates, how mapping rules decide which values reach the order, and what to check when an order you expected does not appear.
The steps below describe the Biz-Tech Services Acumatica WooCommerce Connector. Two screens do most of the work: Import WooCommerce Orders, where retrieved orders are staged and imported, and WooCommerce Orders, which holds the imported record and links back to the documents it created. Both are governed by the WooCommerce Store screen, so that is where the task really starts.
Before You Import: The Settings That Decide What Comes In
The Order Settings tab of the WooCommerce Store screen configures order synchronization to Acumatica, and nothing on the processing screens overrides it. If an order never shows up for import, the cause is almost always a value on this tab.
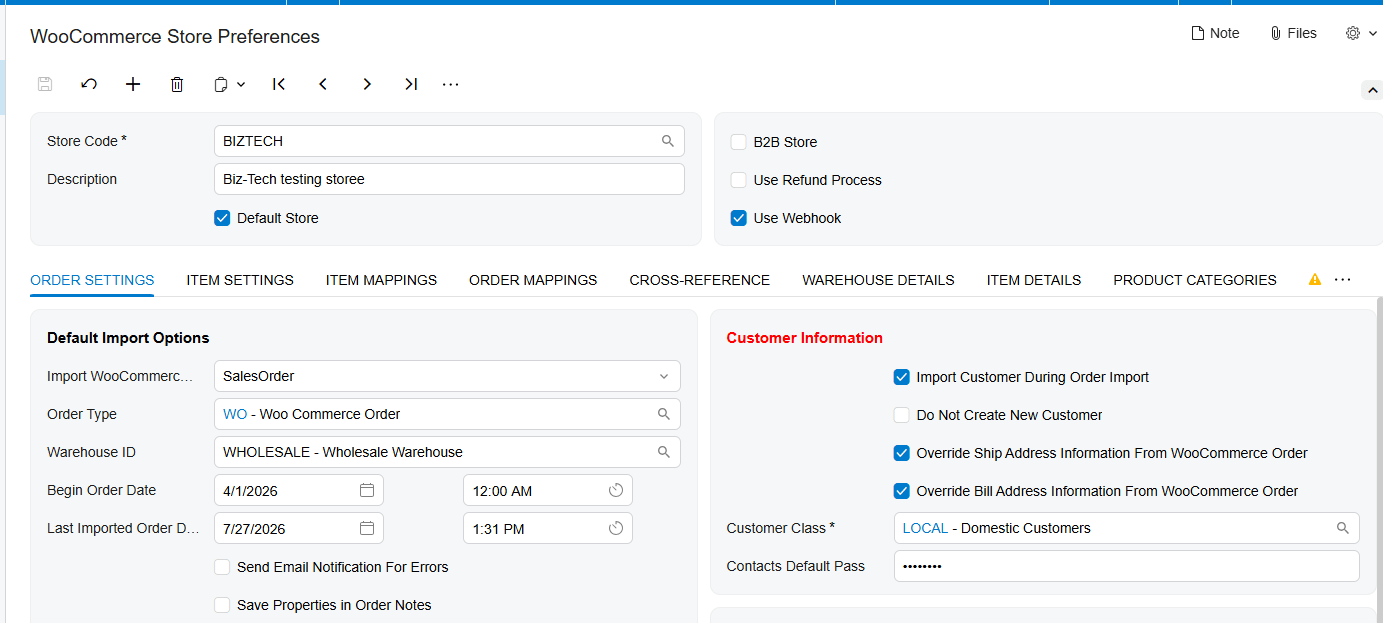
Import WooCommerce Orders To specifies the type of Acumatica document into which orders will be imported; the documented selection is Sales Orders. It matters more than anything else here, because the lines, discounts, freight, tax, and payment all attach to that document. Order Type defines the default order type for all orders created by the Biz-Tech Services Acumatica WooCommerce integration, and because it drives numbering and workflow, a wrong value has to be corrected order by order.
Warehouse ID specifies the default warehouse assigned to orders imported from WooCommerce, so inventory availability and stock management align with the selected warehouse.
Begin Order Date filters which orders are retrieved: only orders created on or after this date are imported, enabling an incremental import instead of dragging in the entire history of the store. Last Imported Order Date displays the date of the most recent order successfully imported, and the next import process begins from this date so no orders are skipped or duplicated.
One rule about that window is flagged as important in the documentation: orders are imported into Acumatica based on their updated date rather than their created date. An old order edited yesterday is in scope today; a recent order untouched since the last run may not be.
WooCommerce Status determines which orders are imported based on their status, for example Completed, Processing, or On Hold. Only orders matching a selected status are included, and the corresponding checkbox must be selected for an order to be retrieved and imported at all. That filter lets your business decide which parts of the store reach the ERP.
Importing WooCommerce Orders, Step by Step
The task has two stages. Retrieval brings order data into staging records; import turns a staged record into a real Acumatica document. Run them back to back, or retrieve on a schedule and import after review.
Step 1: Run Get Orders and Wait for the Retrieval Timer
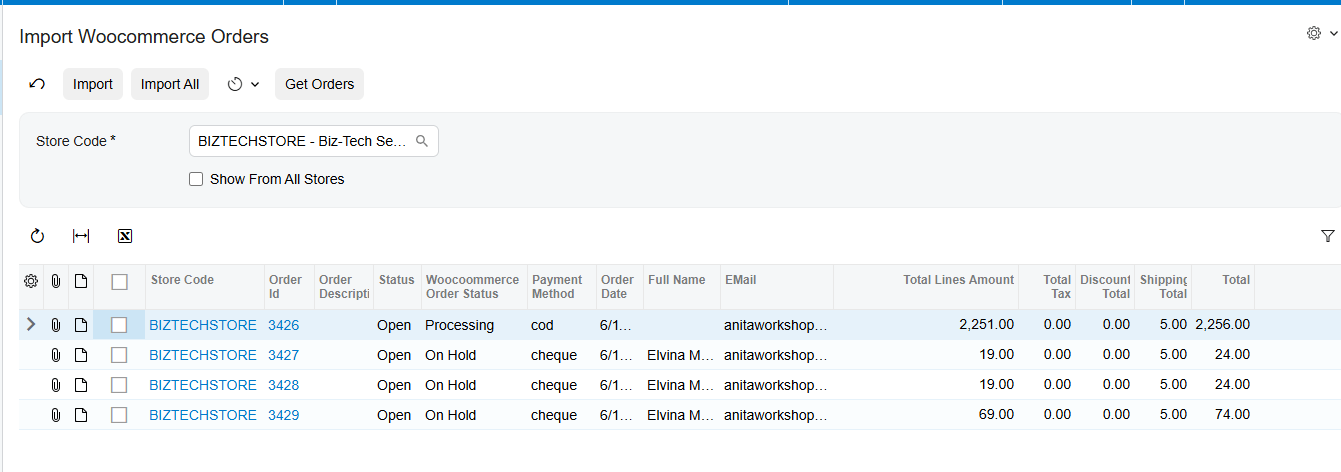
Open the Import WooCommerce Orders screen, select the store code, and click Get Orders. The button retrieves orders from WooCommerce, and a timer indicates the elapsed time until the process is complete. A store marked with the Default Store checkbox is set automatically in the Store Code field on the processing screens.
Let the timer finish. All orders for the selected period are retrieved and displayed at once rather than trickling in, so an empty grid mid-run is not evidence that nothing was found. Retrieval can also be scheduled: configure the Get Orders screen with Import Orders from WooCommerce selected in the Screen ID field.
Step 2: Review What Was Retrieved
Each retrieved order in the grid carries a hyperlink; clicking the order number navigates to the corresponding WooCommerce order screen in Biz-Tech Services WooCommerce Acumatica integration, where you can inspect the lines, addresses, and mapped values. Retrieval is when the Biz-Tech Services Acumatica WooCommerce connector captures order values into the staging record, so this is your last chance to adjust what the import will write.
Step 3: Import Selected Orders, or Use Import All
The Import button imports the orders you selected in the grid; Import All imports every order displayed there, which is the right choice once you trust the retrieval filters. This stage schedules separately: the Import All screen must be set up, with Import WooCommerce Orders selected in the Screen ID field.
Step 4: Import a Single Order by ID with the Import Order Action
Sometimes you do not want a batch. The Actions workspace of the WooCommerce Orders screen includes Import Order: by choosing the store code and setting the order ID, this action retrieves an individual order into Acumatica. Use it when the date window or status filters would make a full run too wide or too narrow to catch the order you care about.
Which Screen Your Order Lands On
Many support questions about the WooCommerce order import in Acumatica are really about routing: an order was retrieved, the user cannot find it, and concludes retrieval failed. Usually it landed on the other screen.
During the retrieval and import process, orders with the canceled, failed, empty, and completed statuses are displayed on the WooCommerce Orders screen of Biz-Tech Services Acumatica WooCommerce integration. Orders with the on-hold, partial-shipped, processing, and pending statuses are displayed on the Import WooCommerce Orders screen, and that processing screen only shows orders with the Partially Shipped, On hold, Pending, Pending payment, and Processing statuses in the store.
The Import WooCommerce Orders screen is a work queue holding orders that are still actionable; the WooCommerce Orders screen is the record of the order as the Biz-Tech Services Acumatica WooCommerce connector knows it, whether or not anything further should happen to it.
The same routing explains a behavior that looks like a defect. After the WooCommerce Cancel Order process, when the status becomes Cancelled in both systems, reopening the order in Acumatica does not send the request again to update the store. You can change the status manually in WooCommerce and retrieve the order again, but it appears on the WooCommerce Orders screen based on its processing status, not on the Import WooCommerce Orders screen, because it already has an associated sales order.
Document Triggers: What the Import Creates
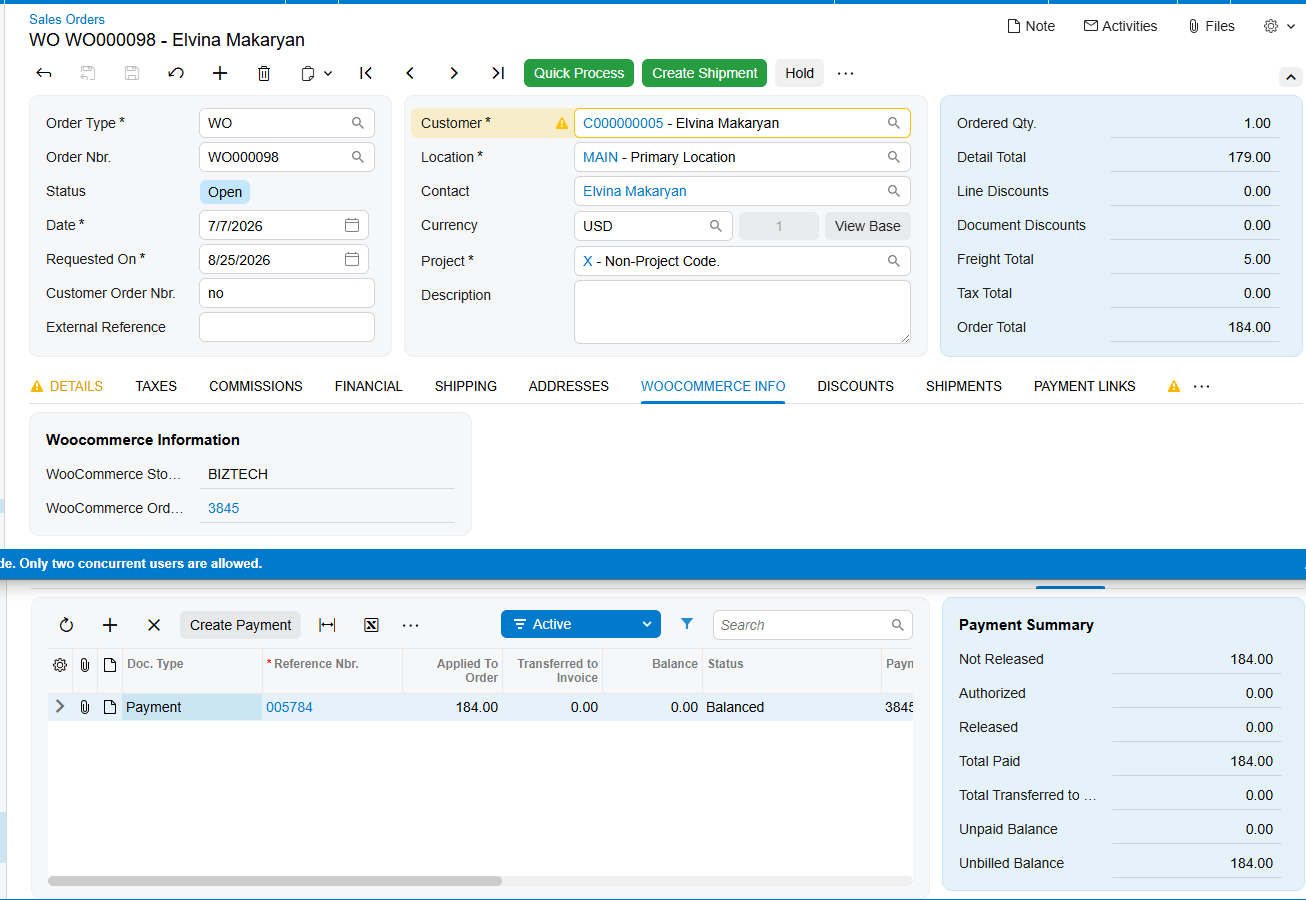
Knowing which documents the import triggers is what lets you verify a run. The primary document is the Acumatica sales order, created with the type set in Import WooCommerce Orders To and the Order Type and Warehouse ID defaults from the Order Settings tab.
You confirm the trigger fired from the WooCommerce Orders screen, not by hunting through Sales Orders. Sales Order Number displays the order sales order number if the order is imported, and Invoice Number displays its invoice number if the order is invoiced. An empty Sales Order Number on a retrieved order means retrieval succeeded but the import did not.
The second document the import can create is a payment. If Skip WooCommerce Payment is not selected, payment information comes across using the Payment Method and Payment Type you configured, and if Release Payment during Order Import is selected the payment is released automatically at the time the order is imported. Leave it unselected and the payment waits for your finance users.
The status on the WooCommerce Orders screen reflects the initial state of the order upon import. If the order is fulfilled in WooCommerce afterwards, Actions then Refresh Order updates the status in Acumatica to match the store. That is the answer whenever a status looks stale, and it is lighter than re-importing.
Further documents follow through the normal Acumatica flow rather than from the import itself: users click Create Shipment, confirm the shipment once box ID and tracking number are set, click Prepare Invoice, and then Release. The order status in both systems then changes to Completed and Invoice Number links back to the invoice.
Mapping Rules That Decide What Lands on the Order
Two settings decide which fields get pulled in, and one rule about timing decides whether changing those settings affects the orders in front of you.
The Order Mappings Tab
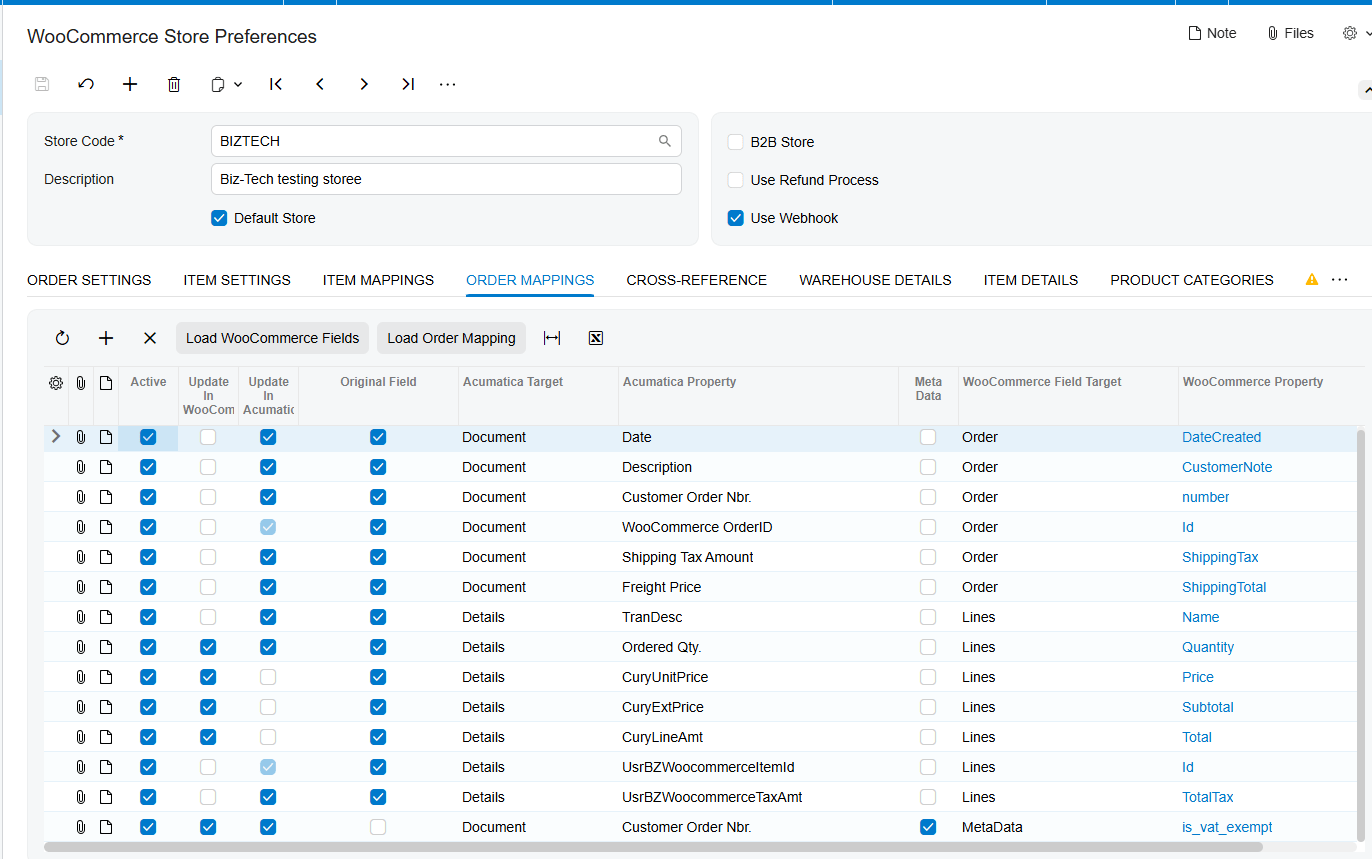
This tab on the WooCommerce Store screen holds the order mapping configuration. By default it is automatically loaded and mapped during the save action on the WooCommerce Store Preferences screen, so a correctly configured store already has a working default. Users can also configure it manually, and Load WooCommerce Fields loads or updates all related order fields under the WooCommerce properties.
Acumatica Target specifies the type of sales order field: Document for header fields or Details for line fields. That is the first decision on every row, because it decides whether a value lands once on the order or once per line. Acumatica Property is the field itself, and it can be an original or a custom field.
On the other side, WooCommerce Field Target specifies the type of order field, such as Order, Line, or Metadata, and WooCommerce Property is the field loaded during Load WooCommerce Fields. Original Field indicates a field is an original field, and original fields must be mapped for order synchronization; Meta Data should be checked when the field target is meta data. When a store value never reaches Acumatica, an unchecked box on that row is the first thing to inspect.
Direction is controlled by two checkboxes. Update in Acumatica applies updates to that field during order synchronization; Update in WooCommerce applies them in the store instead. For an import task you want Update in Acumatica, because a row with only the other direction selected changes nothing on your sales order.
The Import Fields Tab
The Import Fields tab on the WooCommerce Orders screen shows information related to the Order Mappings configured on the store. It is populated based on the order mapping during the Get Order process, then imported into Acumatica during the Order Import process. What you see there is what the import will write.
The Rule That Catches Everyone: Mapping Changes Do Not Reach Retrieved Orders
The documentation states it plainly: any changes to the Order Mapping configuration do not affect orders that have already been retrieved. Users can manually make changes only from the Import Fields tab of the WooCommerce order before importing it into Acumatica.
So if you find a mapping mistake after a batch retrieval, fixing the Order Mappings tab corrects future retrievals only. The staged orders keep the values they captured, and your only in-place remedy is editing Import Fields on each one. Validate the mapping against a few test orders first.
Ship Via Cross-References
A WooCommerce shipping method name is not an Acumatica Ship Via code, so it needs a translation layer. The Cross-Reference options specify which entities are matched between the two systems, for example how payments, countries, or ship vias correspond. After you select the checkbox, the field appears on the Cross-Reference tab, and only checked entities appear in that drop-down.
On that tab, Get Shipping Methods loads the WooCommerce shipping methods under the WooCommerce Value field mapped with the Acumatica Ship Via. The verification point is documented: after the order import process, the Ship Via value should be visible in the Delivery Settings field on the Shipping tab of the Sales Orders screen.
Customer, Payment, Discount, and Tax Behavior on Import
Four groups of options decide how much of the WooCommerce order context reaches Acumatica, and each has a documented fallback worth knowing.
Customer Information Options
Import Customer means the Biz-Tech Services Acumatica WooCommerce integration imports the customer information from WooCommerce into a new customer record in Acumatica. Override Ship Address Information from WooCommerce Order imports the address the order will ship to, and Override Bill Address Information from WooCommerce Order imports the address of the party who will pay the bill. Customer Class sets the default class on new customers created by the Biz-Tech Services Acumatica WooCommerce integrator.
The fallback is the part to remember: if the Import Customer checkbox and the ship and bill address options are unselected, customer data is not imported, and the order is created using the default customer information in Acumatica. That is legitimate for a business that does not want a record per online shopper, and it also explains reports that every imported order landed on the same customer.
Individual customers are not imported directly from WooCommerce; they arrive through the orders. The connector searches by WooCommerce customer ID, then billing email, then account name, and creates a new customer and contact if none is found.
Shipping and Payment Options
The shipping option determines which shipping information is imported. Based on the configured setup, the shipping total can be imported as either the Freight Price or the Premium Freight Price, so web shipping revenue lands in whichever field your reporting already uses.
If Skip WooCommerce Payment is selected, imported orders will not include payment information and are created without recording any payment. If it is unselected, more options appear: Payment Method specifies the method to assign during import, for example Credit Card, PayPal, or Bank Transfer; Payment Type determines the payment type in Acumatica, for example Prepayment, Cash, or Credit; and Release Payment during Order Import releases the payment automatically.
Credit card orders divide the work between the systems. In WooCommerce, payments can be authorized at checkout, meaning card details are verified and funds reserved by the gateway but not collected. Once the order is synchronized into Acumatica the system does not authorize again; it performs a post-authorization that records the existing authorization in Accounts Receivable, and the payment can then be captured when the order is ready to fulfill. The connector supports Ebizcharge, Fortis, and other credit card payment methods, each of which must also be set up in the ERP.
Discounts
With line-level discounts, discounts are calculated for each individual item and the Discount Amount and Discount Code fields in the sales order Document Details table are populated accordingly. With order-level discounts, the discount applies to the whole order and the details appear in the Discount section. When a total looks wrong, check which of the two places the discount landed.
Tax Options
These options ensure taxes for WooCommerce orders are calculated and applied correctly in Acumatica, with flexibility for businesses using external tax services. Customer Tax Zone is the combined tax of the effective taxes for a zone, defined by the locations of vendors or customers. Tax ID is the customer tax ID, and Taxable Category creates or edits the tax categories applied to products. Is Freight Taxable in WooCommerce indicates freight is taxed in the store, and Use External allows another tax service, for example Avalara.
Do Not Import WooCommerce Price
If this checkbox is selected, the system ignores the WooCommerce prices during the order import process and uses the corresponding Acumatica item prices instead. Businesses that treat the ERP as the pricing authority want this; businesses running store promotions do not. When it is selected, the Send Invoice Info during Release, Invoice checkbox becomes disabled.
Validation and Common Exceptions
Most failures in a WooCommerce order import into Acumatica fall into a few patterns. Working through them in this order resolves most cases without guesswork.
The Order Was Never Retrieved Because Its Status Is Not Selected
Only orders matching the selected WooCommerce Status are included, and the corresponding checkbox must be selected for an order to be retrieved and imported. A store that adds a new order status, or routes orders through a status nobody enabled, produces this symptom.
The Date Window Excluded It, or the Updated-Date Rule Surprised You
An order predating Begin Order Date will never arrive, no matter how often you re-run Get Orders. And because orders are imported on their updated date rather than their created date, an order can fall outside the window you expected in either direction. When the dates fight you, use Import Order with the order ID.
The Item Does Not Exist in Acumatica
The Biz-Tech Services Acumatica WooCommerce connector searches for the Inventory CD using the WooCommerce product SKU. If found it retrieves that item; if not, the error message The item {0} does not exist in the system is displayed. If the Import Item checkbox is not selected, the program prohibits the import and creation of items unless they already exist in Acumatica, so an unselected checkbox plus a new web-only SKU reliably produces this error.
A Customer Was Not Created and Every Order Went to the Same Account
This is the documented fallback, not a fault. When Import Customer and the address override options are unselected, customer data is not imported and the order uses the default customer information in Acumatica. Select the options you want, and set Customer Class.
Your Mapping Edits Did Not Apply
Changes to the Order Mapping configuration do not affect orders already retrieved. Either edit Import Fields on each affected order before importing it, or work with freshly retrieved orders so the new mapping is applied during the Get Order process.
Ship Via Is Blank on the Sales Order
A blank Delivery Settings value on the Shipping tab of the Sales Orders screen points at the Cross-Reference tab: either the ship via entity was never checked in the Cross-Reference options, or the WooCommerce shipping method has no matching row. Run Get Shipping Methods and map each method to an Acumatica Ship Via.
Where the Error Messages Live
Send Email Notification for Errors alerts users about failed orders at the address configured on the Order Settings tab, during batch imports and during process updates for the same order. For the full picture, the Get Order Process Error Messages screen includes all error messages generated during the order retrieval process.
Where to Check Your Work
After a WooCommerce order import run in Biz-Tech Services WooCommerce Acumatica integration, verify the result rather than assuming it. These fields tell you within minutes whether the import did what you intended and, if not, where it stopped.
1. Store Code on the Import WooCommerce Orders screen: confirm you retrieved from the store you meant.
2. Last Imported Order Date on the Order Settings tab: it shows where the next import process will begin.
3. The WooCommerce Status checkboxes: the status of the order you are looking for must be selected.
4. Sales Order Number on the WooCommerce Orders screen: populated means the order was imported and a sales order exists.
5. Invoice Number on the WooCommerce Orders screen: populated means the order has been invoiced.
6. Status on the WooCommerce Orders screen: run Refresh Order if it looks stale against the store.
7. Import Fields tab: populated from the order mapping, and the last place to correct values before importing.
8. Document Details, Total Lines Amount, Discount Total, Shipping Total, Total Tax, and Total on the WooCommerce Orders screen: compare against the order in the store.
9. Discount Amount and Discount Code in the sales order Document Details table, or the Discount section for order-level discounts.
10. Delivery Settings on the Shipping tab of the Sales Orders screen: the mapped Ship Via should be visible after the import.
11. Warehouse on the imported sales order: it should match the Warehouse ID default.
14. The Payments tab of the sales order, with Payment Method and Payment Type: confirm the payment was created, and released if that option is selected.
15. The Get Order Process Error Messages screen: review it after every scheduled run.
Importing WooCommerce Orders: Frequently Asked Questions
Why is my WooCommerce order not showing on the Import WooCommerce Orders screen?
Usually this is routing rather than failure in Biz-Tech Services Acumatica WooCommerce integrator. That screen only shows orders with the Partially Shipped, On hold, Pending, Pending payment, and Processing statuses; canceled, failed, empty, and completed orders appear on the WooCommerce Orders screen. If it is on neither, check that its status is selected and its updated date falls in your window.
I changed the order mapping. Why did nothing change on my imported orders?
Because changes to the Order Mapping configuration do not affect orders already retrieved. The Import Fields tab was populated from the mapping during the Get Order process, and that captured set is what the import writes. Edit Import Fields manually before importing, or retrieve fresh orders.
What does the error The item does not exist in the system mean?
It means the Biz-Tech Services WooCommerce Acumatica connector searched for an Inventory CD using the WooCommerce product SKU and found no match. Either create the item with an Inventory CD matching the store SKU, or correct the SKU in WooCommerce. If the Import Item checkbox is not selected, the Biz-Tech Services WooCommerce Acumatica integrator will not create the missing item.
Can I import just one WooCommerce order without running a whole batch?
Yes. Use the Import Order action in the Actions workspace of the WooCommerce Orders screen: choose the store code, set the order ID, and it retrieves that individual order into Acumatica. It is the quickest way to retry one order that failed in a batch.
Every imported order is on the same customer. What did I configure wrong?
Probably nothing broke; this is the documented fallback. If the Import Customer checkbox and the address override options are unselected, the order uses the default customer information in Acumatica. Select Import Customer and the overrides you need, and set Customer Class.
The order status in Acumatica does not match WooCommerce. Do I need to re-import?
No. The status on the WooCommerce Orders screen reflects the initial state of the order at import, so it does not track later changes on its own. If the order is fulfilled or updated in the store afterwards, go to Actions and click Refresh Order.
Why was an old order imported again?
Because orders are imported on their updated date rather than their created date. If someone edited an old order in WooCommerce, its updated date moved into your retrieval window and the Biz-Tech Services Acumatica WooCommerce picked it up. That is also what lets later store edits reach Acumatica.
Can I automate the WooCommerce order import instead of clicking through it?
Yes, and the two stages schedule separately. For retrieval, configure the Get Orders screen and select Import Orders from WooCommerce in the Screen ID field. For import, set up the Import All screen and select Import WooCommerce Orders. Scheduling retrieval only is a good middle ground while you validate the configuration.
Work With the Biz-Tech Services WooCommerce Connector
Importing WooCommerce orders into Acumatica rests on decisions made in advance. The Order Settings tab decides which orders are eligible, through the document type, the Order Type and Warehouse ID defaults, the date window, and the status selections. Get Orders stages what matched, each status decides which screen the order lands on, and Import or Import All turns a staged order into a sales order with its payment, discounts, freight, and tax. When something goes wrong, the Sales Order Number field, the Import Fields tab, and the Get Order Process Error Messages screen tell you where the run stopped.
If your business runs WooCommerce alongside Acumatica ERP and wants order import that is predictable, auditable, and configured to match how you already work, the Biz-Tech Services WooCommerce Acumatica Connector is built for exactly that. Visit https://biz-techservices.com to learn more about our Acumatica expertise or to schedule a personalized demonstration.
Check also the video – https://www.youtube.com/watch?v=N8bnQS5EKTw

