
How to Import Shopify Orders into Acumatica
To import Shopify orders into Acumatica, you configure a Shopify store record, choose which order statuses and dates qualify, retrieve the orders on a processing screen, and import them as Acumatica sales documents. This article walks through that task with the Biz-Tech Services Shopify Acumatica Connector for Acumatica ERP (enterprise resource planning): the settings that decide what comes in, the documents the import creates, and what to check when an order does not arrive as expected.
The scope is the inbound task only: getting a placed Shopify order into Acumatica, turning it into a document your teams can work, and diagnosing what commonly goes wrong. Every setting below uses the exact field name the Biz-Tech Services Acumatica Shopify connector shows on screen.
Before You Import: The Settings That Decide What Comes In
The Shopify order import is not a single button. A store record plus a set of import options define a filter: which orders are eligible, what they become in Acumatica, and which defaults fill the gaps. Because these settings decide what is pulled from Shopify in the first place, getting them right saves considerable cleanup later.
The Shopify Store Record and Its Connection
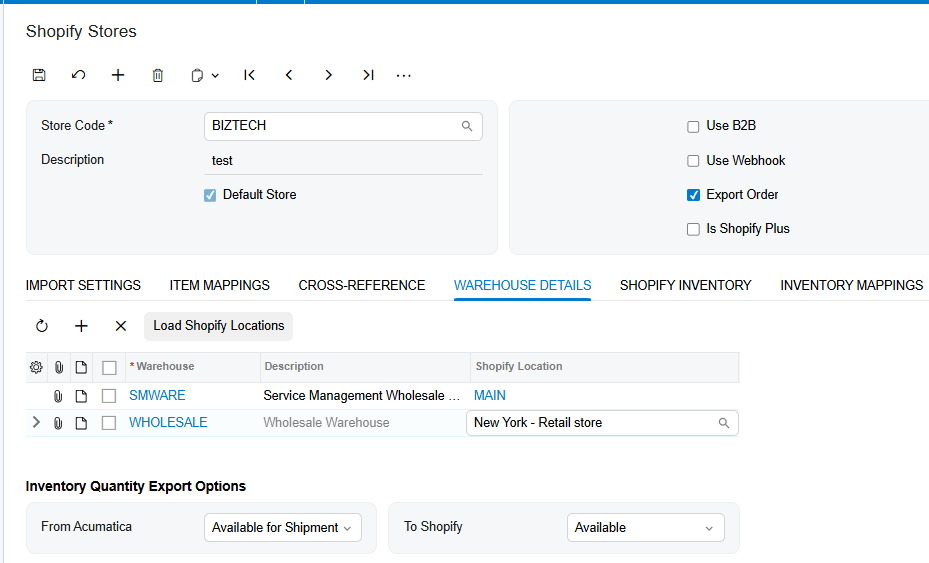
Everything begins on the Shopify Store screen in Acumatica. The Biz-Tech Services Acumatica Shopify integration requires connection settings there and connects to the corresponding Shopify system based on them. You create the record by clicking Add New Store, which redirects you to the Shopify Credentials screen. Each record carries a Store Code, a lookup field identifying the Shopify store, and a Description.
Test Credentials verifies the connection through the API (application programming interface) using the values on the Connection Settings tab. If your business runs one storefront, select Default Store so it appears automatically on the processing screens.
Document Type, Order Type, and Branch
The most consequential setting is Import Shopify Orders to, which specifies the Acumatica document type Shopify orders become. Orders can be imported as Sales Orders, Sales Order Invoices (SO Invoice), or Accounts Receivable Invoices (AR Invoice). The choice drives everything downstream: a sales order flows into picking, shipping, and invoicing, while importing straight to an invoice skips the fulfillment path entirely.
Order Type sets the default type of the orders the Biz-Tech Services Shopify Acumatica integration creates, so numbering and workflow follow from it. Branch controls the Acumatica organizational branch; the import uses the branch values already set up on the store record.
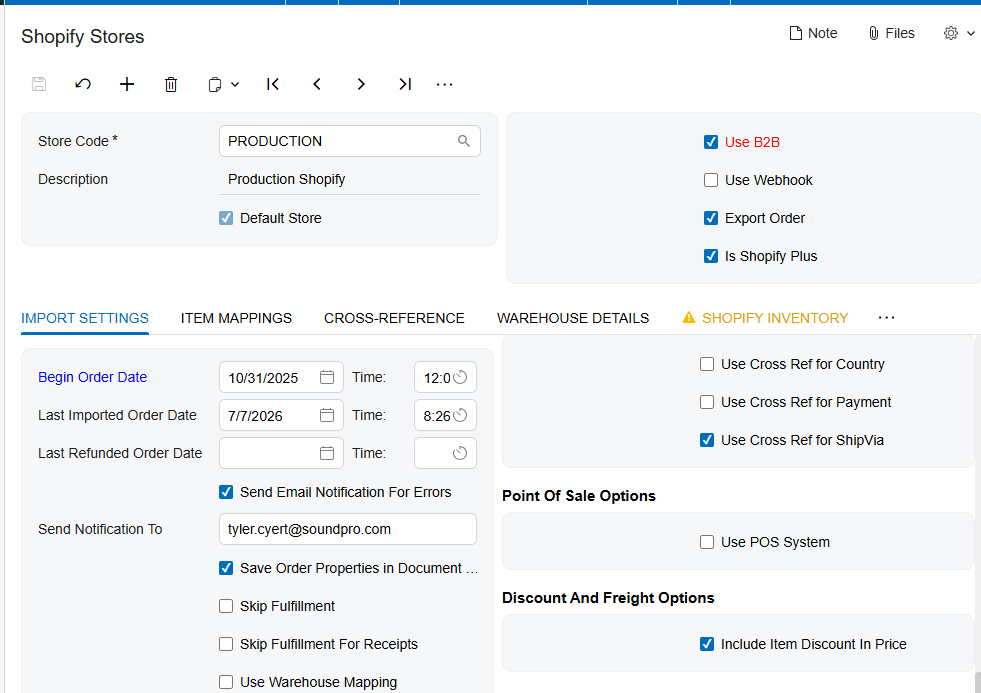
Date Filtering: Begin Order Date and Last Imported Order Date
Begin Order Date displays the date from which the first order should be imported. Last Imported Order Date displays the date the last order was imported, and for the other invoice import processes it counts the date related to the last invoice date.
The rule connecting them explains most reports of missing orders. Initial retrieval begins from Begin Order Date if the last imported order date is not later than Begin Order Date; afterward, orders are fetched based on the last imported order date. The window moves forward on its own, so back-dated orders behind that watermark are not swept up by a normal retrieval.
Order Status Selections
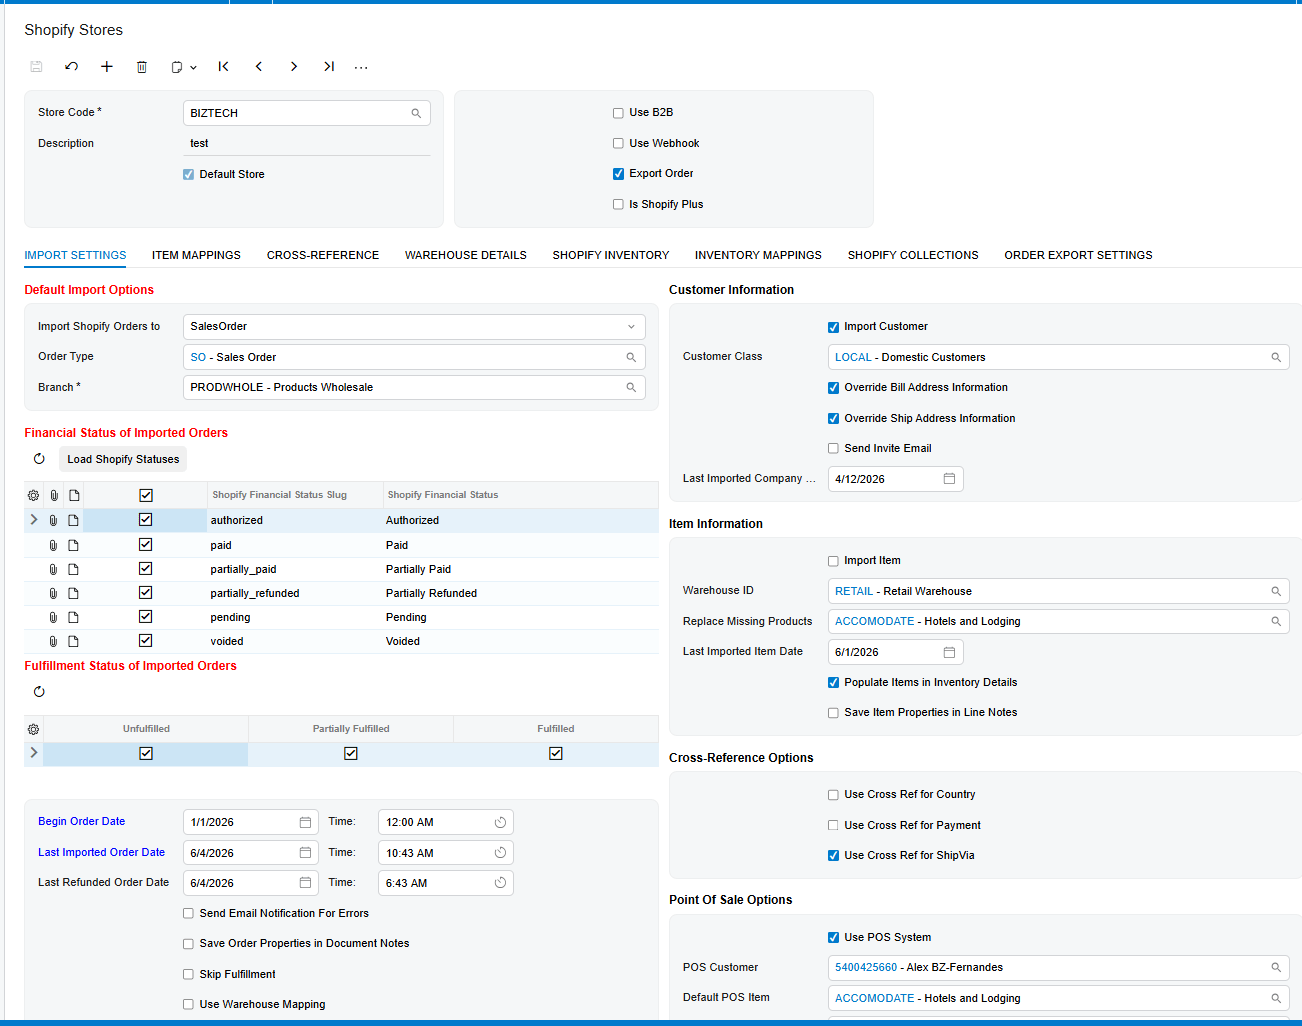
Status filtering happens on two levels. Fulfillment Status of Orders reflects the status of the corresponding Shopify order that will be imported. Under Order Status sit the Shopify order financial statuses, and the corresponding Order Status checkbox must be selected for an order to be retrieved and imported. An unchecked status does not import with a warning; it never appears at all.
A second constraint lives on the processing screen, which shows only Shopify orders with the Fulfilled, Unfulfilled, or partially fulfilled status. Account for both filters.
Notification, Notes, and Refresh Options
Send Email Notifications for Errors opens a field for an email address and makes the Biz-Tech Services Acumatica Shopify connector notify you about order IDs that hit errors during retrieval. Save Order Properties in Document Notes makes the Biz-Tech Services Shopify Acumatica connector retrieve order properties into Acumatica document notes while fetching orders.
Refresh Order When Import Orders decides how current the data is at import time: selected, the process sends a request to Shopify and updates the order data; cleared, the order is imported without updating anything.
Importing Shopify Orders, Step by Step
The Import Shopify Orders screen lets you retrieve and import all Shopify orders into Acumatica. It separates retrieval from import on purpose, so you can look before you commit.
Step 1: Retrieve the Shopify Orders
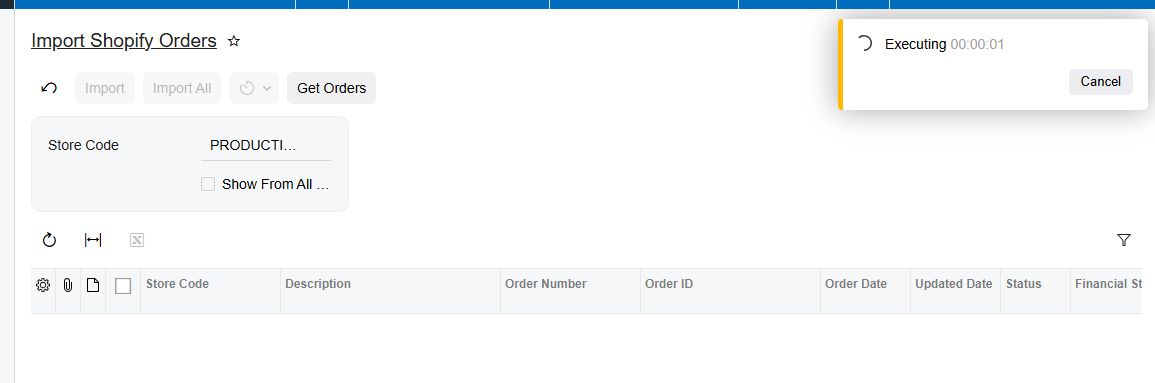
Click Get Orders on Import Shopify Orders screen in Biz-Tech Services Acumatica Shopify integrator. The button retrieves orders from Shopify, and a timer indicates the elapsed time until the process completes. The grid contains only orders with the Fulfilled, Unfulfilled, or partially fulfilled status, restricted further by the financial statuses you checked and by the date logic above. Retrieval creates nothing in Acumatica; it stages what is eligible.
Step 2: Review What Was Retrieved
Each retrieved order carries a hyperlink on its order number. Clicking it navigates to the Shopify Orders screen of Biz-Tech Services Acumatica Shopify integration, which presents the initial situation of the Shopify order. This is your inspection point. It shows the Order ID field with the Shopify order ID and order number, Status with the Shopify order status as held in Acumatica, Payment Method, and Ship Via with the shipping method used.
Its tabs include Document Details, which provides information about the items of the order, and Addresses, which offers details about the customer address. Reviewing here catches unmapped shipping and payment methods early: the payment method and Ship Via values used to build Cross-Reference mappings are taken from this screen.
Step 3: Import Selected Orders or Import All
Back on the Import Shopify Orders screen of Biz-Tech Services Shopify Acumatica integrator, IMPORT lets you select and import specific orders; IMPORT ALL imports every order in the grid. Use selective import for the first run and after any mapping change, so a mistake affects one Acumatica document rather than a day of trading. If an error appears while importing an order, the error message is displayed on the screen with information about the system error.
Step 4: Import an Individual Order by Shopify Order ID
Sometimes you need one order the normal window will not produce, such as one dated behind the last imported order date. The Shopify Orders screen provides an Import Order button that gets orders by Shopify order ID. After you use it, the order displays on the Import Shopify Orders screen and is ready to be imported. This is the documented way to manually import a preferred order instead of widening the date filter.
Step 5: Remove the Manual Step
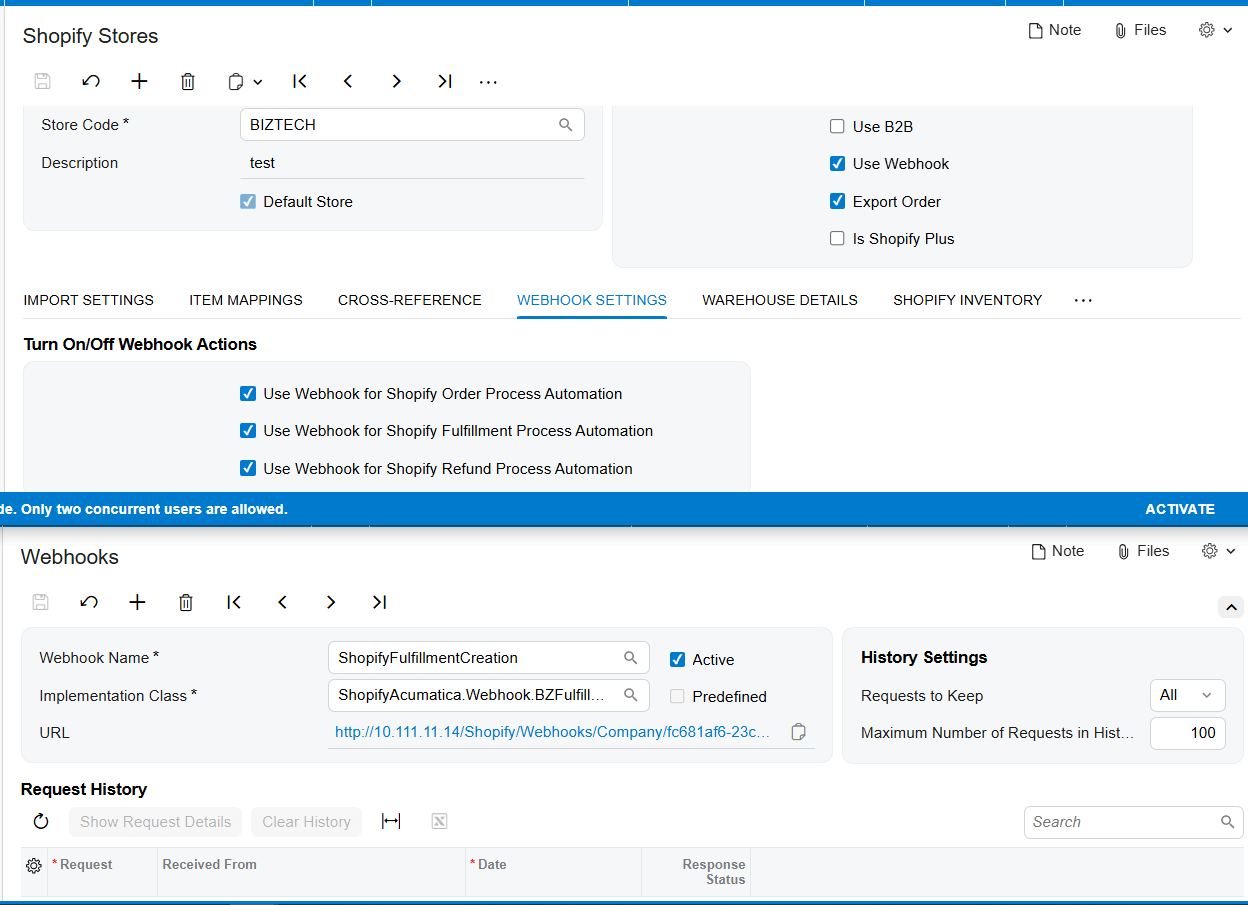
The Import Shopify Orders screen also allows you to set up a schedule for getting and importing orders. A second path runs through webhooks: with Use Webhook for Shopify Order Process Automation selected, any order created in Shopify is automatically created and imported on the Acumatica Sales Orders screen, and afterward the Webhook Order checkbox is automatically selected on the Shopify Orders screen of Biz-Tech Services Shopify Acumatica integrator. This requires the Use Webhook checkbox on the store record, which enables the webhook logic. To create the mapping, go to the Webhooks screen in Acumatica, fill in the webhook name and implementation class, and click Save; that generates a webhook URL (uniform resource locator) which you add to the URL field of the newly created webhook in Shopify.
Document Triggers: What the Shopify Order Import Creates
The Acumatica document an import creates is chosen by Import Shopify Orders to on the store record. That field is the trigger, and the three outcomes are a sales order, a sales order invoice, or an accounts receivable invoice.
The Sales Order Path
Imported as sales orders Biz-Tech Services Shopify Acumatica integration, the results are ordinary Acumatica sales orders created with the Order Type and branch set on the store record. Shipments are created and confirmed against them, and Prepare Invoice moves them toward billing. The documentation describes this handoff: the Biz-Tech Services Acumatica Shopify integrator retrieves orders from Shopify, imports the selected orders, and when a user confirms the shipments created from them, fulfillment events are generated for each corresponding order.
The Payment Document
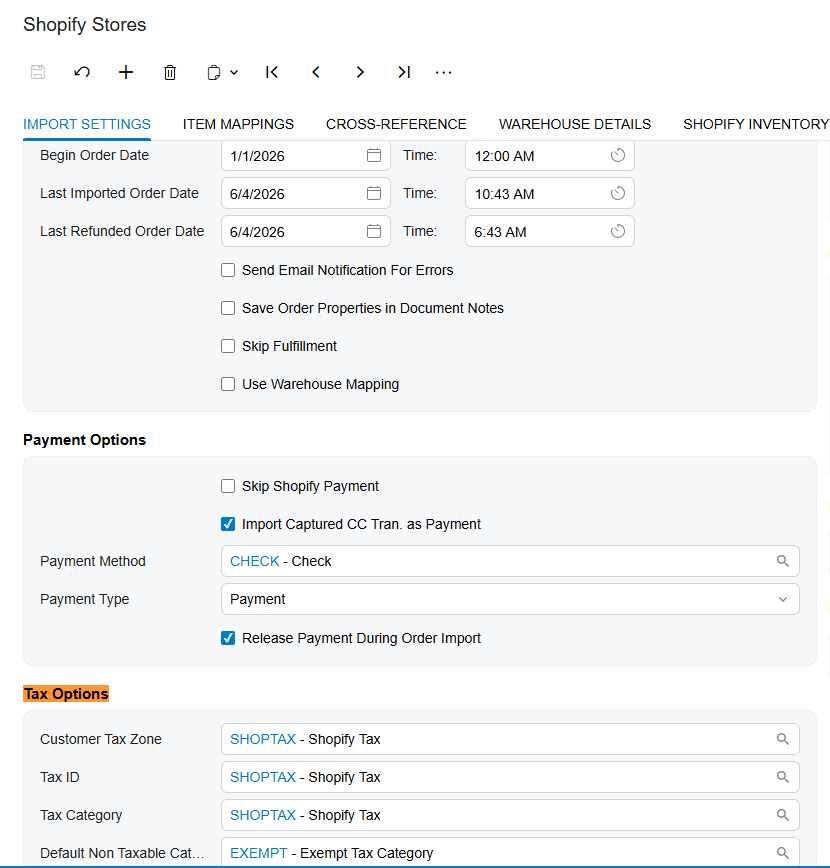
A payment can be created alongside the order. If a Shopify order has a payment and should be imported with it, the Import Captured CC Tran. as Payment checkbox must be selected; otherwise, the order is imported without any payment. Payment Method sets the method applied during the import, Payment Type offers Payment and Prepayment, and Release Payment During Order Import determines whether the payment arrives already released in Acumatica.
Fields That Link Shopify Orders to Acumatica Documents
The Shopify Orders screen is the join between the systems. Order ID displays the Shopify order ID and order number. Sales Order Number displays the sales order number once the order is imported. Invoice Number displays the invoice number once the order is invoiced. Together these let you move from a customer service question about a Shopify order number to the exact Acumatica document in one hop, in either direction.
One further linkage is easy to miss: the documentation states that after the import process, the Ship Via value should be displayed in the Delivery Settings field on the Shipping tab of the Acumatica Sales Orders screen. That is where you confirm a shipping method mapping actually took effect.
Mapping Rules That Decide What Lands on the Order
Mapping turns a technically successful import into a usable document. The Biz-Tech Services Acumatica Shopify connector handles it through three mechanisms: item resolution by SKU, cross-references for value translation, and item creation defaults for when nothing matches.
Item Resolution by SKU
Line items resolve through the SKU (stock keeping unit). During the sync action the Biz-Tech Services Shopify Acumatica connector takes the Shopify item SKU and creates an Acumatica inventory ID from it, which is what makes SKU the reliable join key on an imported order line. In the import direction you also have the capability to create a map between Shopify and Acumatica items.
Cross-References for Shipping Method, Payment, and Customer
Cross-Reference options on the Import Settings tab let you select which entities should be set up and matched in Shopify and Acumatica during the transition. Selecting them makes the Ship Via field appear, which maps a Shopify value to the Acumatica Ship Via value. Only the checked entities from Cross-Reference Options show up in that drop-down, so a missing entity is fixed on the Import Settings tab, not on the Cross-Reference tab.
Cross-references also drive customer selection by tag. If Use Tags to Import Customer is selected and the type Code is chosen, you set up the Shopify tags and the Acumatica customer account codes (AcctCD) in the Shopify Value and Acumatica Value fields on the Cross-Reference tab. Shopify orders carrying a mapped tag then get that customer. If the Use def. class if tag is not found checkbox is not selected, a new customer is created taking its class from that tab. The same logic works for items.
Defaults When Nothing Matches
The Import Item checkbox governs unmatched lines. Selected, the system may create a new item if it does not exist in Acumatica during the sync and order import process, and it reveals the defaults that item will use: imported item type, item class, UOM (unit of measure), and warehouse ID. That is why warehouse belongs on your pre-import checklist.
When Import Item is not selected, the behavior is more conservative: for a new item arriving on an order, the system sets Replace Missing Products as the item name and takes the warehouse from the Warehouse ID field. One option grows your item master automatically; the other funnels unknown products into a placeholder somebody must reconcile.
Three further options appear with Import Item selected. Use Numbering Sequence for SKU Generation generates a new SKU per the numbering sequence setup when none is found during item creation. Populate Items in Inventory Details adds the item into inventory details while importing. Save Item Properties in Line Notes lets the order sync with line and header notes in Acumatica. Separately, Include Item Discount in Price includes the item discount amount in the order price, changing how imported line totals reconcile against Shopify.
Customer, Payment, and Tax Behavior on Import
Three groups of settings determine who the order is billed to, whether money comes with it, and how tax is applied.
Customer Creation Versus a Default Customer
Import Customer is the switch. Selected, the Biz-Tech Services Acumatica Shopify integration imports the customer information from Shopify into a new Acumatica customer record. Not selected, orders are imported with the default customer. Creating records gives you per-buyer history; a default customer keeps the customer master small for high-volume retail traffic. A related field, Last Imported Company Date, displays when the last company was imported.
Address handling is controlled independently. Override Ship Address Information from Shopify Order imports the address of the location the order will ship to, and Override Bill Address Information from Shopify Order imports the address of whoever pays the order bill. These matter most with a default customer, since without them every order inherits the default customer addresses rather than what the buyer entered at checkout.
Point of Sale Orders
Counter transactions are a separate case. Use POS system enables the importation of POS (point of sale) orders. POS Customer sets a default customer for those orders, and Default POS Item sets the default item for the POS order import process. Configure this group deliberately so counter sales do not land on your web default customer.
Payment on Import
Read the payment options together. Skip Shopify Payment imports the order without payment. Import Captured CC Tran. as Payment is the affirmative switch for bringing a captured credit card transaction across into Acumatica. Payment Method and Payment Type set what that payment looks like, with Payment and Prepayment available. Release Payment During Order Import brings it in already released. Decide these once, with your controller present; changing them later leaves a mixed population of payments to reconcile.
Tax Options
Four settings make up the Tax Options of Biz-Tech Services Shopify Acumatica integration. Customer Tax Zone is the combined set of effective taxes for a zone, defined according to the locations of the vendors or customers. Tax ID holds the customer tax ID. Taxable Category creates or edits the tax categories applied to products. Default Non-Taxable Category sets an exempt tax category for non-taxable items so they display on sales order lines. These are the tax controls the Biz-Tech Services Shopify Acumatica connector documentation defines for the import path; if your business uses a different tax determination arrangement in Acumatica, confirm the behavior before go-live.
Validation and Common Exceptions
Most Shopify order import problems are not connector failures. They are a filter or a default doing exactly what it was configured to do.
The Order Never Appears in the Grid
Almost always a filter. Check in sequence: whether the order has the Fulfilled, Unfulfilled, or partially fulfilled status, since the processing page shows only those; whether the checkbox for that order financial status is selected, because it must be for the order to be retrieved and imported at all; and whether the order date falls inside the active window, given that after the first run orders are fetched based on the last imported order date. If the order is behind that watermark, use Import Order on the Shopify Orders screen to pull it by ID.
The Item on the Line Is Not the Item You Expected
A line arriving as Replace Missing Products means the item did not resolve and Import Item is cleared, so the Biz-Tech Services Acumatica Shopify connector used the documented fallback and took the warehouse from the Warehouse ID field. A newly created Acumatica item you did not want means the opposite: Import Item is selected and the item was built from the configured item type, item class, UOM, and warehouse defaults. Either way the root cause is a SKU that did not match, so fix SKU alignment first.
The Customer Is Wrong or Was Not Created
If every order lands on the same customer, Import Customer is cleared and the default customer is in use as documented. If addresses look wrong, the two override checkboxes are likely cleared too. If you use tag-based selection and get the wrong customer, verify the tag and account code pair exists in the Shopify Value and Acumatica Value fields on the Cross-Reference tab, and check Use def. class if tag is not found.
The Numbering Sequence Is Missing
The documentation records this explicitly: if the corresponding numbering sequence is absent, an error message will be displayed. Verify the Acumatica numbering sequences behind the document type you import to and behind item creation before your first production run.
The Shipping Method Did Not Carry Over
If Delivery Settings on the Shipping tab of the created sales order is empty or wrong, look at the Ship Via cross-reference. Confirm the entity is checked in Cross-Reference Options, since only checked entities appear in the drop-down, and confirm the Shopify value matches the Ship Via value shown on the Shopify Orders screen for that order.
How the Connector Reports Errors
Errors surface in two places. If an error appears while importing an order, the message is displayed on the processing screen with information about the system error. Separately, with Send Email Notifications for Errors selected, the Biz-Tech Services Acumatica Shopify connector emails notifications for the order IDs that encounter errors during retrieval. Turn that second channel on for scheduled imports, where nobody is watching the screen.
Where to Check Your Work
Do not simply confirm documents were created. Open an imported order in Acumatica, verify each field below, then repeat for one order from every pattern you expect: taxable, exempt, paid, and new customer.
1. Import Shopify Orders to on the store record, confirming the created document is the sales order, SO invoice, or AR invoice you intended.
2. Order Type and Branch on the created document, matching the store record defaults.
3. Sales Order Number on the Shopify Orders screen, populated once the order is imported.
4. Invoice Number on the Shopify Orders screen, populated once the order is invoiced.
5. Delivery Settings on the Shipping tab of the sales order, where the Ship Via value should appear after import.
6. The line item Acumatica inventory IDs, checking that none silently defaulted to Replace Missing Products.
7. The warehouse on the order lines, against the warehouse ID configured for item creation or the Warehouse ID field.
8. The customer on the header, and whether a new record was created or the default customer was used.
9. The ship-to and bill-to addresses, confirming the override options produced buyer addresses.
10. The Payments tab, verifying payment method, payment type, and whether the payment was released during import.
11. Customer Tax Zone and the tax category on the lines, including the non-taxable category on exempt lines.
12. Last Imported Order Date on the store record, which should have advanced after a successful run.
Importing Shopify Orders: Frequently Asked Questions
Why are some of my orders missing from the Import Shopify Orders screen?
Three filters can hide an order. The processing page shows only orders with the Fulfilled, Unfulfilled, or partially fulfilled status. The order financial status checkbox must be selected for that order to be retrieved and imported. And the retrieval window starts from Begin Order Date only on the first run, after which orders are fetched based on the last imported order date.
How do I import one specific order without changing my date settings?
Use the Import Order button on the Shopify Orders screen, which gets an order by its Shopify order ID. Once retrieved that way, the order displays on the Import Shopify Orders screen and is ready to be imported like any other. This avoids moving your date window backward.
What is the difference between IMPORT and IMPORT ALL?
IMPORT lets you select specific orders in the grid and import only those; IMPORT ALL imports every order shown. Use the selective button whenever you have just changed a mapping or a default, so any surprise is contained to one Acumatica document.
Why is every imported order landing on the same customer?
That is the documented behavior when Import Customer is not selected: orders are imported with the default customer instead of creating an Acumatica customer record from Shopify data. Select Import Customer if you want per-buyer records. If you prefer the default customer, also select the ship and bill address overrides so each order still carries the buyer addresses.
Why does a line show Replace Missing Products instead of a real item?
That value is the documented fallback when Import Item is not selected and the item does not exist in Acumatica. The system sets Replace Missing Products as the item name and takes the warehouse from the Warehouse ID field. The real fix is usually SKU alignment, since item resolution runs on the SKU. Import Item is the secondary decision, about whether missing items should be created automatically.
Can the order come in with its payment already applied and released?
Yes. Select Import Captured CC Tran. as Payment so an order that has a payment in Shopify is imported with it, then set Payment Method and Payment Type, choosing between Payment and Prepayment. Selecting Release Payment During Order Import brings the payment into Acumatica already released. Skip Shopify Payment does the opposite.
Do I have to run the Shopify order import manually every day?
No. The Import Shopify Orders screen allows you to set up a schedule for getting and importing orders. Alternatively, selecting Use Webhook for Shopify Order Process Automation means any order created in Shopify is automatically created and imported on the Acumatica Sales Orders screen. If you automate, turn on error email notifications.
The order status in Acumatica does not match my Shopify store. What should I do?
The stored status reflects the initial state of the Shopify order at import, so a later change in the store does not appear on its own. Open Actions on the Shopify Orders screen and click Refresh Order, which updates the status to match the store. To reduce how often this happens, select Refresh Order When Import Orders so the import requests fresh data before creating the document.
Work With the Biz-Tech Services Shopify Connector
Importing Shopify orders into Acumatica is a configuration task before it is an operational one. The store record decides which orders qualify and what document they become, the cross-references and item settings decide what lands on each line, and the customer, payment, and tax options decide who is billed and how. Retrieve first, review, import selectively until the configuration proves itself, then schedule it or hand it to a webhook. When something looks wrong, the Order ID, Sales Order Number, and Invoice Number fields on the Shopify Orders screen tell you where an order stands.
If your business is planning an e-commerce integration or trying to eliminate manual order entry from a growing sales channel, the Biz-Tech Services team can help you configure the Shopify order import to match how you actually sell. Visit https://biz-techservices.com to learn more about our Acumatica expertise or to schedule a personalized demonstration.
Check also this https://www.youtube.com/watch?v=wkjPKdLzv2M

