
How to Import Salesforce Orders into Acumatica
Importing Salesforce orders into Acumatica starts on the Import Salesforce Orders screen: retrieve orders with Get Orders, review the selected records, and use Import or Import All to create the corresponding sales orders. The result depends on the Salesforce Store configuration, including order type, warehouse, customer, item, tax, payment, cross-reference, and address settings.
This guide focuses on the operational steps and controls that determine whether an order can be imported and what appears on the resulting document. The Biz-Tech Services Salesforce Acumatica Connector gives users a defined process for retrieving eligible Salesforce orders, validating the records that appear, importing them individually or in a batch, and checking the resulting sales order number and status.
Before You Start: What Must Be Configured
Before using the import screen, configure the Salesforce Store record and confirm that its General Info credentials are valid with Test Credentials under Actions. The Biz-Tech Services Acumatica Salesforce Connector relies on this store setup to identify the import rules that apply to every retrieved order.
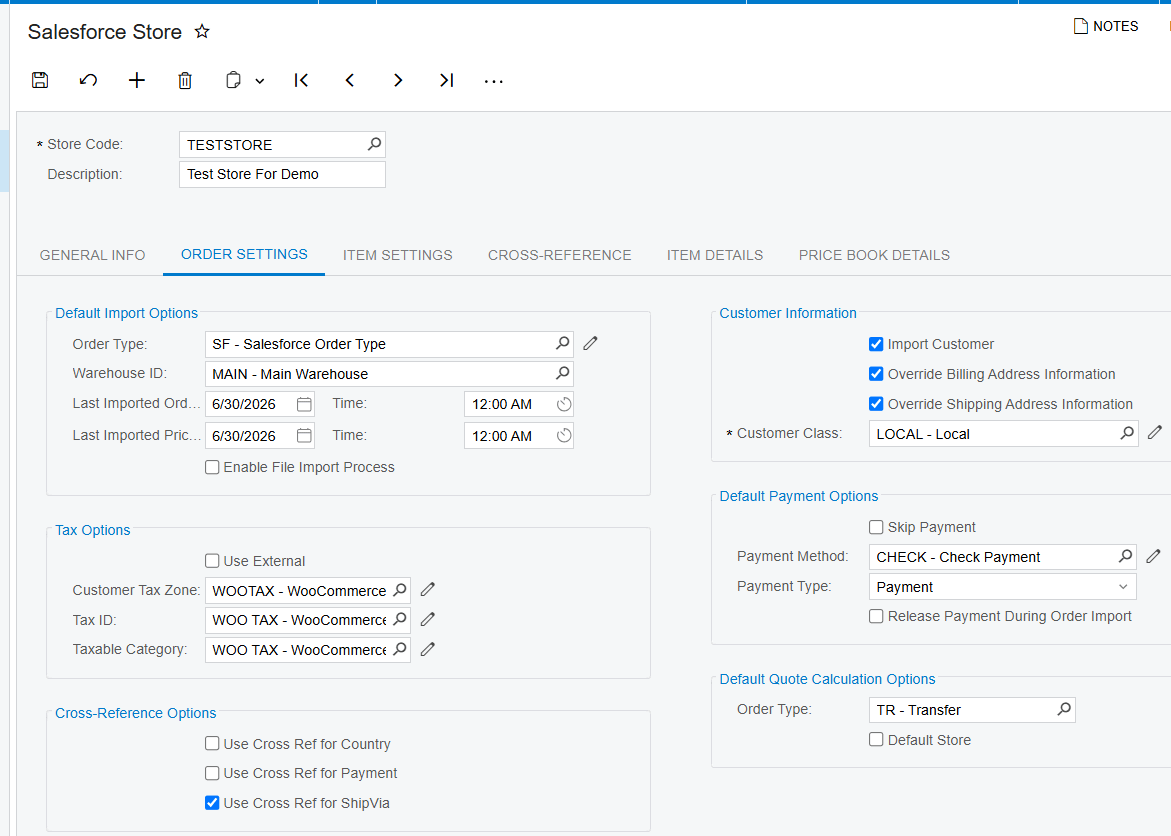
1. Set Order Type to the Acumatica document type that should receive the imported Salesforce order.
2. Select the default Warehouse ID that should be assigned during import.
3. Review Last Imported Order Date because the next Get Orders operation uses this date to retrieve new orders.
4. Choose whether Enable File Import Process should copy a file from the Salesforce order to the workspace on the Acumatica Sales Orders screen.
5. Configure tax behavior by selecting Use External for an alternative tax calculation such as Avalara, or by defining Customer Tax Zone, Tax ID, and Tax Category for comparable Salesforce taxes.
6. Enable only the needed cross-reference options, such as Payment, Country, or Ship Via, and create the corresponding mappings on the Cross-Reference tab.
7. Decide whether Import Customer and Import Item may create missing records, and configure the customer class and product numbering behavior required for those records.
8. Set the payment method and payment type, then decide whether Salesforce payment should be skipped or released during order import.
These prerequisites are intentionally concise. Connection setup and the broader inbound and outbound record flow are covered in the sibling article, How Salesforce CRM Data Flows into Acumatica ERP.
How to Import Salesforce Orders into Acumatica, Step by Step
The Biz-Tech Services Salesforce Acumatica Integration turns the import into a short processing sequence, but each step depends on the store settings already being complete.
Step 1: Confirm the Salesforce Store import date and defaults
Open the Salesforce Store configuration and verify the Last Imported Order Date, Order Type, Warehouse ID, and the customer, item, tax, payment, address, and cross-reference options. The last imported date controls which new orders the next retrieval can return, while the remaining defaults shape the Acumatica document.
Step 2: Retrieve eligible orders with Get Orders
Open Import Salesforce Orders and press Get Orders. The connector retrieves Salesforce orders related to the setup date on the Order Settings tab of the Salesforce Store. Review the displayed records before processing them.
Step 3: Inspect an order before importing it
Select an Order ID hyperlink to open Salesforce Orders Inquiry. This inquiry shows the initial Salesforce order details and, after processing, provides the associated sales order number and sales order status. Use it to confirm that you are working with the intended source order.
Step 4: Import selected orders or the full displayed list
Use Import when you want to process only selected orders. Use Import All when every displayed order is ready. Customer, item, payment, tax, address, warehouse, order type, file, and cross-reference rules are applied as configured on the Salesforce Store record.
Step 5: Confirm the created sales order
Return to Salesforce Orders Inquiry through the Order ID link and check the SO number and SO status. If a record does not import as expected, compare it against the store settings and the mapping rules described below before attempting another processing run.
Document Triggers: What Each Action Creates
Get Orders retrieves Salesforce orders associated with the configured date; it does not, by itself, represent the documented creation step. Import processes selected displayed orders, while Import All processes all displayed orders. The manual identifies the destination as the document type selected in Order Type and later identifies the result with an SO number and SO status in Salesforce Orders Inquiry.
Import Customer is a separate creation trigger inside the order process. When selected, it creates a new Acumatica customer with email and contact information and the configured customer class. When it is not selected, every imported order uses the default customer.
Import Item controls whether a missing Salesforce product may become a new item in Acumatica. When it is not selected, the integration searches for Inventory CD by the Salesforce Product SKU and requires a matching Acumatica item. Use Numbering Sequence for Product ID Generation can assign a unique product ID from a predefined numbering sequence when product creation is enabled.
Payment creation follows the payment settings. Skip Salesforce Payment imports the order without payment when selected. Otherwise, Payment Method and Payment Type shape the imported payment, and Release Payment during Order Import controls whether that payment is released during processing. The source documents sales order and payment outcomes; it does not document purchase order or invoice creation as part of this Salesforce order-import screen.
Mapping Rules That Decide What Appears on the Order
Cross-reference settings provide the documented mapping layer for Payment, Country, and Ship Via. To use one, select its corresponding checkbox in Order Settings and create its mapping on the Cross-Reference tab. For payment cross-references, Use Cross Ref for Payment must be enabled and the payment must not be skipped.
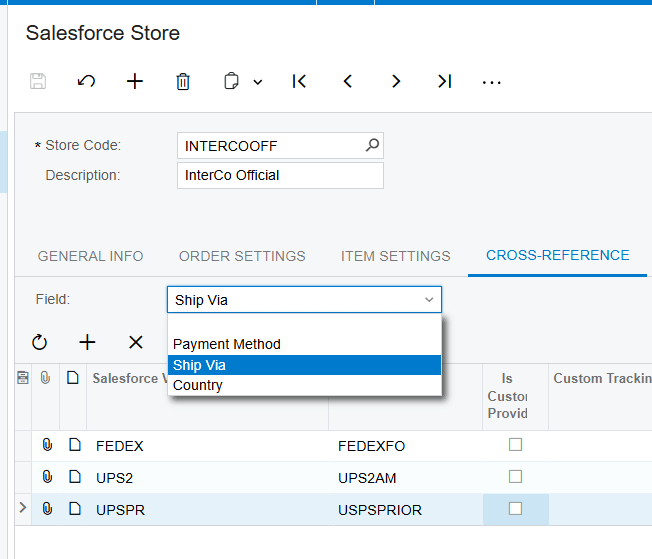
The customer rule decides whether the document uses a newly created customer or the configured default customer. The item rule matches Salesforce Product SKU to Acumatica Inventory CD unless item creation is allowed. The warehouse and order type defaults place the order in the configured destination.
Tax mapping follows one of two documented approaches. Use External enables alternative tax calculation, with Avalara given as the example. Customer Tax Zone, Tax ID, and Tax Category support importing similar taxes from Salesforce. The file option determines whether a Salesforce order file is copied to the Sales Orders workspace.
Address handling depends on the Override Billing Address Information and Override Shipping Address Information checkboxes. The manual says that selecting them puts the Salesforce order addresses on the sales order. Its description of the opposite case contains a contradiction, so verify actual behavior in your configured environment before depending on that sentence.
Validation and Common Exceptions
Credential validation begins with Test Credentials on the Salesforce Store. During order processing, the clearest documented validation exception concerns item matching: when Import Item is not selected and no Inventory CD matches the Salesforce Product SKU, the system displays “The item does not exist in the system.” Resolve the item or allow configured item creation before retrying.
1. No orders appear after Get Orders: verify the Last Imported Order Date because retrieval uses that setup date.
2. An imported order has no payment: check whether Skip Salesforce Payment is selected.
3. A payment cross-reference is ignored: confirm Use Cross Ref for Payment is selected, a mapping exists, and payment is not being skipped.
4. The wrong customer appears: determine whether Import Customer is selected; otherwise, the connector uses the default customer for every imported order.
5. A product cannot be resolved: compare the Salesforce Product SKU with Acumatica Inventory CD, or review the Import Item and product numbering settings.
6. Taxes do not follow the expected route: review Use External versus Customer Tax Zone, Tax ID, and Tax Category.
7. An expected Salesforce file is absent: confirm Enable File Import Process is selected.
The documentation provides the one item-not-found message above but does not publish a broader catalog of import error text. For other failures, use the exact fields and inquiries named here to isolate the configuration branch involved rather than assuming an undocumented message or recovery action.
Where to Check Your Work
The Biz-Tech Services Acumatica Salesforce Integration exposes the most useful import checks in the store setup, processing screen, inquiry, and resulting sales order:
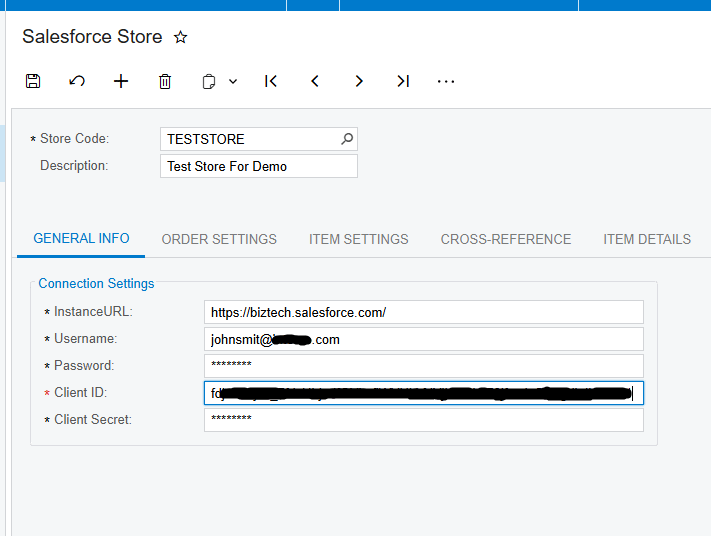
1. Salesforce Store – General Info: confirm the API credentials with Test Credentials under Actions.
2. Salesforce Store – Order Settings: verify Order Type and Warehouse ID.
3. Salesforce Store – Order Settings: check Last Imported Order Date before retrieving another set of orders.
4. Salesforce Store – Order Settings: review customer, item, tax, payment, address, and file-import selections.
5. Salesforce Store – Cross-Reference tab: confirm mappings for enabled Payment, Country, or Ship Via options.
6. Import Salesforce Orders: verify that Get Orders returned the expected records.
7. Import Salesforce Orders: confirm whether the intended records are selected before using Import, or whether the entire list is ready for Import All.
8. Salesforce Orders Inquiry: inspect the initial Salesforce order details through the Order ID hyperlink.
9. Salesforce Orders Inquiry: confirm the resulting SO number and SO status.
10. Sales Orders screen workspace: confirm that the Salesforce file was copied when Enable File Import Process is selected.
How to Import Salesforce Orders into Acumatica: Frequently Asked Questions
What does Get Orders do?
Get Orders retrieves Salesforce orders related to the Last Imported Order Date configured on the Order Settings tab of the Salesforce Store. Review the returned list before selecting Import or Import All.
What is the difference between Import and Import All?
Import processes only selected displayed orders. Import All processes every order displayed on the Import Salesforce Orders screen.
How can I tell whether an Acumatica sales order was created?
Click the Order ID hyperlink and use Salesforce Orders Inquiry to check the SO number and SO status. The Biz-Tech Services Salesforce Acumatica Integrator documents this inquiry as the place that connects the source order details with the resulting Acumatica sales order information.
Why does the item not exist error appear?
When Import Item is not selected, Acumatica searches Inventory CD using the Salesforce Product SKU. If it cannot find a match, the documented item-not-found error appears. Create or correct the Acumatica item, or review whether configured item creation should be enabled.
Why was the order imported without a payment?
Check Skip Salesforce Payment. When selected, it intentionally imports the Salesforce order without payment. If using a payment cross-reference, payment must not be skipped.
Can the import create a missing customer?
Yes. Import Customer creates a new customer using email, contact information, and the selected customer class. When the option is cleared, the default customer is used for every imported order.
Can the import create purchase orders or invoices?
The source documents importing Salesforce orders into the sales order document type selected in Order Type and checking the resulting SO number and status. It does not describe purchase order or invoice creation from this screen, so those outcomes should not be assumed.
Why did the imported address differ from the Salesforce order?
Review Override Billing Address Information and Override Shipping Address Information. The manual says selecting them uses Salesforce order addresses, but its opposite-case wording is internally contradictory. Validate the actual result in a test order before applying the setting broadly.
Work With the Biz-Tech Services Salesforce Connector
A reliable Salesforce order import starts with valid credentials and precise store defaults, then proceeds through Get Orders, record review, Import or Import All, and confirmation in Salesforce Orders Inquiry. Keep customer and item creation, payment handling, taxes, addresses, files, and cross-references aligned with the intended Acumatica sales order result.
If your team wants help configuring and validating this workflow, the Biz-Tech Services Acumatica Salesforce Integrator can support a source-grounded implementation. Visit https://biz-techservices.com to learn more about Biz-Tech Services and discuss your Salesforce and Acumatica requirements.

