How to Set Up DocVision PDF Automation in Acumatica
Manually entering sales orders from customer PDFs is one of the most time-consuming and error-prone tasks in any sales department. At Biz-Tech Services, we knew there had to be a better way. That is why we developed DocVision, a powerful enhancement built natively for Acumatica ERP that automates the creation of Sales Orders directly from PDF documents.
What is DocVision?
DocVision is designed to streamline your sales operations. It allows users to upload PDF files—such as purchase orders or shipping requests—and instantly generate corresponding Sales Orders within Acumatica. Because it is a native integration, it ensures smooth performance without any external dependencies, respecting your existing security permissions and audit trails.
Key Features for Maximum Efficiency
1. Smart Customer Recognition: The system automatically identifies customer and ship-to information from each PDF using pre-configured templates.
2. Per-Customer PDF Mapping: No two customers use the same format. DocVision allows you to customize PDF parsing rules for each customer to support multiple document structures.
3. Error Reduction: By extracting information directly from source documents, you minimize manual data entry mistakes and improve data consistency.
4. Scalable & Configurable: As your business grows, you can easily onboard new customers and adapt to new PDF formats.
Setting Up Your Environment
The foundation of DocVision lies in a secure Azure Setup. By configuring your API keys and connection settings within Acumatica, you leverage Microsoft’s cloud platform for high scalability and secure document handling.
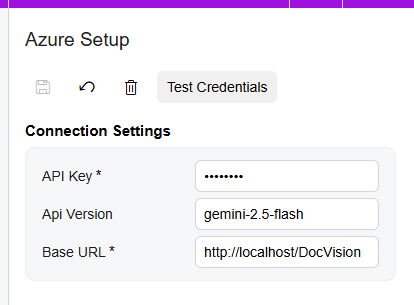
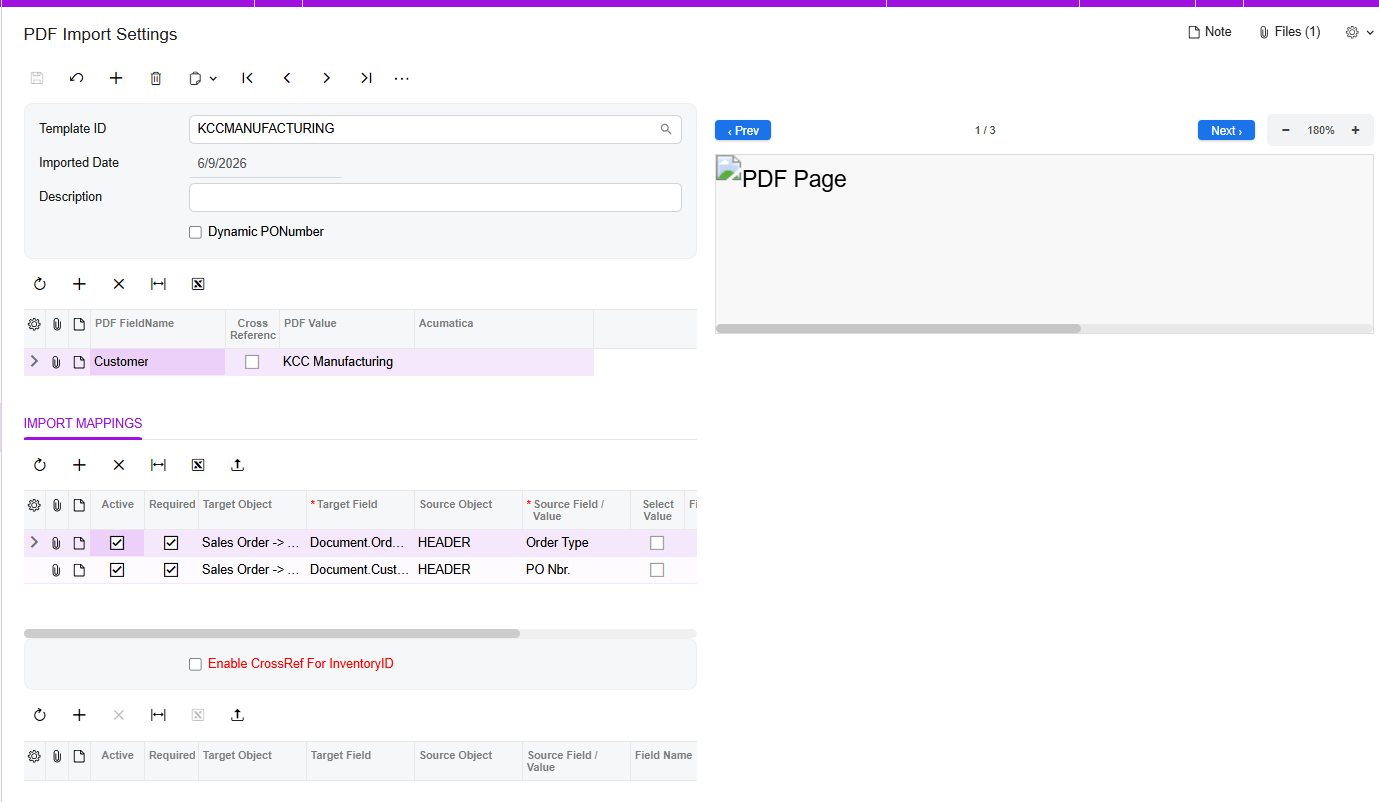
Once your credentials are tested and verified, you can begin creating templates in the PDF Import Settings workspace. Here, you simply upload a sample PDF and define the mapping between PDF values and your Acumatica fields. You can even map complex details, such as header fields or specific line items, by selecting advanced target objects.
Smart Handling of Missing Data
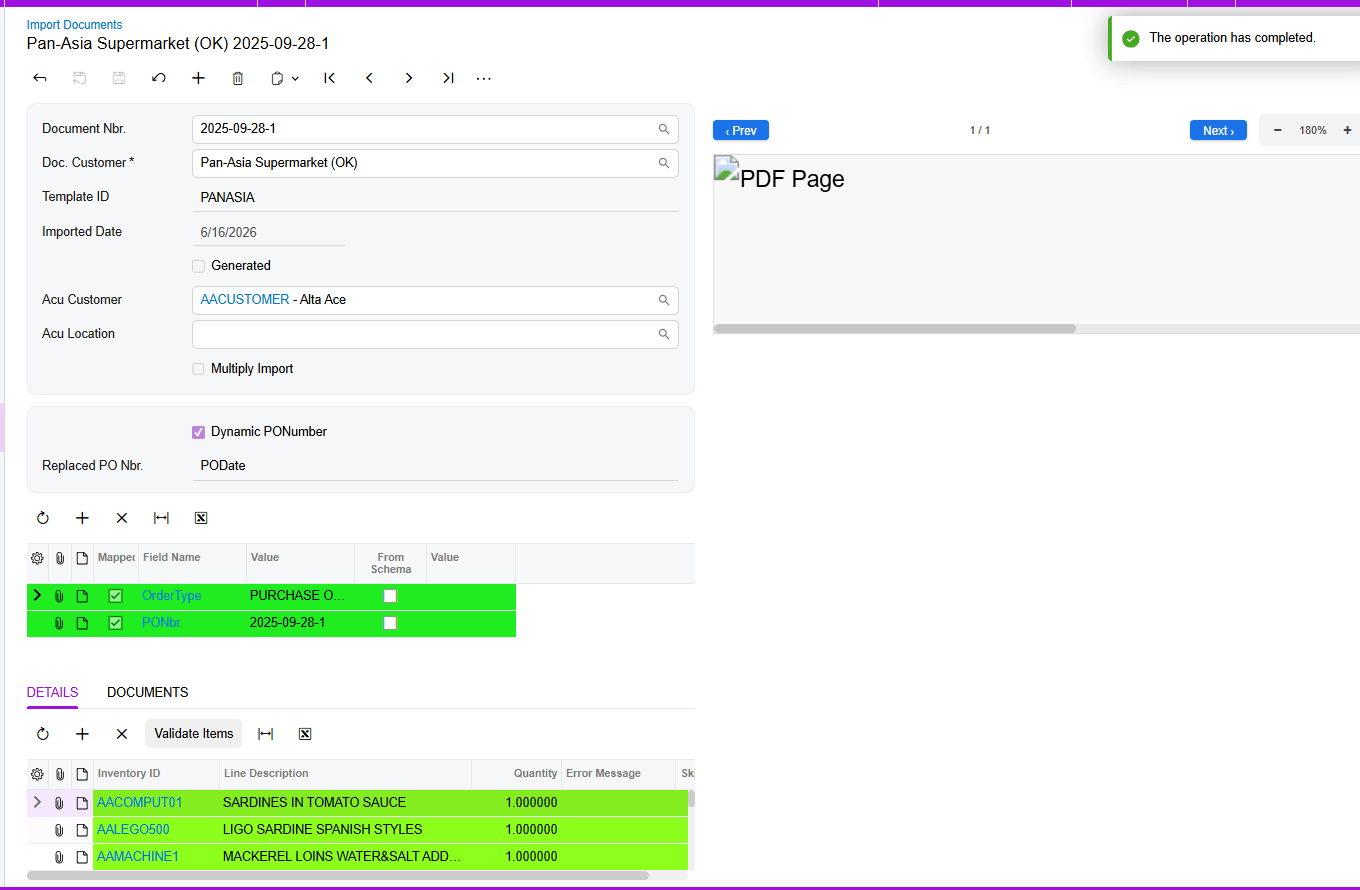
What if a purchase order is missing a PO number? DocVision includes a Dynamic PO Number feature. If the field is missing during import, the system automatically alerts you with a warning message, allowing you to select an alternative number so your workflow never hits a dead end. For even greater precision, you can enable Cross-Referencing to map customer-specific inventory IDs and locations directly to your Acumatica records.
A Seamless User Experience
Managing your imports is visual and intuitive. On the Import Document screen, the system uses a color-coded UI to guide you:
1. Green indicates everything is mapped correctly and you are ready to generate your Sales Order.
2. Red highlights errors in specific item lines that need your attention.
3. Yellow points out mapping issues, which can often be resolved instantly with the “Validate Items” button.
High-Volume Processing
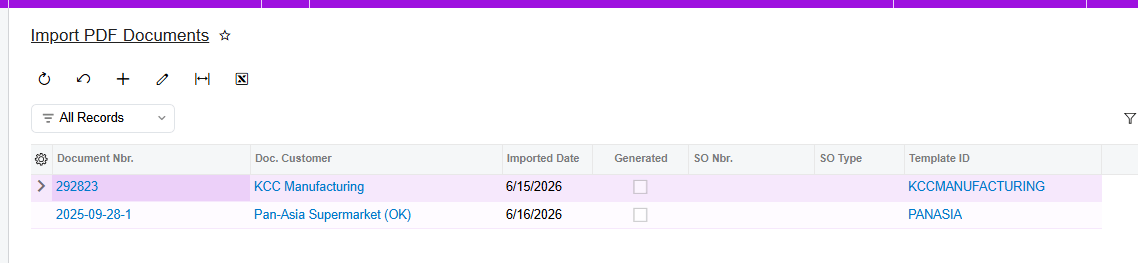
For businesses handling a large volume of orders, DocVision supports Batch Processing. You can filter documents by number and generate multiple Sales Orders at once, significantly speeding up your order processing workflows. You can always track your progress through a specialized Generic Inquiry that keeps all your document numbers, template IDs, and generation dates in one place.

Import PDF Documents
A new Import PDF Documents GI represents all documents.
Conclusion Stop wasting valuable time on manual entry. With DocVision, you can transform your PDF purchase orders into Acumatica Sales Orders with just a few clicks.
How to Set Up California Redemption Value in Acumatica
Streamlining Environmental Fee Compliance: California Redemption Value (CRV) in Acumatica
Managing environmental compliance, such as California’s recycling program, can add complexity to your sales and inventory processes. To simplify this, Acumatica offers a robust CRV (California Redemption Value) feature designed to automate the inclusion of environmental fees on relevant transactions.
This guide outlines how to configure and utilize this feature to ensure accurate compliance within your ERP system.
Understanding the CRV Feature
The CRV functionality in Acumatica allows you to identify products subject to environmental fees and automatically append the appropriate fee to sales transactions.
- Non-Stock Item Requirement: CRV fees are configured as non-stock items.
- Automation: When a beverage or product subject to the recycling program is sold, the system automatically adds the associated CRV item as a separate line on the transaction.
- Visibility: New fields, such as "Parent Item" and "Child Item," have been added to Sales Orders, Shipments, and Invoices to clearly distinguish between the main product and its associated environmental fee.
How to Configure CRV in Acumatica
To enable and manage CRV fees for your products, follow these configuration steps:
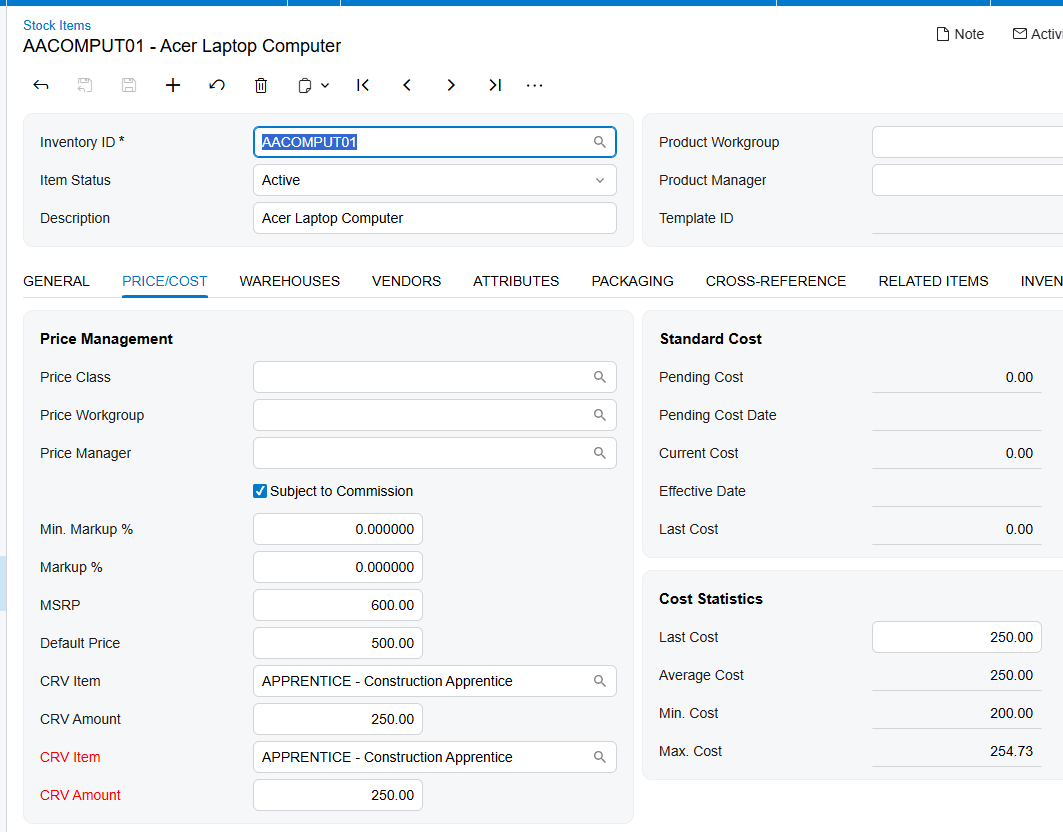
1. Setup the Stock Item
- Navigate to the Stock Item screen.
- Select the relevant item.
- Go to the Price/Cost tab.
- In the CRV Item field, select the appropriate non-stock item configured for the fee.
- On the General tab, utilize the CRV Amount field to define the specific fee amount based on the selected Unit of Measure (UOM).
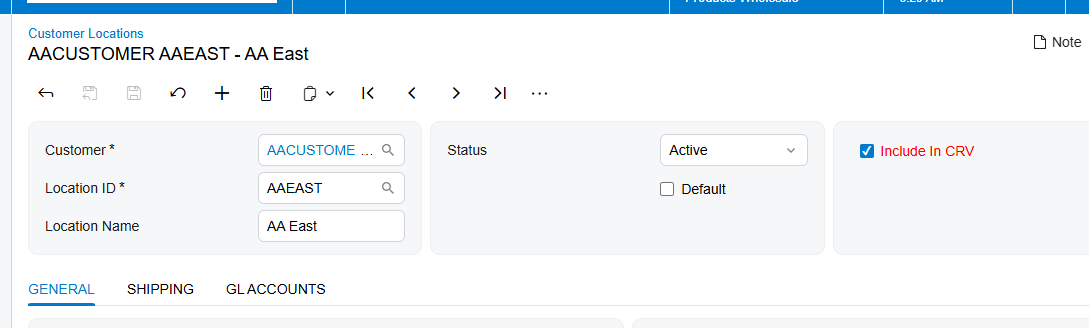
2. Configure Customer Locations
For the system to apply these fees, you must also define which customers are subject to CRV:
- Navigate to the Customer Locations screen.
- Open the default location for the desired customer.
-
Ensure the Include in CRV checkbox is selected.
- Note: If this box is unchecked, the CRV item will not be displayed or applied to Sales Orders for this location.
How It Works in Sales Orders
Once configured, the process is seamless:
- When you create a Sales Order for a customer with "Include in CRV" enabled, adding a parent item that has a CRV item configured will trigger the system to automatically insert the CRV fee as a new line.
- The system intelligently applies the same quantity and warehouse settings to the child (CRV) item as the parent item.
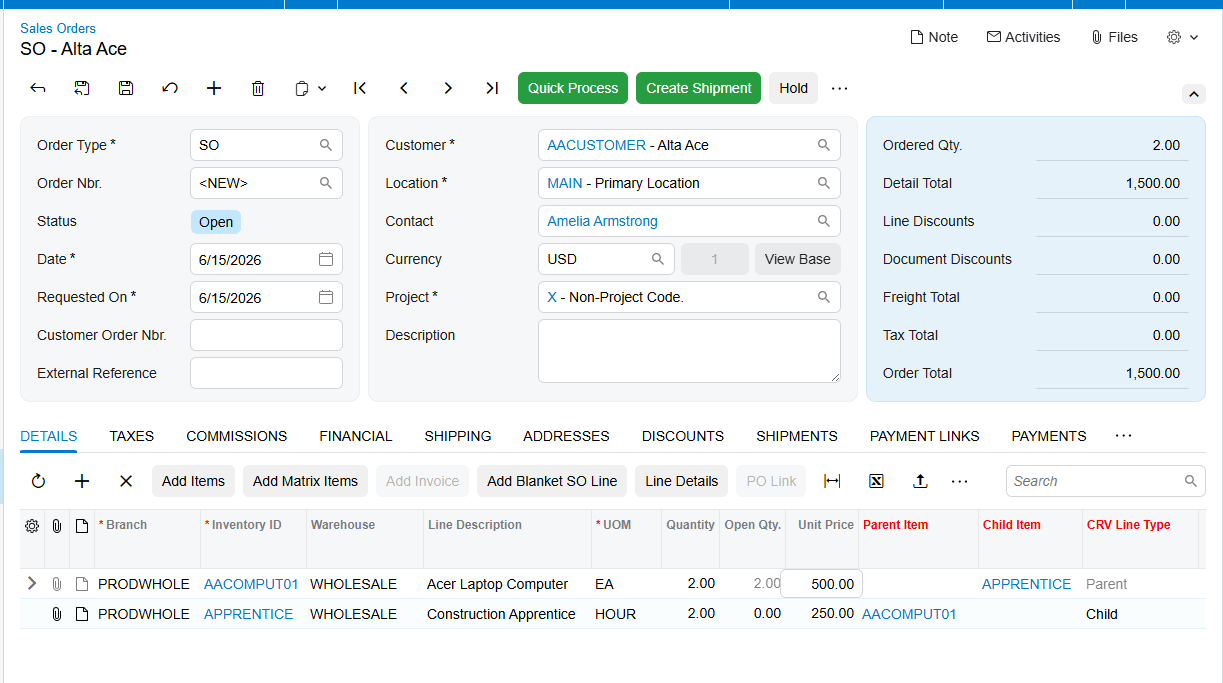
By leveraging these features, your team can maintain compliance with California’s recycling requirements without manual intervention, reducing the risk of errors during the sales process.
Are you interested in learning how to configure other automated tax or fee structures within your Acumatica environment?
How to Set Up Gift Card Processing in Acumatica
Unlocking Growth: The Ultimate Guide to Biz-Tech Gift Card Processing for Acumatica
Welcome to the future of customer loyalty and revenue growth. Biz-Tech Services Gift Card Processing, seamlessly integrated with Acumatica, provides a high-ROI solution that allows your company to sell serialized gift cards and process them as a primary payment method. This solution is designed to streamline your financial workflows while enhancing the customer experience.
Setting the Foundation: Initial Setup
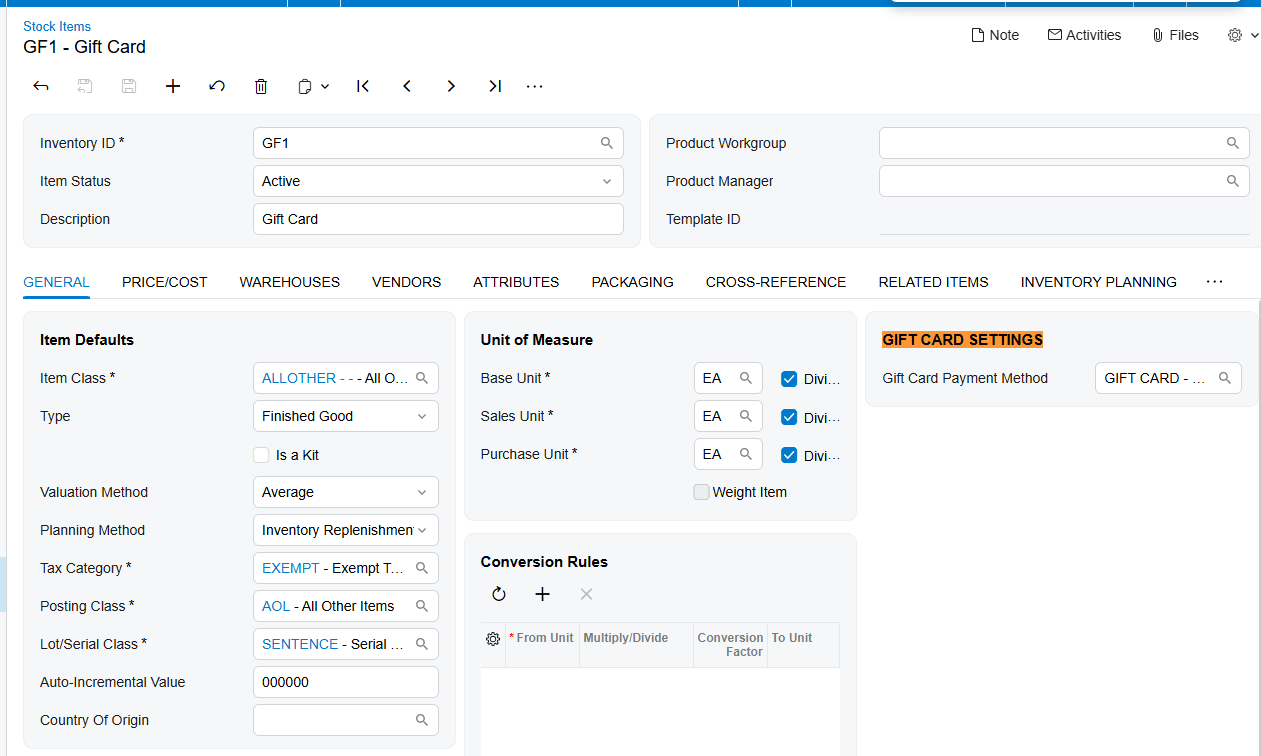
The first step in your journey is configuring your Payment Methods. To ensure clean financial tracking, it is strongly recommended to create a dedicated General Ledger account specifically for your gift card items. By linking a cash account to this method, you can define a 'Default Gift Card' that will automatically populate during the payment process, ensuring a smoother experience for your users.
Configuring for Success: Mapping and Security
The Gift Card Preferences screen is the heart of your configuration. Here, you can establish vital mapping between external SKUs and your internal Acumatica items, which is essential for businesses operating across multiple commerce platforms.
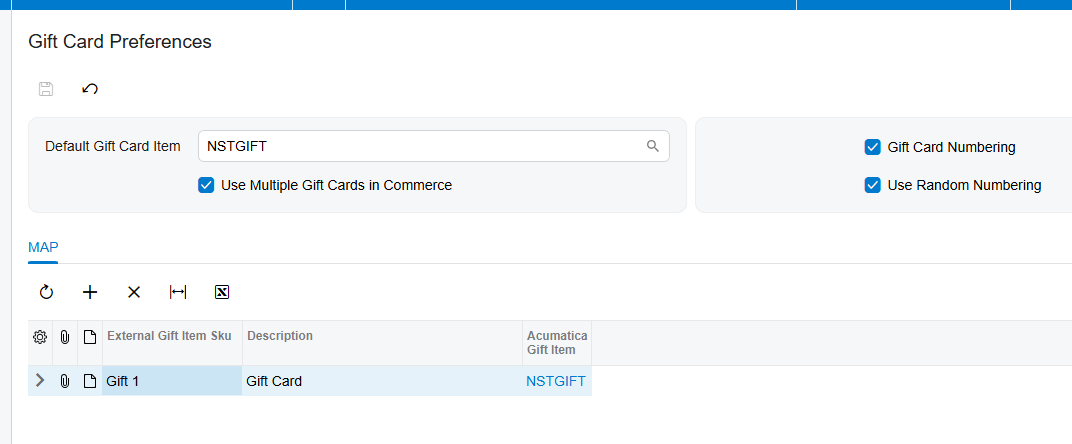
Security is a paramount concern, which is why the system offers two distinct numbering modes:
1. Numbering Segments: Allows you to define a structured, auto-incremental sequence.
2. Random Numbering: A powerful tool to prevent unauthorized use by generating unique strings based on the quantity of cards in a sales order, rather than following a predictable pattern.
Flexible Inventory Management: Stock vs. Non-Stock
Biz-Tech supports both inventory models to fit your specific business needs:
1. Non-Stock Items: Fulfillment is direct. Once a gift card is sold on a standard Sales Order, the system generates serial numbers visible in a dedicated popup for the user. For these items, 'Ship Complete' is utilized as the standard shipping rule.
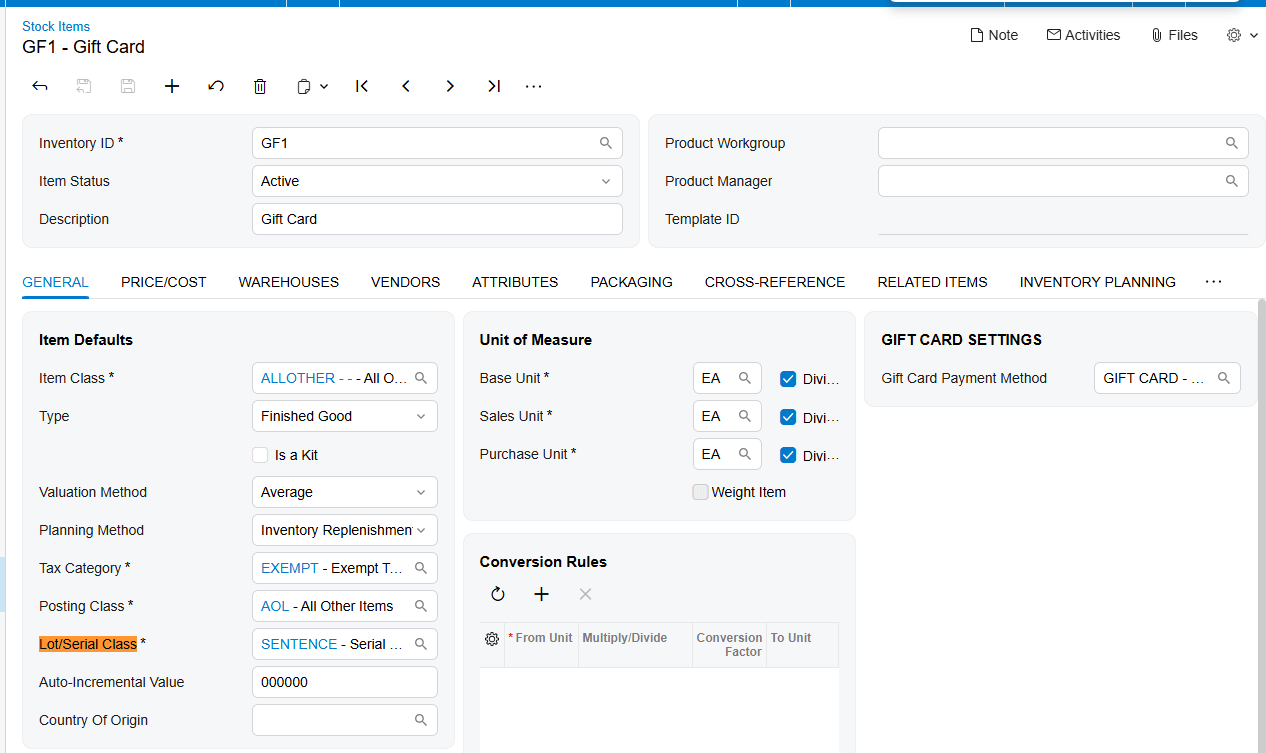
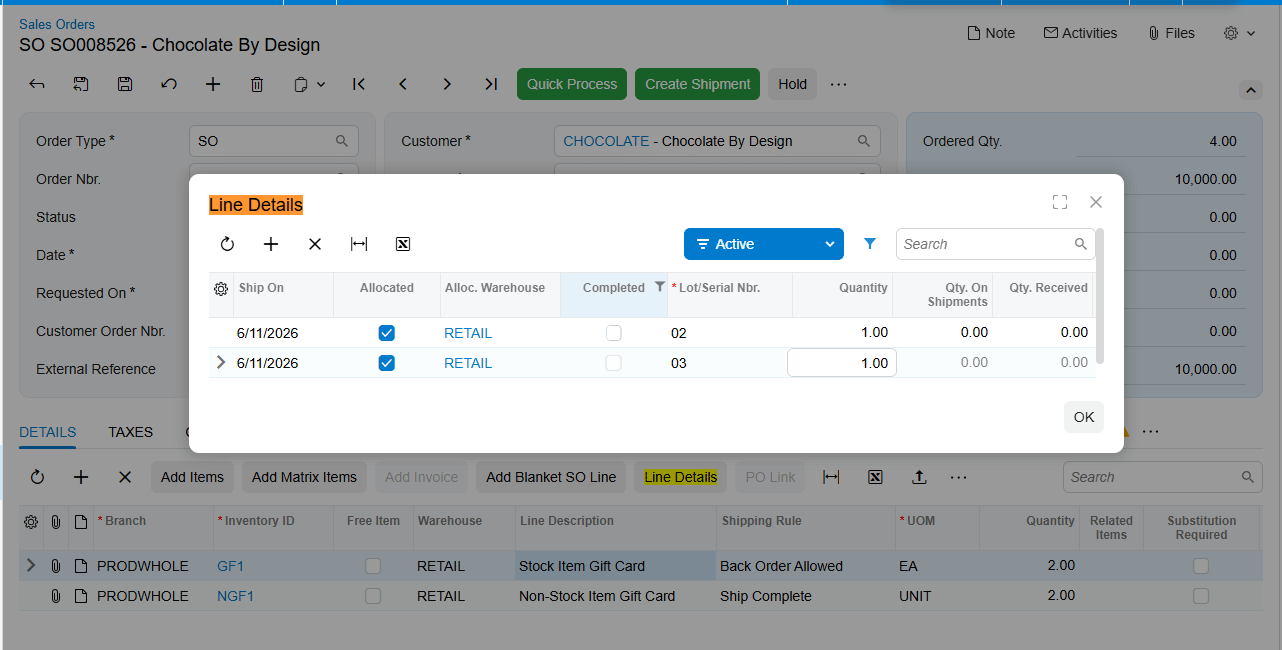
2. Stock Items: For businesses managing physical cards, Stock Items offer deeper control. You must create a specific Lot/Serial Class to track serial numbers and expiration dates. These cards are brought into the system via the Receipts screen, and when a customer makes a purchase, the system requires an allocation from the available pool to ensure only cards currently in your warehouse are sold and tracked.
Seamless Sales and Payment Processing
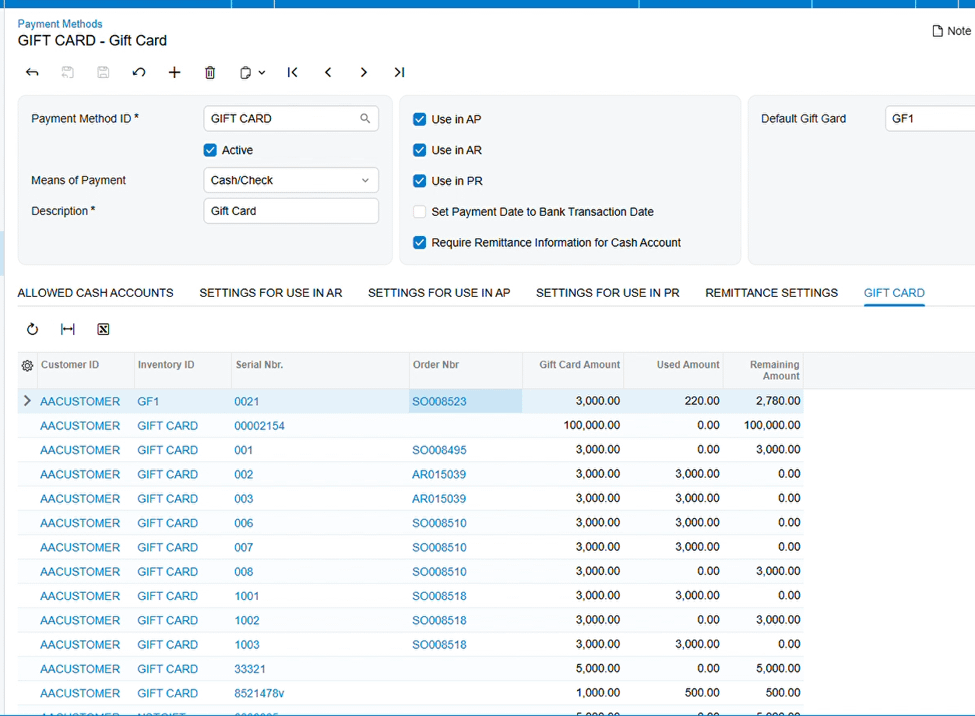
Selling a gift card is as simple as any other transaction in Acumatica. Whether an order is created manually or imported from an external system, gift card details—including the customer ID and order number—are automatically stored in the GIFT CARDS tab of the Payment Methods screen once a regular Sales Order with Gift Card inventory in its line is created, shipped if needed, and the invoice is released. Just do not forget to have the correct serial number for the item
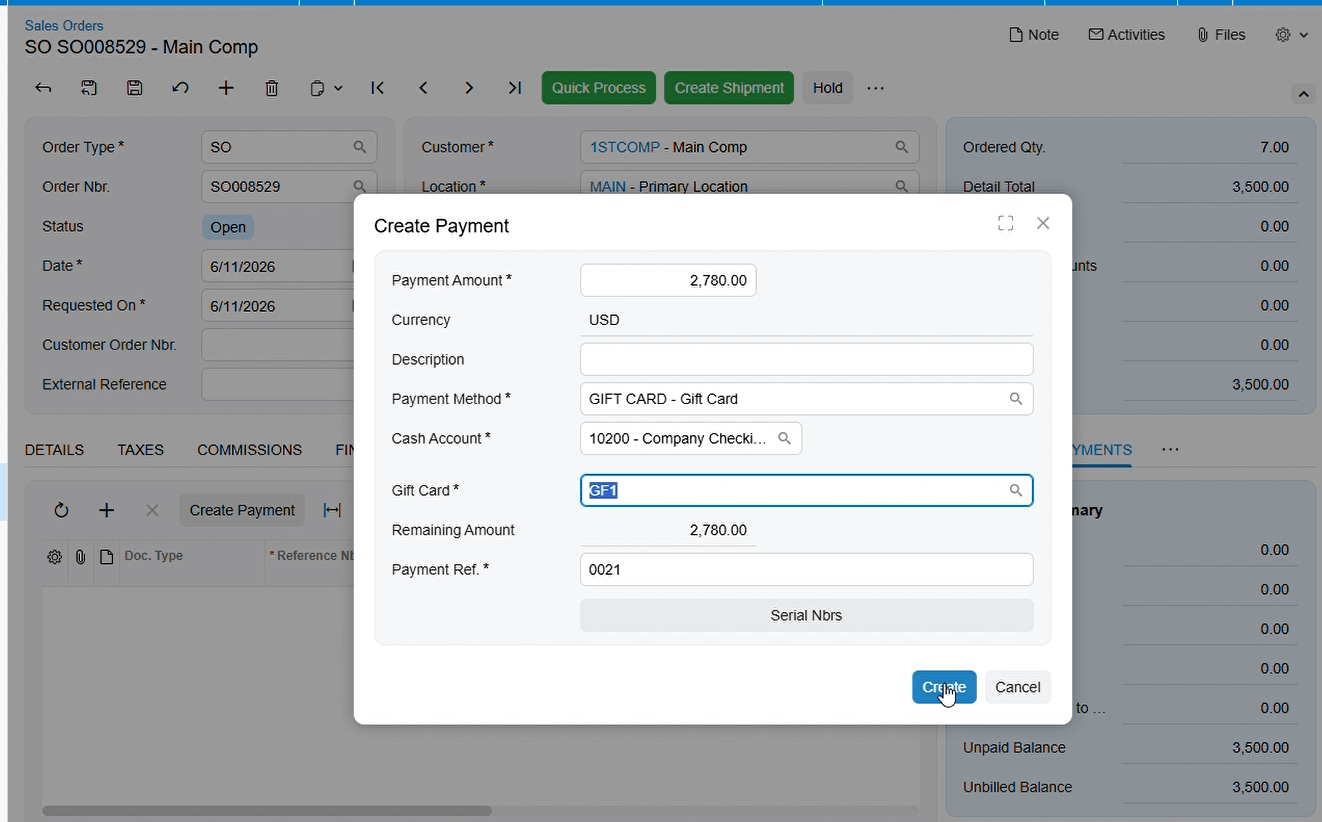
Then you can process a payment and purchase by Gift Card. Simply have your Sales Order ready with the appropriate line amounts and quantities. On the Payments tab, select your configured Gift Card payment method and the specific serial number. After the payment is released, the card amounts are adjusted automatically in the system. You are able to use the Gift Card partially.
After the Payment is release, all the transactions are available on Payment Methods Screen.
Advanced Visibility: Tracking, Returns, and API Integration
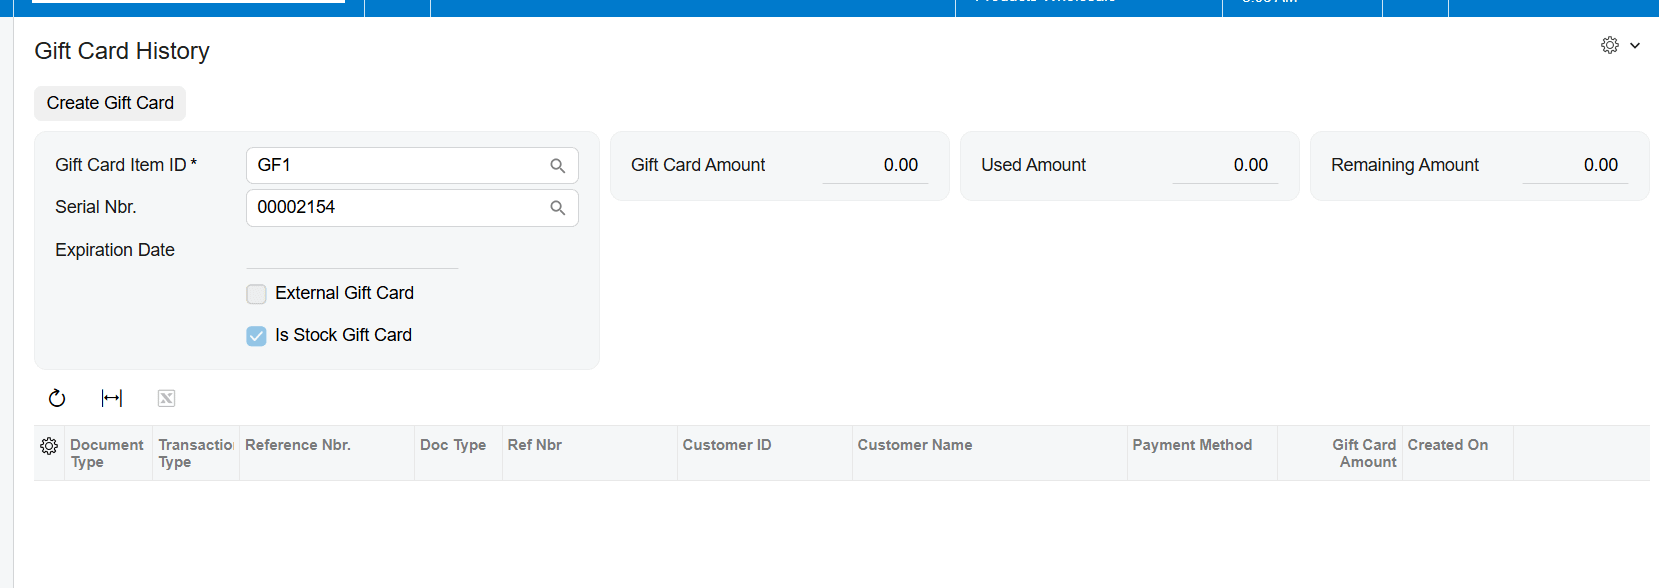
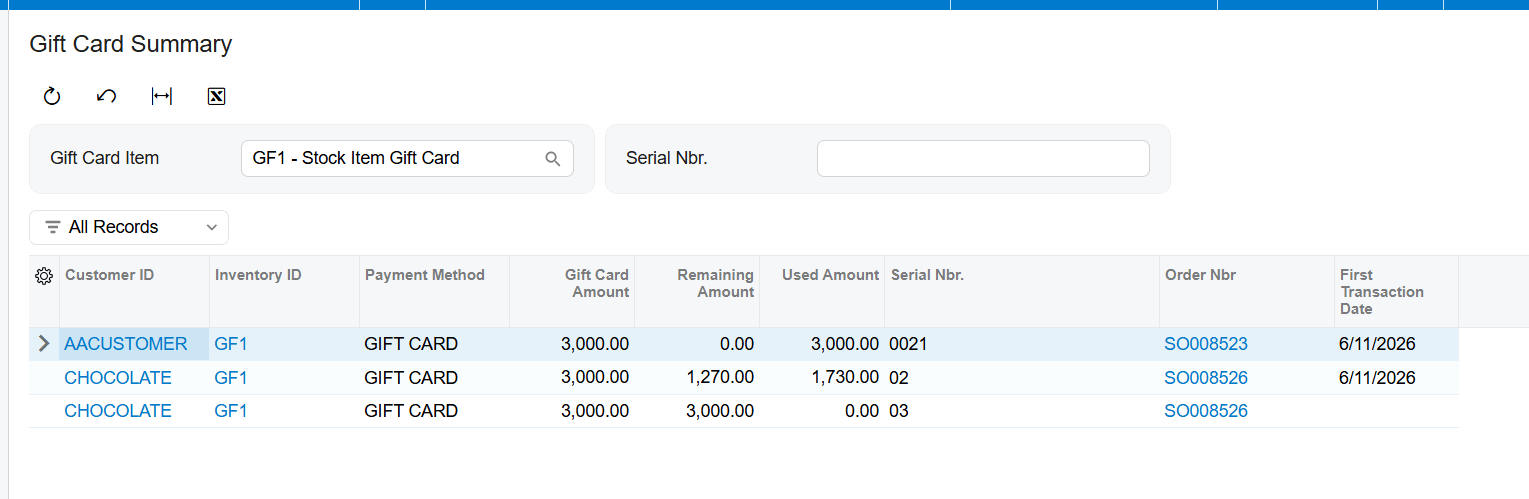
Total visibility is provided through the Gift Card History and Gift Card Summary screens, accessible via the Payment Methods screen. The History screen allows you to view every single transaction associated with a card, from its initial issuance to every partial payment made. You even have the flexibility to manually create a card here if needed.
Managing returns is equally streamlined. By using the Return Order (RC type), you can bring a gift card back into inventory and the system will automatically update its balance. For modern, multi-channel retailers, the Biztech API endpoint allows you to import gift card information from external systems effortlessly. This ensures that your Acumatica system remains the single source of truth for all gift card balances, whether they were sold in-store or online.
Drive your business forward with the precision and power of Biz-Tech Gift Card Processing
How to Set Up Consignment Processing in Acumatica
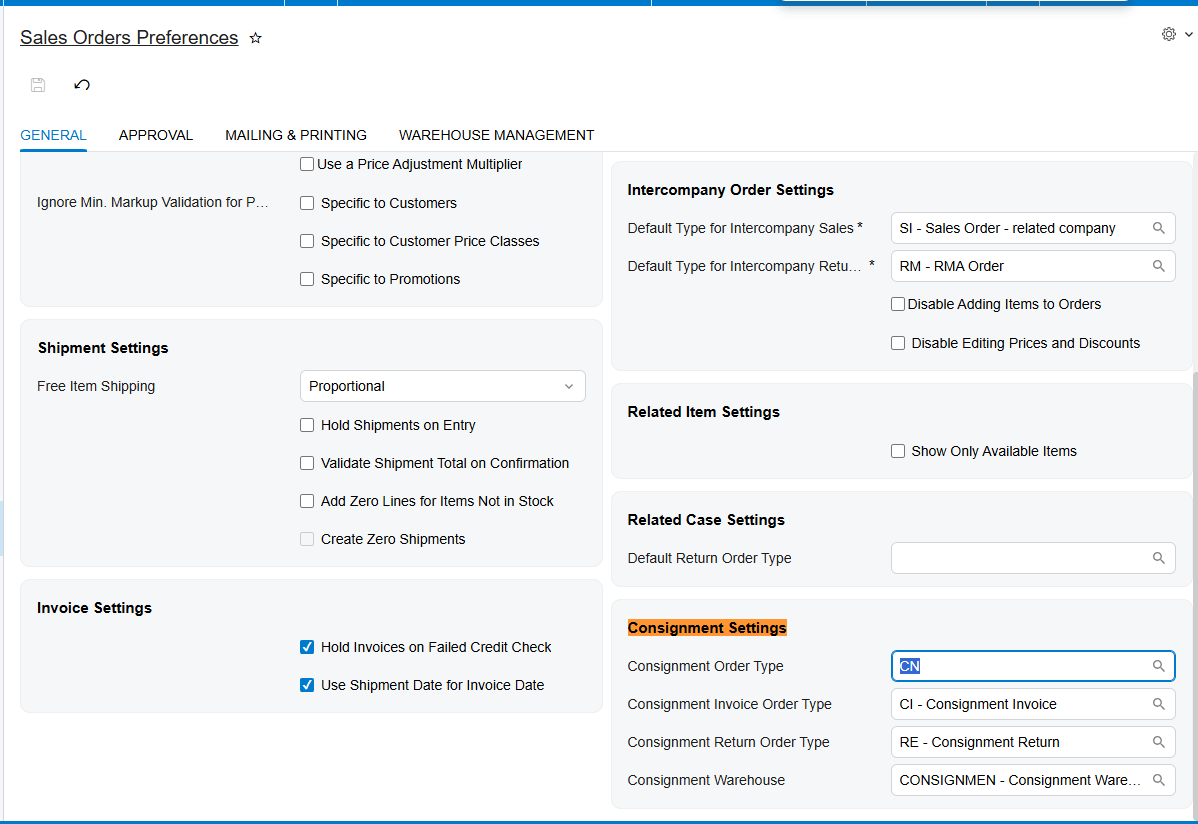
Initial Configuration: Order Types and Preferences "First, you need to have your order types ready. Specifically, ensure you have a Transfer Order type configured, which we’ll refer to as the CN type. Next, head over to the Sales Order Preferences screen (SO101000). You'll find a dedicated Consignment Settings section where you need to map your order types: set the Consignment Order Type to 'CN', define your Invoice Order Type, and set your Return Order Type. These mappings are critical because they dictate how the system generates documents later in the process."
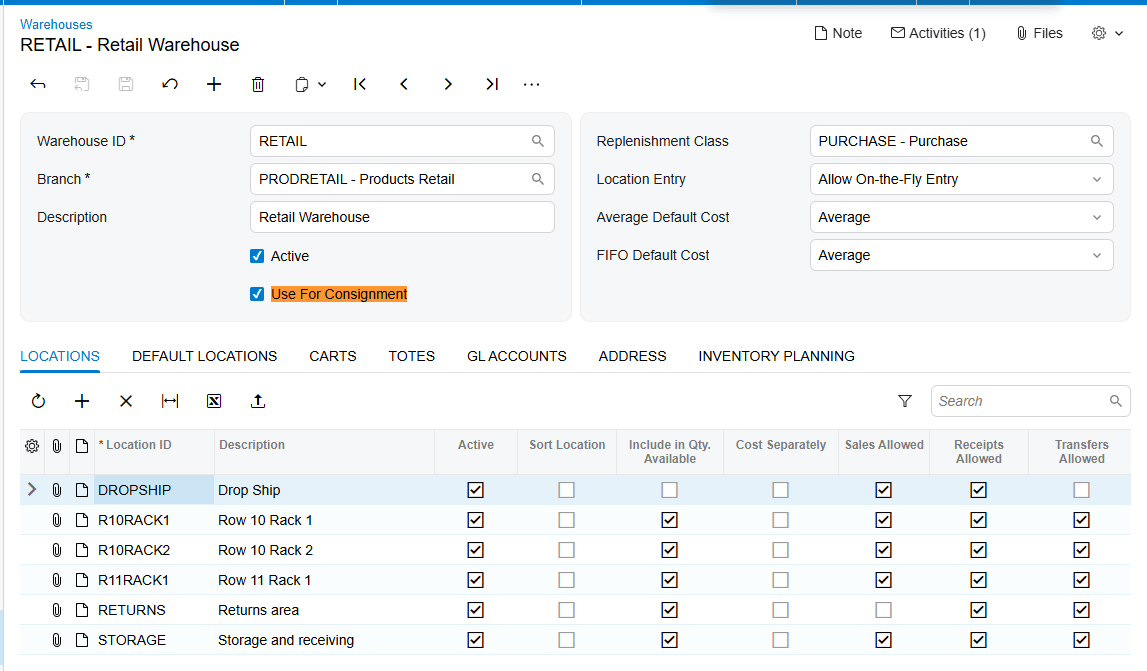
Warehouse and Customer Setup "Now for the infrastructure. On the Warehouses screen (IN204000), identify your consignment warehouse and ensure the 'Use For Consignment' checkbox is selected. Without this, you won't be able to link it to the Consignment Settings. Once that's active, go to the Customers screen and navigate to the Shipping tab. Here, you must add that specific warehouse to the Consignment Warehouse field. This customer-level setting will override any default selections when you create an order for them."
The Sales Order Workflow "With the setup complete, let's create a Sales Order. Select Order Type CN and choose your customer. After adding your items, proceed through the standard shipment creation and confirmation. The most important step here is to press the 'Update IN' button. This action issues items from your main warehouse and receives them into the consignment warehouse, automatically generating a Transfer-type Purchase Receipt."
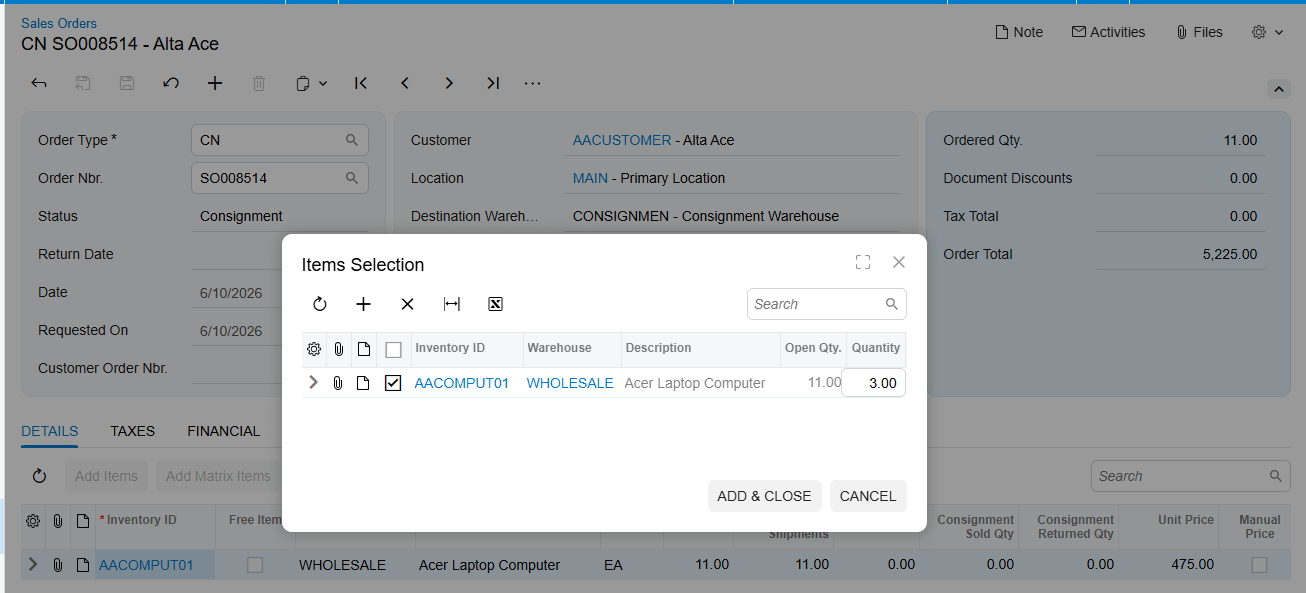
Selling and Returning Items "Once the items are in the consignment warehouse and the order status is 'Consignment' or 'Partial Consignment', you'll see two key actions in the menu: 'Consignment Sell Items' and 'Consignment Return Items'.

When you select one, a popup appears for item and quantity selection. Every time you add a quantity in these popups, the system automatically creates a new Sales Order. The type of order created depends entirely on what you set earlier in the Sales Order Preferences for 'Invoice Order Type' and 'Return Order Type'."
Managing Consignment Physical Inventory "Finally, let's talk about reconciliation. You can perform physical inventory specifically for stock at customer locations. To do this, create a PI Type with the 'Consignment Inventory Count' checkbox selected, which enables fields for the specific Customer and Location. When you complete this PI process, the system automatically generates a Consignment Invoice for any consumed items, following the same logic as the manual 'Sell Items' process. When all items are sold or returned, the original Consignment Order will automatically close
It’s important to understand that these statuses are entirely distinct from regular sales order statuses; they function independently to specifically track the consignment flow.
- Open: This is the starting point. When you first create a consignment order, it sits in "Open" status, meaning none of the items have been shipped to the customer yet.
- Partial Consignment: As soon as you ship some, but not all, of the ordered items, the status shifts here. This indicates that part of your stock is at the customer's location while the rest is still pending shipment.
- Consignment: Once every item on the order has been shipped, the status becomes "Consignment". At this stage, all items are officially part of the consignment inventory held by the customer.
- Closed: This is the final stage. The order moves to "Closed" automatically only when all ordered items have been shipped and every one of those items has been either successfully sold or returned to your warehouse.
Once an order is Closed, the "Consignment Sell" and "Consignment Return" buttons are disabled, and while you can still see the order-level data in generic inquiries, the item-level details will no longer appear in the "Consignment Item Details" inquiry
Acumatica ERP directly with your Shopify storefront.
Today, we're focusing on the absolute lifeblood of modern e-commerce. We've got a rapid-fire explainer lined up for you, entirely dedicated to configuring the Biz-Tech software to link your Acumatica ERP directly with your Shopify storefront. We're skipping all the fluff today. We're diving straight into the UI to look at the exact setup screens, the configuration toggles, and the mapping logic that makes Day One automation a reality.
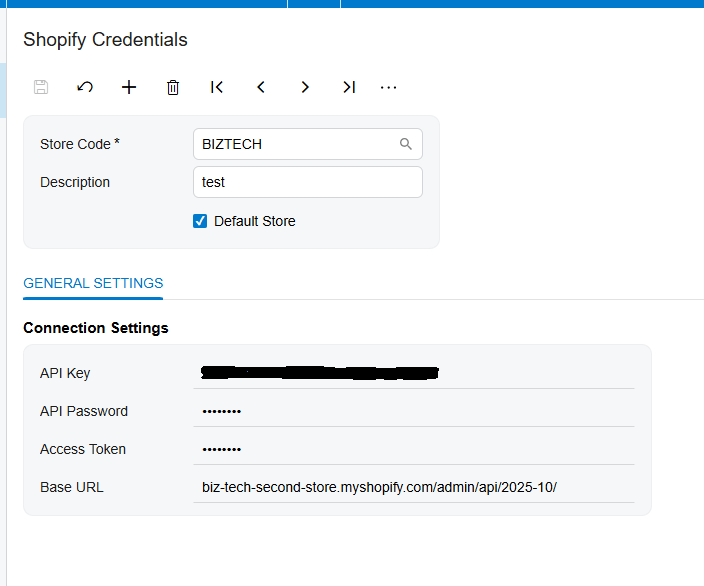
First up on the list: Shopify credentials. Honestly, this is the bedrock of your entire integration because before a single piece of inventory can even think about syncing, Acumatica and Shopify need a secure encrypted line of communication. And right below that, you've got your API key, password, and access token. Now, these aren't just random strings of text. These are the secure digital handshakes that authorize the system to pull and push your valuable data. It's really just three straightforward steps: Create a unique store code, enter your secure API keys, and test the connection.
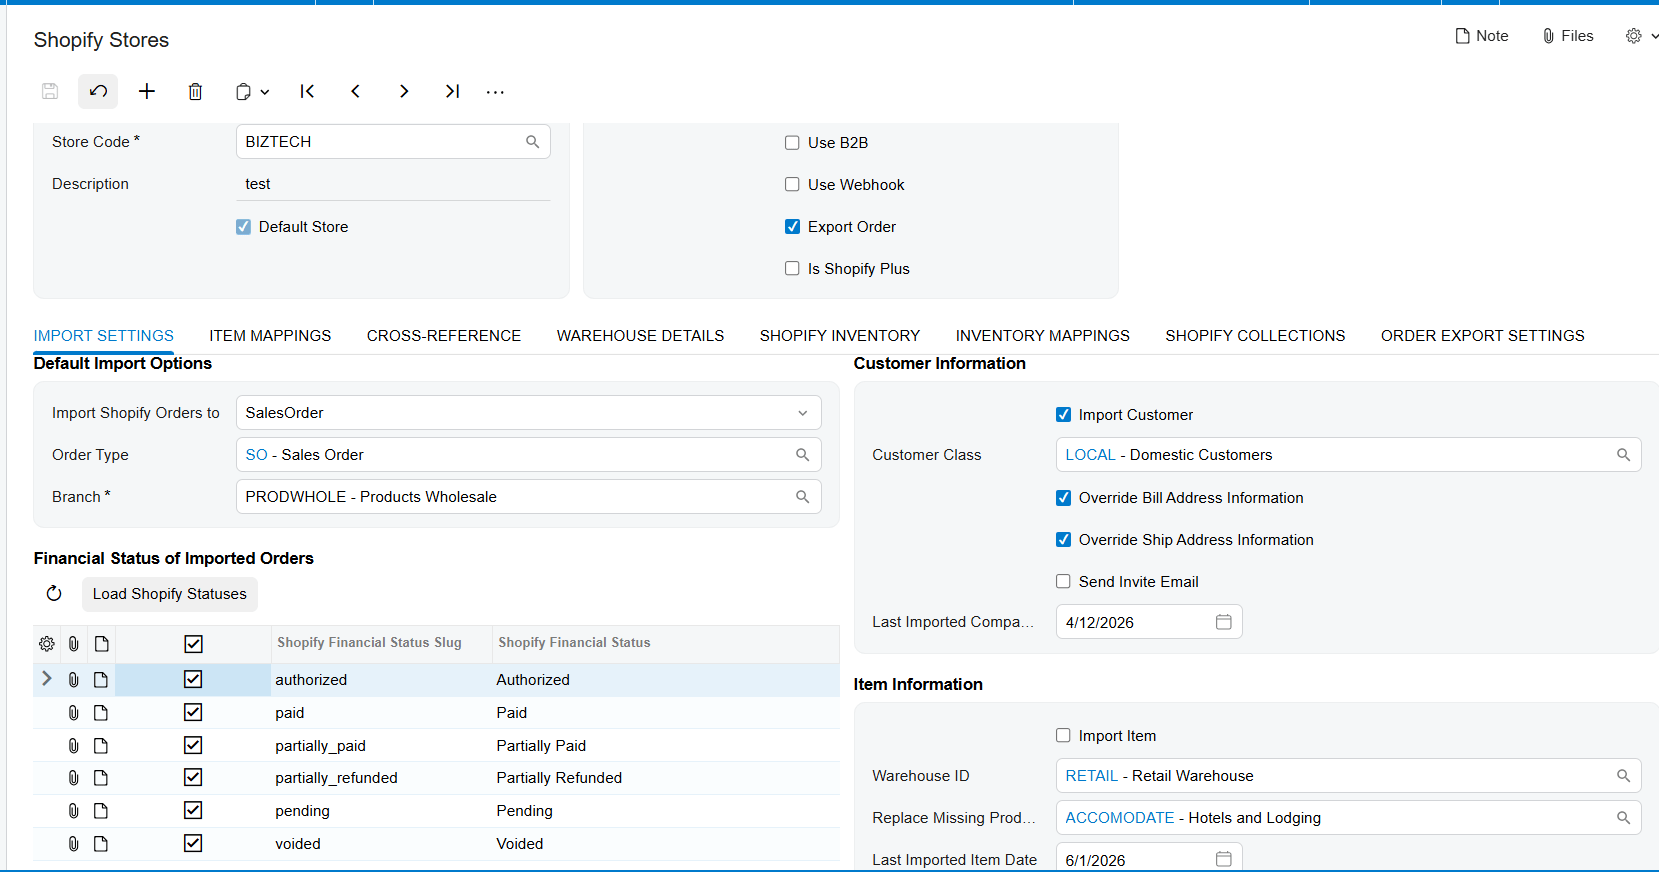
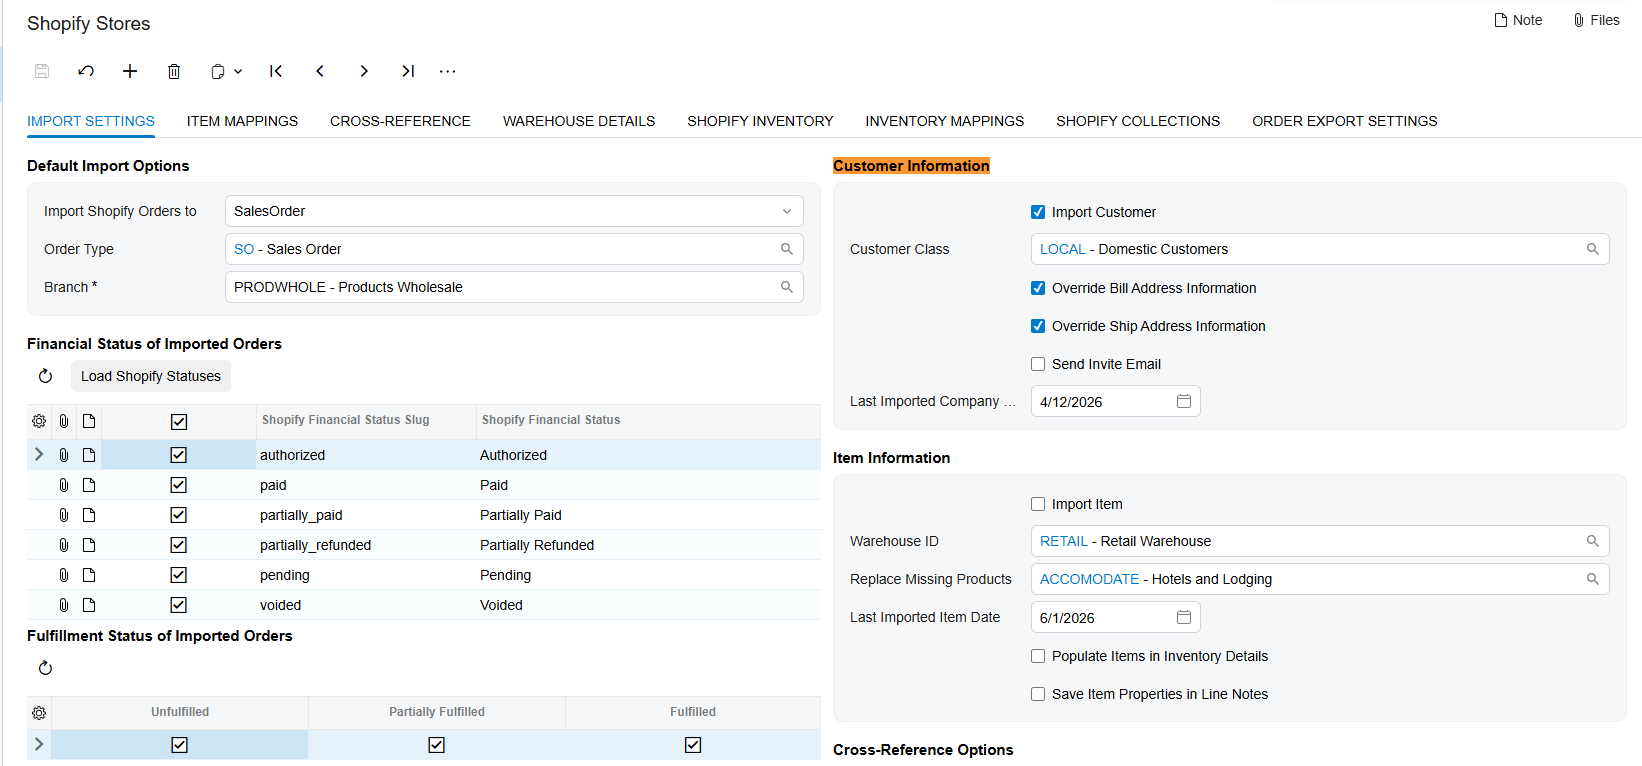
Let's move over to the import settings. And I've got to say, this is where the sheer flexibility of the Shopify connector really starts to shine. Take a look at the default import options section. You aren't forced into one rigid path here at all. You can dynamically map incoming Shopify orders so they land in Acumatica as standard sales orders, sales order invoices, or even direct accounts receivable invoices. It totally adapts to how your specific branch actually operates.
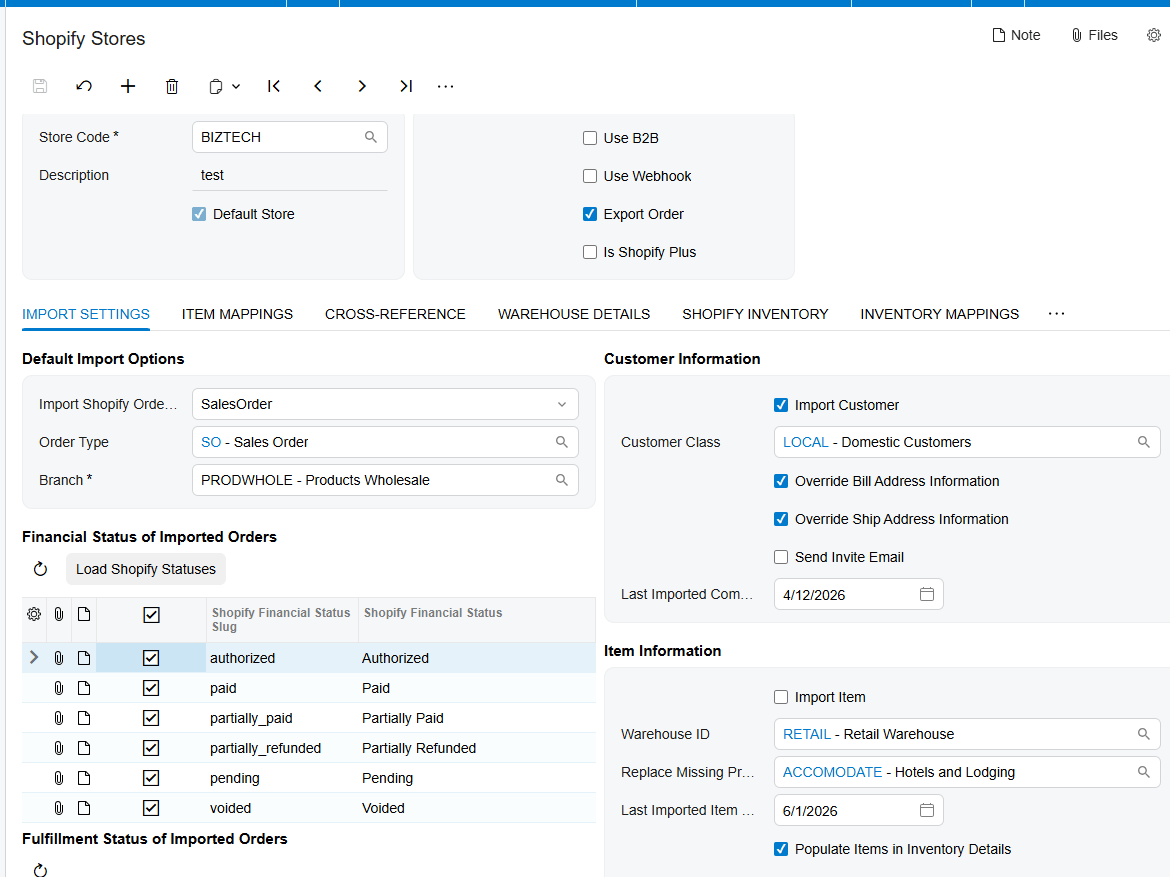
Now, sticking with that same screen, but just panning down a bit, we hit the financial status mapping matrix. What's super fascinating here is how it bridges the language barrier between e-commerce and enterprise accounting. Shopify uses these very specific statuses, right? Things like 'authorized' or 'partially_refunded'. Well, this matrix lets you map those exact tags directly into Acumatica. So, an order marked 'paid' in Shopify instantly behaves exactly like a paid entity in your ERP. Zero guesswork required.
Continuing on with the financial setup, let's look at the payment options block. When a customer swipes a credit card on your Shopify store, that captured transaction obviously needs a home in Acumatica. See that 'payment method' field that's currently set to 'check'? This allows you to meticulously link those digital transactions to your internal payment types in the ERP. You can even set it to automatically release the payment right during the import. That means you're automating cash receipts from the exact second the customer hits checkout. Right below payments: taxes. You'll notice fields for customer tax zone, tax ID, and tax category. And they're mapped here with the code 'shop tax'. Since tax liability is usually determined by where the customer or vendor is geographically located, this configuration makes sure the integration automatically assigns the correct tax zones and filters out exempt items.

Glancing over to the right side of the import settings, we find the customer and item information panels. Just imagine a brand new customer buys a newly launched product variant on your site. Well, by simply checking 'import customer' and 'import item,' the system automatically ingests that fresh data and builds entirely new profiles and inventory records in Acumatica totally from scratch.
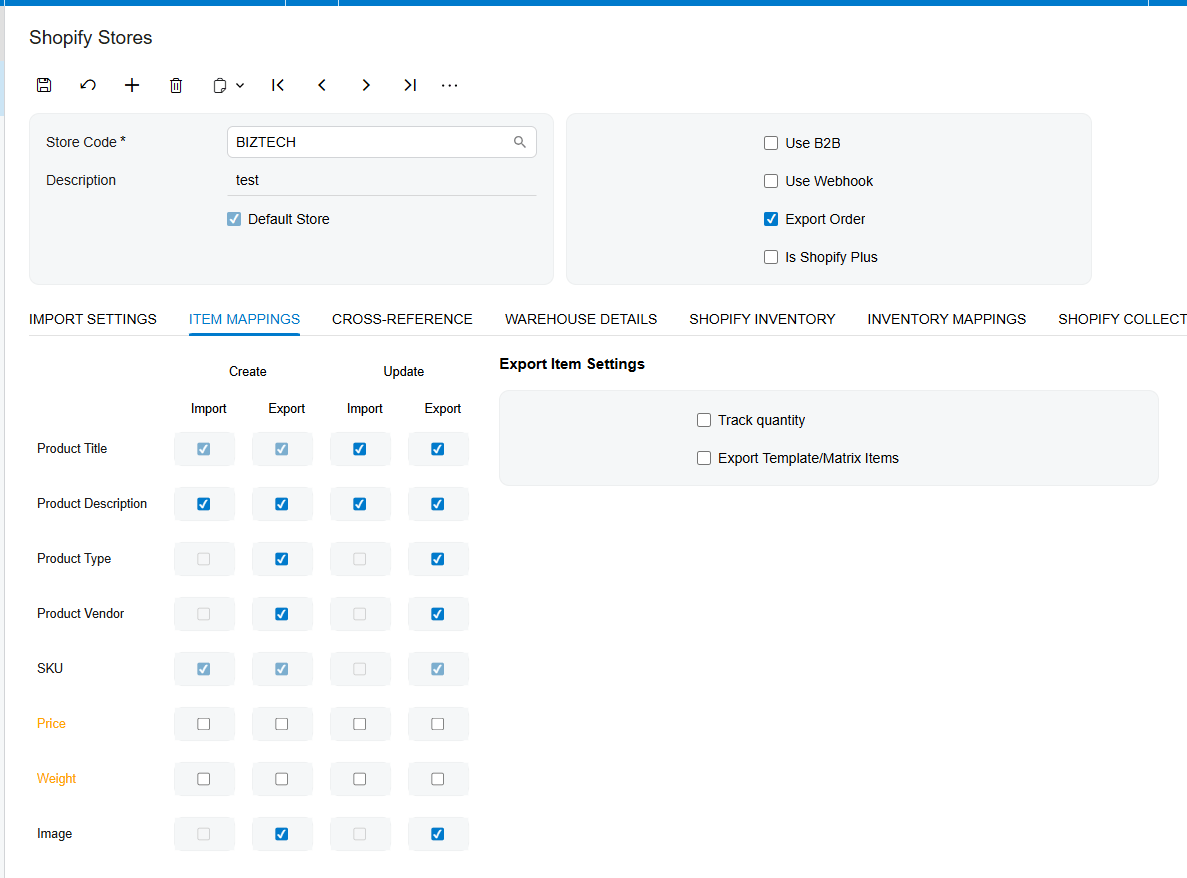
Let's zoom in a little tighter on the item mappings tab. Think of this as the absolute control center for your product data. Notice those columns: create, update, import, and export. This is bidirectional synchronization in action. Basically, you dictate exactly which system is the source of truth. Want Acumatica to control the price and push it out to Shopify? Check 'export'. Want Shopify to dictate the product description? Check 'import'. If you leave these specific mapping checkboxes unselected for fields like price or weight, the Shopify integrator is going to bypass them entirely during its sync cycle.
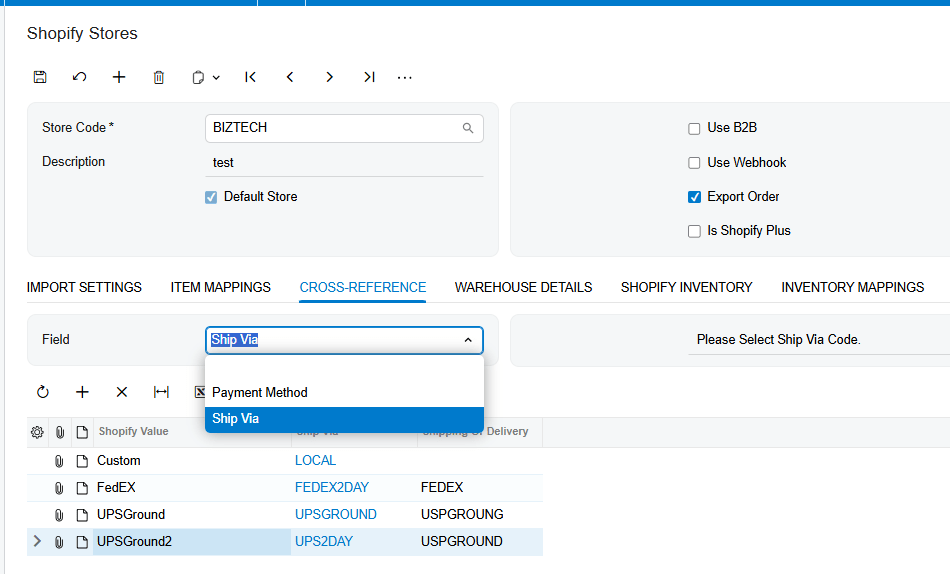
Next up is the cross-reference tab. This drop-down functionality maps Shopify shipping carriers precisely to Acumatica's 'ship via' codes. For example, if a customer selects UPS ground at checkout, mapping UPS ground to your internal code makes sure the delivery settings on the sales order are populated flawlessly. Similarly, by toggling the field selector to Payment Method, you can map your Shopify payment sources directly to your corresponding Acumatica payment types to ensure accurate financial tracking for every order
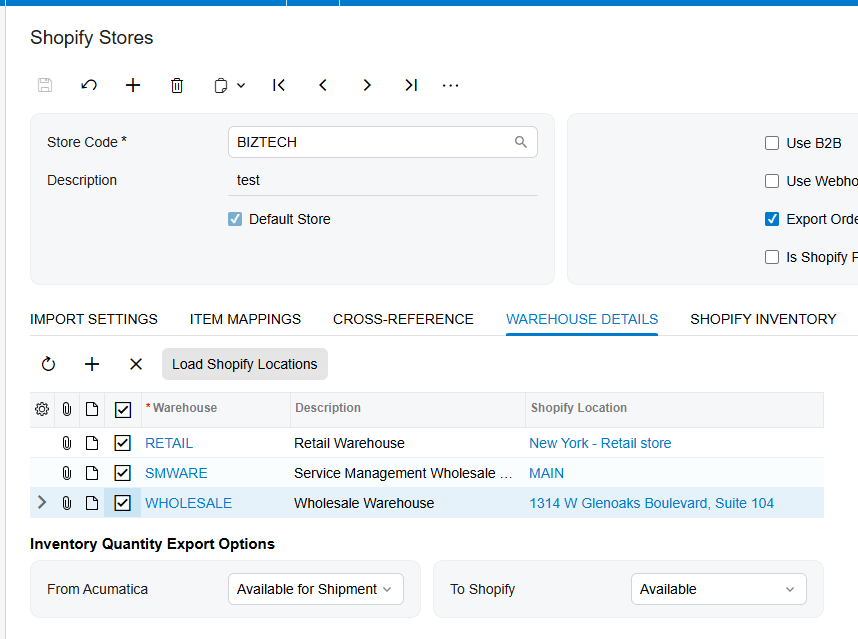
And beyond just shipping methods, we actually have to align where the physical goods reside, right? That's done through location synchronization. This underlying logic maintains flawless warehouse data between both platforms. The crucial detail here is that the location ID from Acumatica is securely stored directly within Shopify's info tab. This precise link ensures that inventory is decremented from the correct physical warehouse, preventing that nightmare of overselling and keeping your physical and digital shelves perfectly aligned.
A tool like the Biz-Tech Shopify connector is incredibly powerful, but its true magic relies entirely on the precision of these initial setups. So, review your own implementation checklists, tune those default options, and prepare to truly reap the rewards of seamless automation."
How to Set Up Kit Processing in Acumatica
How do you customize kit components directly inside a sales order? Say a customer calls and wants a specific desktop computer build. You know, swapping out the hard drive, maybe choosing a different monitor size. Your sales team really needs a frictionless way to enter that order. Well, by the end of our time together today, you're going to understand exactly how your backend specifications directly control and streamline that front-end sales order experience.
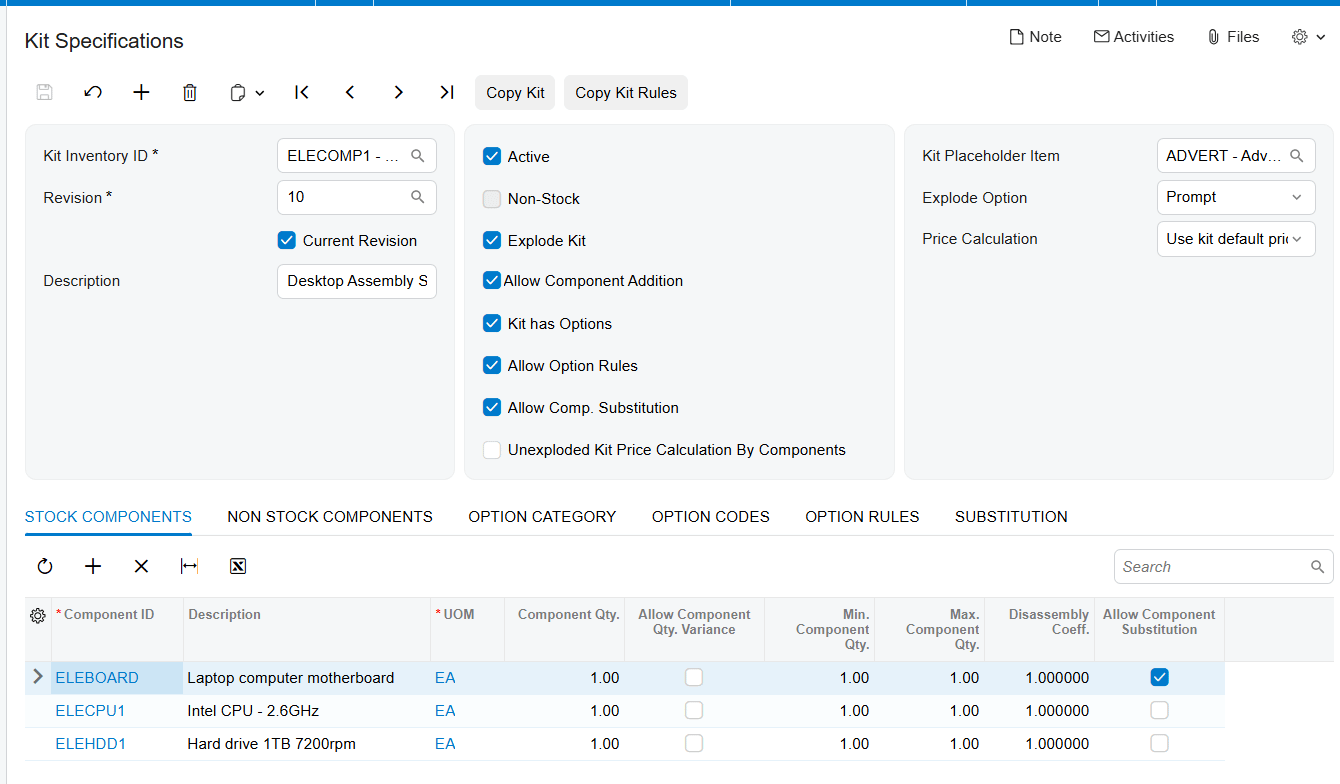
Let's look at our road map for today. Defining kit specifications. This is where we shift from global preferences down to the item specific rules. So before a kit can actually do anything useful on a sales order, you have to hit a few prerequisites. Obviously, you've got to mark the specification as active. Then you need to select explode kit, which basically tells the system, hey, this item is allowed to be broken down into its component parts.
But here is a really critical concept. You absolutely must assign a kit placeholder item. See, because a kit consists of multiple components, when it explodes on the sales order, all those individual parts get added. To stop your system from double counting the cost of the components and the master kit itself. The kit item is actually replaced by this non-stop placeholder item.
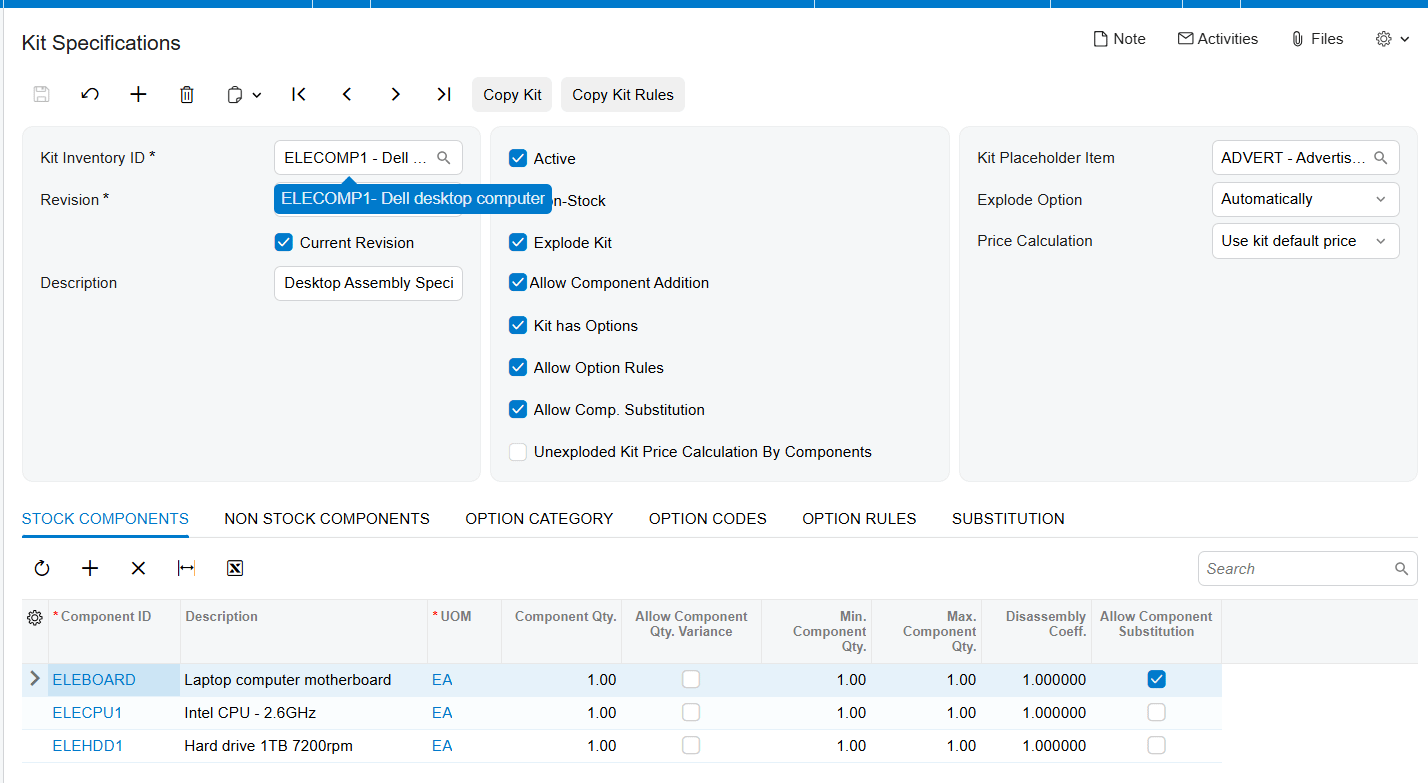
But let's look a little further down to that kit has options checkbox. It dynamically reveals the option category and option codes tabs down at the bottom of your screen. That's what allows you to build those highly customizable bundles where customers can literally pick and choose their specific components. So, it's pretty vital to understand the distinction here. Option categories are your broad classifications. Think size, color, or maybe processor type. Option codes, on the other hand, are the actual specific selections within those categories like 8x10 black or 2.6 GHz CPU.
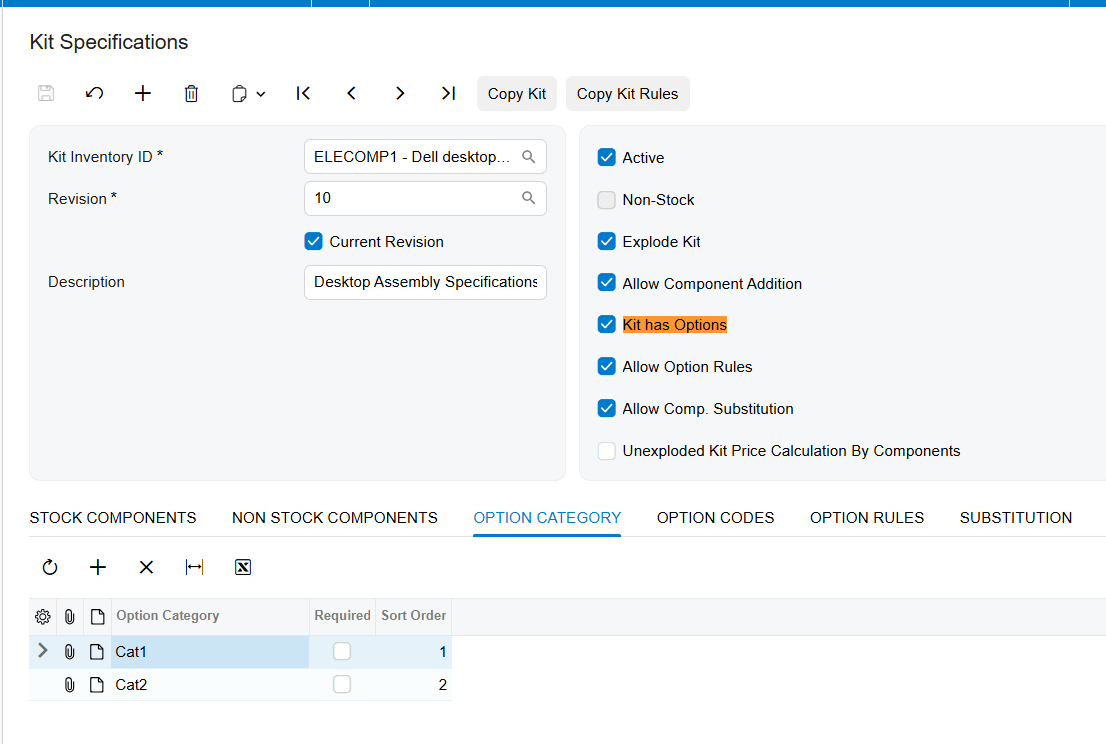
Notice that required checkbox from the setup. If you marked an option category as required during your backend configuration, this popup will literally force the sales rep to pick an option code before they can even proceed with the kit order.
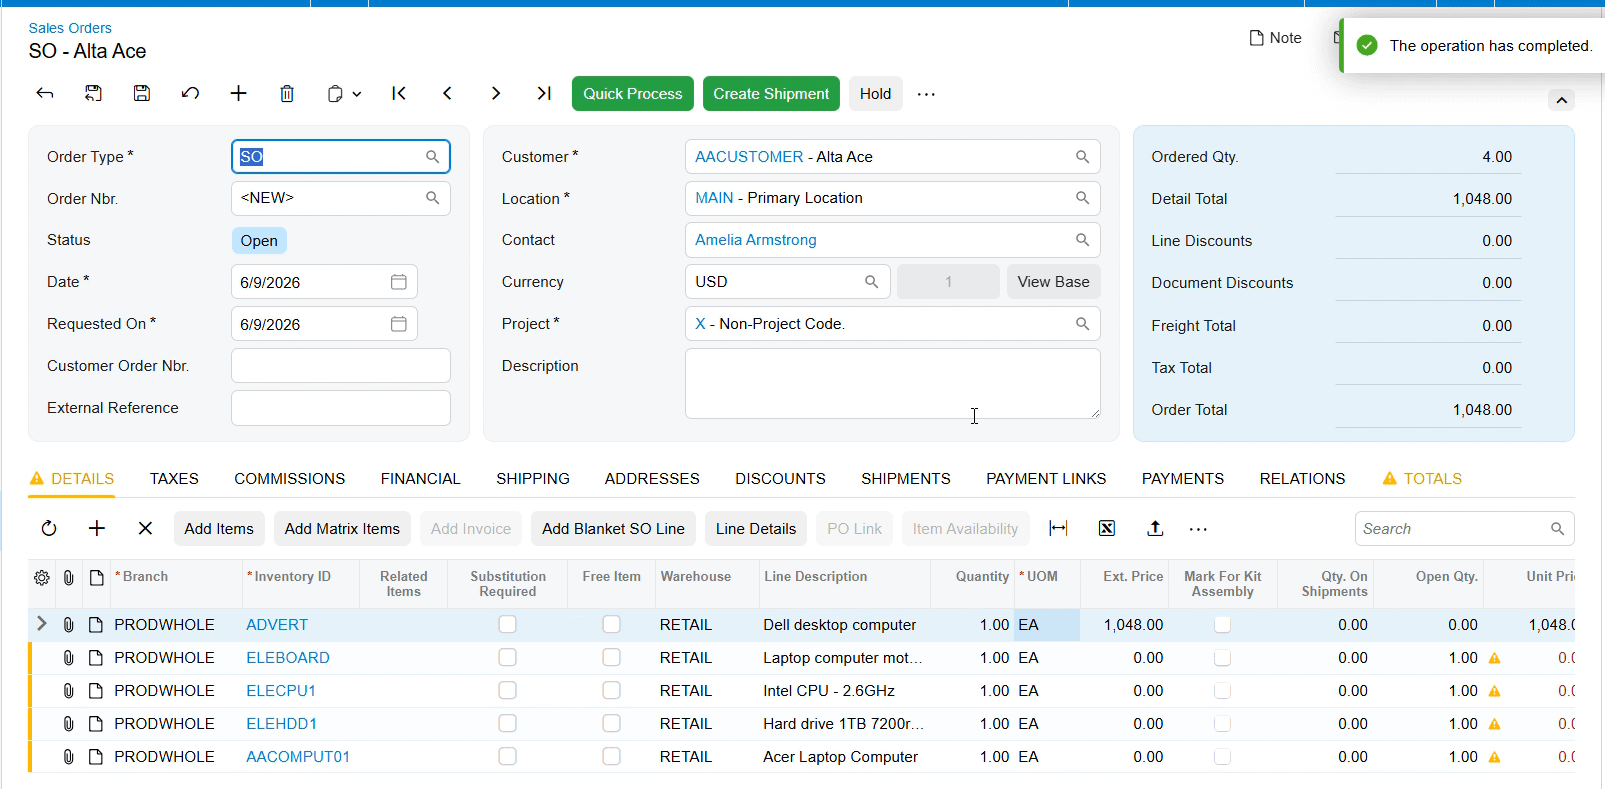
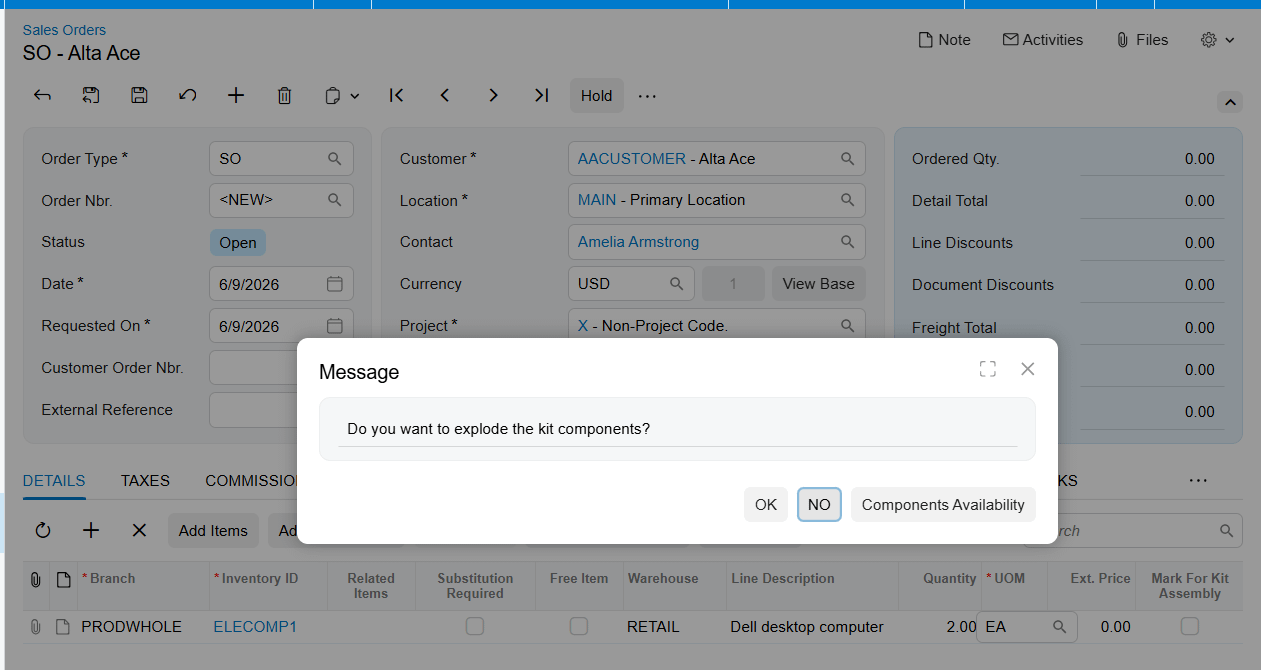
So, let's move on and see how this actually builds into the explosion phase. In your backend settings, you had a choice for the explode option, automatic or prompt. If you chose automatic. Well, the system just does the work for you. The moment the item is entered, it instantly explodes into its component parts right on the sales order screen.
But if you chose prompt, the system actually pauses and empowers the sales team. It gives them a choice, prompting them to decide if they actually want to explode those components right then and there. If you selected prompt back in the configuration, this exact message box gets triggered during a live sales order. It simply asks, do you want to explode the kit components?
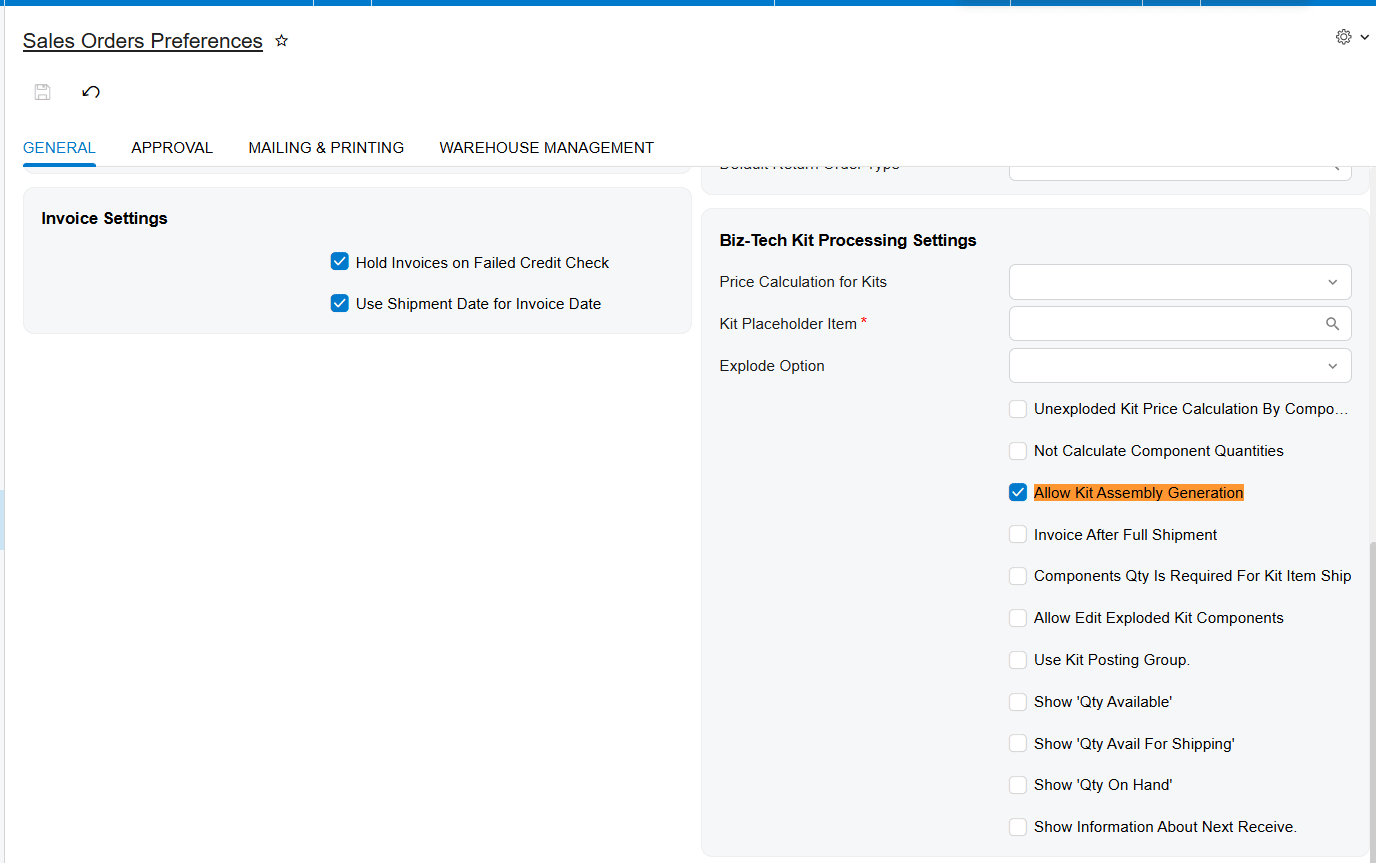
Let's talk about generating those final documents. Direct your eyes to the detail grid on this sales order screen. There's a specific checkbox highlighted right there. Mark for kit assembly on Sales Order line and Allow Kit Assembly Generation on SO Preferences.
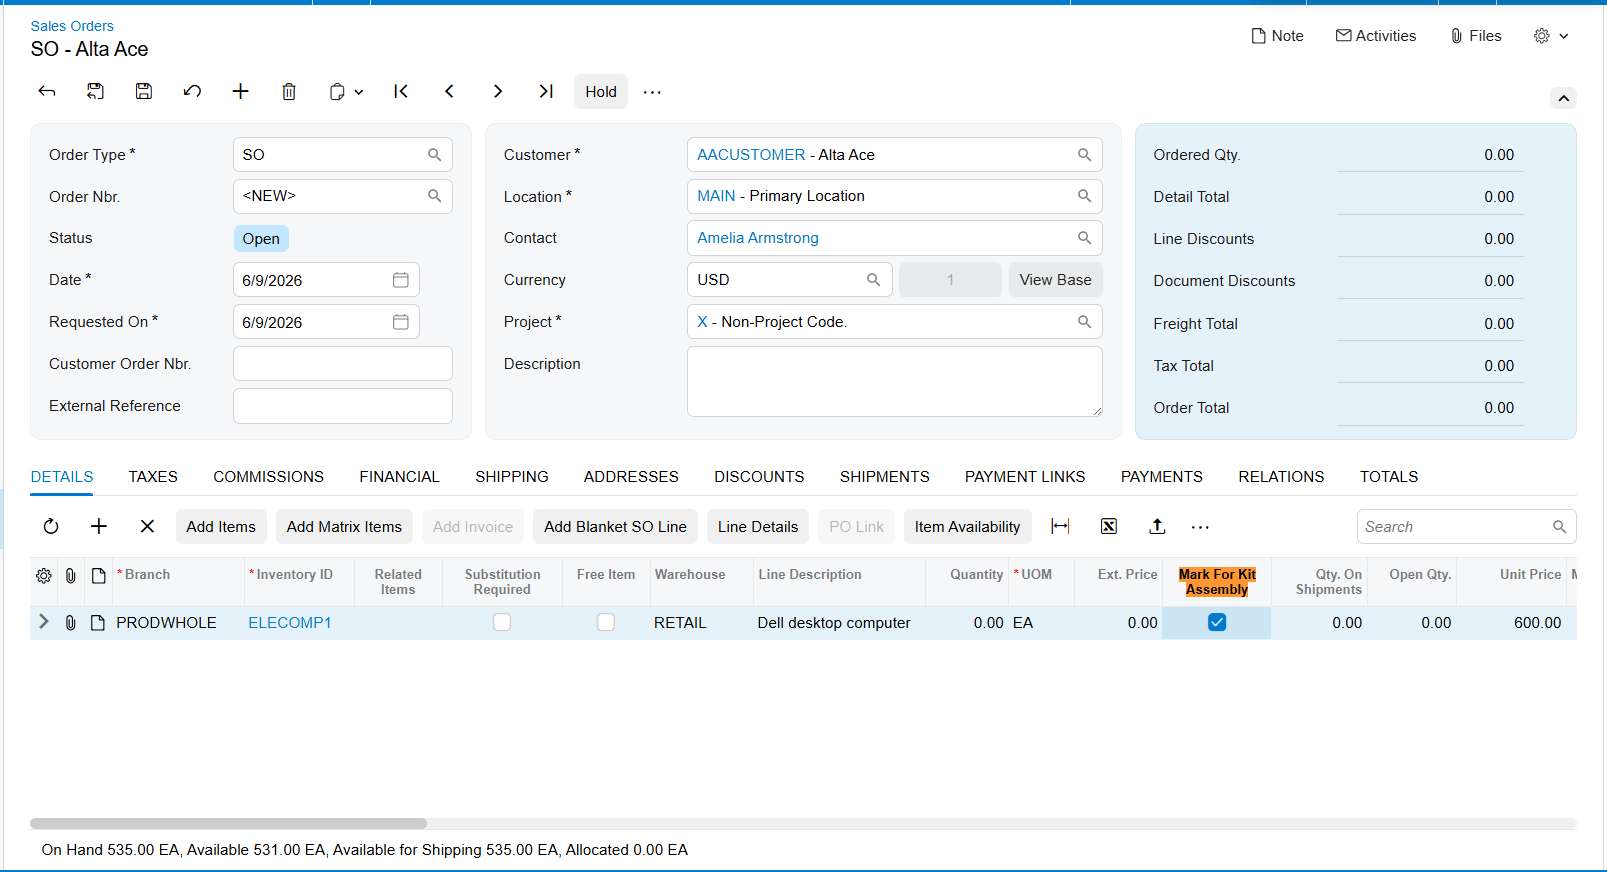
Once your kit is on the order, taking this box tells the system that this specific line item requires a formal assembly process before it can be shipped out. This checkbox will be totally disabled if you're working with a non-stock item. It's specifically designed for goods that require physical warehouse assembly.
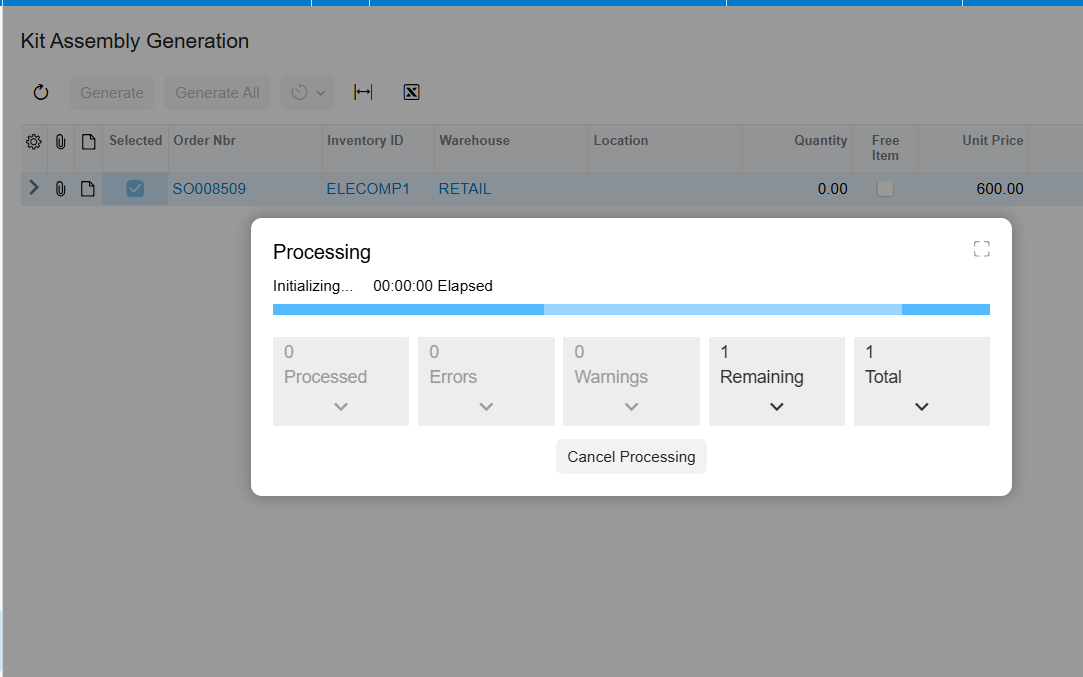
Generating kit assemblies. Once generated, a link assembly document number will dynamically appear right there in the details tab of your sales order. Your sales rep instantly knows the whole assembly document has been created for the warehouse now that your front-end sales team and your backend settings are perfectly aligned. Because understanding this workflow isn't just about clicking the right buttons. It's about empowering your teams to work with frictionless precision. Thanks so much for joining me for this explainer and happy configuring