
How DSCO Data Flows Through Acumatica Order-to-Cash Automation
The DSCO data flow in Acumatica moves a retailer order through five documented stages: DSCO orders are pulled into Acumatica ERP and turned into sales orders or invoices, the purchase order is acknowledged back to DSCO, inventory quantities are pushed out, shipment confirmation and tracking numbers are exported when the invoice is prepared, and the invoice is exported when it is released, which moves the order to Shipped. Each stage is a separate screen in Acumatica, and each one writes a status value you can read back on the order.
That separation matters more than it first appears. Because every leg of the flow is its own processing screen with its own selection grid, your business can see exactly where a record is sitting at any moment, and a failure in one leg does not silently poison the rest. This article walks the whole path in sequence, from installing the customization package and testing credentials through to exporting invoices and cancellations, and names the screens, tabs, checkboxes and fields that control each hop. Where the product documentation is silent on a step, this article says so rather than guessing.
What the DSCO Connector for Acumatica Does
The Biz-Tech Services DSCO Acumatica Connector is a customization package for Acumatica Enterprise Resource Planning (ERP) that connects an Acumatica instance to a DSCO store. DSCO is a drop-ship and retailer-supplier network, so the connector sits between the retailer-facing platform and the supplier-side Acumatica system that actually picks, ships and bills the goods.
Communication runs over the DSCO API. The Bzi-Tech Services Acumatica DSCO connector authenticates with an Access Token and a Base URL that you store on the DSCO Store screen in Acumatica, and every subsequent action – retrieving orders, acknowledging them, updating quantities, setting tracking numbers, sending invoice numbers, canceling orders and canceling individual lines – is an API request issued from a specific Acumatica screen.
The product must be installed on an Acumatica system carrying one of the specified licenses: PCSR, PERP or SAAS. If your instance is on a different license type, confirm eligibility with Biz-Tech Services before planning an implementation, because this is a prerequisite rather than a configuration option.
It is worth being precise about scope. The Bzi-Tech Services Acumatica DSCO connector automates the DSCO-facing legs of the order-to-cash cycle – order intake, acknowledgment, inventory availability, shipment confirmation and invoice export. The documentation does not describe payment application or cash receipt handling; the connector’s documented responsibility ends when the invoice number has been sent to DSCO and the order reaches Shipped.
The DSCO Data Flow at a Glance
Before looking at individual screens, it helps to see the whole path in order. Each of the following steps corresponds to a real screen or button in Acumatica, and each one hands a record to the next step:
1. Install the DSCO Connector customization package on the Customization Projects form (SM204505) and publish it to the tenant.
2. Configure the DSCO Store screen: enter the Partner Code, Access Token and Base URL, then use Test Credentials to confirm the connection works before anything is imported.
3. Map the supporting data – default Customer, warehouse cross-references, inventory item cross-references and cancel codes – on the DSCO Store tabs, so imported records can resolve to real Acumatica records.
4. Pull orders inbound on the Import DSCO Orders screen using GET ORDERS, then IMPORT or IMPORT ALL to create sales orders or invoices in Acumatica.
5. Acknowledge the purchase order back to DSCO, either automatically through the Set Order as Acknowledged checkbox on the store, or manually from the Export DSCO PO Acknowledgment screen.
6. Push inventory availability outbound from the Export DSCO Inventory Quantities screen so DSCO sees current quantities for the mapped items and warehouses.
7. Confirm the shipment outbound on the Export DSCO Shipments screen, which sets the tracking number on the order and moves it to Pending Shipment.
8. Export the invoice on the Export DSCO Invoices screen, which sets the invoice number in DSCO and moves the order to Shipped, with the invoice status set to Closed.
Setting Up the DSCO Connector in Acumatica
How do you install the DSCO Connector package?
The Biz-Tech Services Acumatica DSCO connector is delivered as a deployment package and installed through the standard Acumatica Customization Projects form, form ID SM204505. This is the same form your business already uses to add a customization project, open a project in the Customization Project Editor, validate one or several projects, publish projects to one or more tenants, cancel a publication, view the published project XML, export a project as a deployment package, import a project from an existing package, and delete a project.
The relevant operation here is import followed by publish. When you upload the package, the platform uploads the selected package, creates the corresponding customization project, and saves the project in the database. Publishing that project is what makes the DSCO screens appear in your Acumatica instance. Because the Bzi-Tech Services DSCO Acumatica connector arrives through the ordinary customization pipeline, it is also validated and republished the ordinary way after an Acumatica upgrade.
What goes on the General Settings tab of the DSCO Store screen?
The DSCO Store screen is the control panel for the entire Bzi-Tech Services Acumatica DSCO integration. Once the connection has been established, you use this form to specify the store settings, select the entities that need to be synchronized, define the default settings for customer synchronization, inventory items and order synchronization, and map shipping rules between Acumatica ERP and the store.
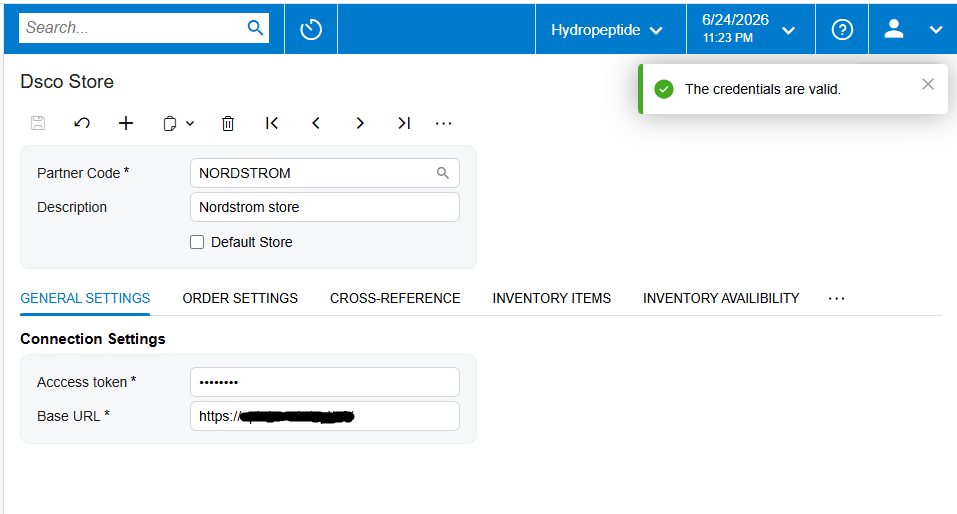
On the General Settings tab, Partner Code is a lookup field that indicates the corresponding DSCO store, and Description is a free-text field used to describe that store. These two fields identify which trading relationship the record belongs to, which matters as soon as your business runs more than one store.
Two credential fields drive the API connection. Access Token is a digital credential used to authorize and authenticate a user or application, granting specific permissions to access resources or perform actions within a system or service. Base URL is the fundamental web address, or Uniform Resource Locator, that serves as the starting point for all relative URLs within a website or web application – in other words, the root endpoint that every API call is built on top of.
Why should you use Test Credentials before importing anything?
Test Credentials is a button that allows you to test the ability to connect to the DSCO store via the API by using the information specified on the General Settings tab. Running it is not a formality. Every downstream screen in the flow – order import, acknowledgment, inventory sync, shipment export, invoice export, cancellation export – depends on this one connection. If the Access Token or Base URL is wrong, each of those screens will fail individually and the failures will look like separate problems. Testing the credentials once, at setup time, turns a scattered set of symptoms into a single answer.
Order Settings: How DSCO Orders Enter Acumatica
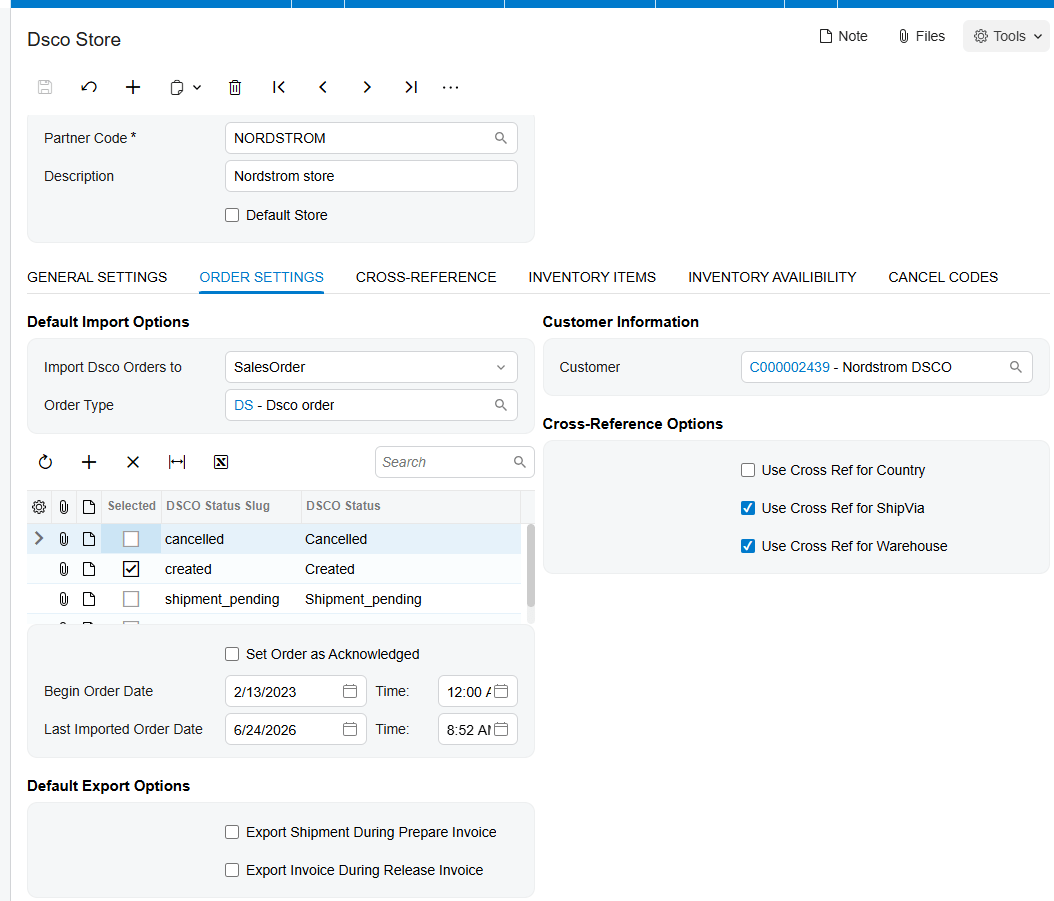
The Order Settings tab of the DSCO Store screen decides what an imported order actually becomes in Acumatica and which orders are eligible to come in at all. These settings are read at import time, so changing them changes the behaviour of every subsequent import.
What document type do DSCO orders become in Acumatica?
The Import DSCO Orders To field specifies the document type into which the orders will be imported. A DSCO order can be imported to Acumatica as a Sales Order or as an SO Invoice. This is a structural decision rather than a cosmetic one: importing as a sales order gives your business the full pick, pack, ship and invoice sequence, while importing directly as an SO invoice shortens the path. Choose based on whether shipments are actually processed inside Acumatica.
Order Type sets the default type of orders to be created by the Bzi-Tech Services DSCO Acumatica integration. Together with the document type, it determines which Acumatica order processing rules apply to everything DSCO sends you, so it is worth aligning with how your business already segments drop-ship volume from ordinary sales.
What does the DSCO Status setting control?
DSCO Status is the status of the corresponding order that will be imported to Acumatica, presented as a set of checkboxes. The documentation is explicit on this point: the corresponding order status checkbox must be selected for the order to be retrieved and imported. If an expected order never appears in the import grid, this is the first setting to check, because an unchecked status silently filters the order out at the source rather than reporting an error.
When should Set Order as Acknowledged be checked?
When the Set Order as Acknowledged checkbox is selected, sending back a separate acknowledgment for the order is unnecessary – the Bzi-Tech Services Acumatica DCO integrator treats the order as acknowledged as part of the import. With the checkbox enabled and the order imported with the corresponding settings, the Acknowledged Status in DSCO field on the Sales Orders screen is set to Closed.
If the checkbox is not selected in a store, acknowledgment becomes a deliberate manual step: you send the acknowledgment for the corresponding order from the Export DSCO PO Acknowledgment screen in Acumatica. Neither approach is inherently better. Leaving the checkbox clear gives your business a review gate before the retailer is told the order is accepted; selecting it removes a step for high-volume, low-touch drop-ship traffic.
How do Begin Order Date and Last Imported Order Date limit what is retrieved?
Begin Order Date allows you to filter data retrieval, and Last Imported Order Date records the date when the last order was imported. The pair works as a window on the retailer side of the conversation. Begin Order Date is particularly important on a new installation, because without it a first retrieval can reach back further than your business intends and pull historical orders that were already handled elsewhere.
What do the two export checkboxes on Order Settings do?
Two checkboxes on the Order Settings tab wire the outbound half of the order-to-cash flow to ordinary Acumatica document processing, and they are the most consequential settings on the screen.
1. Export Shipment During Prepare Invoice: if this checkbox is selected, the system sends shipment information to DSCO and marks the order as shipment pending. If it is not selected, no API request is sent and no update is made in the Bzi-Tech Services Acumatica DSCO connector.
2. Export Invoice During Release Invoice: if this checkbox is selected, the system sends invoice information to DSCO and the order gets the Shipped status.
The design intent is that shipment confirmation and invoice transmission ride along with the Acumatica actions your team already performs. Preparing the invoice is what tells DSCO the goods are going out; releasing the invoice is what tells it the transaction is billed. If either checkbox is clear, the corresponding export screen stays empty and the DSCO order status never advances, which is the single most common reason an Bzi-Tech Services Acumatica DSCO integration appears to have stopped working.
Mapping Customers, Warehouses and Items Before the First Import
An incoming order arrives with the retailer’s own identifiers. Before it can become an Acumatica document, those identifiers have to resolve to real Acumatica records – a customer, a warehouse, an inventory ID. The DSCO Store screen provides a dedicated tab for each of these mappings, and skipping them is the most reliable way to make imports fail.
What does the Customer Information tab set?
The Customer field on this tab allows you to select a default customer, which is then set on DSCO orders during the import process. Because drop-ship traffic from a single retailer partner typically bills to one account, a default customer keeps the import from needing to resolve a customer per order.
The Cross-Reference options on the same tab allow you to select the entities that should be matched in DSCO and Acumatica during the transition. This is a gate as well as a selection: only the checked entities of Cross-Reference Options will show up in the drop-down field on the Cross-Reference tab. If an entity you expect to map is missing from that drop-down, the cause is almost always an unchecked box here.
Why does the Use Cross Ref for Warehouse checkbox matter?
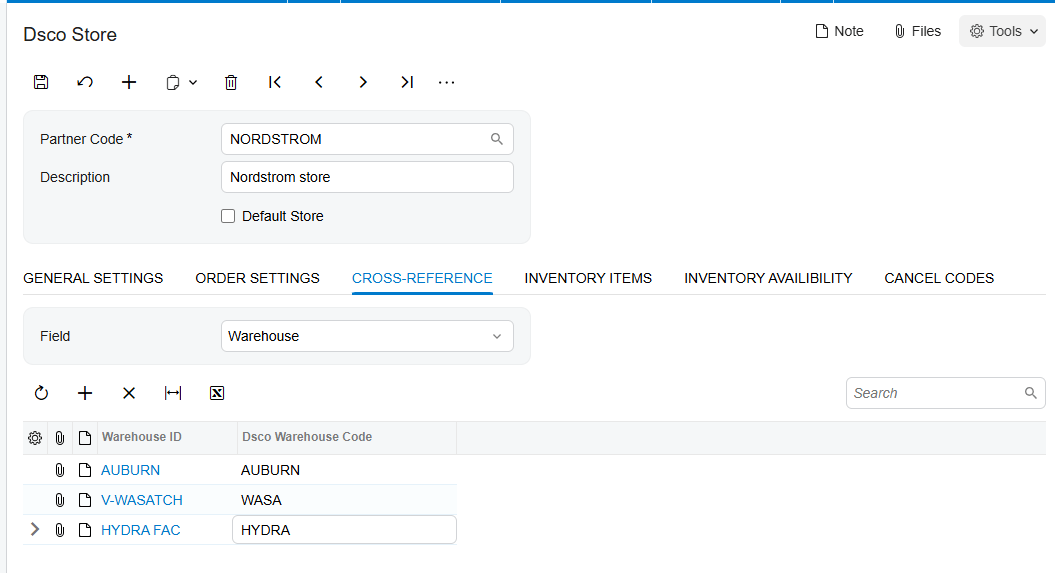
If the Use Cross Ref for Warehouse checkbox is selected, the values of the DSCO item’s warehouse must be mapped to Acumatica warehouse values from the Cross-Reference tab. The documentation carries an explicit warning about the consequence of skipping this: if the warehouse values are not mapped, the order import process produces the error message “Warehouse does not have value.”
That error is worth memorizing, because it is a configuration failure dressed up as a data failure. Nothing is wrong with the order itself; the Bzi-Tech Services DSCO Acumatica connector simply has no Acumatica warehouse to put the line against.
What is the Cross-Reference tab for?
The Cross-Reference tab holds the mappings that let the Bzi-Tech Services DSCO Acumatica integrator translate data elements between the Acumatica system and the DSCO system. The documentation is emphatic that setup accuracy here is a prerequisite for the outbound half of the flow as well as the inbound half: it is important to ensure the setup is correct before sending an API request to update order status and set tracking numbers in DSCO, and the accuracy of the data on this tab is crucial to the success of that request. If the mapping is incorrect or incomplete, the result is a failure to update order status and set tracking numbers correctly.
In practice this means a broken cross-reference does not only block imports. It can also let an order in and then break shipment confirmation days later, at the point where the retailer is waiting for a tracking number.
How does the Inventory Items tab map DSCO items to Acumatica inventory IDs?
The drop-down fields in the cross-reference section of the Inventory Item tab let you choose how to search for the item within the Bzi-Tech Services Acumatica DSCO connector and map it to the Acumatica Inventory ID. In the documented example, the drop-down value is set to SKU, meaning Stock Keeping Unit. With that setting, the system searches for an item with the corresponding SKU number and then associates it with the Acumatica inventory ID.
The same warning applies as with warehouses: if the item values are not mapped, an error message appears during the order import process. Choosing the matching key is therefore a decision about which identifier your business can guarantee is identical on both sides, not just a preference.
What goes on the Inventory Availability tab?
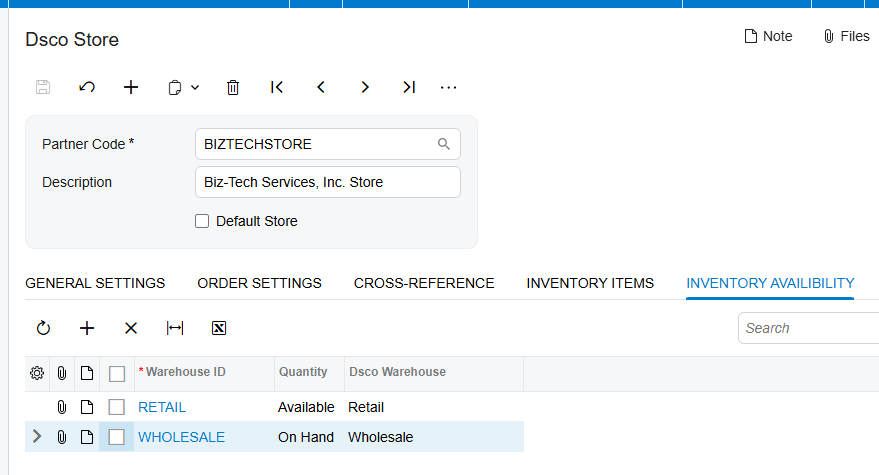
On the Inventory Availability screen you add the warehouses that need to be in sync with DSCO. Two behaviours follow from that list. First, if warehouses are selected on this screen, the exported item quantity displays the sum of quantities from those selected warehouses. Second, the item quantity synced from Acumatica to DSCO depends on the chosen drop-down value: On Hand, Available, or Available for Shipment.
That drop-down deserves a real decision rather than a default. On Hand reports physical stock regardless of commitments; Available and Available for Shipment reflect narrower, more conservative numbers. For drop-ship traffic, over-reporting availability to a retail partner produces oversell and cancellations downstream, which is precisely the failure the cancellation screens later in this article exist to clean up.
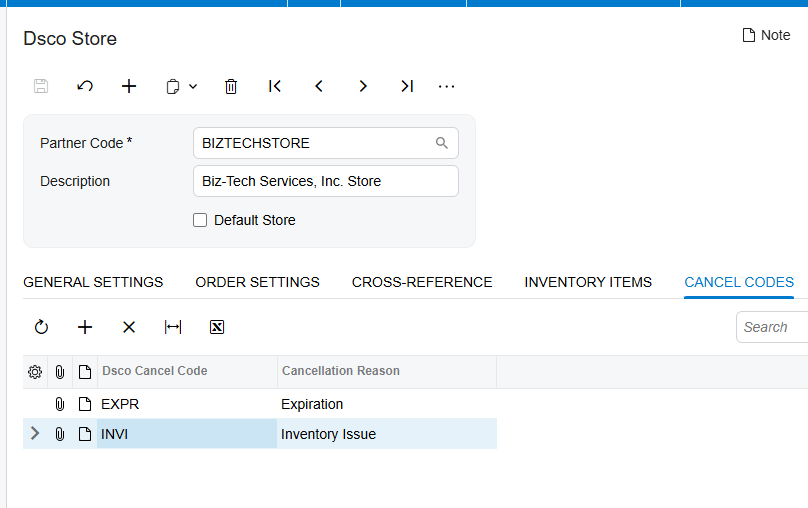
What are Cancel Codes used for?
Order cancel reasons are added to the Cancel Codes tab. When canceling orders, a cancellation reason must be selected, and the values offered are the reason codes that have already been set up on this tab. The list of cancellation reasons can be imported or exported as an Excel file, which makes it practical to keep the code list aligned with whatever the retailer partner expects without retyping it.
Setting these up early is a small task with an outsized payoff. Because a cancel code is mandatory at cancellation time, an empty Cancel Codes tab blocks a cancellation at exactly the moment your business is under time pressure to send it.
Inbound: Importing DSCO Orders into Acumatica
With the store configured, the inbound leg runs from the Import DSCO Orders screen. This screen allows you to get and import all orders from DSCO into Acumatica, and it splits the work into two deliberately separate actions – retrieval and import.
What does the GET ORDERS button do?
Pressing the GET ORDERS button retrieves the orders from DSCO. After clicking the button, a timer indicates the elapsed time until the process is complete. The documentation flags an important behaviour here: after clicking GET ORDERS, the screen gets and displays at once all orders for the selected period. On a first run, or after a long gap, that can be a large set, which is why Begin Order Date on the store settings is worth configuring deliberately.
Retrieval is not the same as import. At this stage the orders are staged on the screen for review, and nothing has been created in Acumatica yet. You can click an Order Number to view the corresponding order in a pop-up window, with the most important information shown on the DSCO Orders screen.
How do you import selected DSCO orders?
By selecting the order or orders that need to be imported and clicking the IMPORT button, you begin the import process. Alternatively, you can click the IMPORT ALL button to import every order in the grid. After pressing IMPORT, the selected orders get filtered off the screen – which doubles as your progress indicator, since what remains in the grid is what has not yet been imported.
A long-running import is not a trap. Users can cancel the process of importing orders by clicking Cancel Processing, so a batch that was started against the wrong selection can be stopped rather than waited out.
What happens when an order fails to import?
If an error occurs while processing, an error message is displayed in the line corresponding to that order in the grid. Users can hover the cursor over the red cross to view additional information about the error. For deeper diagnosis, the documentation directs you to click TOOLS then Trace to access additional information about an error.
This per-line error model is why import is worth running in reviewable batches. A failure is attributed to the specific order that caused it, the rest of the batch is unaffected, and the failed order stays visible in the grid so it can be retried after the underlying mapping is corrected.
What does the DSCO Orders screen show after import?
This screen is the record of what the Bzi-Tech Services Acumatica DSCO integrator knows about each order. Its DSCO Order Status section initially displays the status held in DSCO. Once the order is marked as shipped there, you can update that status inside Acumatica by opening the Actions menu and clicking the Refresh Order button – a manual pull that reconciles Acumatica’s copy of the status with the DSCO platform.
After an order has been imported and an invoice created, this screen also shows the sales order number and the invoice number associated with that order. That makes DSCO Orders the natural place to answer the question “what did this order actually become in Acumatica?” without hunting through the Sales Orders screen.
Acknowledging DSCO Purchase Orders
Acknowledgment is the first thing the retailer hears back after sending an order, and it is controlled entirely by the Set Order as Acknowledged checkbox described earlier.
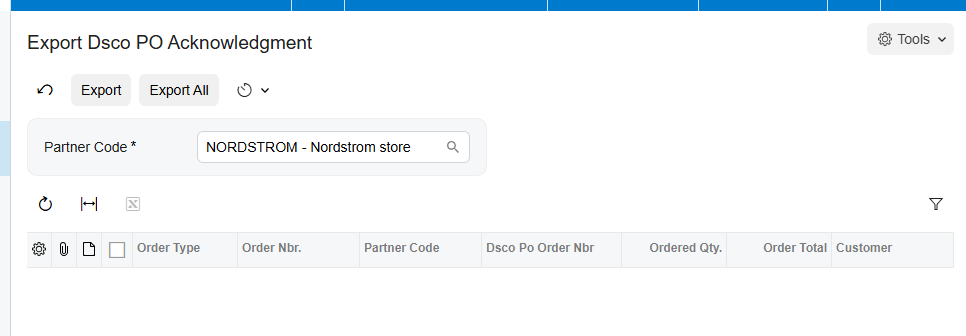
If that checkbox is not selected on the store, then after importing an order into Acumatica it appears on the Export DSCO PO Acknowledgment screen, which gives you the opportunity to send the acknowledgment from there. After sending the acknowledgment for the corresponding order from that page, the order disappears from the screen, and the Acknowledged Status in DSCO field on the Sales Orders screen is updated to Closed.
The disappear-when-done pattern repeats across every outbound screen in this Bzi-Tech Services Acumatica DSCO connector, and it is the most useful monitoring habit to build. Each export screen is effectively a work queue: if a document is still listed, the corresponding message has not reached DSCO yet.
Keeping DSCO Inventory Quantities in Sync
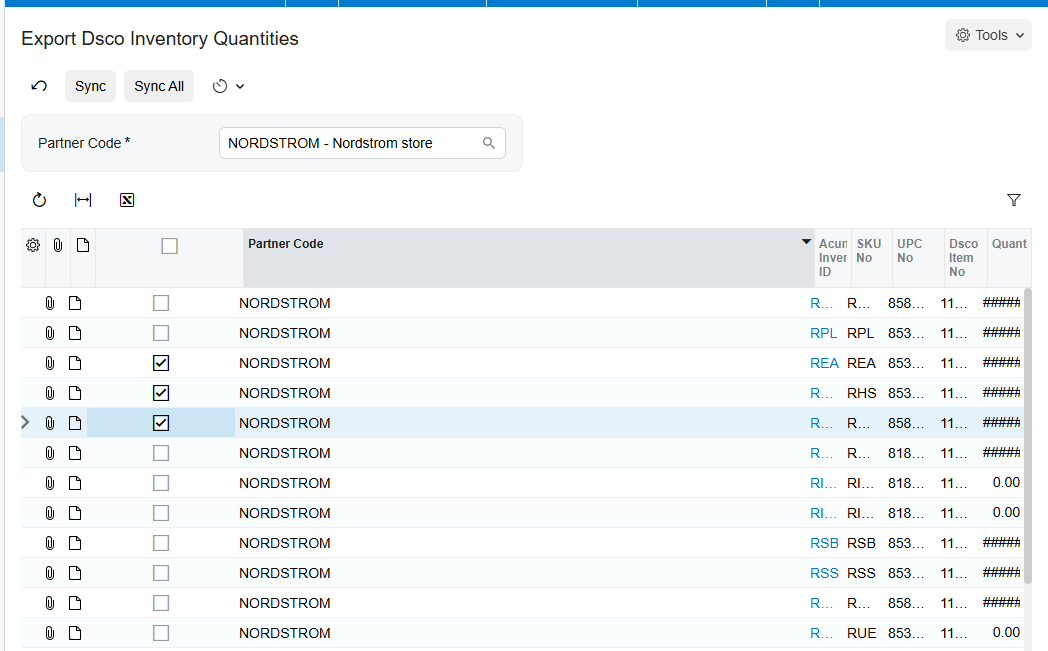
The Export DSCO Inventory Quantities screen is used for syncing Acumatica and DSCO inventory quantities. Beforehand, you choose the required items from the Inventory Items tab of the DSCO Store screen and press Save, which is what puts those items in scope for the sync.
There are two documented ways to update an inventory quantity from this screen:
1. Select the checkbox for the item and click the SYNC button. The Quantity field is pushed to DSCO and the inventory quantity there is updated. Quantity is a read-only field that indicates the inventory quantity of the item in the Acumatica system.
2. Change the DSCO Quantity field, select the checkbox, then click SYNC. The inventory quantity in DSCO is updated based on the DSCO Quantity value rather than the Acumatica figure.
The second option exists for good reason. There are legitimate cases where the number a retailer should see is not the raw Acumatica figure – stock reserved for another channel, for example – and the editable DSCO Quantity field lets your business publish a deliberate number. Because Quantity is read-only, the two paths cannot be confused: whatever you type goes in DSCO Quantity, and whatever Acumatica calculates stays in Quantity.
Outbound: Confirming Shipments Back to DSCO
Shipment confirmation is where the order-to-cash flow turns outbound, and it is the leg the retailer is usually watching most closely.
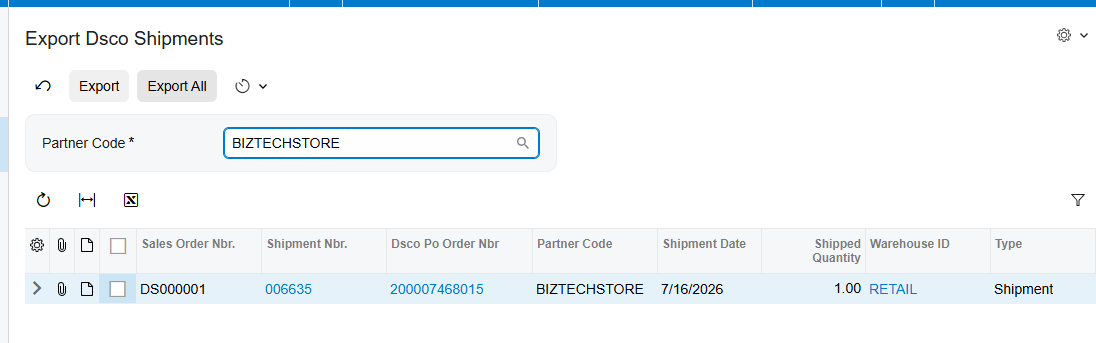
When the relevant checkbox – Export Shipment During Prepare Invoice – is chosen within the store, the Export DSCO Shipments screen presents the count of shipments that have been confirmed. Upon selecting and processing these shipments, the order status in the Bzi-Tech Services DSCO Acumatica integrator is updated to Pending Shipment, and the tracking number is set on the DSCO order.
Two behaviours are worth holding onto. First, if the Export Shipment During Prepare Invoice checkbox is not selected, no API request is sent and no updates are made by the Bzi-Tech Services Acumatica DSCO integrator – the screen simply has nothing to do. Second, once the shipment is dispatched, the Shipment Status in DSCO field shows the value Closed and the shipment number no longer appears on the Export DSCO Shipments screen.
That second point is the practical monitoring rule for this stage. A shipment number that is still sitting on the Export DSCO Shipments screen has not been confirmed, no matter what the Acumatica shipment itself says.
Outbound: Exporting Invoices to Close the DSCO Order
The invoice is the last documented outbound message in the flow, and it is what moves the DSCO order to its final state.
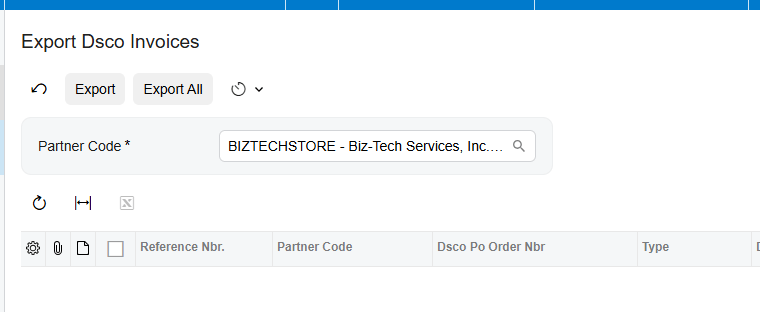
If the Export Invoice During Release Invoice checkbox is chosen in the store settings, processing invoices from the Export DSCO Invoices screen updates the DSCO order status to Shipped and sets the corresponding invoice number there. The invoice status in DSCO is then set to Closed, and the invoice number is removed from the Export DSCO Invoices screen.
This is the endpoint of the connector’s documented responsibility. From the retailer’s side of the network, the order is now shipped, carries a tracking number and carries an invoice number; from your side, the Acumatica invoice is released and enters your normal accounts receivable process. The product documentation does not describe payment application, cash receipts or remittance handling, so anything beyond the released invoice sits outside what the Bzi-Tech Services DSCO Acumatica connector is documented to do.
Cancellations: Exporting Canceled DSCO Orders and Line Items
Not every order completes, and the Bzi-Tech Services Acumatica DSCO connector treats a cancellation as an outbound message that has to reach DSCO explicitly. Two screens handle it, one for whole orders and one for individual lines.
How do you cancel a whole DSCO order?
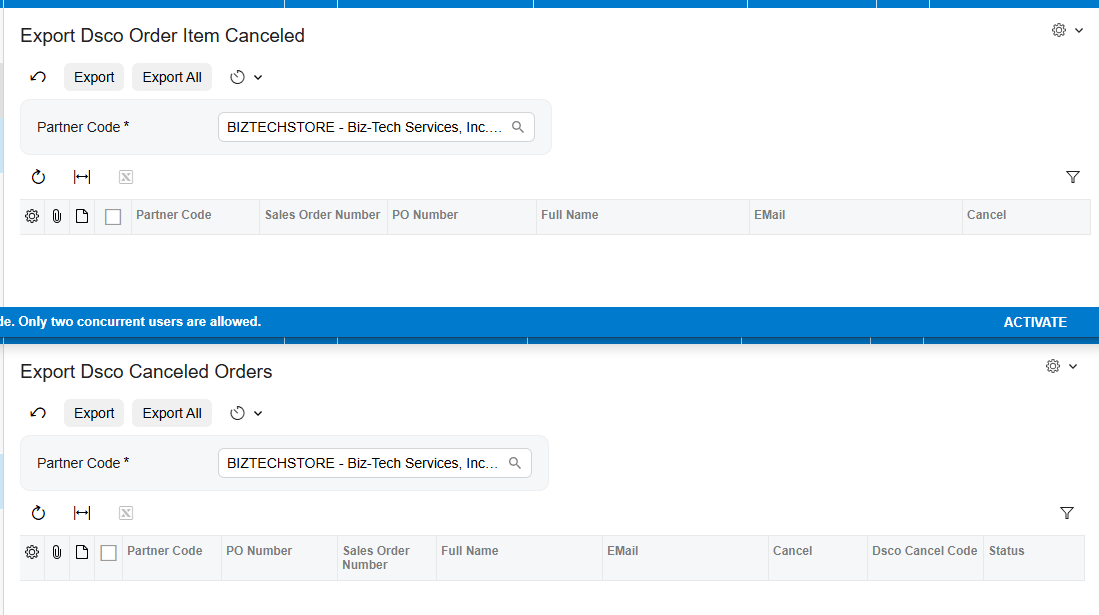
The Export DSCO Canceled Orders screen allows you to export all orders that have been canceled from the Sales Orders screen. To cancel a DSCO order from the Sales Orders screen, open Actions and select the Cancel Order button. A pop-up window appears where you fill in the Canceling a Line and DSCO Cancel Code fields – the latter offering the reason codes already set up on the Cancel Codes tab of the DSCO Store screen. After pressing Yes, the order is canceled and appears on the Export DSCO Canceled Orders screen. Upon selecting the order and processing it, the system sends an API request to update the order status to Canceled in DSCO.
How do you cancel a single line on a DSCO order?
The Export DSCO Order Item Canceled screen allows you to cancel the line item of a DSCO order while the order is on the Sales Orders screen. For item cancellation you can change the quantity to zero or delete the line, after which a pop-up window appears where you fill in the Canceling a Line and DSCO Cancel Code fields. After pressing Yes, the cancellation is recorded and appears on the Export DSCO Order Item Canceled screen. Upon selecting the order and processing it, the system sends an API request to update the item status to Canceled in DSCO.
The important discipline here is that canceling in Acumatica is only half the transaction. Until the record is selected and processed on the matching export screen, DSCO still believes the order or the line is live, and the retailer is still expecting it.
Where to Monitor DSCO Results in Acumatica
Because each leg of the flow has its own screen and its own status field, monitoring the Bzi-Tech Services DSCO Acumatica integration is a matter of knowing which field answers which question. These are the exact places to look:
1. DSCO Store, General Settings tab – use Test Credentials to confirm the Access Token and Base URL still authenticate against the API.
2. DSCO Store, Order Settings tab – check Last Imported Order Date to see when the last successful order import ran, and Begin Order Date to see how far back retrieval reaches.
3. DSCO Store, Order Settings tab – confirm the DSCO Status checkboxes, since an unchecked status prevents matching orders from being retrieved at all.
4. Import DSCO Orders screen – anything still listed in the grid after a GET ORDERS run has been retrieved but not yet imported.
5. Import DSCO Orders screen – hover over the red cross on a grid line to read the error message for that specific order, then use TOOLS then Trace for the fuller detail.
6. DSCO Orders screen, DSCO Order Status section – the current DSCO-side status of the order, refreshable through Actions then Refresh Order.
7. DSCO Orders screen – the sales order number and invoice number created in Acumatica for that order.
8. Sales Orders screen, Acknowledged Status in DSCO field – Closed means the purchase order acknowledgment has been sent.
9. Export DSCO PO Acknowledgment screen – any order still listed has not been acknowledged yet.
10. Export DSCO Shipments screen and the Shipment Status in DSCO field – a shipment number that has disappeared from the screen and shows Closed has been confirmed with its tracking number.
11. Export DSCO Invoices screen – an invoice number that has been removed from the screen has been sent, with the order moved to Shipped and the invoice status in DSCO set to Closed.
12. Export DSCO Canceled Orders and Export DSCO Order Item Canceled screens – anything still listed is a cancellation that has not been sent.
DSCO Acumatica Integration: Frequently Asked Questions
Why is a DSCO order not importing into Acumatica?
Work through the settings in the order the Bzi-Tech Services DSCO Acumatica connector reads them. First confirm the corresponding order status checkbox is selected under DSCO Status on the Order Settings tab, because the documentation states the order will not be retrieved and imported otherwise. Then check Begin Order Date, which filters data retrieval and can exclude older orders entirely. If the order is retrieved but fails at import, hover over the red cross on its line in the Import DSCO Orders grid and use TOOLS then Trace for the detail.
What does the error “Warehouse does not have value” mean?
This error appears during the order import process when the DSCO item’s warehouse values have not been mapped to Acumatica warehouse values. It occurs when the Use Cross Ref for Warehouse checkbox is selected on the Customer Information tab but the corresponding mapping is missing from the Cross-Reference tab. Add the warehouse mapping on the Cross-Reference tab and import the order again – nothing needs to change on the DSCO side.
Why did DSCO shipment confirmation fail or never happen?
The first thing to check is the Export Shipment During Prepare Invoice checkbox on the Order Settings tab of the store; if it is not selected, no API request is sent and no updates are made in the Bzi-Tech Services Acumatica DSCO integrator at all. If the checkbox is selected and the shipment is still listed on the Export DSCO Shipments screen, the shipment has not been selected and processed yet. If processing is failing, review the Cross-Reference tab, since the documentation states that incorrect or incomplete mapping there causes failures to update order status and set tracking numbers.
Can a DSCO order be imported as an invoice instead of a sales order?
Yes. The Import DSCO Orders To field on the Order Settings tab specifies the document type into which DSCO orders will be imported, and the documented options are Sales Order and SO Invoice. Choose SO Invoice when your business does not process the shipment inside Acumatica, and Sales Order when you need the full order, shipment and invoice sequence – including the shipment confirmation leg back to DSCO.
How do I send a purchase order acknowledgment to DSCO manually?
Leave the Set Order as Acknowledged checkbox clear on the DSCO Store. Imported orders then appear on the Export DSCO PO Acknowledgment screen, where you select and send the acknowledgment. Once sent, the order disappears from that screen and the Acknowledged Status in DSCO field on the Sales Orders screen changes to Closed.
Which quantity does Acumatica send to DSCO?
It depends on two settings on the Inventory Availability tab. The warehouses you add there determine the scope, and if warehouses are selected the exported item quantity is the sum of the quantities from those warehouses. The drop-down value then determines the basis: On Hand, Available, or Available for Shipment. You can also override the figure at send time by editing the DSCO Quantity field on the Export DSCO Inventory Quantities screen before clicking SYNC.
Why is a canceled Acumatica order still open in DSCO?
Canceling the order on the Acumatica Sales Orders screen through Actions then Cancel Order only stages the cancellation. The order then appears on the Export DSCO Canceled Orders screen, and the API request that updates the order status to Canceled in DSCO is sent only when you select that record and process it. The same two-step pattern applies to line-level cancellations on the Export DSCO Order Item Canceled screen.
How do I update a DSCO order status inside Acumatica after it ships?
Open the DSCO Orders screen for that order, open the Actions menu and click Refresh Order. The DSCO Order Status section initially shows the status captured at import time; Refresh Order pulls the current status from DSCO once the order has been marked as shipped there, so Acumatica reflects reality rather than a stale value.
Work With the Biz-Tech Services DSCO Connector
The DSCO data flow through Acumatica is a sequence of clearly separated hops: configure and test the connection on the DSCO Store screen, map customers, warehouses, items and cancel codes so incoming identifiers resolve to Acumatica records, import orders on the Import DSCO Orders screen, acknowledge them, keep inventory quantities current, then let the Export Shipment During Prepare Invoice and Export Invoice During Release Invoice checkboxes carry shipment confirmation and invoice numbers back out as your team prepares and releases invoices in the normal way. Every stage leaves a status you can read, and every outbound screen behaves as a queue that empties when the message has landed. Getting the cross-reference mapping right up front is what keeps that queue moving.
The DSCO Connector for Acumatica ERP is built and supported by Biz-Tech Services, Inc. If your business is planning a Bzi-Tech Services Acumatica DSCO integration, or wants a review of an existing configuration, visit https://biz-techservices.com to learn more about the connector and the rest of the Biz-Tech Services product range for Acumatica.

