
How to Sync WooCommerce Inventory with Acumatica
Synchronizing WooCommerce inventory with Acumatica gives an online store a stock figure derived from the warehouses and quantity definition selected in the ERP. In the Biz-Tech WooCommerce Connector, inventory quantity flows from Acumatica to WooCommerce through the Export WooCommerce Inventory Quantities processing screen. A reliable setup depends on more than running that process: products must be linked, inventory details must be loaded and selected, warehouses must be included, and the correct quantity basis must be chosen.
This guide explains the documented workflow for WooCommerce inventory sync with Acumatica, the fields that control the result, and the checks that help prevent missing products or misleading availability.
How WooCommerce Inventory Sync with Acumatica Works
Acumatica is the source of the quantity exported by this connector workflow. For every eligible item, the connector totals the selected quantity across all warehouses included on the WooCommerce Store’s Warehouse Details tab. That combined value appears on the Export WooCommerce Inventory Quantities processing screen and can then be sent to WooCommerce.
The quantity type is configurable. The documented choices are On Hand, Available, and Available for Shipment. This choice matters because each measure represents a different view of stock. The connector documentation identifies the options but does not prescribe one universal choice; the business should select the measure that matches its promise to online customers.
Prerequisites for Acumatica WooCommerce Inventory Integration
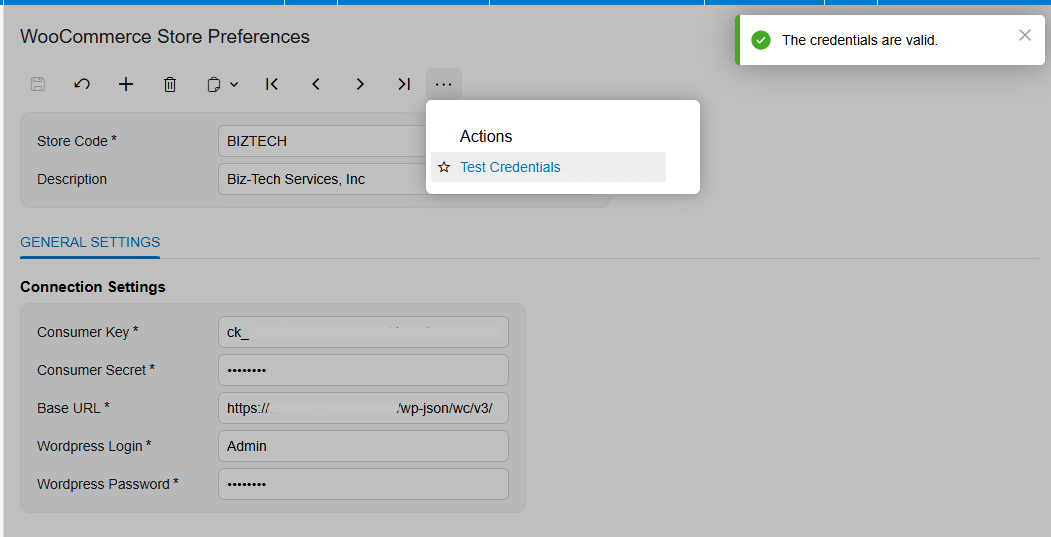
Before syncing quantities, confirm the connector package has been published and the WooCommerce workspace is available in Acumatica. Configure the connection in WooCommerce Store Preferences with the Store Code, Base URL, Consumer Key, Consumer Secret, WordPress Login, and WordPress Password. Use Test Credentials and continue only after Acumatica reports that the credentials are valid.
The WooCommerce REST API keys are generated in WooCommerce under Settings, Advanced, REST API. The source documentation says to add a key, select the WordPress user and access level, and generate the Consumer Key and Consumer Secret. Because the connector updates WooCommerce, the credentials must provide the access required by the intended integration operations.
Three item-level conditions must also be satisfied before a product appears on the quantity processing screen:
1. The product must already be represented as a WooCommerce item in Acumatica.
2. The item must be loaded, checked, and saved in the Inventory Details or Item Details area of the WooCommerce Store setup.
3. At least one relevant warehouse and a quantity type must be selected on the Warehouse Details tab.
Practical Workflow to Sync WooCommerce Inventory with Acumatica
1. Open WooCommerce Store Preferences, enter the WooCommerce connection values, and run Test Credentials. Saving the credentials establishes the store connection used by the remaining connector screens.
2. Open the WooCommerce Store screen for the correct Store Code. If one store should be preselected on processing screens, select Default Store in the header.
3. Review Item Settings. Decide whether the connector may create missing Acumatica items during imports by using Import Item. When matching imported products, the connector searches Acumatica Inventory CD using the WooCommerce Product SKU. If Import Item is off and no match exists, the process returns an item-not-found error.
4. Establish the product link. On Item Details, load Acumatica items or WooCommerce items as appropriate, select the required records, and synchronize them. When an Acumatica item is created in WooCommerce, WooCommerce generates a product ID that is stored in Acumatica. For exports, the connector uses the Acumatica Inventory CD as the WooCommerce SKU.
5. On the Warehouse Details tab, add every Acumatica warehouse whose stock should contribute to the web quantity. Exclude warehouses that should not support ecommerce availability.
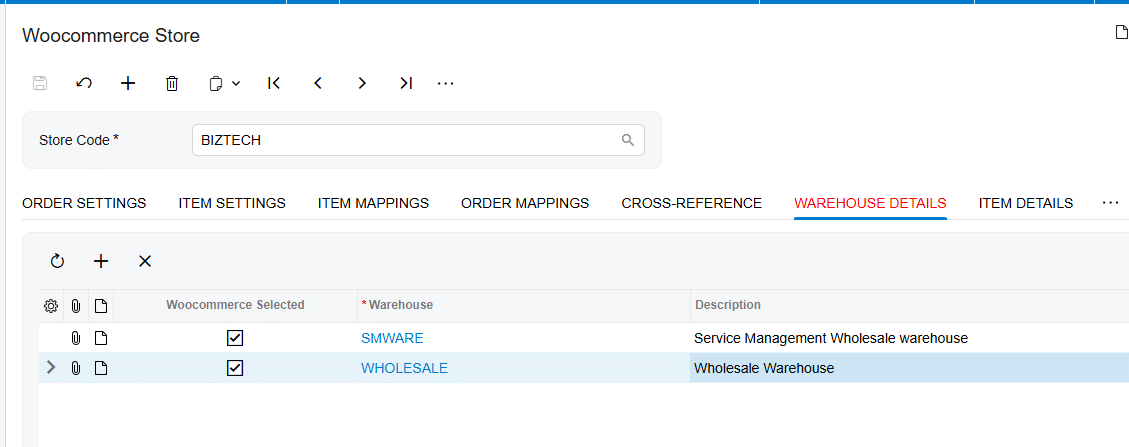
6. For each included warehouse, select the quantity basis: On Hand, Available, or Available for Shipment. Use one definition that reflects the operational meaning of stock you want WooCommerce shoppers to see.
7. Return to Item Details or Inventory Details, load the relevant inventory, check the items to include, and save. A product that is not loaded, selected, and saved will not meet the documented eligibility requirements for the quantity screen.
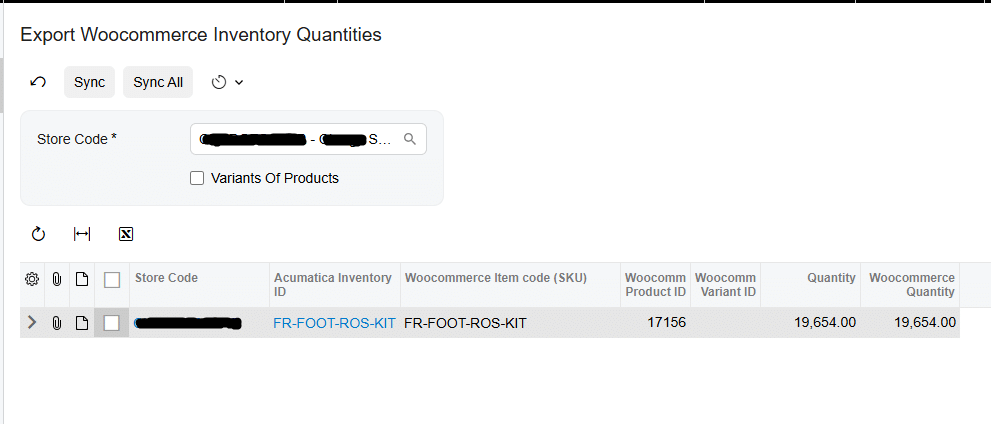
8. Open Export WooCommerce Inventory Quantities. Select the Store Code if it is not already supplied by Default Store, then review the eligible products and calculated values.
9. Compare Quantity with the expected aggregate from the selected warehouses. Quantity is read-only and shows the connector’s calculated total. WooCommerce Quantity is editable and is the value to be synchronized, allowing an operator to adjust the outgoing amount when the business process requires it.
10. Process the selected items. After a controlled manual run validates the setup, configure the screen’s scheduler if recurring automatic synchronization is needed.
Key Fields and Settings That Control Inventory Sync
Store Code and Default Store
Store Code identifies the WooCommerce store connected to the process. In a multi-store environment, selecting the wrong store can direct product or quantity updates to the wrong endpoint. Default Store can automatically populate Store Code on processing screens, reducing repetitive selection while making it important to verify the default.
Warehouse Details
Warehouse Details defines the inventory locations included in the calculation. The connector adds the chosen quantity across all selected warehouses and presents one combined quantity for each item. The source does not describe warehouse-specific quantities in WooCommerce, allocation rules, or safety-stock deductions, so those behaviors should not be assumed.
Quantity Type
The quantity basis can be On Hand, Available, or Available for Shipment. Validate the selected basis against a sample item in Acumatica before enabling automation. A technically successful export can still publish an unsuitable figure if the chosen measure does not match the ecommerce fulfillment policy.
Quantity and WooCommerce Quantity
On the processing screen, Quantity is the read-only aggregate calculated from Acumatica. WooCommerce Quantity is editable and represents the amount selected for synchronization. Treat edits as controlled exceptions and document why an override was used, because repeated manual changes can obscure whether the warehouse setup is producing the intended result.
SKU and WooCommerce Product ID
Product identity is foundational. During WooCommerce-to-Acumatica item lookup, the connector searches Inventory CD by WooCommerce SKU. During Acumatica-to-WooCommerce export, Inventory CD becomes the WooCommerce SKU. A newly created WooCommerce product receives a unique WooCommerce ID, which is displayed in the WooCommerce Store and on the Stock Item’s WooCommerce Inventory tab.
Monitoring and Validation
Start with a small, representative set that includes a single-warehouse item, a multi-warehouse item, and a product with low or zero stock. For each item, confirm the SKU and WooCommerce product ID, verify that the item is selected and saved, and recalculate the expected total using only the warehouses and quantity basis configured in Warehouse Details.
On Export WooCommerce Inventory Quantities, compare the read-only Quantity with that expected total and review any edited WooCommerce Quantity before processing. After the run, inspect the matching product in WooCommerce to confirm that its inventory reflects the intended value. The connector’s export processing is batch-oriented; the documentation states that Export Item Processes sends one API request for 100 items, which is useful context when assessing batch behavior.
For scheduled synchronization, validate at least one manual cycle first, then review subsequent runs for omitted products, unexpected totals, and stale values. The documentation confirms that quantity synchronization can run manually or through a scheduler, but it does not specify a recommended frequency, retry policy, or dedicated quantity-error screen. Set the interval and operational review procedure according to order volume and stock volatility.
Common Pitfalls
1. Missing items on the processing screen. Confirm that each product is already a WooCommerce item in Acumatica and is loaded, checked, and saved in the store’s inventory details.
2. Incorrect aggregate stock. Recheck which warehouses are selected and whether the quantity basis is On Hand, Available, or Available for Shipment.
3. SKU mismatches. WooCommerce SKU and Acumatica Inventory CD are central to item identification. Missing or inconsistent values can prevent matching; if SKU generation is enabled but its numbering sequence is absent, the connector reports an error.
4. Unintended manual overrides. Because WooCommerce Quantity is editable, an operator can send a value different from the calculated Quantity. Review overrides before processing.
5. Assuming item mapping applies to Acumatica item export. The documentation says Inventory Mapping does not support mapping during Acumatica item export; it is available for mapping WooCommerce items to Acumatica during import.
6. Automating too early. First verify credentials, item links, warehouse inclusion, quantity definition, and the resulting web stock with a limited manual run.
Frequently Asked Questions
Which system supplies the inventory quantity?
In the documented quantity export workflow, Acumatica supplies the value. The connector calculates quantity from the selected Acumatica warehouses and exports it to WooCommerce.
Can inventory from multiple Acumatica warehouses be combined?
Yes. The connector totals the chosen quantity across all warehouses selected on Warehouse Details and displays that combined amount on the processing screen.
Which Acumatica quantity can be synchronized?
The documented options are On Hand, Available, and Available for Shipment. The correct choice depends on how the business defines sellable ecommerce inventory.
Why is a product missing from Export WooCommerce Inventory Quantities?
Check the three documented requirements: it must exist as a WooCommerce item in Acumatica, be loaded and saved in Inventory Details, and have the required warehouse and quantity selection configured.
Can the inventory sync run automatically?
Yes. The quantity synchronization can be run manually or through a scheduler. The source does not specify a universal schedule interval, so test manually and choose timing that fits the operation.
Can I change the quantity before sending it to WooCommerce?
Yes. Quantity is read-only, while WooCommerce Quantity is editable. Any override should be reviewed because it can differ from the Acumatica aggregate.
Build a Reliable Acumatica WooCommerce Inventory Workflow
A dependable WooCommerce inventory sync starts with product identity and a deliberate inventory policy. Validate credentials, connect each product, select only the warehouses that support online fulfillment, choose the right quantity basis, and compare calculated values before processing. Once the manual workflow is proven, scheduling can keep WooCommerce stock aligned with Acumatica while routine checks catch exceptions.
Need help configuring or validating the connector? Contact Biz-Tech Services to discuss your WooCommerce and Acumatica integration.

