
How EZCom EDI Data Flows Through Acumatica ERP
EZCom EDI data reaches Acumatica through an intermediate server: the connector pulls purchase orders out of the EZCom Electronic Data Interchange, or EDI, platform, imports the selected ones into Acumatica ERP as sales orders, and then sends acknowledgements, routing requests, warehouse orders, shipments and invoices back the other way. Nothing travels directly between the two systems: Acumatica connects to an intermediate server controlled by Biz-Tech Services, and that server connects to the EZCom EDI platform.
This article traces that path end to end for the Biz-Tech Services EZCom EDI Acumatica Connector: which screen retrieves each document, what the document becomes once it lands in Acumatica, which fields decide the customer, item and warehouse on the resulting sales order, and which screens you watch to confirm a document actually went out. Configuration appears only where a setting governs a handoff, because most of the flow logic in this product lives in per-partner settings rather than in the import screens themselves.
What the EZCom EDI Connector for Acumatica Does
The Biz-Tech Services Acumatica EZCom EDI Connector is an integration from Biz-Tech Services, Inc. that links the EZCom EDI platform to Acumatica ERP so trading-partner documents move between them without rekeying. The connection is managed by an intermediate server controlled by Biz-Tech Services. Based on the connection settings stored on the General Settings screen, the integration connects first to that intermediate server and then from the intermediate server to the corresponding EZCom EDI platform system. The integration also requires default options and the required values for the order import process. It retrieves orders from the EZCom system to the intermediate server and imports the selected order or orders into Acumatica ERP. When a user confirms the shipments created from those imported orders, fulfillment events are generated in the EZCom platform for each corresponding order.
The product is delivered as an Acumatica customization project and is installed from the Customization Projects form (SM204505), where the deployment package is imported, the project is validated and then published to the tenant. It must be installed on an Acumatica system carrying one of these licenses: PCSR, PERP or SAAS.
The EZCom EDI Data Flow at a Glance
The flow is a loop with a documented screen at every stage. Read the stages below in order and you have the full path a trading-partner document travels, from EZCom EDI into Acumatica and back out again.
1. Connect: General Settings stores the Account and API Key issued for each EZCom website plus the EZCom admin panel Login and Password, and tests the connection to the Acumatica-Biz-Tech server.
2. Load partners: Get Trading Partners on the Trading Partners screen retrieves all partners, and each Partner Code then carries its own import rules, export rules, cross-references and item mapping.
3. Retrieve inbound orders: Get Orders on the Import Purchase Orders screen pulls every order for the selected period from the EZCom partner into a grid.
4. Create sales orders: Import or Import All turns the selected EZCom orders into Acumatica sales orders, resolving customer, inventory item and warehouse from the Trading Partners setup.
5. Absorb updates: Import Changed Purchase Orders brings in revised orders, Import Routing Response applies carrier data to the shipment, and Import Warehouse Shipment writes shipped quantity and tracking number onto the shipment.
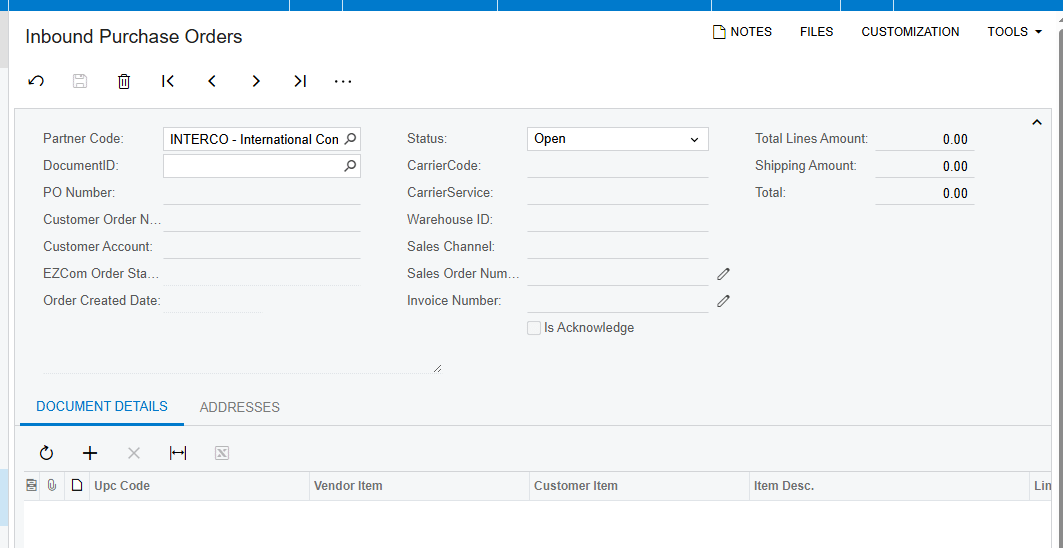
6. Review: the Inbound Purchase Orders screen displays all the information related to the EZCom order for the corresponding partner.
7. Send outbound documents: Send Outbound PO Acks., Send Routing Request, Send Warehouse Order, Send Outbound Shipments and Send Outbound Invoice push acknowledgements, routing requests, warehouse orders, shipment notices and invoices back to EZCom EDI.
8. Sync availability: Send Inventory Availability pushes item quantities to EZCom EDI per the mapping on the Inventory Availability tab of the Trading Partners screen.
Where the EZCom EDI Flow Starts: Connection and Trading Partner Settings
Two screens sit upstream of every document. General Settings decides whether Acumatica can reach EZCom EDI and over what date range; Trading Partners decides what each retrieved document turns into. Neither moves data by itself, but a wrong value on either one shows up later as a missing order or a sales order built on the wrong customer.
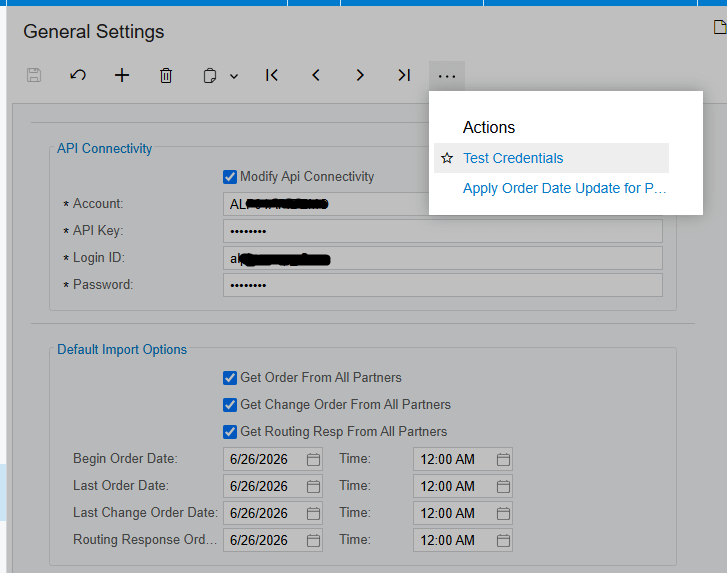
General Settings: credentials and the date window
When the Modify API Connectivity checkbox is selected on the General Settings screen, the system displays the Account and API Key fields, which are provided for each EZCom website, along with the EZCom admin panel Login and Password. Using the information on the API Connectivity tab, the system tests the ability to connect to the Acumatica-Biz-Tech server. Clicking the Test Credentials button under the Actions option verifies the credentials, which is the fastest way to prove the first hop of the flow is healthy before troubleshooting anything downstream.
The same screen carries the Default Import Options that set the retrieval window across the board. Get Order From All Partners retrieves orders from all partners based on the date configured on this screen, Get Change Order From All Partners does the same for changed orders, and Get Routing Response From All Partners does the same for routing responses. These options take effect only when the user selects the corresponding checkbox and then clicks the Apply Order Date Update for Partners button under the Actions option — a common reason a new date appears to change nothing.
Trading Partners: the per-partner rules that shape every imported order
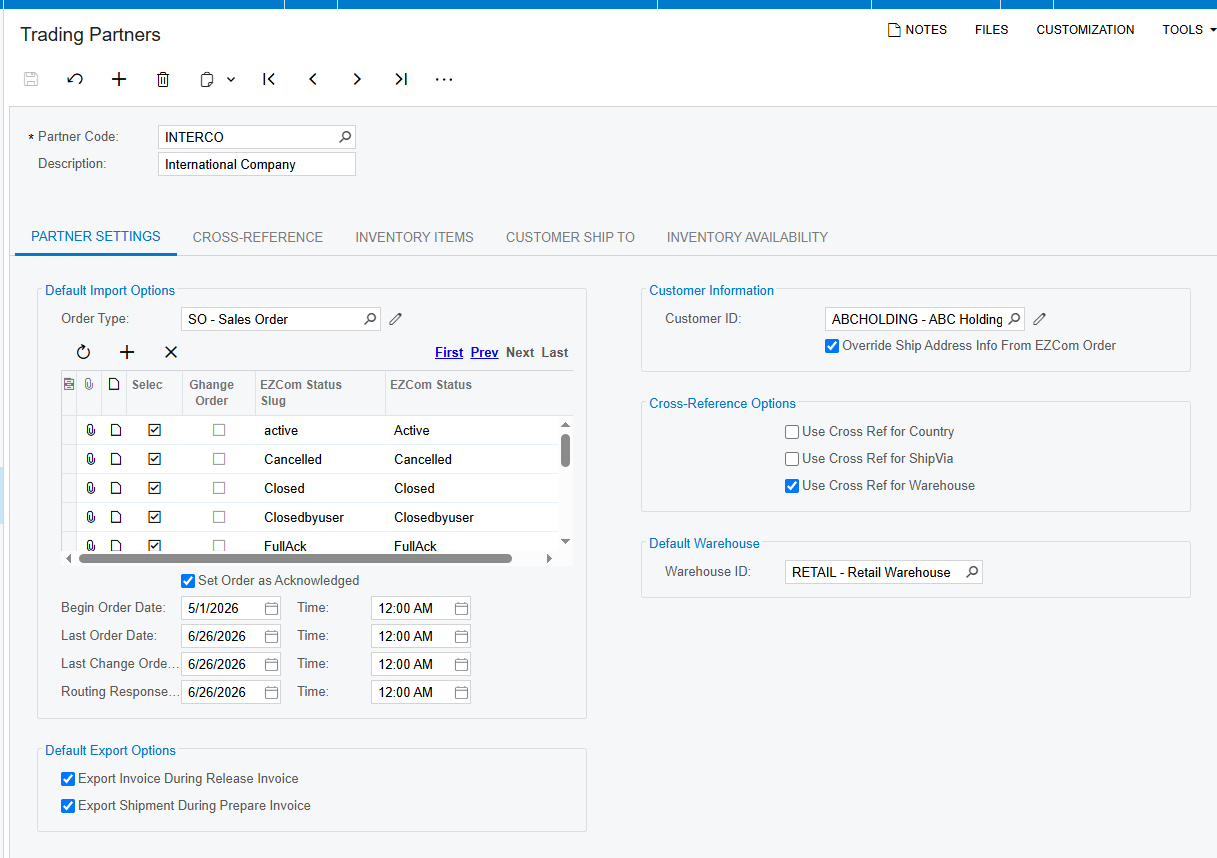
Click the Get Trading Partners button under the Actions option on the Trading Partners screen to retrieve all partners, then configure the options for each Partner Code. Partner Code is a lookup field that identifies the partner and Description holds the details about it. Under Partner Settings, the Default Import Options define what the connector builds: Order Type is the default type of orders created by the integration, and EZCom Status reflects the status of the corresponding EZCom order that will be imported into Acumatica. The corresponding order status checkbox must be selected for the order to be retrieved and imported, which makes EZCom Status the first filter in the inbound flow. Three date fields then narrow each inbound stream separately: Begin Order Date filters the order retrieval, Last Changed Order Date filters the changed order retrieval, and Routing Response Order Date filters the routing response retrieval.
One partner setting shortens the loop entirely. Set Order as Acknowledged marks the order as acknowledged during the order import process and sets the status of the sales order to Closed without sending any request to the website. If your business uses that option, the order never appears on the acknowledgement queue, because no acknowledgement request is sent at all.
Inbound EZCom EDI Documents: How Orders Reach Acumatica
Four screens bring data in, each handling a different stage of the partner order. All four follow the same outline: choose the partner, retrieve, review the grid, import.
Import Purchase Orders
The Import Purchase Orders screen retrieves and imports the orders of the corresponding partner from EZCom EDI into Acumatica. The Get Orders button retrieves the orders, and a timer then indicates the elapsed time until the process is complete. All orders for the selected period are retrieved and displayed at once rather than page by page, so the grid is the complete candidate list for that window. A user can cancel the process of getting orders by clicking the loading icon next to the timer. The Import button imports the selected orders, and Import All imports every order displayed on the grid.
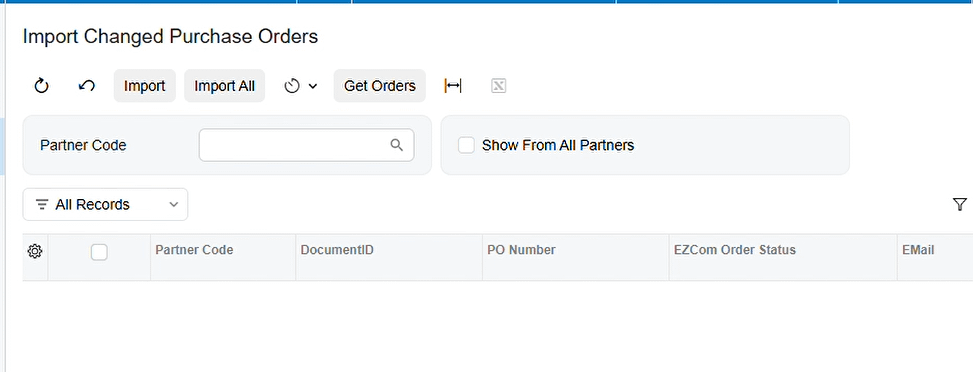
Import Changed Purchase Orders
The Import Changed Purchase Orders screen retrieves and imports the changed orders of the corresponding partner from EZCom EDI into Acumatica. It is the same retrieve-and-import pattern applied to revisions rather than new documents, and the Last Changed Order Date field on the Trading Partners screen is what limits which revisions come back.
Import Routing Response
The Import Routing Response screen retrieves and imports the routing response orders of the corresponding partner. When the EZCom order reaches the shipment level, the get routing response process reads the Carrier Code and Carrier Service on the EZCom order, retrieves the corresponding Ship Via from the Cross Reference tab on the Trading Partners screen, and updates the shipment accordingly during the import process. This is where a partner routing instruction becomes an Acumatica shipment value, so the Ship Via cross-reference has to exist before routing responses are pulled.
Import Warehouse Shipment
If the EZCom order is at the shipment level and is imported from the Import Warehouse Shipment screen, the system imports the item quantity and tracking number from EZCom EDI, updating the shipped quantity and tracking number on the shipment. This button also exists on the shipment screen, so the same import can be triggered from the shipment record you are already working in.
What an Inbound EZCom EDI Order Becomes in Acumatica
Importing is not a straight copy. Every time the Biz-Tech Services EZCom EDI Acumatica Integration creates a sales order it has to answer three questions from the Trading Partners setup: which customer the order belongs to, which inventory item each line points at, and which warehouse, country and ship via values apply. Those three lookups are where imports usually succeed or fail.
Which customer the sales order is created for
The simple case is the Customer ID field under Customer Information on the Trading Partners screen: the integration imports the customer information from EZCom EDI into the Acumatica customer selected there. Override Ship Address Info from EZCom Order imports the address of the location the order is going to be shipped to from the EZCom order itself. If the Customer Ship To tab has a setup, the customer import follows that setup instead. The system first searches for the Trading Partner Ship To ID using the Location Number from the EZCom order; once the location is identified, it looks for a customer matching both the Child Customer and the Parent Customer on the Customers screen; then it searches for a matching Customer ID and Location CD in the Customer Ship To tab of the EZCom Store on the Customer Location screen. The customer found there is the one used to create the sales order. If the Customer Ship To tab is not set up, the system uses the customer configured in Partner Settings.
Which inventory item each order line lands on
The item on the EZCom order has to be mapped under the Inventory Items tab of the Trading Partners screen for the EZCom order to be imported into Acumatica. The dropdown fields in that tab’s cross-reference section let you choose how to search for the item within the Partner Code and map it to the Acumatica Inventory ID. If the dropdown value is set to UPC Code, for example, the system searches for an item with the corresponding UPC Code number and associates it with the Acumatica inventory ID. Only the entities checked under Cross-Reference Options appear in that dropdown. If the items are not mapped, an error message appears during the order import process, so item mapping is the single most common blocker in the inbound flow.
Which warehouse, country and ship via values are used
Warehouse ID under Default Warehouse represents the default warehouse set on the orders imported from EZCom EDI. The Cross-Reference tab overrides that with matched values: on that tab, the Field column selects the entity whose EZCom and Acumatica values need to be matched. If the Use Cross Ref for Country checkbox is checked and the country is set up under the Cross-Reference tab, the system takes the cross-reference value during the EZCom order import process, and the Use Cross Ref for ShipVia and Use Cross Ref for warehouse checkboxes behave the same way for their entities. One dependency is easy to miss: the Default Warehouse field on the Trading Partners screen must be empty for the system to take the cross-reference warehouse value.
Outbound EZCom EDI Documents: What Acumatica Sends Back
Once the sales order exists in Acumatica the flow reverses. Five screens send documents out, and two of them double as queues catching whatever the automatic export settings did not handle.
Send Outbound PO Acks.
The Send Outbound PO Acks. screen displays all the orders of the corresponding partner that have an open Acknowledge status. Clicking the Send or Send All button sends an acknowledgement request for the selected orders, after which the EZCom order is marked as Acknowledged on the website and the status of the sales order in Acumatica changes to Closed. That status change on both sides is the confirmation that the acknowledgement actually reached EZCom EDI.
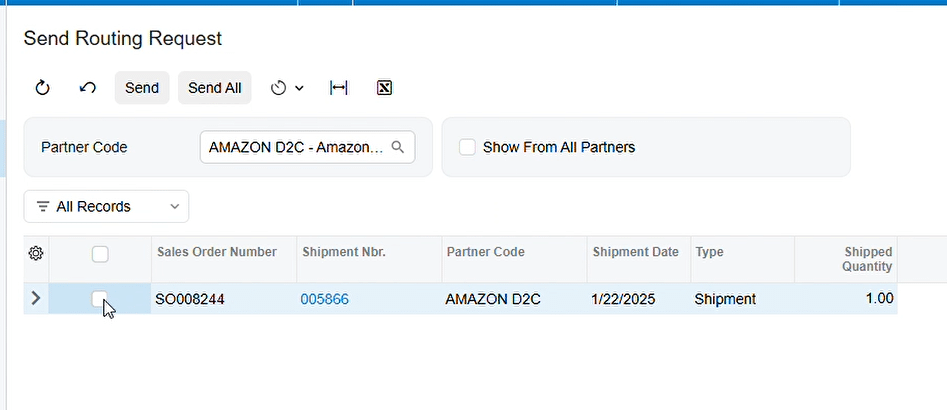
Send Routing Request
The Send Routing Request screen displays all the orders of the corresponding partner that are at shipment level. During the routing request process, the system sends the EZCom Order ID and submits a routing request indicating that the product is ready for shipment. The routing response that comes back later is imported from the Import Routing Response screen, which closes that half of the loop.
Send Warehouse Order
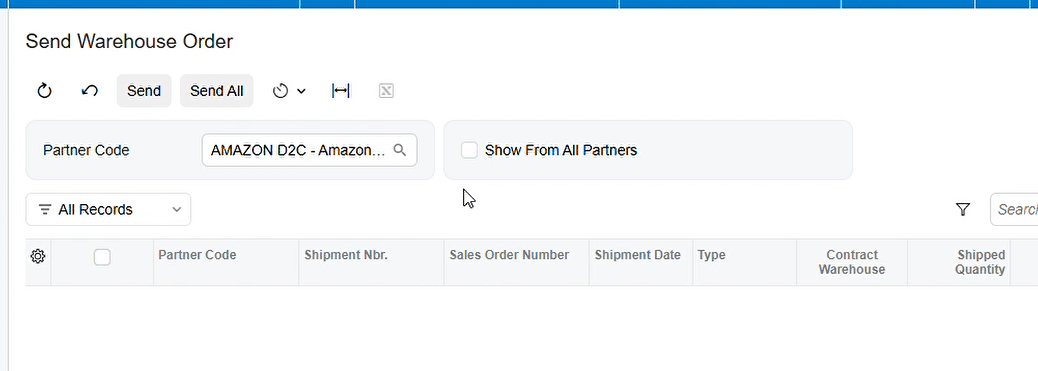
After the Get Warehouse Order process, the EZCom orders display on the Send Warehouse Order screen. By sending the warehouse order request, the system sends the warehouse Code, the UPC Code and the quantity for each item during the shipment process from the corresponding warehouse.
Send Outbound Shipments
The Export Shipment During Prepare Invoice checkbox under Default Export Options on the Trading Partners screen sends a request to the website during the Prepare Invoice process in Acumatica, after which the sales order status is updated to Closed. If that checkbox is not selected for the partner, the order instead appears on the Send Outbound Shipments screen after Prepare Invoice. Sending the request from there updates the order shipment status in Acumatica to Closed and updates the order in the EZCom store, so the manual path reaches the same end state as the automatic one.
Send Outbound Invoice
The invoice side mirrors the shipment side. Export Invoice During Release Invoice sends a request to the website during the invoice release process in Acumatica, after which the sales order status is updated to Closed. If that checkbox is not enabled during the Release Invoice process, the EZCom orders appear on the Send Outbound Invoice screen; sending from there updates the order invoice status in Acumatica to Closed and updates the order in the EZCom store.
Syncing Inventory Availability Back to EZCom EDI
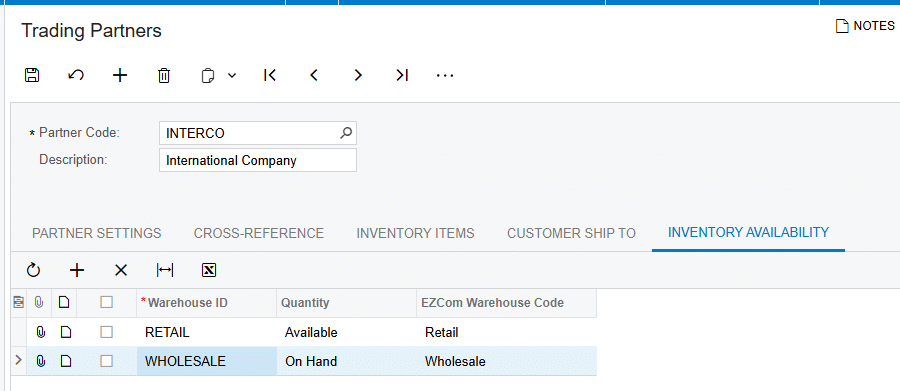
Item quantity is the one non-order data stream the documentation describes, and it runs outbound only. The Send Inventory Availability screen displays all the items already loaded and checked under the Inventory Items tab of the Trading Partners screen for the corresponding partner. To send the quantities, the mapping must be set up under the Inventory Availability tab, where the Acumatica warehouse, the quantity option and the EZCom warehouse code, given as the item UPC code, are matched. After selecting the items and pressing Send or Send All, the item quantity is synced to EZCom EDI according to that mapping. No price sync is documented in either direction, so treat availability as the only inventory value this flow carries.
Errors and Reprocessing in the EZCom EDI Flow
Error handling runs through the screens themselves rather than a dedicated log, so recovery generally means fixing the setup that governs a handoff and running the retrieval or send again.
These are the failure points the documentation names explicitly.
1. Unmapped items stop an import: if items are not mapped under the Inventory Items tab, an error message appears during the order import process. Add the mapping and import again.
2. Bad credentials stop everything upstream: use Test Credentials under Actions on General Settings to confirm the connection to the Acumatica-Biz-Tech server before investigating individual documents.
3. A long retrieval can be stopped: click the loading icon next to the timer on the Import Purchase Orders screen to cancel the process of getting orders.
4. Missing orders usually mean a filter, not a failure: check that the corresponding order status checkbox is selected for the EZCom Status, and check Begin Order Date, Last Changed Order Date and Routing Response Order Date for that partner.
5. A new date that changes nothing usually means Apply Order Date Update for Partners was never clicked on General Settings after selecting the corresponding checkbox.
6. An ignored warehouse cross-reference usually means the Default Warehouse field still holds a value; it must be empty for the cross-reference value to be used.
7. Documents that did not export automatically are not lost: they queue on the Send Outbound Shipments and Send Outbound Invoice screens, where you resend them.
Where to Monitor EZCom EDI Results in Acumatica
Every stage of the Biz-Tech Services EZCom EDI Acumatica Integrator leaves visible evidence on a specific screen, and the outbound screens are self-clearing worklists: an order that is still listed has not been sent yet. Use the following checkpoints to confirm results.
1. Inbound Purchase Orders — displays all the information related to the EZCom order for the corresponding partner, and is the reference view for anything already imported.
2. Import Purchase Orders grid — after Get Orders, shows every order retrieved for the selected period, with the timer reporting elapsed time until the retrieval completes.
3. Import Changed Purchase Orders — shows the changed orders retrieved for the partner, so you can tell a revision apart from an original.
4. Import Routing Response — shows the routing response orders retrieved, and the shipment itself shows the Ship Via that the Carrier Code and Carrier Service resolved to through the Cross Reference tab.
5. The shipment record — after Import Warehouse Shipment, carries the shipped quantity and tracking number brought in from EZCom EDI.
6. Send Outbound PO Acks. — lists orders that still have an open Acknowledge status; an order that has left this screen has been acknowledged on the EZCom website.
7. Send Routing Request — lists the orders at shipment level for the partner that are waiting for a routing request carrying the EZCom Order ID.
8. Send Warehouse Order — lists the EZCom orders produced by the Get Warehouse Order process, waiting on warehouse Code, UPC Code and quantity per item.
9. Send Outbound Shipments — the queue for partners without Export Shipment During Prepare Invoice selected; the order shipment status in Acumatica reads Closed after the request is sent.
10. Send Outbound Invoice — the queue for partners without Export Invoice During Release Invoice selected; the order invoice status in Acumatica reads Closed after the request is sent.
11. Send Inventory Availability — lists the items loaded and checked on the Inventory Items tab, and confirms that quantities went out through Send or Send All.
12. The sales order status in Acumatica — reads Closed after an acknowledgement, a shipment export or an invoice export succeeds, making it the clearest end-of-flow indicator.
EZCom EDI Acumatica Integration: Frequently Asked Questions
How does an EZCom EDI order become a sales order in Acumatica?
You retrieve the orders for a partner with Get Orders on the Import Purchase Orders screen, then click Import or Import All. The Biz-Tech Services Acumatica EZCom EDI Integration creates the sales order using the Order Type set for that Partner Code, the customer resolved from Customer Information or the Customer Ship To tab, the inventory item resolved from the Inventory Items mapping, and the warehouse from Default Warehouse or the warehouse cross-reference.
Which EZCom EDI orders are retrieved when I click Get Orders?
All orders for the selected period are retrieved and displayed at once. The period is controlled by the Begin Order Date on the Trading Partners screen for that partner, or by the date on the General Settings screen when you use Get Order From All Partners. The order status also matters, because the corresponding order status checkbox must be selected for the order to be retrieved and imported.
Why does my EZCom EDI order fail to import into Acumatica?
The documented cause is unmapped items: if the item on the EZCom order is not mapped under the Inventory Items tab of the Trading Partners screen, an error message appears during the order import process. Confirm that the cross-reference dropdown in that tab points at the entity you actually match on, such as UPC Code, and remember that only the entities checked under Cross-Reference Options appear in that dropdown.
Why is my order still sitting on the Send Outbound Invoice screen?
That screen is the catch-up queue for invoices that were not exported automatically. If the Export Invoice During Release Invoice checkbox is not enabled for the partner during the Release Invoice process in Acumatica, the EZCom orders appear there instead. Send them from that screen and the order invoice status in Acumatica updates to Closed and the order is updated in the EZCom store. The Send Outbound Shipments screen works the same way for Export Shipment During Prepare Invoice.
Why is the connector ignoring my warehouse cross-reference?
Check the Default Warehouse section on the Trading Partners screen. The Warehouse ID field there must not hold a value for the system to take the cross-reference value during the import. Also confirm that the Use Cross Ref for warehouse checkbox is checked and that the warehouse is actually set up under the Cross-Reference tab, since both conditions have to be true.
How does inventory quantity get sent back to EZCom EDI?
From the Send Inventory Availability screen, which lists the items already loaded and checked under the Inventory Items tab for that partner. The Acumatica warehouse, the quantity option and the EZCom warehouse code must be mapped on the Inventory Availability tab of the Trading Partners screen first. Select the items and press Send or Send All, and the quantities sync to EZCom EDI according to that mapping.
Does the connector bring shipment tracking numbers into Acumatica?
Yes. When the EZCom order is at the shipment level and is imported from the Import Warehouse Shipment screen, the system imports the item quantity and tracking number from EZCom EDI and updates the shipped quantity and tracking number on the shipment. The same button is available on the shipment screen, so you do not have to leave the shipment to run it.
Work With the Biz-Tech Services EZCom EDI Connector
Keep the shape of the flow in mind whenever a document goes missing. Orders travel from EZCom EDI through the intermediate server into the Import Purchase Orders, Import Changed Purchase Orders, Import Routing Response and Import Warehouse Shipment screens; the Trading Partners setup decides what they become in Acumatica; and acknowledgements, routing requests, warehouse orders, shipments, invoices and inventory quantities travel back out through the Send screens, each leaving a Closed status or an empty worklist behind as proof. Almost every problem in that loop traces back to a single field on the Trading Partners screen.
If your business runs EDI trading-partner orders and wants them landing correctly in Acumatica the first time, the Biz-Tech Services Acumatica EZCom EDI Integrator can be configured around the partners, items and warehouses you actually trade with. Visit https://biz-techservices.com to learn more about our Acumatica expertise or to schedule a personalized demonstration.

